
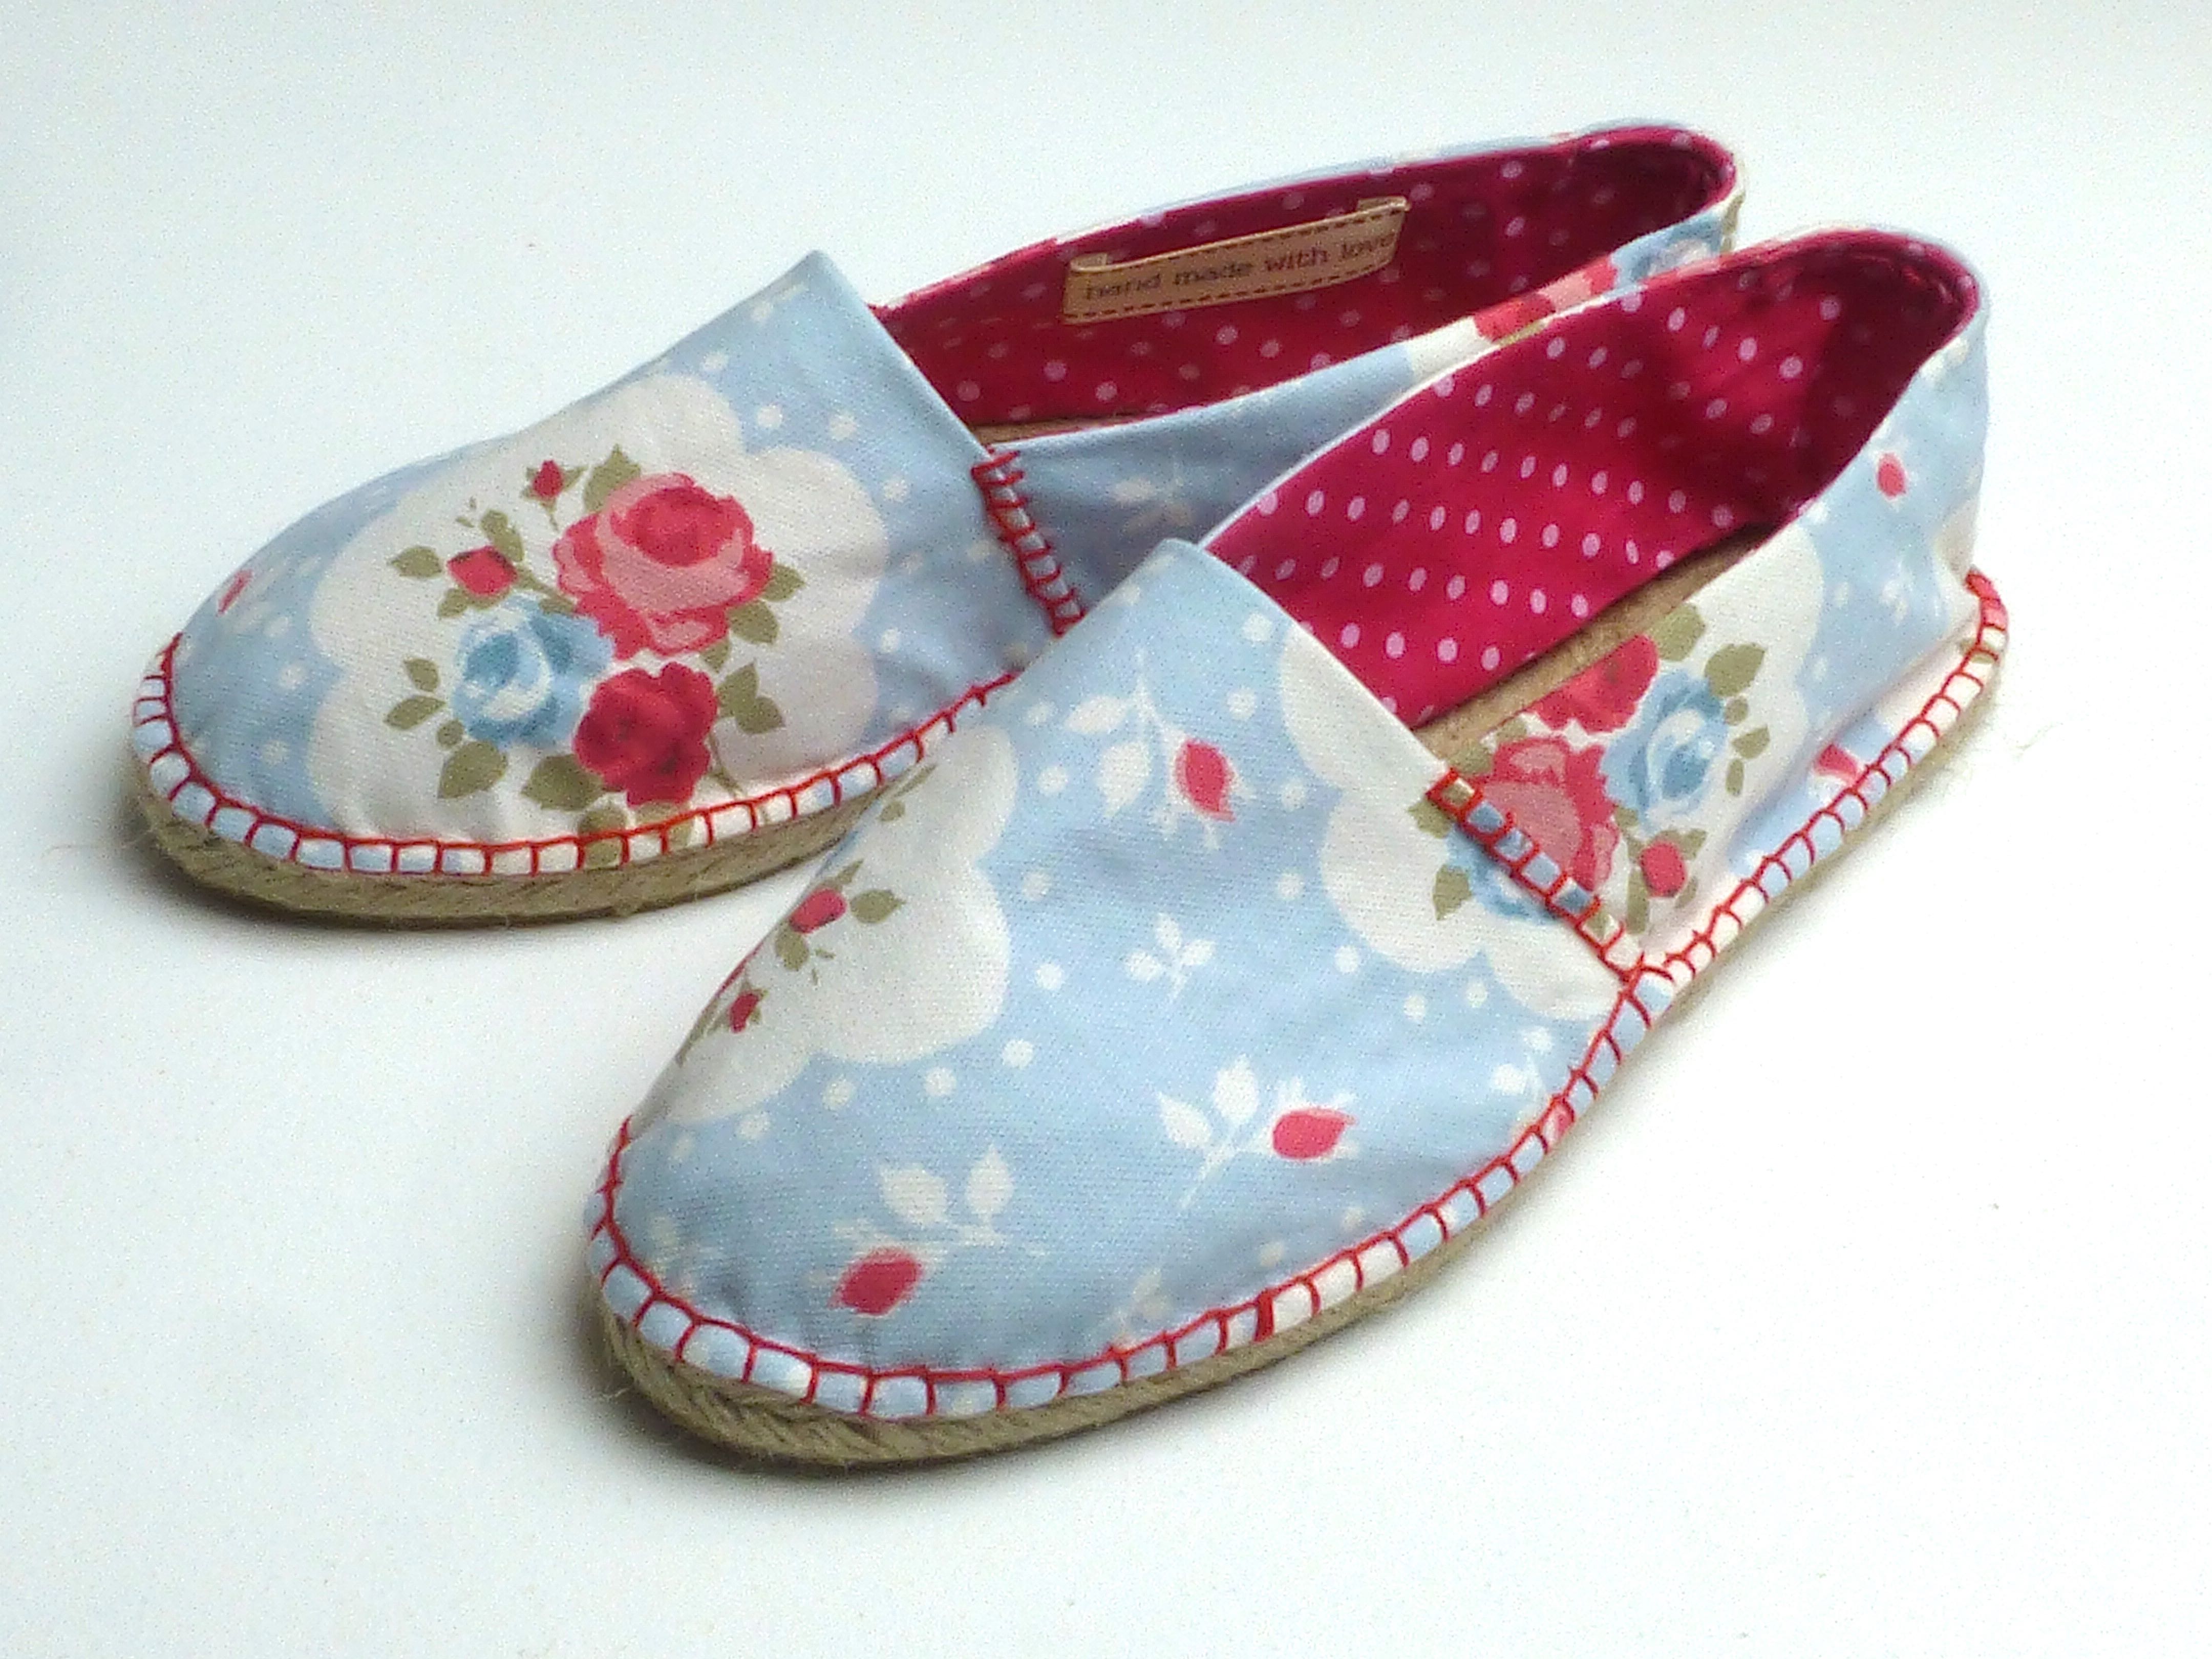
Another day, another birthday present to make, only this time it is something a bit unusual – a pair of handmade espadrilles!
I’ve made slippers and things along those lines before, but never a bonafide pair of shoes.
The soles were by Prym and purchased online from The Makery in Bath.


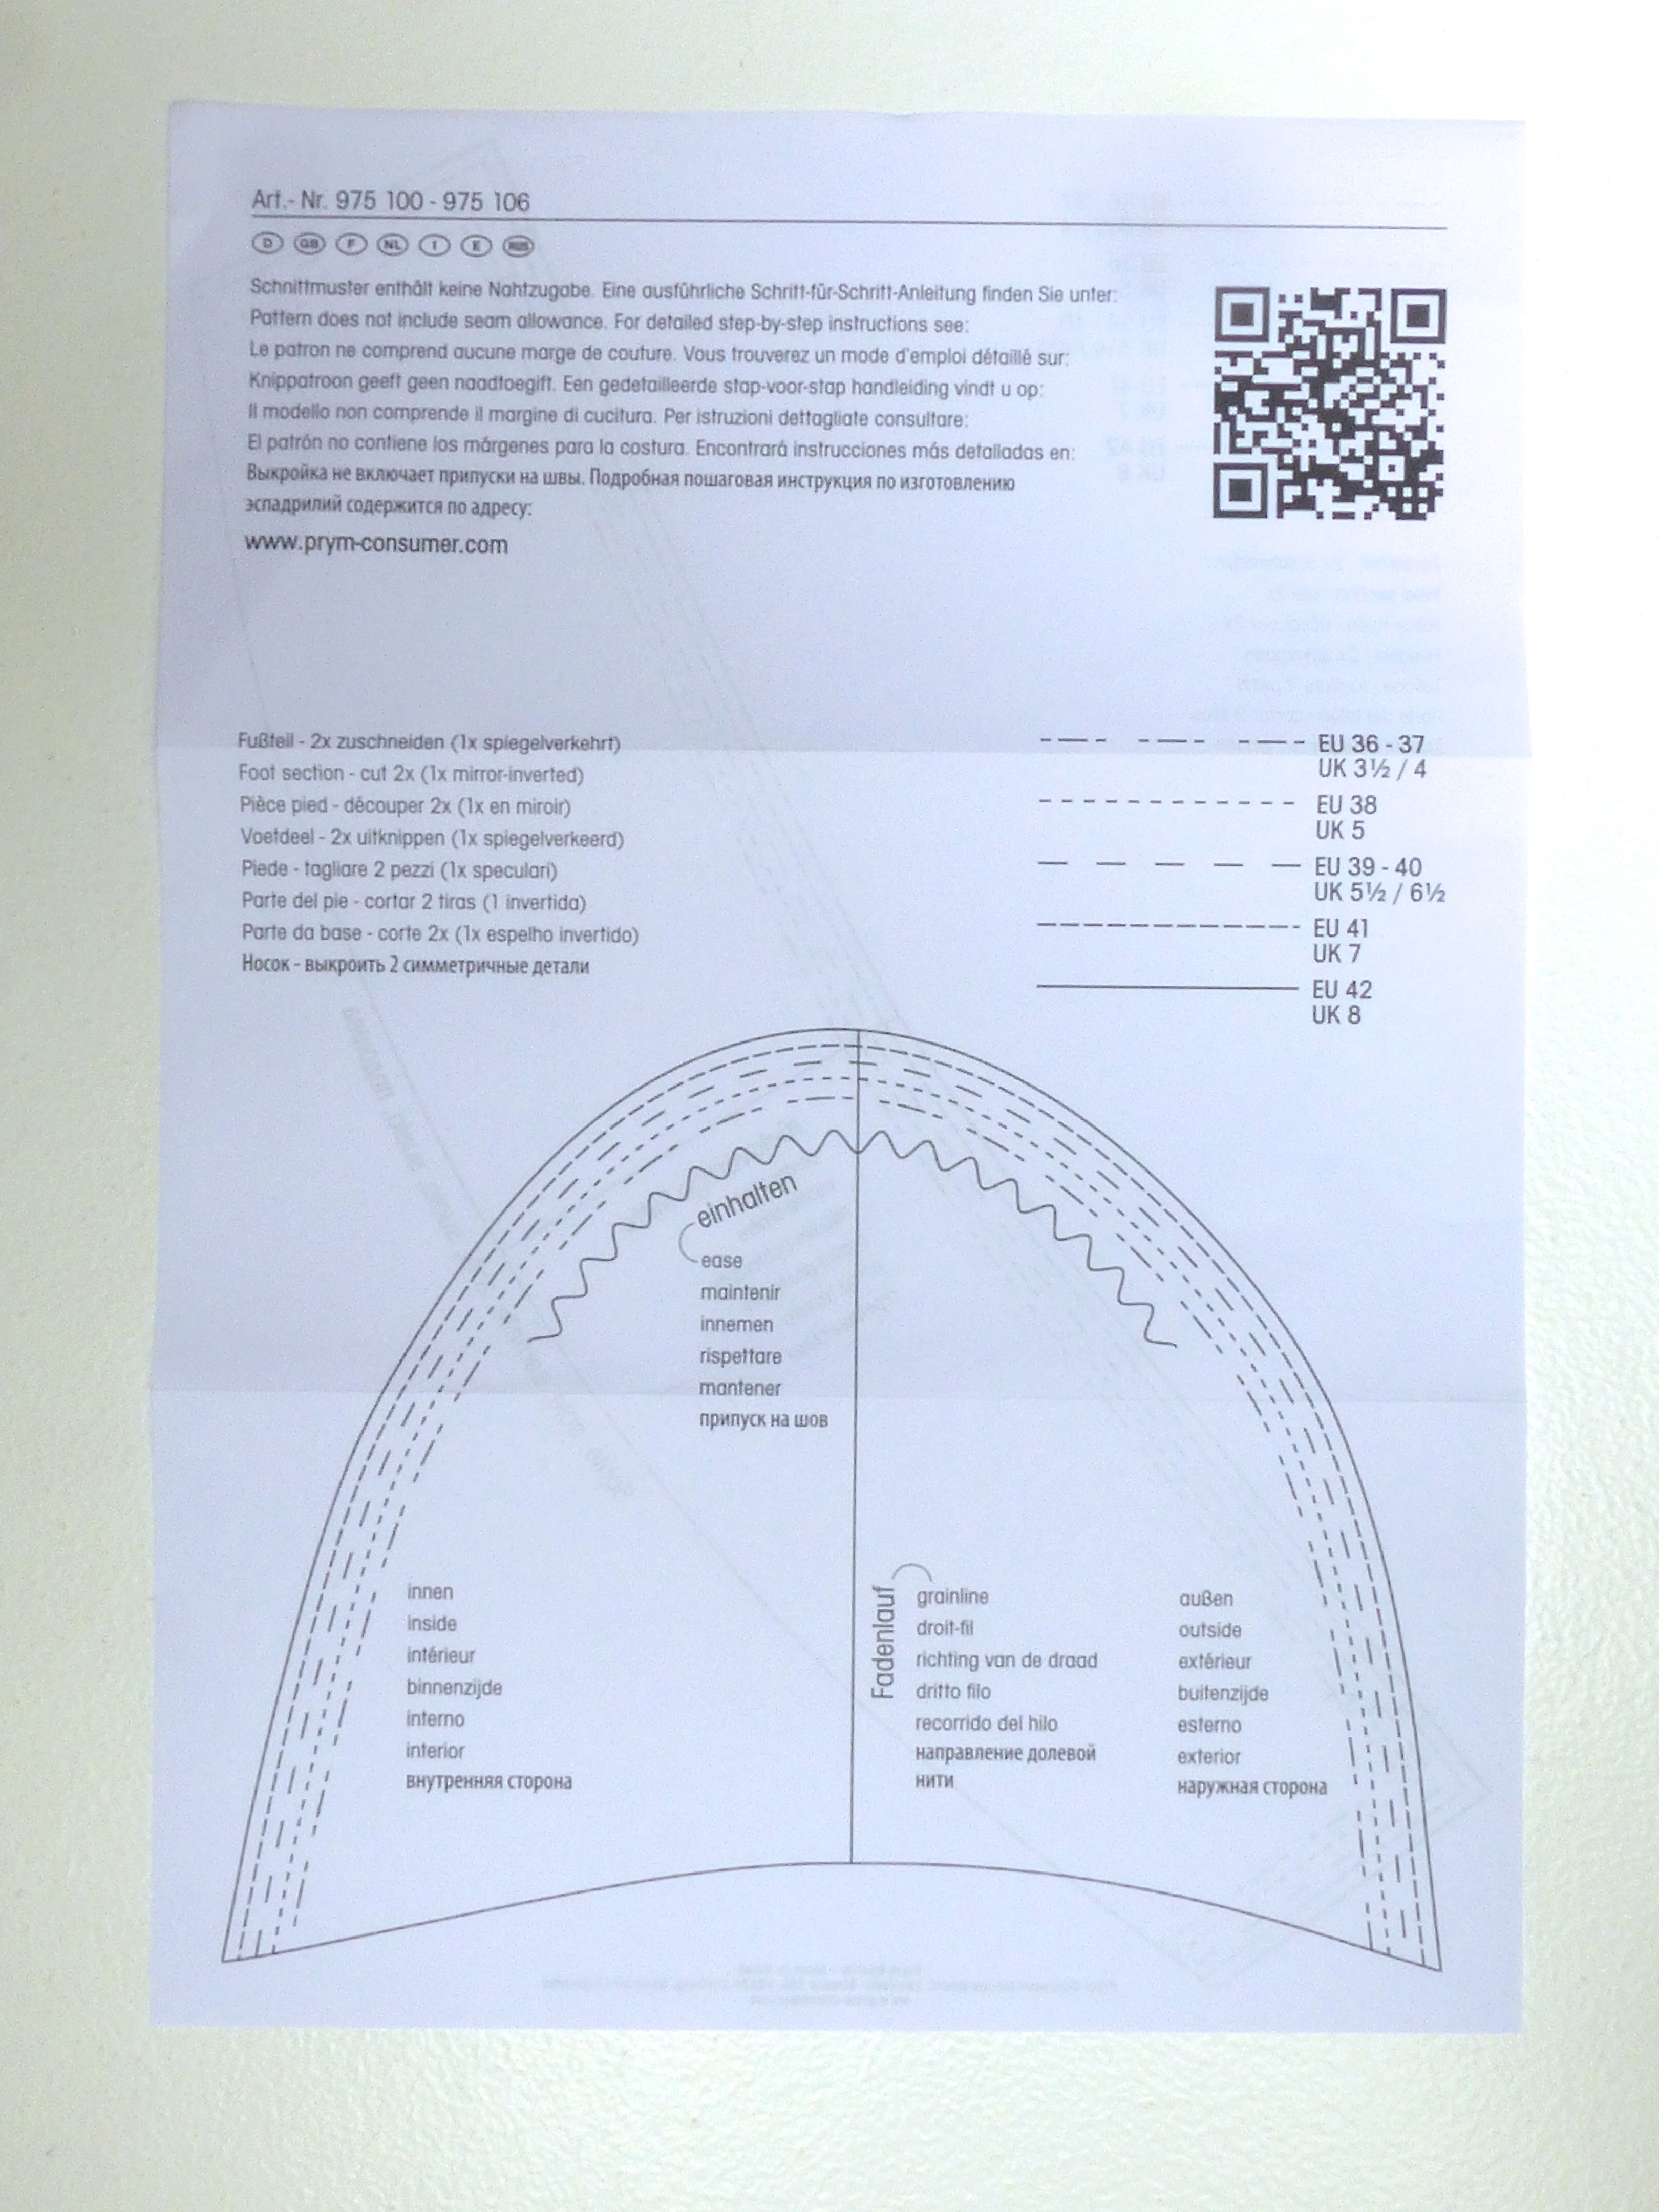
The box includes templates for the uppers in various adult sizes, but I heeded advice from others who have previously made them and went down a size when making them. I cut out a UK size 5 for the recipient who has size 6 feet, and they fitted perfectly without slipping off.
Although there were no instructions in the box, full step-by-step photographs can be found on the Prym website and it was those I followed.
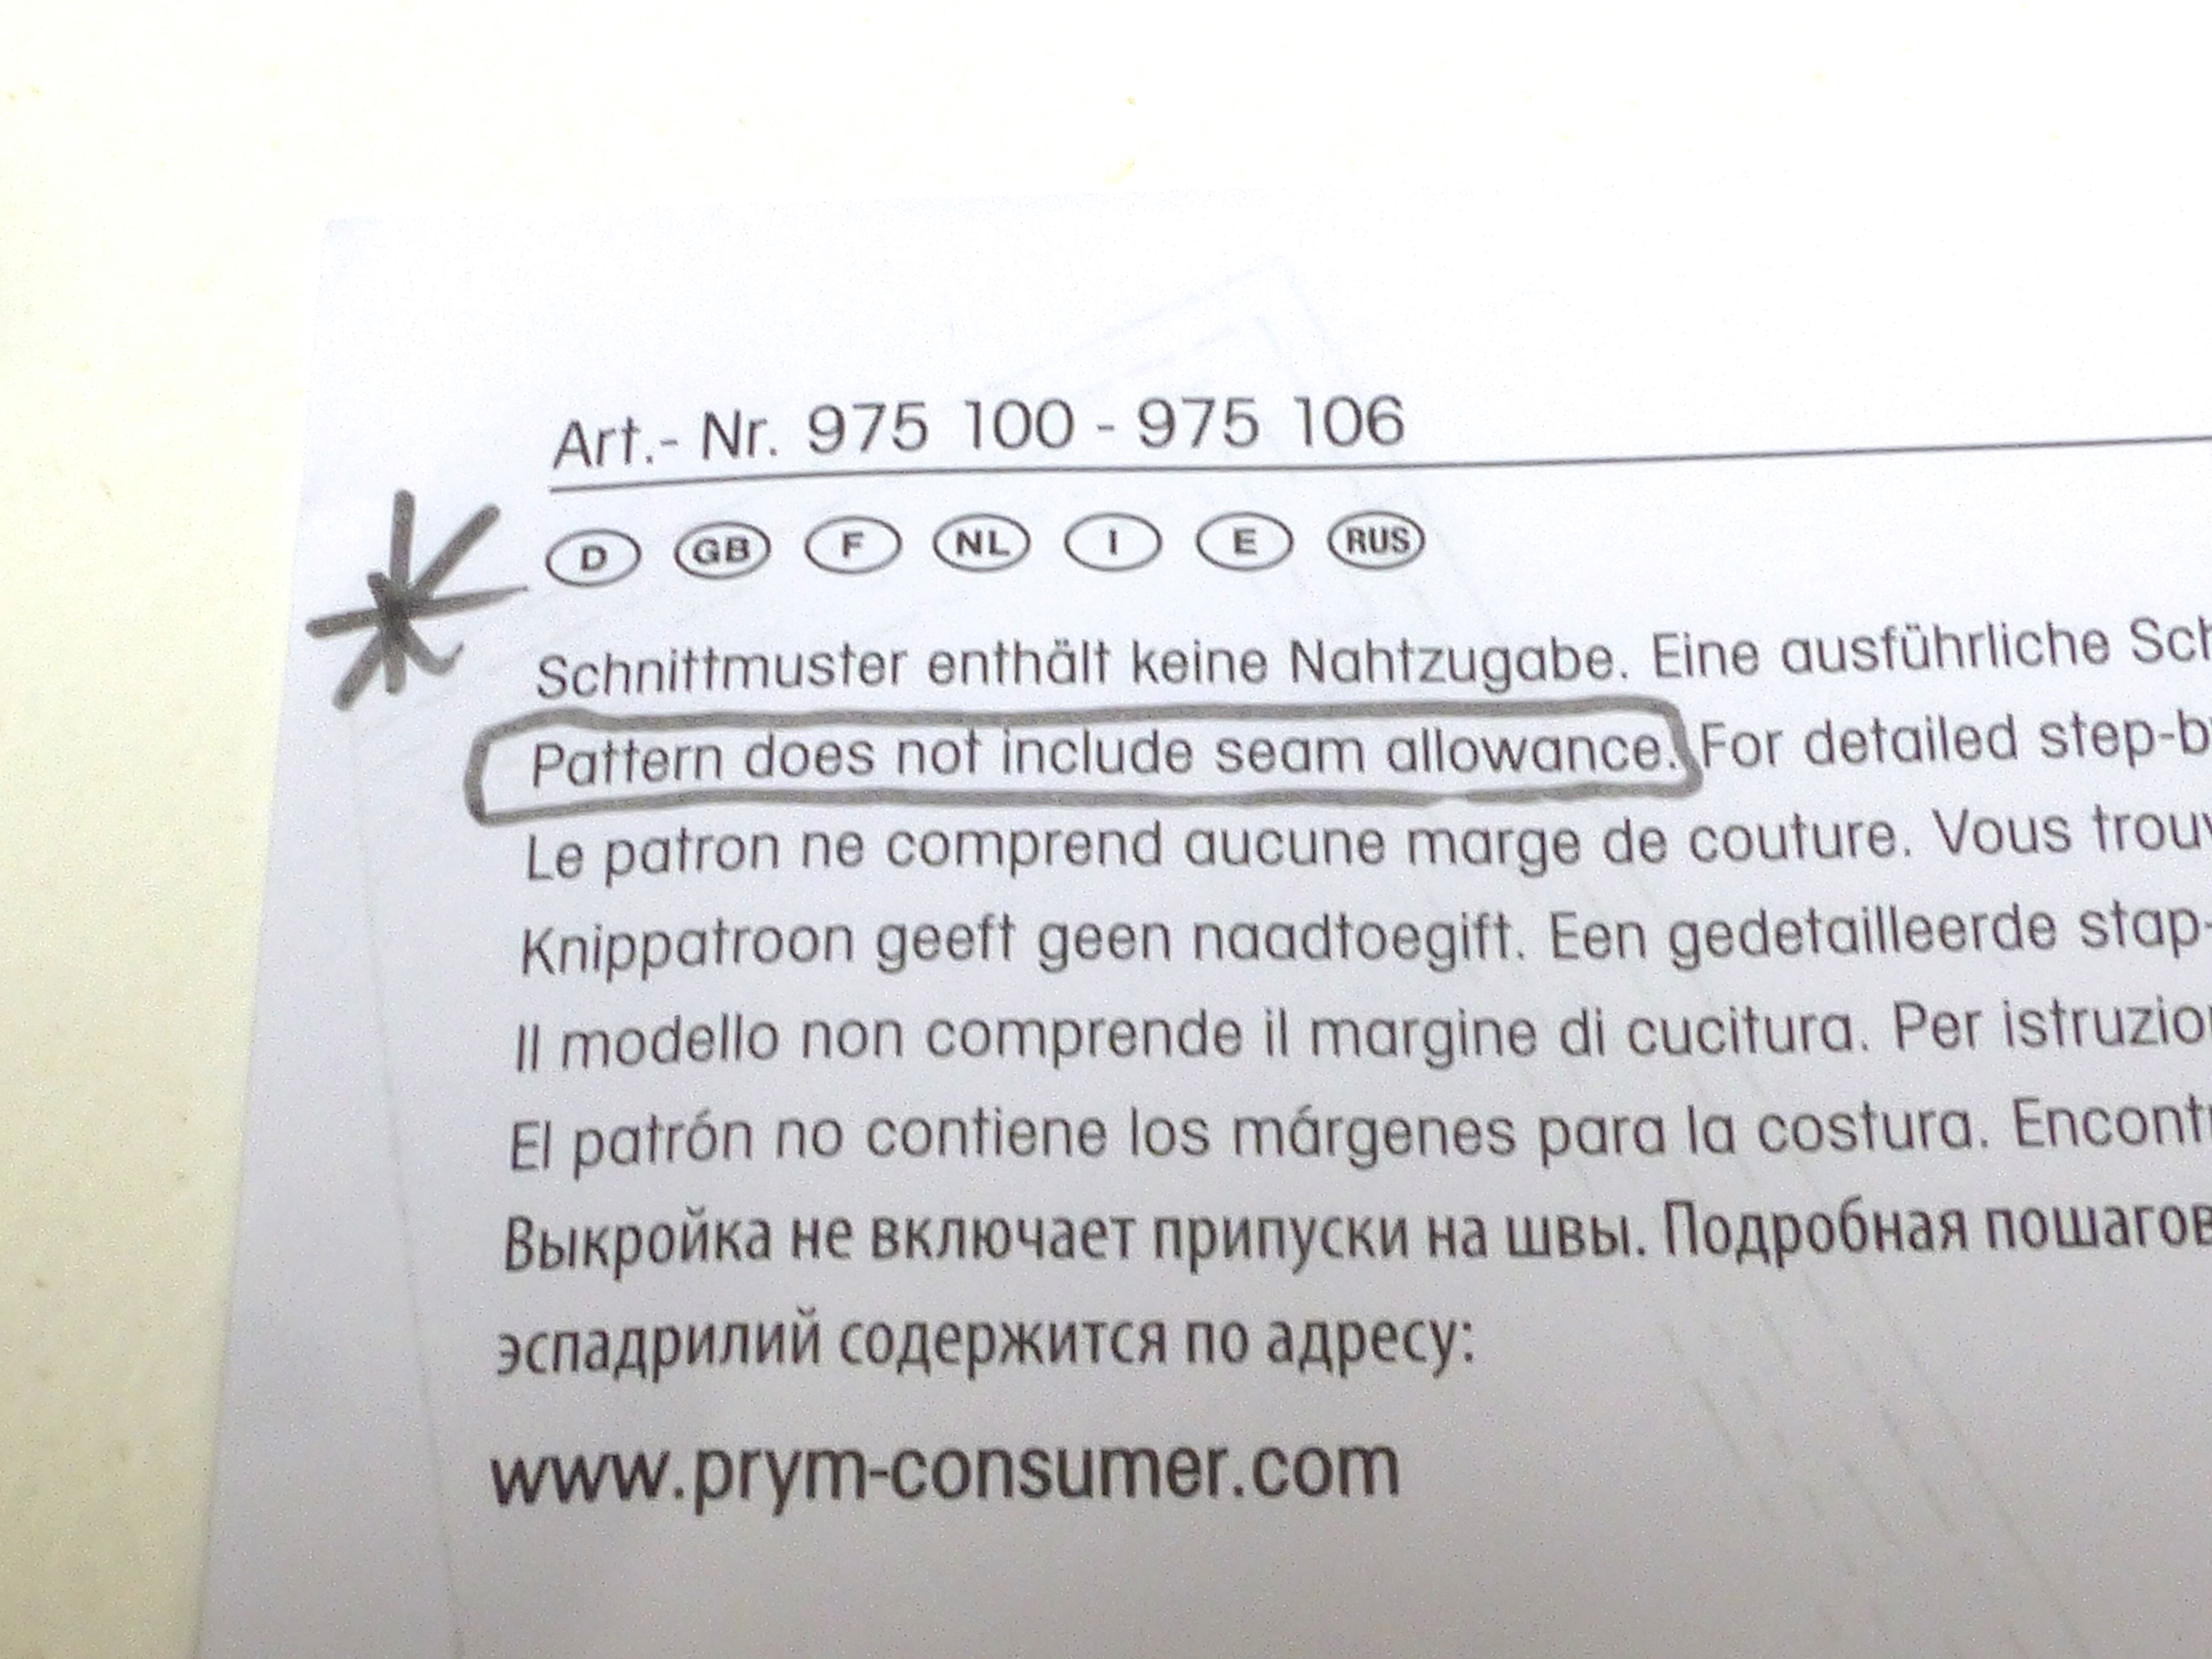
If you are tempted to have a go at these be aware that seam allowances are NOT included – you have to add your own before cutting out!

I had a small amount of “Rosetta” fabric left over from making this cushion and make up bag, and decided to team it with a deep pink spotty lining.
The pattern consists of just two pieces – one for across the front and one for the heel.

I added some fusible interfacing to the outside sections just to give the shoe some extra strength and stability.

I also stretched a two-inch length of narrow elastic at the ankle edge just to make sure the shoes would stay on.

The main fabric is sewn to the lining right sides together, then turned through a gap left in the stitching.

I top stitched the elastic through all the layers for a strong and neat finish.


The toe section is sewn and turned in exactly the same way, cutting across the corners and notching around the curves as necessary.

Next comes the fun bit!
You will need a leather needle to sew through the soles as the wedged point makes light work of it where a standard needle would hurt your finger after a while.

The heel section is pinned to the sole…..

….inserting the pins at an angle as shown below.

I used three strands of embroidery floss to secure the fabric to the sole, using a blanket stitch.

When the heel section is stitched on it should look like this: –

Next, the front is pinned on in a similar fashion, overlapping the heel section.


Blanket stitch is used all the way around the front and also to join the sides together.

A “hand made with love” label adds a personal touch.

That’s it – finished!


I thought I’d better show you what they look like on – have you any idea how difficult it is to take photographs of yourself wearing shoes?!

In the end I put my feet up on the table in my studio……


I’m pleased to report that the recipient was very pleased with her bespoke shoes and put them on immediately – they fit perfectly!
Has anyone else handmade their own espadrilles before?

July 29, 2015 at 7:11 am
They seems soo cozy!! Another project that makes my eyes turn into hearts….. and I love so much the fabric!! It is gorgeous!!
LikeLiked by 1 person
July 29, 2015 at 10:53 am
I used up the last of that fabric except for scraps which will be turned into patchwork at some point. It’s so pretty I may have to buy some more:)
LikeLiked by 1 person
July 29, 2015 at 10:56 am
It is pretty indeed! I have to by some fabric for two bags and one of them can easily be romantic 🙂 I feel free to be inspired by you 🙂 ❤
LikeLiked by 1 person
July 29, 2015 at 7:42 am
I tried very hard to crochet my wedding shoes. I had a lovely, easy pattern for the main part and found some paid for tutorials for making soles. Unfortunately said shoes are still sitting in pieces… But now that these ready made soles are available, I think I’ll revisit!
Yours are lovely BTW, so pretty and amazing blanket stitch 🙂
LikeLiked by 1 person
July 29, 2015 at 10:56 am
Thank you, the soles made it easy I have to say, otherwise I would never have attempted shoes! Would love to see yours when they’re finished:)
LikeLike
July 29, 2015 at 7:45 am
Too cute! Want.
LikeLiked by 1 person
July 29, 2015 at 10:57 am
Why not give them a go? They only take a fat quarter of fabric each for the body and lining:)
LikeLike
July 29, 2015 at 8:33 am
Those are just amazing! I don’t think I am brave enough to try them.
LikeLiked by 1 person
July 29, 2015 at 10:59 am
And here’s me thinking my photos would show how simple they are to make! The soles are about £9 and you only need a fat quarter each for the body and lining, so you could use leftover fabric from another project:)
LikeLike
July 29, 2015 at 8:51 am
As ever you make things look so easy – they’re lovely! A great present, I bet will get lots of use 🙂
LikeLiked by 1 person
July 29, 2015 at 11:01 am
They were as simple as the photographs suggest! I have to say they were quite a surprise to the recipient who is used to receiving handmade gifts from me – who expects homemade shoes?!
LikeLiked by 1 person
July 29, 2015 at 11:22 am
LOL, that’s true!…though, I bet she won’t give them back now!! 😉
LikeLiked by 1 person
July 29, 2015 at 9:13 am
What a great idea! It wouldn’t occur to me to make a pair of shoes and these are lovely!
LikeLiked by 1 person
July 29, 2015 at 11:02 am
I was looking for something different to make for somebody who is used to receiving a handmade gift from me every birthday and Christmas – I managed to surprise her with something she’d never have expected!
LikeLiked by 1 person
July 29, 2015 at 9:31 am
I think we must be twins! I made some espadrilles a while ago – flowers and spots. You were more sensible and put the elastic in first!
LikeLike
July 29, 2015 at 10:05 am
I couldn’t remember where I saw them to link back to – it was your blog! I fell in love with yours and realised I had some floral and spotty fabric quite similar so decided to have a go myself. They were such fun to make, so thank you for the inspiration!
LikeLike
July 29, 2015 at 10:12 am
I’m very flattered!
LikeLiked by 1 person
July 29, 2015 at 10:25 am
Gorgeous! Love your fabric choices too. Will you be making a pair for yourself next?!
LikeLiked by 1 person
July 29, 2015 at 11:05 am
Thank you, although I probably won’t make any for myself as I’m quite hard on shoes and would wreck them in no time! Living in the country tends to negate the need to wear anything less than sturdy, functional footwear – I live in my Birkenstocks in the Summer and Dubarrys in the Winter:)
LikeLiked by 1 person
July 29, 2015 at 11:29 am
Wow!! Those are just adorable!! What a great idea! So, so creative!
LikeLiked by 1 person
July 29, 2015 at 11:39 am
Thank you! It was nice to be able to make something a bit different and unexpected for a change.
LikeLiked by 1 person
July 29, 2015 at 11:44 am
You managed much better feet photos than I achieved, it is certainly harder than you would think! I love the idea of making these, maybe some for Abi’s stocking 🙂 When you say go a size down is that just the fabric or when you buy the sole as well? This has really inspired me, off for a bit of shopping (second time today while reading my feed – oops!!) x
LikeLiked by 1 person
July 29, 2015 at 11:49 am
I went down a whole shoe size for both the sole and fabric, but half a size would be better I think. They certainly make an unusual homemade gift – she’ll love them!
LikeLiked by 1 person
July 29, 2015 at 11:52 am
Brilliant, thanks very much. x
LikeLiked by 1 person
July 29, 2015 at 12:09 pm
Wooh! They turned out so awesome! 😀 Love the fabric you picked!
LikeLiked by 1 person
July 29, 2015 at 12:54 pm
Thanks Jess, they turned out even better than I hoped:)
LikeLiked by 1 person
July 29, 2015 at 1:12 pm
That’s good to hear. 😀
LikeLiked by 1 person
July 29, 2015 at 12:36 pm
Never made these before, but now I want to try!
LikeLiked by 1 person
July 29, 2015 at 12:40 pm
You’d find them simple as you’re already a competent dressmaker:)
LikeLike
July 29, 2015 at 2:17 pm
These are beautiful. I never realized you could buy ready-made soles.
LikeLiked by 1 person
July 29, 2015 at 2:22 pm
Neither did I until I came across these by Prym – that’s the reason I’ve not made shoes until now:)
LikeLike
July 29, 2015 at 4:17 pm
Thanks for the heads up about these prym soles and such a fab explanation of how to put them together. Nice and simple and with my rubbish feet one thing I can wear – but don’t tell the podiatrist cos they aren’t supportive enough. And they make them in my size 🙂
LikeLiked by 1 person
July 30, 2015 at 9:45 am
The ready-made soles are a new find for me and I think I may well find other things to make with them, maybe crocheted slipper boots for Christmas presents.
LikeLiked by 1 person
July 30, 2015 at 10:41 am
I spotted some slipper sock soles on the Berge de France website that I’m thinking of making some slipper boots with http://www.bergeredefrance.co.uk/accessories/customise-finsihes/other-accessories/sew-on-soles-for-slipper-socks-eur-10-12-years.html
LikeLiked by 1 person
July 30, 2015 at 11:22 am
Thanks for the link – they look great with the furry inside, much better for slippers:)
LikeLiked by 1 person
July 29, 2015 at 4:54 pm
What a cool project – and tutorial I might add, way to go on making shoes 🙂
LikeLiked by 1 person
July 30, 2015 at 9:46 am
I know, the soles were a great find and I’m now thinking about crocheting some slipper boots for Christmas presents using them:)
LikeLike
July 30, 2015 at 11:14 am
What a great idea, it seems quite a few of us are making a start on our Christmas ‘to do’ list, mine grows each week when I think up a new project:-)
LikeLiked by 1 person
July 30, 2015 at 11:22 am
I’m well into my Christmas present list – I start in February every year!!!
LikeLike
July 30, 2015 at 11:28 am
Nooooooooooooo don’t tell me that LOL
LikeLiked by 1 person
July 30, 2015 at 11:33 am
It’s only because I love making things so much that I need an excuse and Christmas/birthday presents can be made all year and dished out accordingly:)
LikeLike
July 29, 2015 at 10:30 pm
You are talented and oh so brave! I love the fabric for sure! Where did you get it? Fantastic work as always!
LikeLiked by 1 person
July 30, 2015 at 9:52 am
Thank you Robin, the fabric is called ‘Rosetta’ and it’s by Clarke & Clarke. I love their fabrics – all so pretty!
LikeLike
July 29, 2015 at 10:52 pm
Lovely gift – you’re so thoughtful! Saw these over on Karen’s Did You Make That? blog and thought they looked a possibility, in fleece. Must see if I can locate soles over here somewhere, along with leather needles, which will be much easier to find. Thanks you for stepping us through the process. 😀
LikeLiked by 1 person
July 30, 2015 at 9:53 am
Thanks Del, I’ve seen them on several blogs and knew I just had to have a go at making them. Luckily, I had the perfect opportunity when a girl’s birthday came around at the right time:)
LikeLiked by 1 person
July 30, 2015 at 2:15 pm
Once again I’m amazed …… what a wonderful project! Beautifully made, as always – absolutely fabulous, Sheila! Marianne xx
LikeLike
July 30, 2015 at 2:26 pm
Thanks Marianne, it made a change to make shoes!!!!
LikeLiked by 1 person
August 3, 2015 at 10:09 am
I need some!! They’re really lovely, is it easy to adjust them for broader feet or will they just ‘give a bit’? I could even make my mum some to match her new kitchen!!
LikeLiked by 1 person
August 3, 2015 at 6:59 pm
I would think it’s a simple adjustment to make – just measure across the widest part of the foot and cut accordingly. They make a novel present, don’t they?
LikeLiked by 1 person
August 3, 2015 at 9:47 pm
I’ve told my mum I’ll make her some to match her dining room curtains! I showed her yours and she was wondering if it would be possible to make some slip on ones without the back bit for round the house?
LikeLiked by 1 person
August 3, 2015 at 10:03 pm
it is, you just follow the relevant instructions:)
LikeLiked by 1 person
August 26, 2015 at 7:43 am
They are gorgeous! Are you going to make yourself some??
LikeLiked by 1 person
August 26, 2015 at 9:26 am
Probably not – I don’t wear espadrilles as I prefer something with a small heel. They were great fun to make though:)
LikeLiked by 1 person