

No, your eyes don’t deceive you, this IS yet another post featuring the lilac faux sheepskin fabric I bought last month. It really has been the fabric that keeps on giving as I have made not only a full length coat and two pairs of mittens, but also TWO tote bags!


If you would like to make your own, either from similar fabric or from a thick fleecy fabric, here’s a quick tutorial on how I did it.
Materials: Approx. 3/4yd of 45″ wide Faux Sheepskin or fleece
2 Magnetic Snaps
Cut pieces from your fabric following the diagram below (which is NOT to scale). If your fabric has a nap or a directional pattern, be sure to take this into account when cutting out.
You may have to adjust the size of the pocket to suit your particular ‘phone – this pocket is the perfect size for a normal (not ‘plus’) iPhone and you may well have to make it larger for a Samsung Galaxy or similar.

This photo shows the main pieces; front and back, gusset and interior mobile ‘phone pocket.

Seam allowances are 1/4″ throughout.
All raw edges are left unfinished and the seams are constructed with WRONG sides together, making a feature of them.
If you have your own labels, sew them to all pieces before any construction takes place. This avoids any fiddly sewing later on.

Sew your pocket to the inside of the BACK section of the bag around three sides only, leaving the top open.

Apply the magnetic tabs according to the manufacturer’s instructions, using the photos as a guideline for placement.


Pin a tab to the top centre of the front and back sections.

Sew in place.

Pin the gusset to the back section with WRONG sides together. There will be surplus fabric to cut off later.

Stitch with 1/4″ seam allowance, being careful not to get any puckers as you sew around the corners.

Pin the front to the remaining long edge of the gusset and stitch as before.

Trim the corners off the front and back sections to give a rounded finish.

Onto the handles.
Fold in half lengthways with WRONG sides facing in.

Stitch close to the raw edges.

Pin handles about 3″ in from the sides of the bag, on the INSIDE.

BASTE loosely in place if necessary, although I just pinned them.

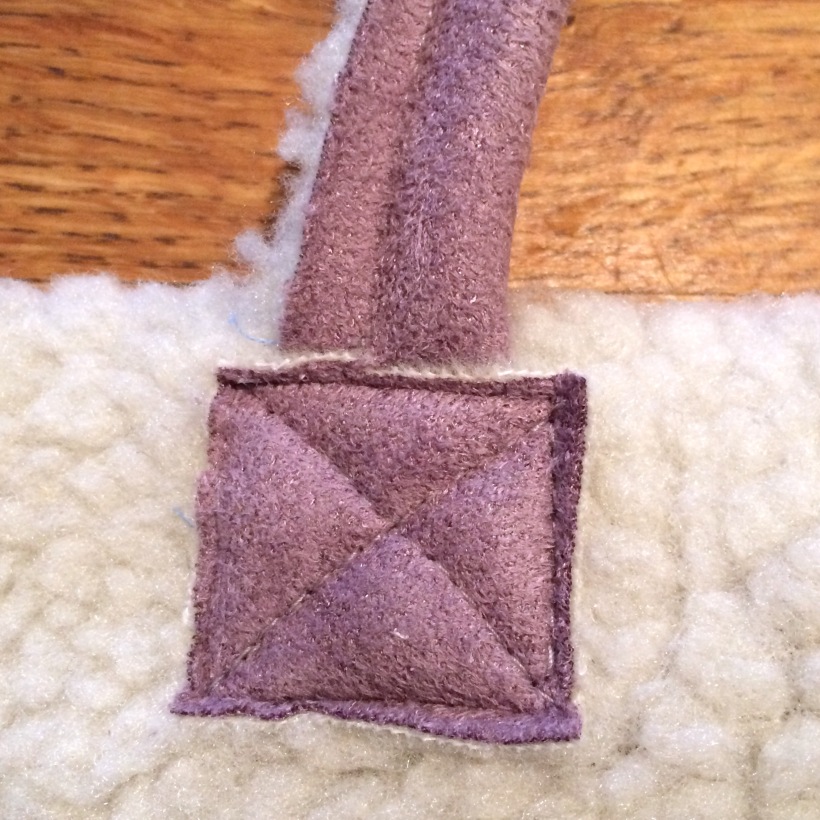
Take your 4 little squares – these will cover the ends of the handles to lend a neat finish on the inside of the bag.

You will need to remove as much of the pile on the reverse side of the fabric as possible. This will reduce the bulk and leave a flatter surface.

Pin each square over the raw edge of a handle and stitch in place, crossing your stitching to strengthen the base of the handles as shown below.

And that’s all there is to it!
This is the first one I made.


I even managed to make a second one using the rest of the scraps. There wasn’t enough to cut the main sections out in one piece, so I had to make a seam for the centre front and back, and I actually prefer this version.
I added my label in a slightly different position and it looks just as good.

The inside is nice and roomy with the all-important interior pocket to keep your ‘phone easily accessible.

The magnetic tabs give an element of security and stop the bag falling open.

As always, your own label adds a professional touch both inside and out.

The handles are short enough not to have the bag dragging on the floor (if you’re around the 5″ mark like me!), but also long enough for you to carry over your shoulder if that is your preference.

One of these is to be a Christmas gift for family and the other one may well end up in my Stitching Santa parcel, depending on who I get in the draw.
Which is your favourite?

November 2, 2017 at 2:15 pm
Brilliant tutorial – I like the one on the right.
LikeLiked by 1 person
November 2, 2017 at 2:45 pm
Me too – I almost want to re-make the first one with a seam down the middle!
LikeLiked by 1 person
November 2, 2017 at 3:04 pm
Love your tutorials. Have you ever done one on how to insert a zip and lining into a crocheted bag?? I have a wash-bag project on-going and will need to work it out soon!
LikeLiked by 1 person
November 2, 2017 at 9:00 pm
No, but it’s no different to a non-crocheted bag and there are literally loads of YouTube videos out there, so you should have no problem. It’s good to know my tutorials are easy to follow though – thanks!
LikeLike
November 2, 2017 at 5:33 pm
I love the one on the left, but both are so nice.
LikeLiked by 1 person
November 2, 2017 at 9:01 pm
Ah, opinion is divided then, which is good to know – at least I haven’t got it horribly wrong either way!
LikeLiked by 1 person
November 2, 2017 at 6:29 pm
I like both of them but prefer the one with the seam down the middle. I think the bag is my favourite of your faux sheepskin makes.
LikeLiked by 1 person
November 2, 2017 at 9:03 pm
Thanks Nikki, the bags have turned out better than I expected considering I made them up as I went along! I still love my coat the best though, as it really is so comfortable to wear:)
LikeLike
November 2, 2017 at 6:34 pm
I like the one with the seam down the middle best. It looks more structured.
LikeLiked by 1 person
November 2, 2017 at 9:04 pm
Me too – I think it looks a bit more authentic with the seam as real sheepskin is often pieced together to get the most efficient use out of a skin.
LikeLiked by 1 person
November 2, 2017 at 7:04 pm
very nice 🙂 I love the labels! And I can’t decide which one I prefer because I thought you’d made one with distict front/back and was thinking that I couldn’t decide which way I preferred!
LikeLiked by 1 person
November 2, 2017 at 9:06 pm
Well, that’s a good thing then as it means I haven’t got one drastically wrong! I’m glad I added the labels as I think it gives them a ‘branded’ look which is more professional.
LikeLiked by 1 person
November 2, 2017 at 9:19 pm
Yes, I agree – the labels look great.
LikeLiked by 1 person
November 2, 2017 at 9:39 pm
I love them both! The labels are a lovely touch. I had a chuckle when I realised that I used exactly the same phrase on your instagram post as you did in your blog post. Great minds eh?
LikeLiked by 1 person
November 2, 2017 at 9:42 pm
I think I used that phrase in my Sunday Sevens – if you read that it may have stuck in your subconscious? Otherwise – SPOOKY!
LikeLike
November 2, 2017 at 11:03 pm
You’re doing well with the sheepskin fabric! The bags look fab 😊
LikeLiked by 1 person
November 3, 2017 at 9:45 am
I’m almost glad the pattern envelope was way out on the amount of fabric needed. It said 3.9m but there was only 3.2m left on the roll and, despite having to cut the sleeves out again after going wrong, I STILL had a metre spare!!
LikeLike
November 3, 2017 at 9:26 am
They are stunning. I think I like the one with the extra seam. 🙂 It gives a bit of detail to it. These look like the perfect bag for just about any carry along occasion. I like the magnetic clasps, those are ideal. 🙂
LikeLiked by 1 person
November 3, 2017 at 9:48 am
Yes, the seamed one is my favourite……I’ve just bought the last metre of the same fabric in pale pink and made another one with a seam😀
LikeLiked by 1 person
November 6, 2017 at 6:23 am
Awesome. These bags are just perfect. And they look so pretty, yet you know they will be strong and durable due to the fabric. And to think all I did with this fabric was make blankets for Miekie. Now I look at it in so many different ways. 🙂 Thanks to you!!
LikeLiked by 1 person
November 6, 2017 at 8:37 am
Faux sheepskin blankets for Miekie? Lucky little dog. Mind you, mine both have hand crocheted ones, so they’re spoiled, too:)
LikeLiked by 1 person
November 7, 2017 at 6:33 am
🙂 I could not resist, they are super comfy in winter for her. And I will admit, I did buy a huge yarn cake for Miekie, to knit a more lightweight blanky for her for summer, mainly to use in the car, as she loves to travel. Her favourite travel spot is the passenger side feet area, as the aircon keeps it nice and cool too.
I guess all our furry children are spoiled. 🙂
LikeLiked by 1 person
November 3, 2017 at 7:29 pm
I like both bags, love the labels!
LikeLike
November 5, 2017 at 8:29 am
Wonderful bags! Certainly a great inspiration for using up all spare material – I end up with a bags full of scraps!
I am also inspired by your labels… where did you get them from?
LikeLike
November 5, 2017 at 9:36 am
Hehe. I’m not sure how much I would use a sheepskin tote but it looks like a wonderful gift 🙂
LikeLike
November 5, 2017 at 11:42 am
i just purchased your pattern for the sew-retro bags and it didn’t ask for my email so i just wanted to give it to you mhswen@yahoo.com then i saw this great post and now i have another bag to make — great ideas
LikeLiked by 1 person
November 5, 2017 at 11:53 am
I’ve just emailed this to you. Folksy and PayPal already have your email address so it comes through automatically with every order. Glad you’re finding my patterns useful!
LikeLike
November 8, 2017 at 8:40 pm
They all (pink included) look great and I so enjoyed seeing the steps of making one. Anyone would love to have one of them, I think!
LikeLike
Pingback: #Stitchingsanta 2018 – The Reveal! | applebymakes