
I was contacted recently by Craftseller magazine in relation to their “Blogger of the Month” feature and was asked if I would like a free double page spread in their magazine.
Um, let me think a minute…..yeeees!
As part of the feature I designed a free pattern for the readers, which was to be copyright-free allowing full reproduction rights. This was harder than it initially seems, I mean, what could I design that hadn’t been done before????
I came up with the idea of a folding travel photo frame and Googled/Pinterest-ed it…….not a single result.
Not one.
No one seems to have come up with a tutorial for such a thing, unless I just didn’t type in the correct keywords. So that was it, decision made, a “Folding Travel Photo Frame And Case” was going to be the free pattern for Craftseller’s readers.
After finalising materials and method on a prototype, this is the final product: –

Do you like it?
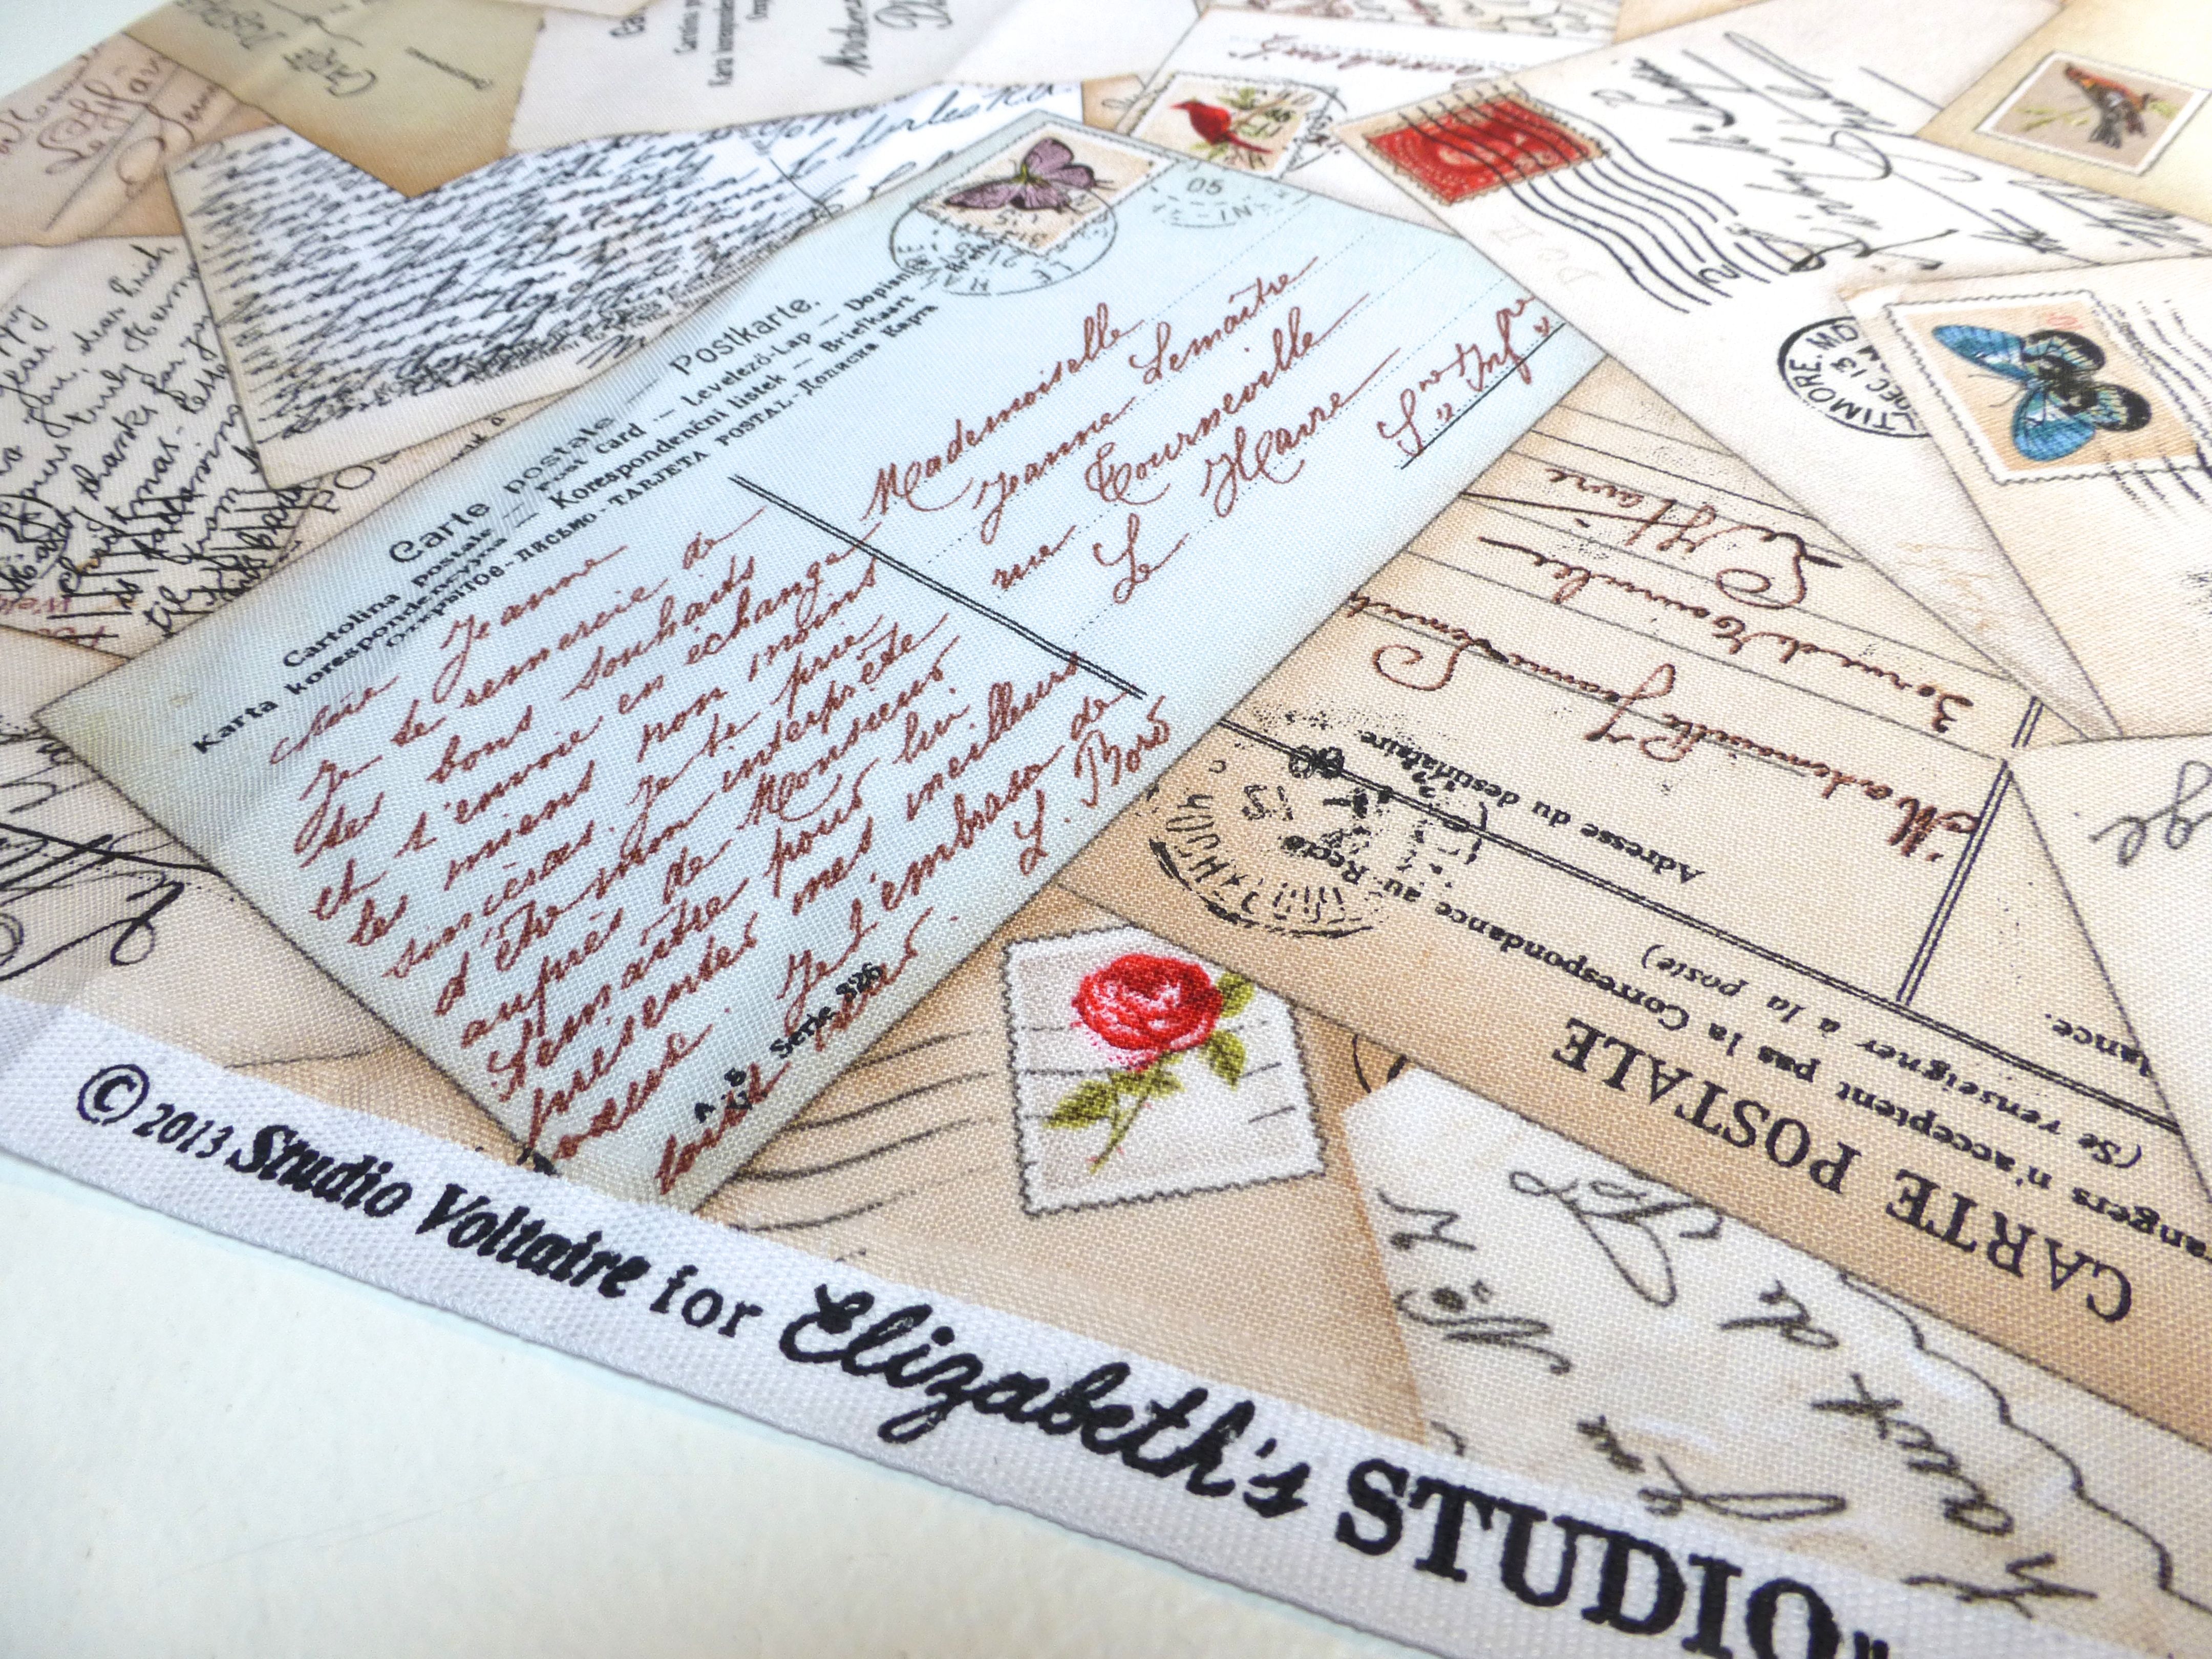
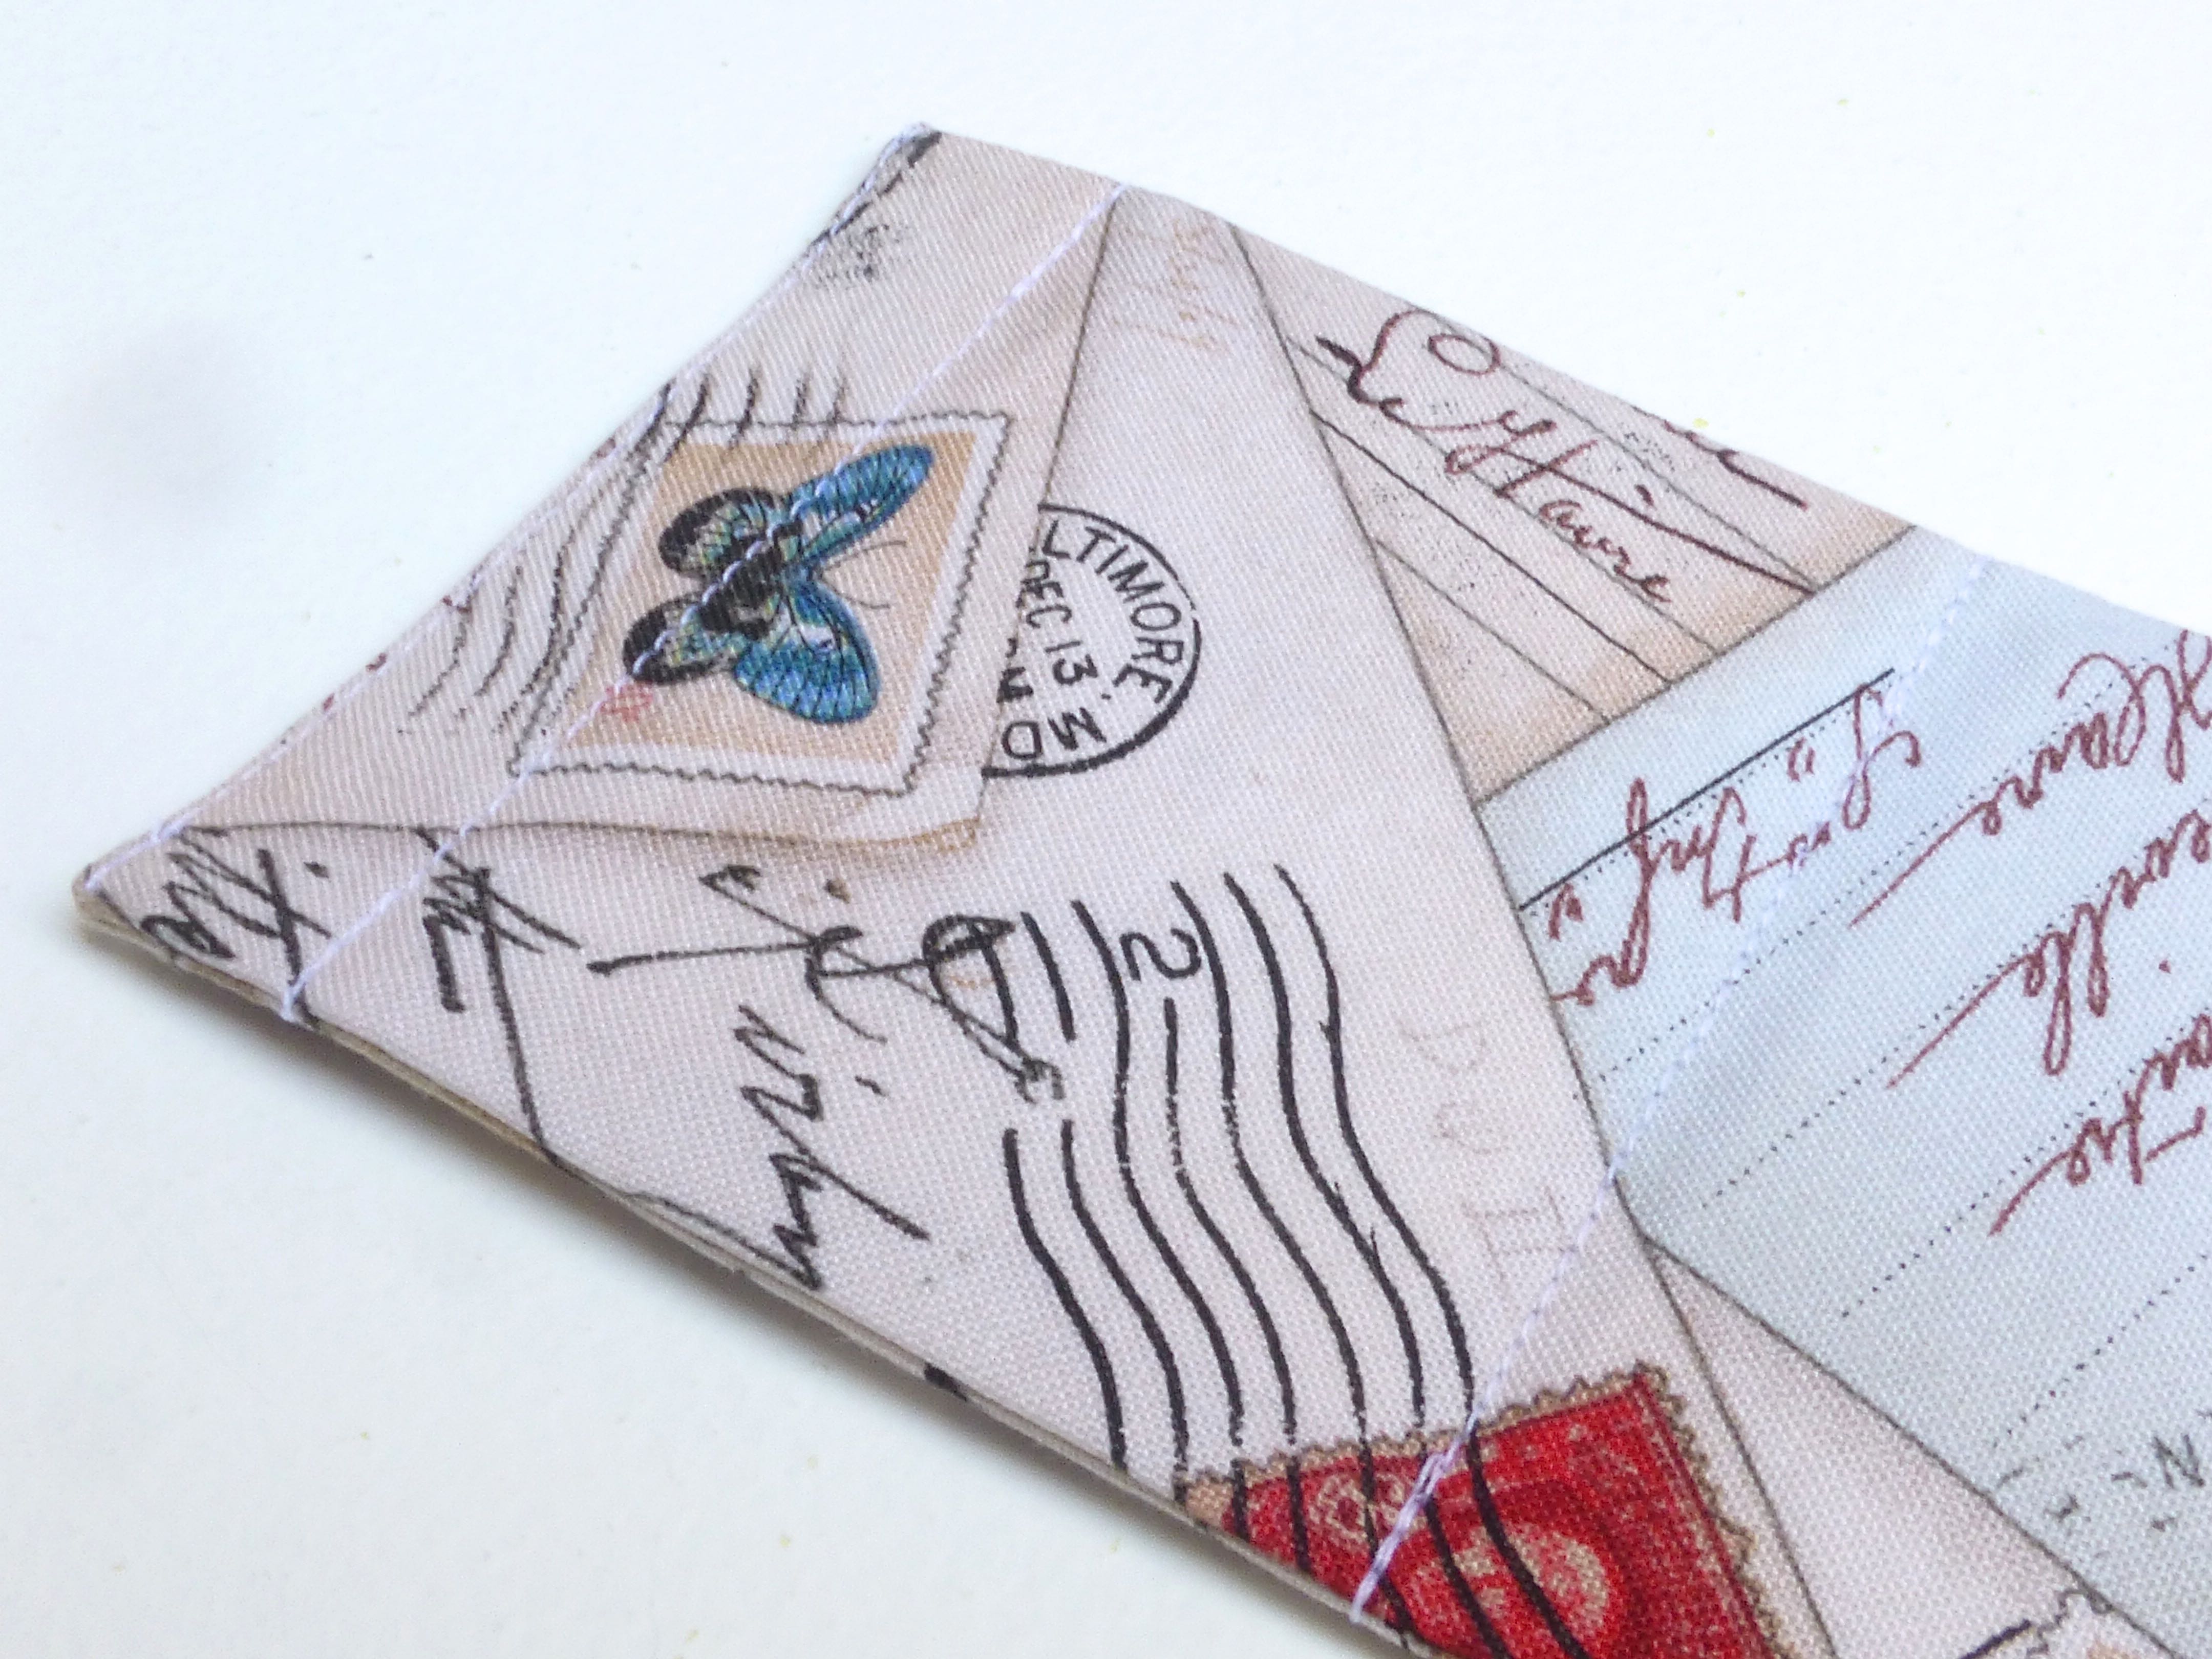
You may remember the “Postcards” fabric from the “Spring In Paris” collection by Studio Voltaire that I bought earlier in the year (see this post), well I thought it would be the perfect match for a travel themed project.
So, here goes with the tutorial!
You will need: –
- A single fat quarter of fabric
- Medium weight iron on interfacing
- 1 sheet acetate
- 1 sheet cardstock
- 2″ length of hook and loop fastener
Cut the following: –
- fabric: – 2 x pieces 12″ x 3.5″
1 x piece 4.5″ x 3.5″
- iron-on interfacing: – 2 x pieces 12″ x 3.5″
1 x piece 4.5″ x 3.5″
- acetate: – 1 x piece 3.5″ x 2.5″
- cardstock: – 2 x pieces 3.5″ x 2.5″
1 x piece 2.5″ x 2″

- Fuse the interfacing to the reverse of the matching fabric pieces following the manufacturers instructions.
- Place the acetate in the centre of the reverse of your 4.5″ x 3.5″ piece of fabric and draw around it, marking a rectangle. Remove the acetate and stay stitch the corners of the marked rectangle..
- Draw a second rectangle 1/4″ inside the first one and cut this section out to create a window for your photograph.

4. Clip corners diagonally to the stay stitching.

5. Fold to inside along the solid lines. Press.
6. Turn down a 1/4″ hem on the top edge and top stitch close to the fold. 
7. Place acetate on the reverse of the window and top stitch close to the inner edge on all four sides.
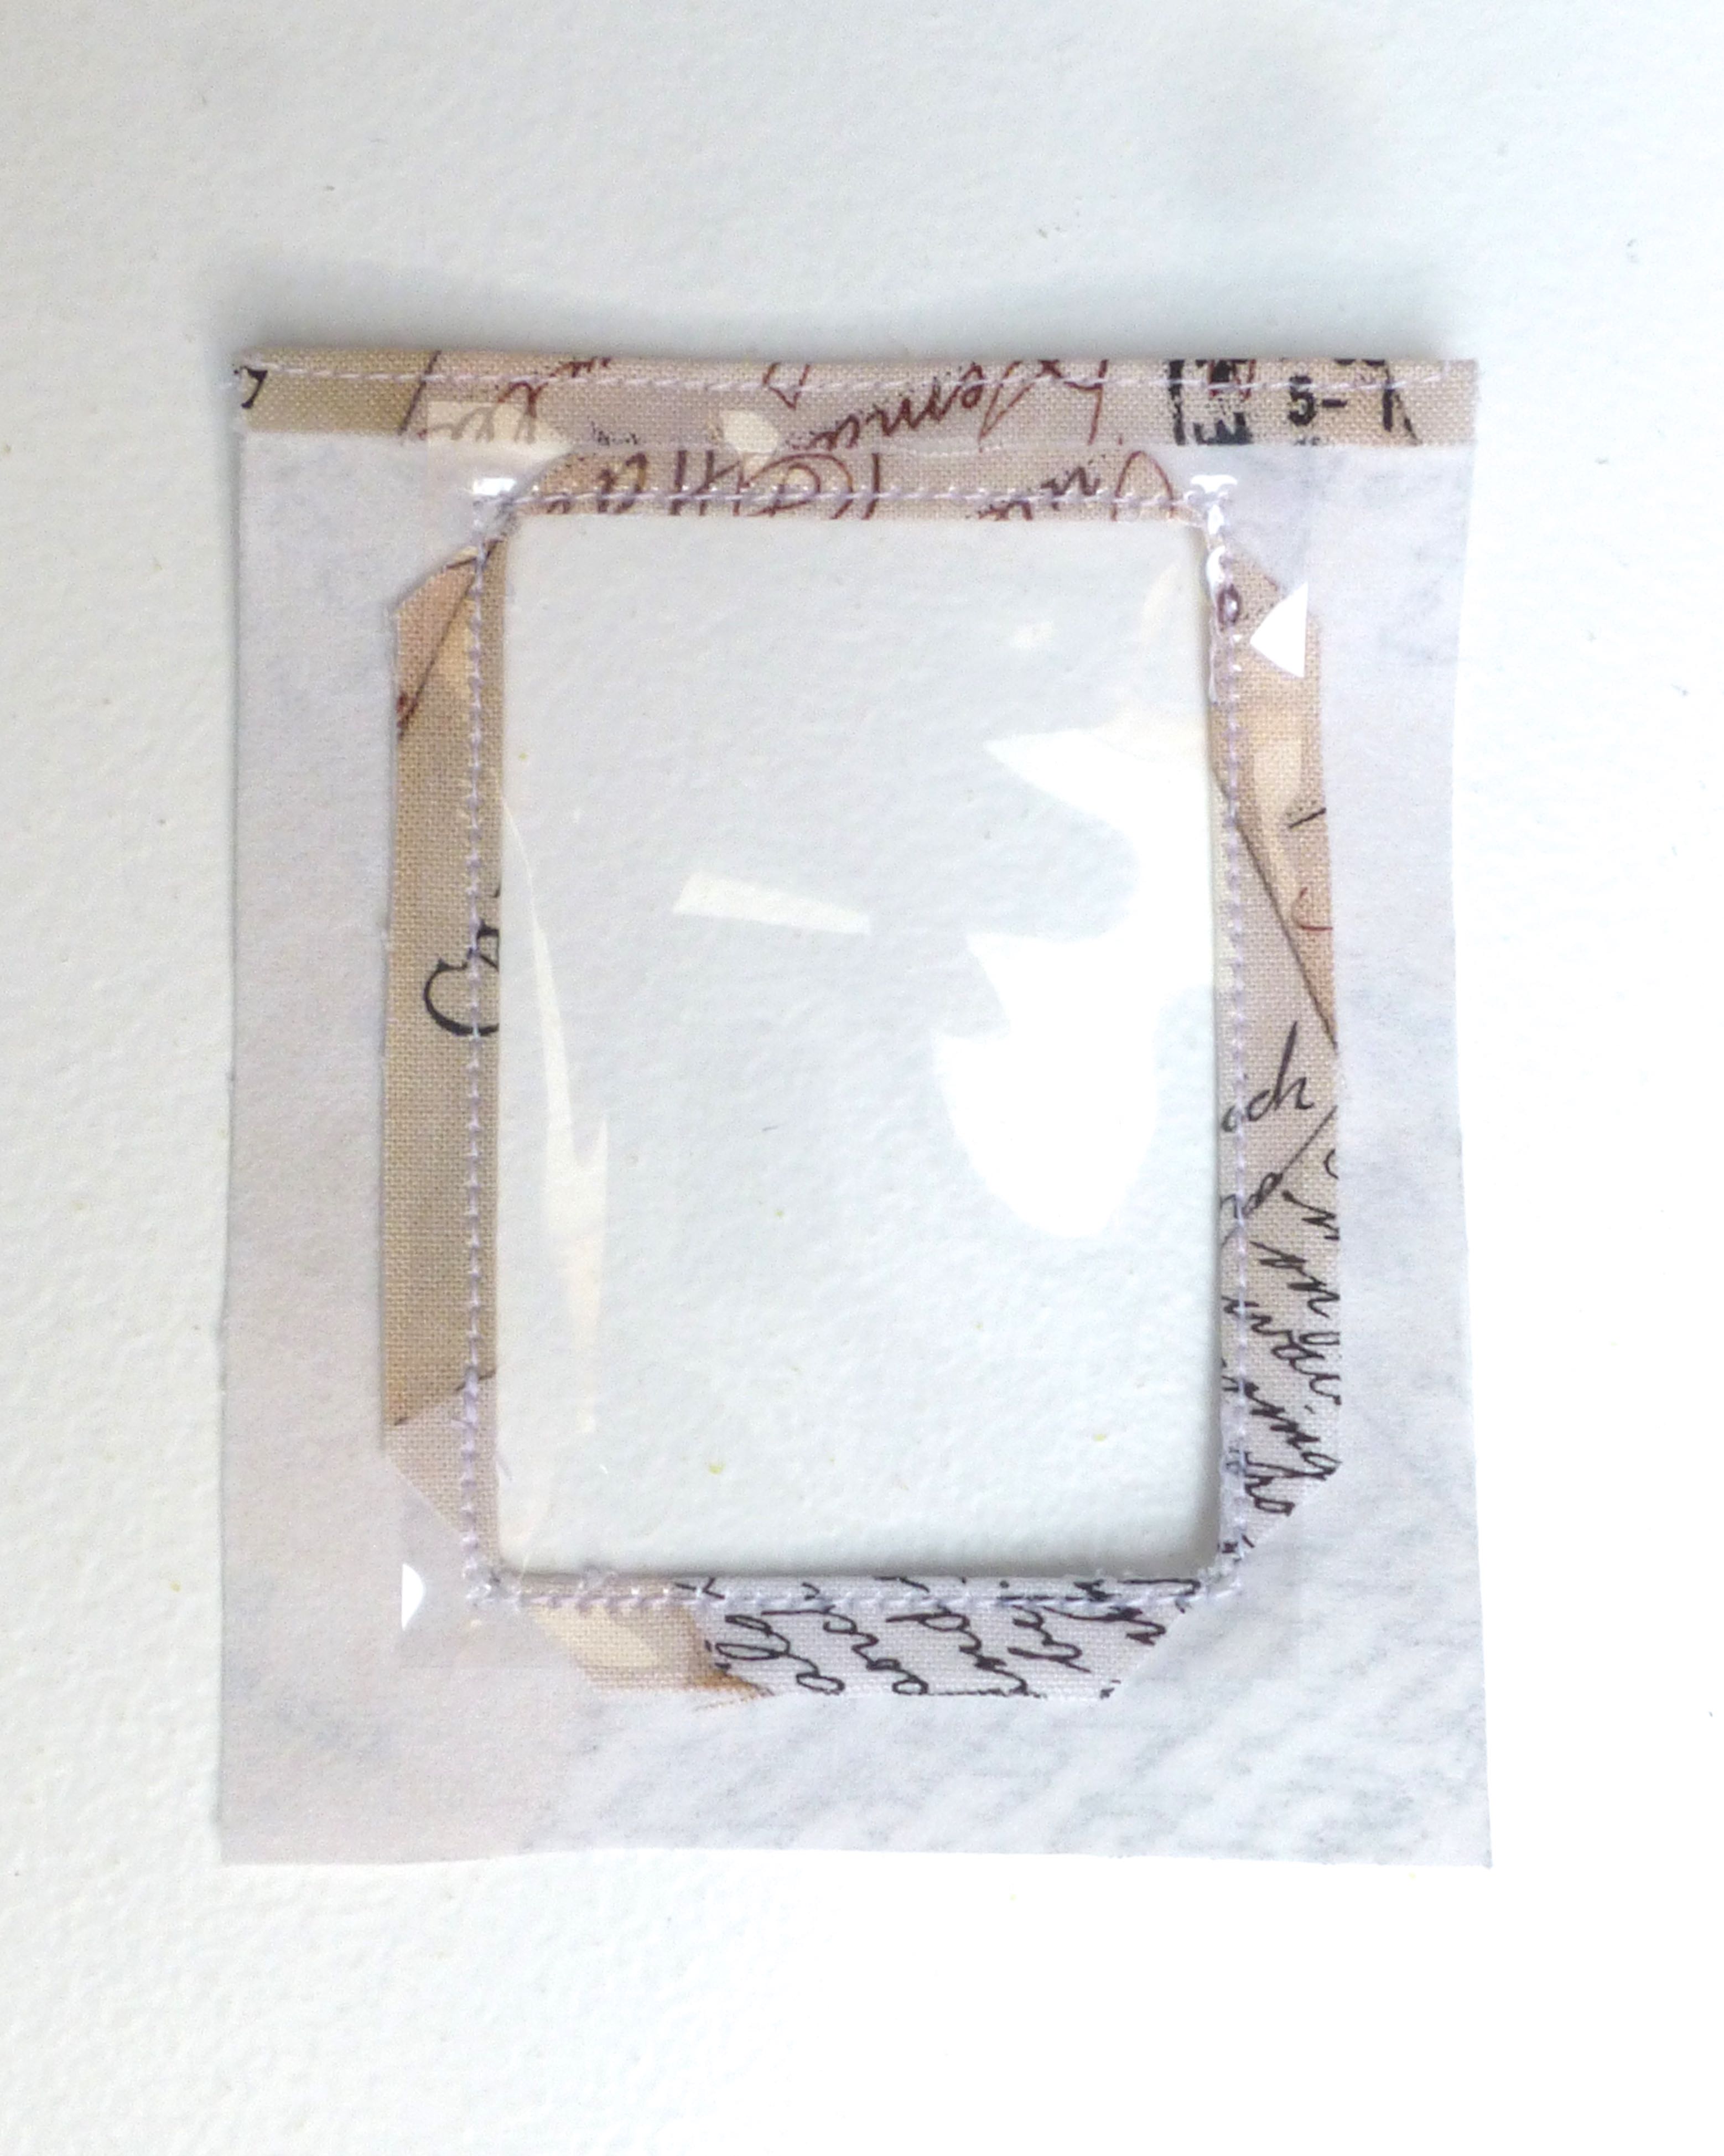
8. Turn and press a 1/4″ hem on remaining three sides of the fabric, being careful not to touch the acetate with the iron.
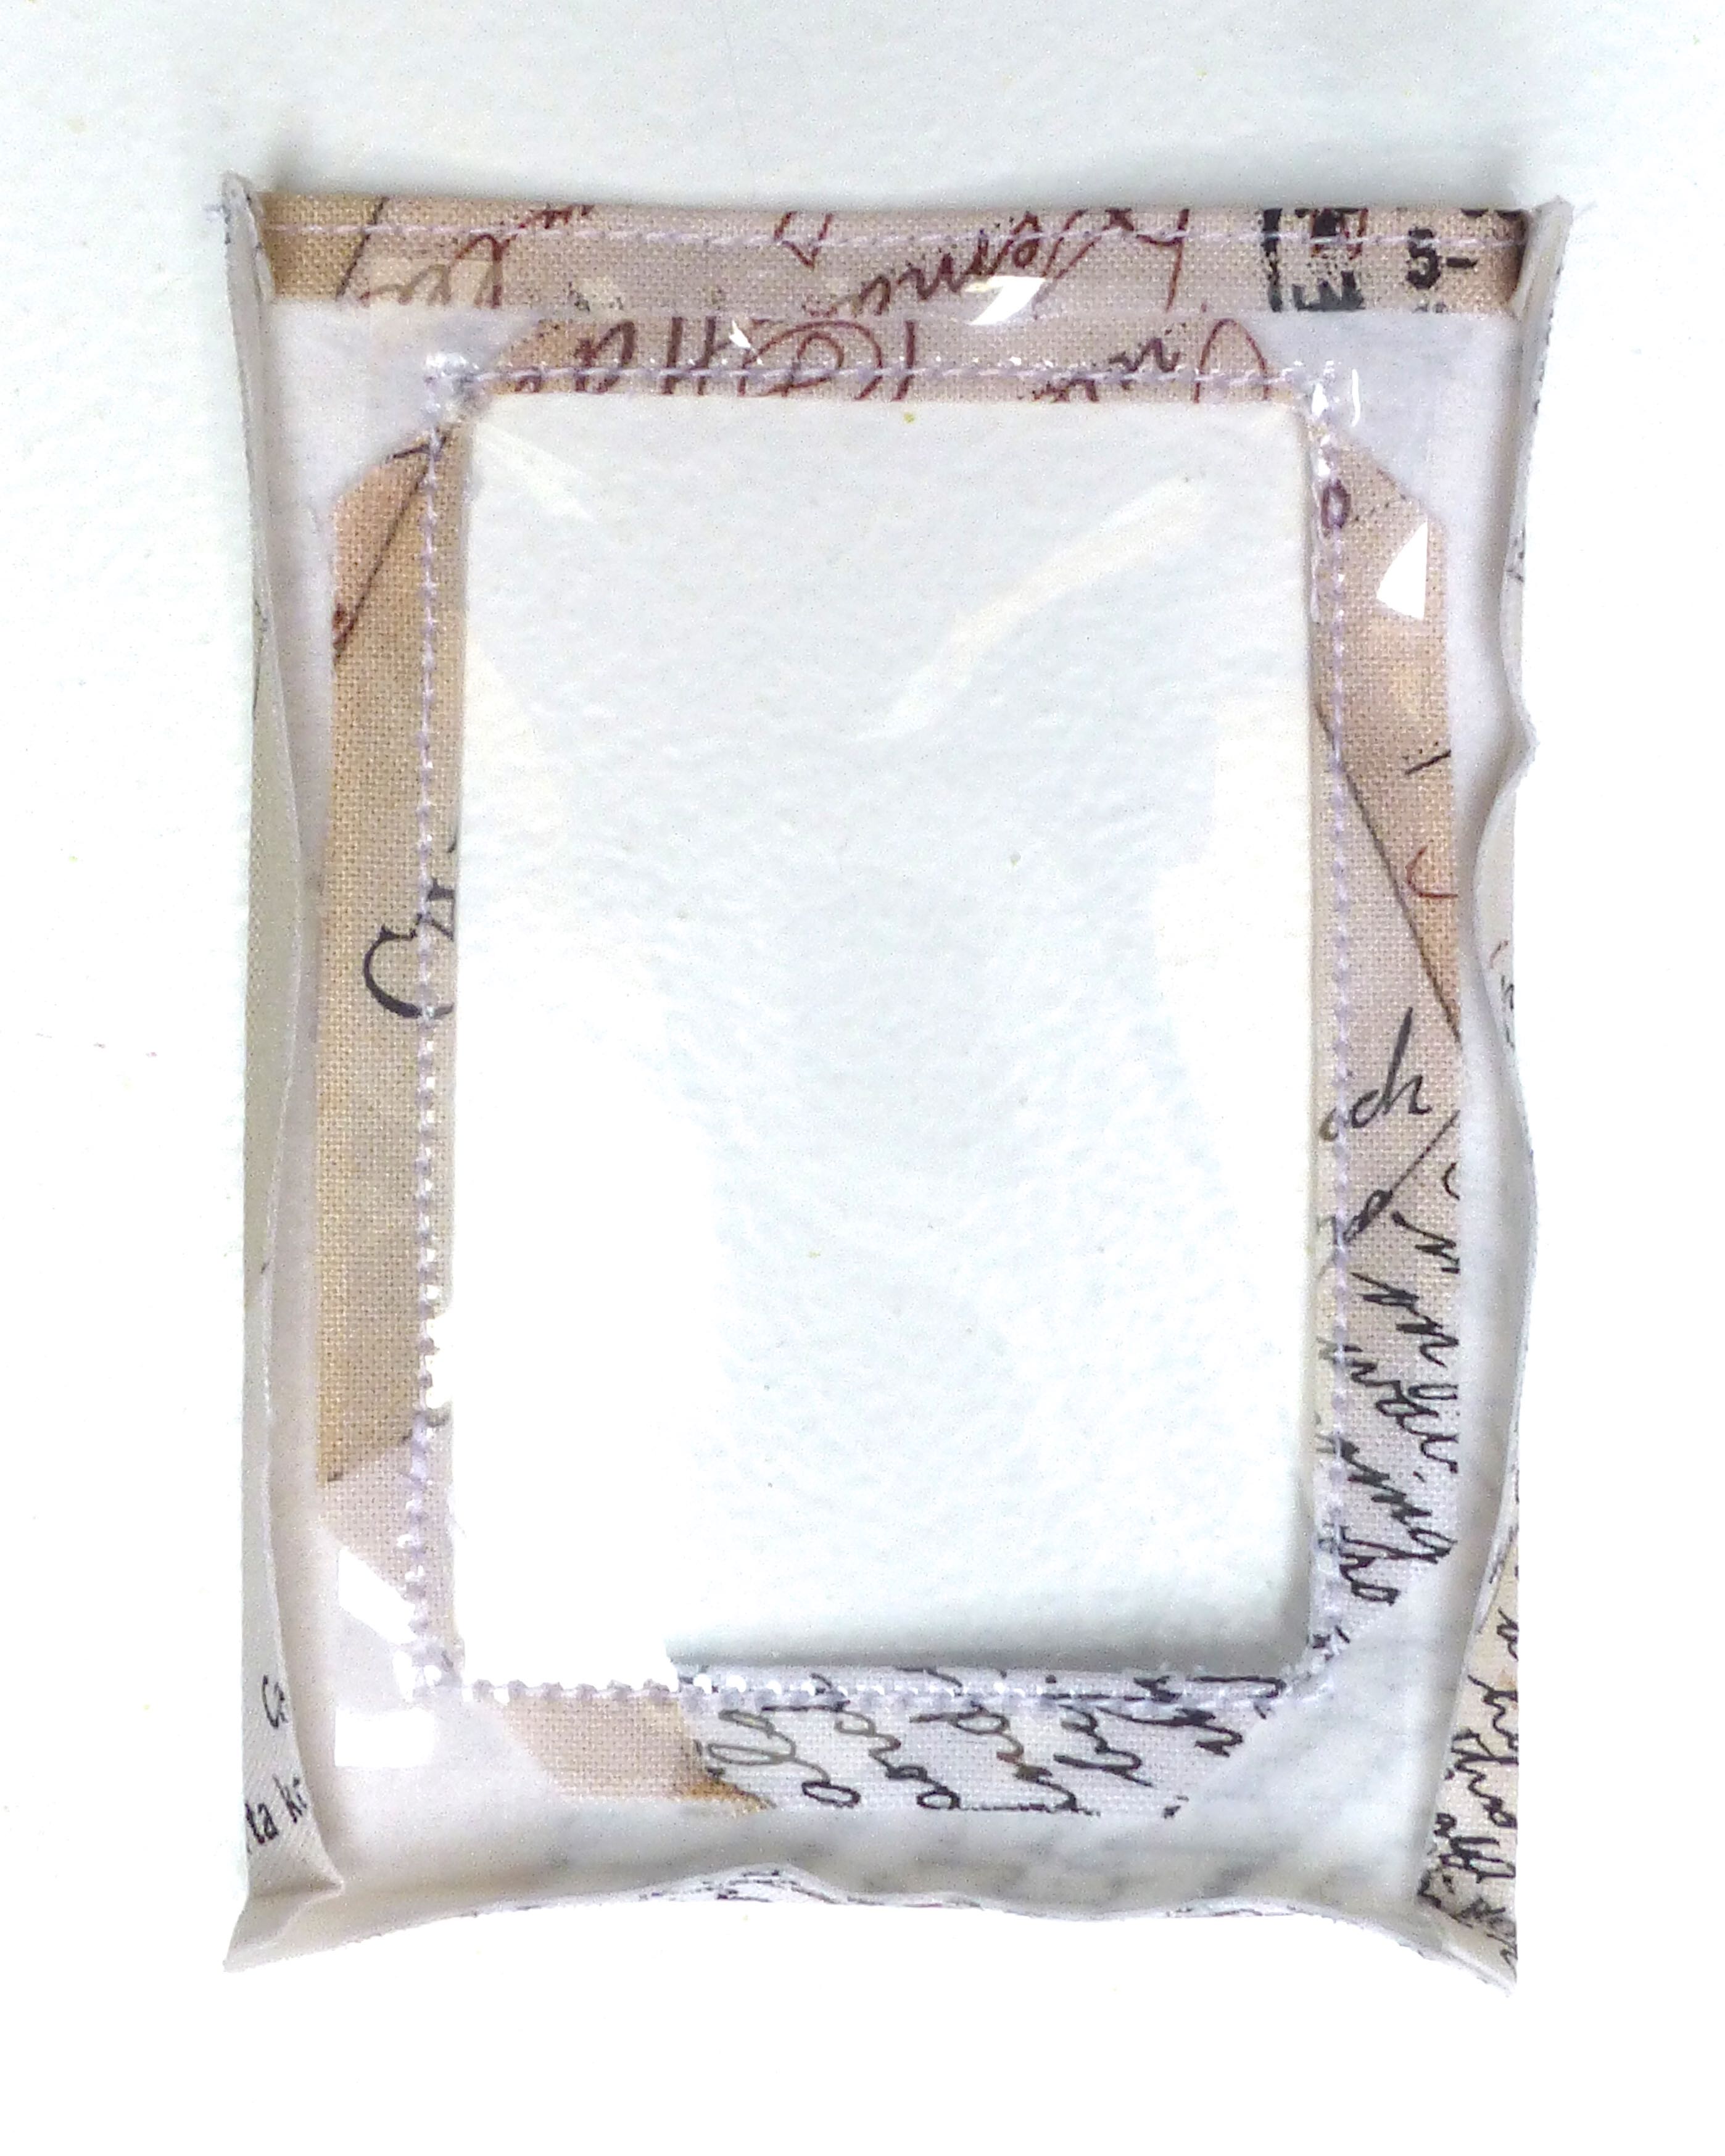
It should now look like this from the right side.

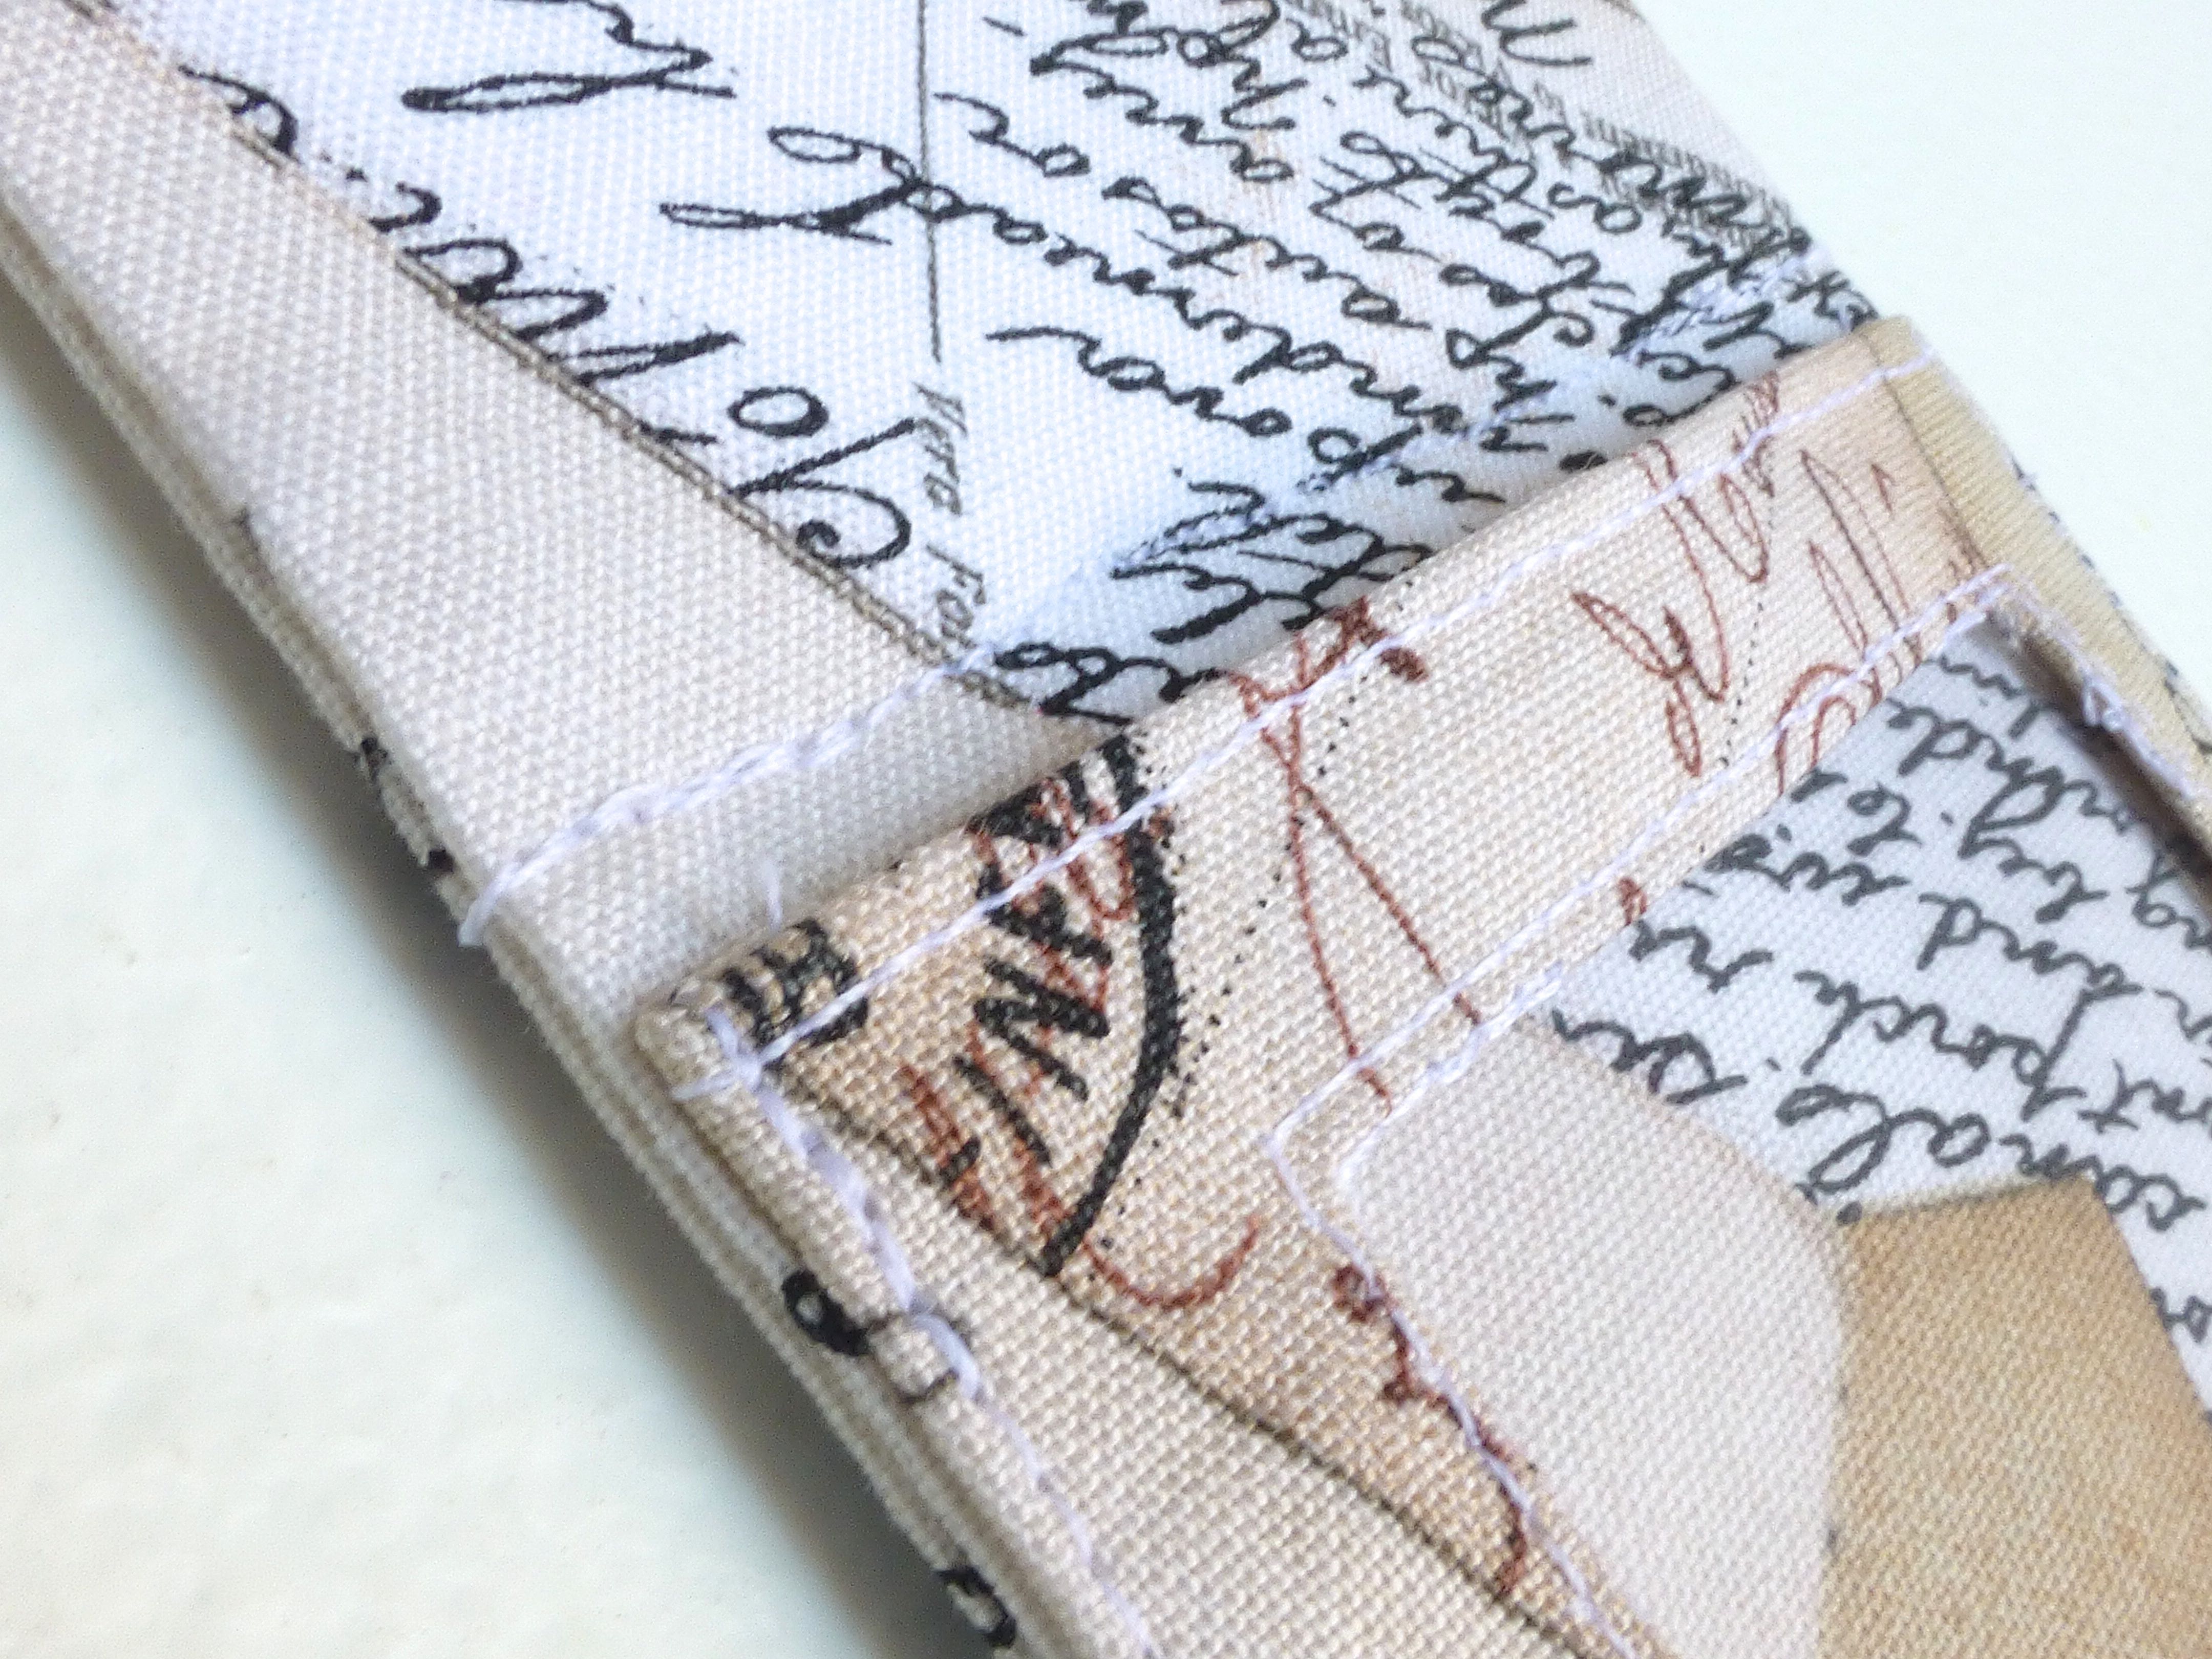
9. To make your frame, take both 12″ x 3.5″ pieces and, with right sides together, sew around three sides with a 1/4″ seam allowance. Trim corners, turn and press.

10. With the right side up, place your window on top of the frame aligning the bottom folded edge with the bottom seam of your frame. Top stitch the window close to folded edges on three sides, leaving the top edge open to slip your photo into.

11. Insert a 3.5″ x 2.5″ piece of card into the open, unfinished end of the frame and push right down to the bottom.
12. Sew just above the window through all layers of the frame to encase the card.
13. Insert the second 3.5″ x 2.5″ piece of card and push down to meet the previous line of stitching.
14. Sew across the width of the frame as before, encasing the second piece of card.
15. Repeat steps 13 & 14 with the smallest 2.5″ x 2″ piece of card.
16.Turn in the raw edges of the frame opening, press and top stitch to close.
17. Window side uppermost, stitch the loop side of the hook and loop fastener to the opposite end of the frame as shown below.

18. Hand stitch the hook side of the fastener to the reverse of the window along the bottom edge.
19. To assemble your travel photo frame, simply fold into a triangle shape and press together the hook and loop fastener.

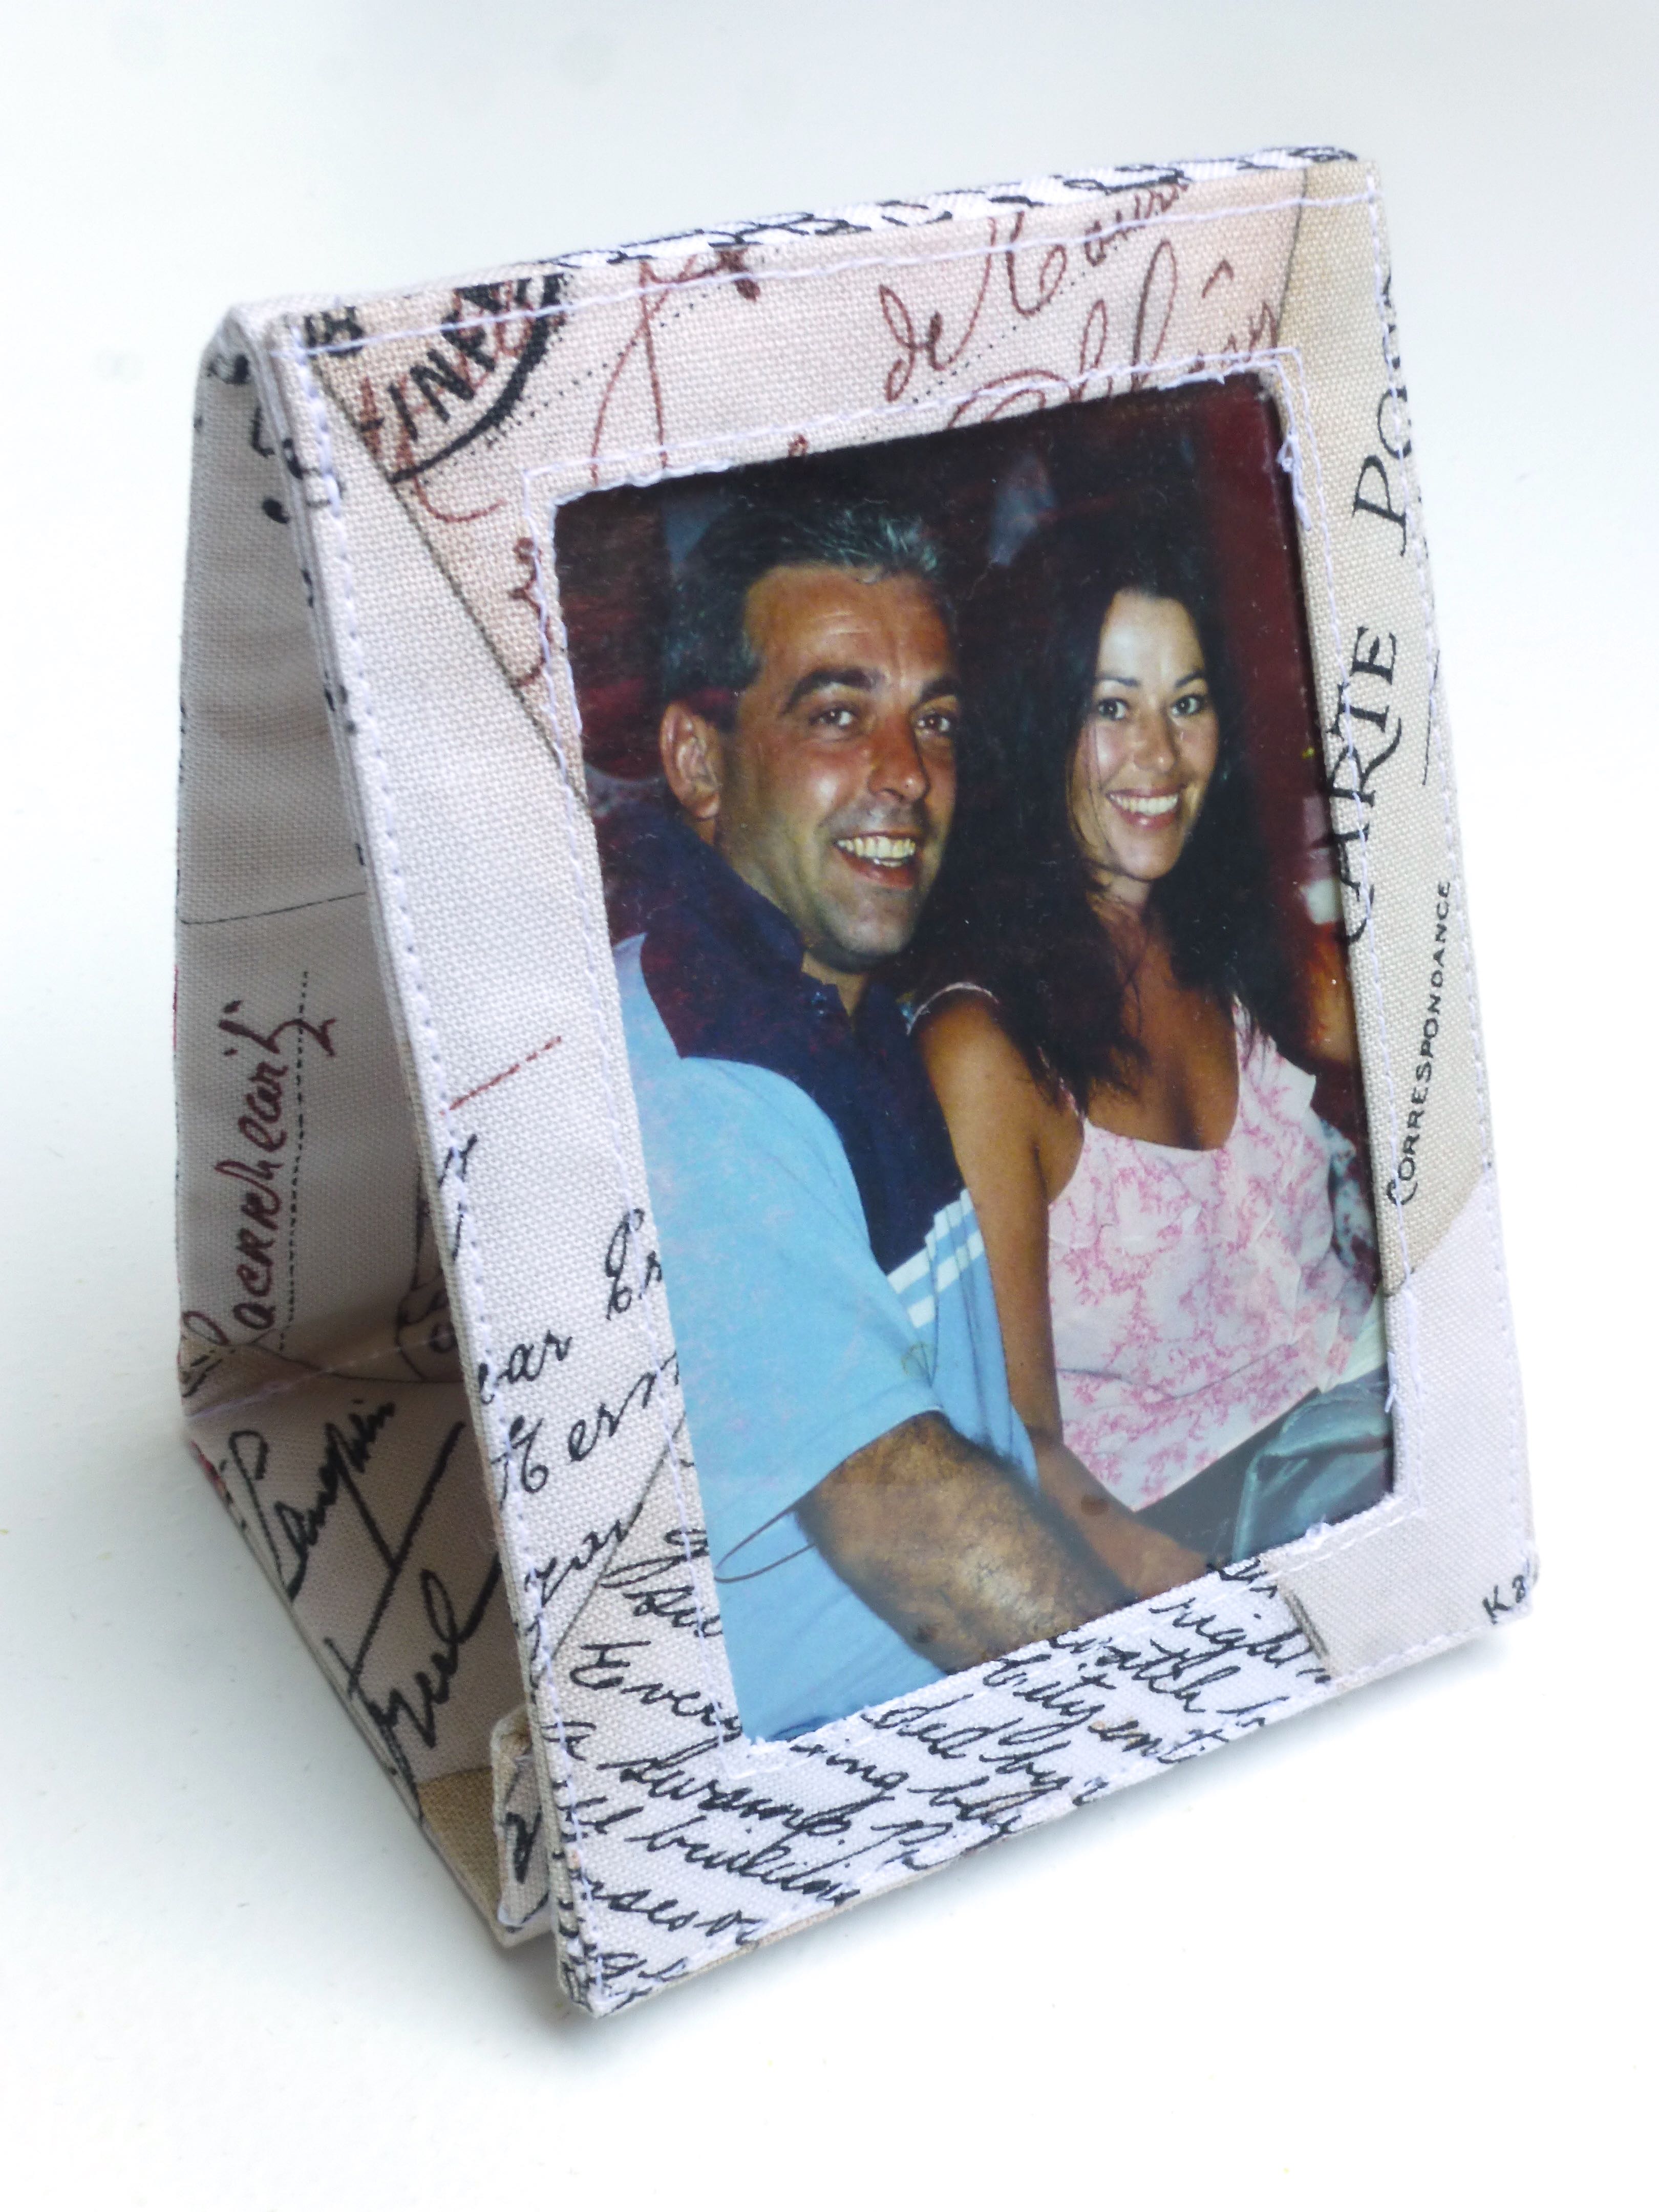
20. Slide your 3″ x 2″ photo in behind the acetate.
For the case: –
- Fuse interfacing to a piece of fabric measuring 16″ x 4.5″. Fold in half width-wise and sew a 1/4″ seam on the three raw edges, leaving a gap to turn.
2. Turn and press.

3. Top stitch close to the edge of the bottom edge.
4. Fold up from the bottom about 3.25″, so the top stitched edge stops 1.25″ from the top edge.
5. Top stitch around the side and top edges to finish.

6. Fold your travel photo frame flat and pop inside the case.

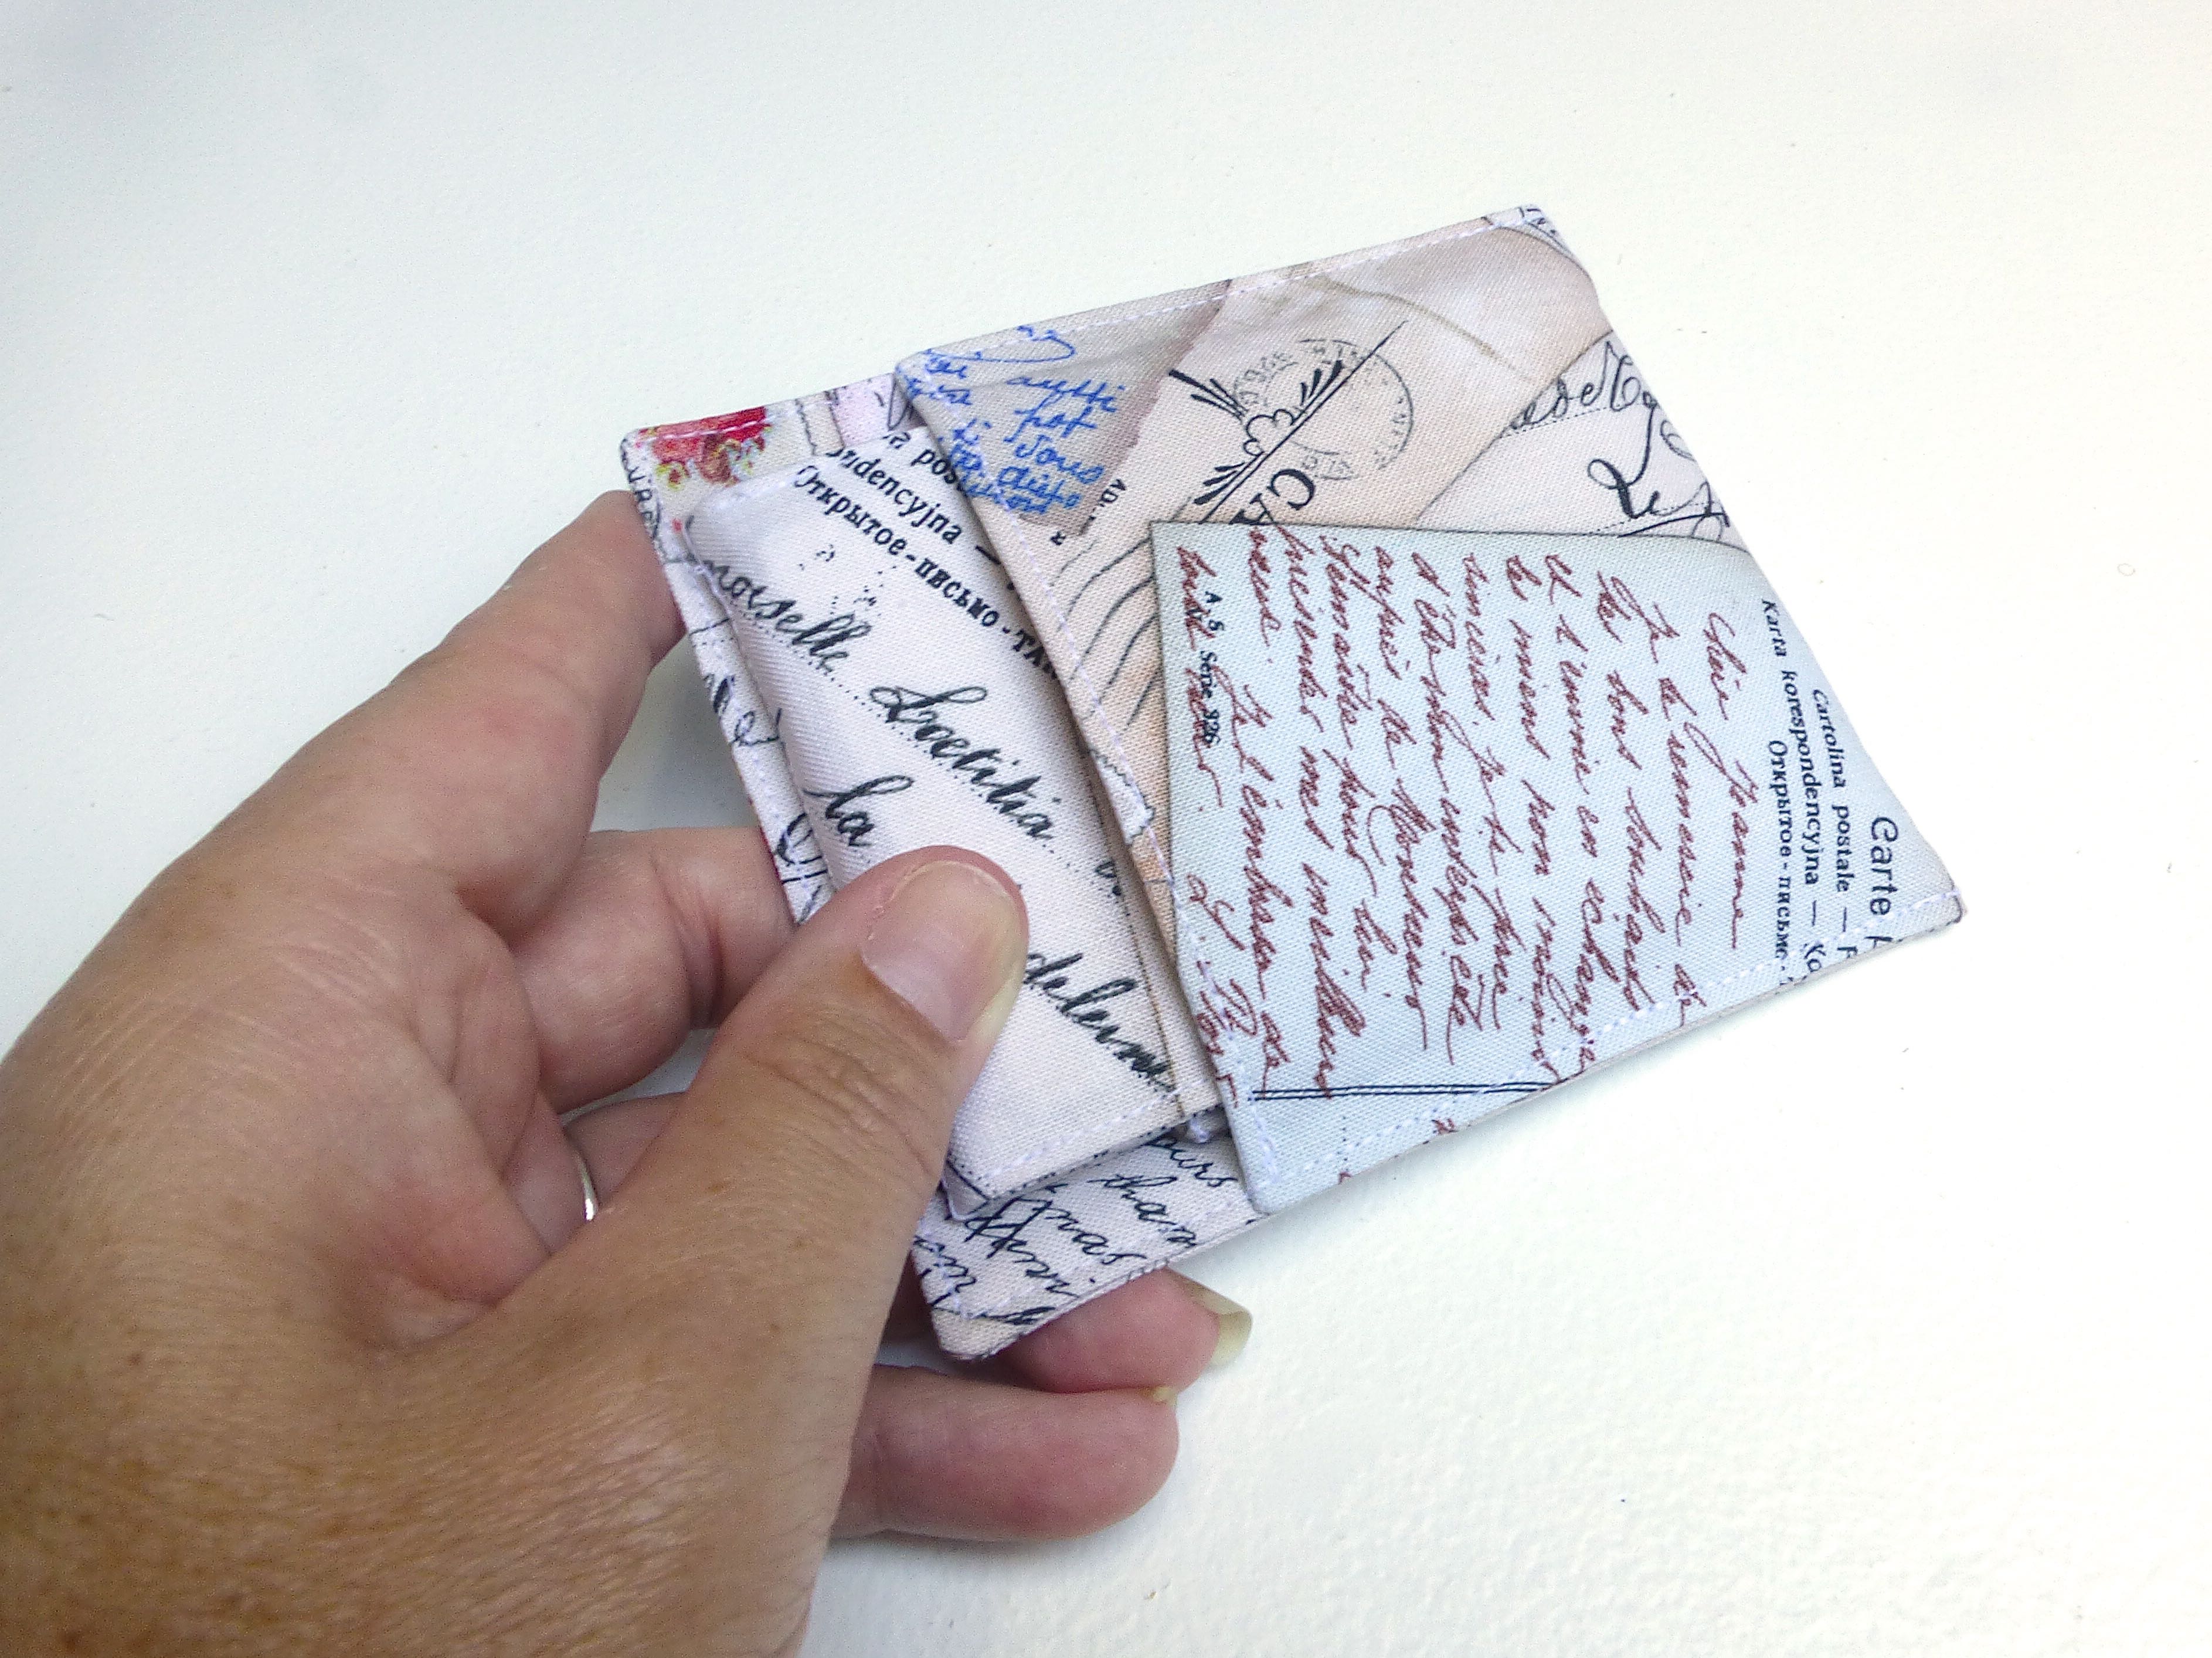
There you have it, a compact and portable, travel-themed folding photo frame – perfect for the traveller or person who works away from home.

Look out for my Blogger Of The Month feature in Craftseller magazine soon!

September 4, 2015 at 3:04 pm
Congratulations on getting a double page Blogger feature!! AND creating a lovely little travel picture frame and case they’re fab 🙂 Great step by step too, for all the people who’ll try out the free pattern
LikeLiked by 1 person
September 4, 2015 at 3:23 pm
I was thrilled to be asked, if a little bemused – my blog isn’t even eighteen months old yet! I do love making tutorials though, so it was a no-brainer.
LikeLiked by 1 person
September 4, 2015 at 3:36 pm
I don’t think it matters how old your blog is – You’re a great person to feature 😉 !!
LikeLiked by 1 person
September 4, 2015 at 3:45 pm
Aw, thanks!
LikeLiked by 1 person
September 4, 2015 at 3:33 pm
Well done indeed! They can obviously spot talent. Really great item! I’m sure they were thrilled. Make sure you charge when they want you to do a series!
LikeLiked by 1 person
September 4, 2015 at 3:34 pm
Ooh, wouldn’t that be lovely? A regular craft column…..
LikeLiked by 2 people
September 4, 2015 at 4:32 pm
Well done for coming up with something original and useful – I can imagine that would be really tricky. How fab that you already had the perfect material in your stash. And beautiful photo of you both 🙂
LikeLiked by 1 person
September 4, 2015 at 6:40 pm
Thank you – and don’t we look young (and slim!) in that photo? It’s kept in my wallet and it was taken 12 years ago when we’d only been dating a few months:)
LikeLiked by 1 person
September 4, 2015 at 10:53 pm
Oh, bless, lovely! I have a similar photo stashed away that I can’t believe is us now, we look so, so young 🙂
LikeLiked by 1 person
September 4, 2015 at 4:41 pm
That’s brilliant! You are becoming seriously famous! Great idea and that fabric is perfect.
LikeLiked by 1 person
September 4, 2015 at 6:41 pm
Thanks, I’ll let you know when the book is released, lol!
LikeLike
September 4, 2015 at 5:54 pm
Love it! What a perfect gift – my friend has just been struggling for a birthday pressie for her partner who’s away on a submarine for 3 months.
Congratulations, hope they sign you up, they must have heard about your book…. 😃
LikeLiked by 1 person
September 4, 2015 at 6:42 pm
Ha ha! You’d laugh if I really did write a book! Point your friend in the direction of the tutorial and don’t forget to send a photo if she does make one:)
LikeLiked by 1 person
September 4, 2015 at 6:44 pm
It’ll be making making it! I made something else, it was posted yesterday, just need to write it up.but I’m sure she’ll want one for Christmas. Might point her in the direction if your shop! 😃
LikeLiked by 1 person
September 4, 2015 at 6:14 pm
I’m not surprised that you were approached, your projects are so very appealing (no. 1 fan here, lol).
Speaking as someone who can’t ever get a mount straight in a frame much less make the frame, I am in awe.
You write well, not all tutes are so clear and concise, or pattern instructions come to that. Well done!
LikeLiked by 2 people
September 4, 2015 at 7:08 pm
Wow, thank you very much, that’s made my day! It’s very time consuming to photograph every stage and then document it in simple steps so it’s good to know it’s time well spent. Thanks for such lovely feedback:)
LikeLike
September 4, 2015 at 7:08 pm
Beautifully done – congratulations!!! xx
LikeLiked by 1 person
September 4, 2015 at 7:10 pm
Thank you, I can’t wait to see the finished article in the magazine:)
LikeLiked by 1 person
September 4, 2015 at 7:08 pm
Congratulations – on both the magazine offer and the project. Both absolutely brilliant!! 🙂
LikeLiked by 1 person
September 4, 2015 at 7:11 pm
Thank you very much, I like doing articles like this and would love to do a regular column:)
LikeLike
September 4, 2015 at 8:16 pm
You go girl!! Congrats on the double page spread. You deserve it. I love everything you do. You are so talented and you make everything you do seem so very easy! 🙂
LikeLiked by 1 person
September 4, 2015 at 8:30 pm
Thanks Robin, your support and encouraging comments mean a lot to me. I’ll share the article on my blog when it comes out:)
LikeLike
September 4, 2015 at 11:13 pm
No thanks needed! I just remembered to tell you that the pic you used to display in the frame is a lovely one. You both look so tanned and happy. Oh yes and in luvvvvv!! LOL
LikeLiked by 1 person
September 4, 2015 at 8:47 pm
Wow what a great idea! And congrats on getting featured – how cool is that?! I’m definitely adding this to my projects to sew list!!
LikeLiked by 1 person
September 4, 2015 at 8:52 pm
Thanks Amy and welcome to my blog! I would love to see a photo if you do make one:)
LikeLike
September 4, 2015 at 9:19 pm
Congratulations! And well done with coming up with something so original, that couldn’t have been easy! Made in some suitably manly material, this would make a great gift for my brother-in-law who works on the rigs!
LikeLiked by 1 person
September 4, 2015 at 9:30 pm
Yes, it would, a Harris Tweed perhaps? Men are notoriously difficult to buy for, let alone make something suitable for, so I reckon you should go for it!
LikeLiked by 1 person
September 4, 2015 at 9:35 pm
Harris Tweed – I like it!
LikeLiked by 1 person
September 4, 2015 at 11:17 pm
Wow what a fantastic idea! Nope I’ve never seen one of them before! You’re so clever. Great for taking your loved ones away with you 🙂 soldiers should take them on tour!!
LikeLike
September 5, 2015 at 7:29 am
Thanks Beth, they’re definitely not out there, are they? I really wanted to come up with something new so was pleased with this ‘lightbulb’ moment. I might make some for my shop in more masculine fabrics as has been suggested. Men are soooo difficult to buy for.
LikeLike
September 5, 2015 at 8:13 am
Many many congratulations and well deserved in my opinion, and a super idea for a crafty make well done !!!!
LikeLiked by 1 person
September 5, 2015 at 8:45 am
Thank you Roma, that’s very kind of you:)
LikeLike
September 6, 2015 at 9:11 am
Craftseller is a brilliant magazine so a BIG well done. Also well deserved as your projects are great and clearly described (I sent the tepee project to No 1 Daughter). Best wishes Moke xxx
LikeLiked by 1 person
September 6, 2015 at 10:26 am
Thank you very much, that’s great to hear – please send a photo of the finished teepee if your daughter gets around to making it?
LikeLike
September 7, 2015 at 1:34 pm
Congratulations! A really great make too 🙂 x
LikeLiked by 1 person
September 7, 2015 at 2:27 pm
Thanks, and thank you for the parcel – it arrived today. I love the mini “Whiskers” on the embroidery scissors too, such a lovely surprise!
LikeLiked by 1 person
September 7, 2015 at 5:05 pm
That’s okay, so glad you were pleased with it, I wanted to pop a little surprise in there 🙂
LikeLiked by 1 person
September 8, 2015 at 4:23 pm
Congratulations! and yes, definitely well deserved. Love the frame 🙂
LikeLike