Click on the link to see this month’s project for Minerva Crafts in action! : – Burda 6610 Tunic


Click on the link to see this month’s project for Minerva Crafts in action! : – Burda 6610 Tunic
Every year the school holds a Summer fair to raise funds for the PTFA and I make various things for them to sell or raffle, often at the last minute, so I’m feeling a little bit smug that I’ve already started this year – and it’s not until June!
In three mammoth jam-making sessions I managed to make 42 jars of Blackberry and Apple jam, 25 of which are being donated for the school fair.
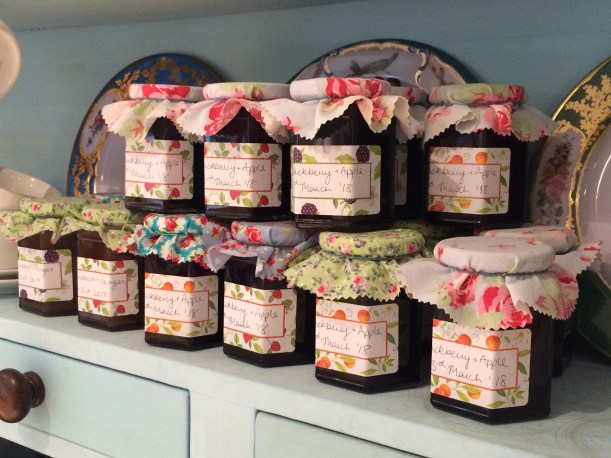
Last year there was a ‘Horsington’s Got Talent’ stall, whereby parents and pupils make all manner of crafty things to sell, and for which I made lots of things. It was a huge success, selling out completely apparently, so the Committee have put out another request for handmade items.
As I inevitably end up spending quite a bit of money on things I make like sugar and lemons for the jam, all the ingredients for 50 scones and cakes for the cake stall, I try to make the crafty items out of things I can source for free or that I already have in my supplies.
Like this pile of (freshly laundered) pillowcases and tea towels, all surplus to requirements and acquired from several different people who know I can’t say no to gifts of leftover/unwanted fabrics.
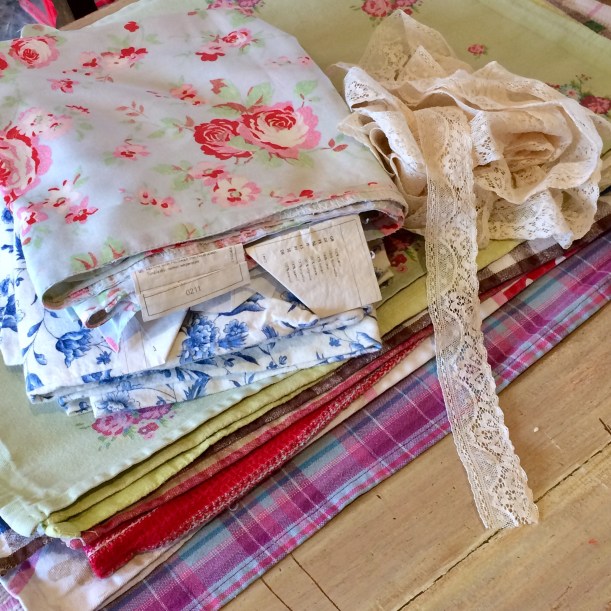
I don’t know what you see when you look at this mix but, add in a bit of vintage lace trim and it screams “Patchwork quilt” to me. No? Well, that’s how my mind works, anyway:)
The very word ‘vintage’ conjures up images of faded florals and linens, so I picked out the remaining old Ikea pillowcases (some of which had been cut up to make hats for the jars of jam) and 3 or 4 neutral tea towels which would work nicely.
My Olfa quilting set made short work of cutting out the 48 6″ squares needed to make a quilt just large enough for a single bed.

I laid them all out on the floor and fiddled around until I was happy with the arrangement.

All seams were stitched with 1/4″ seam allowance and pressed as each strip was completed.

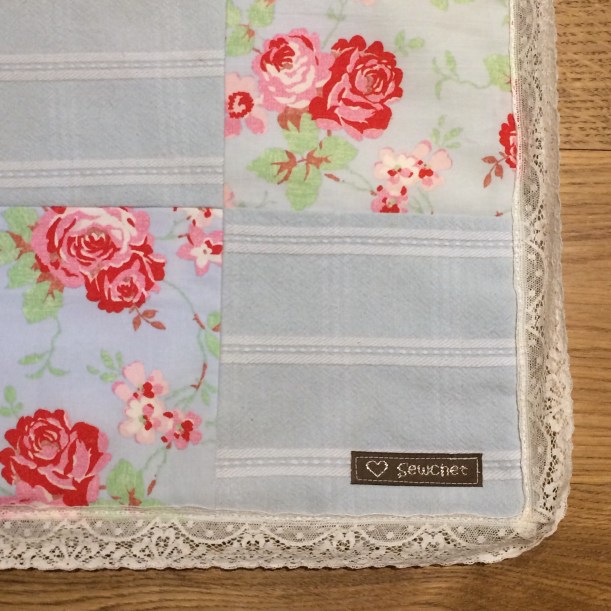
This is the finished quilt top.

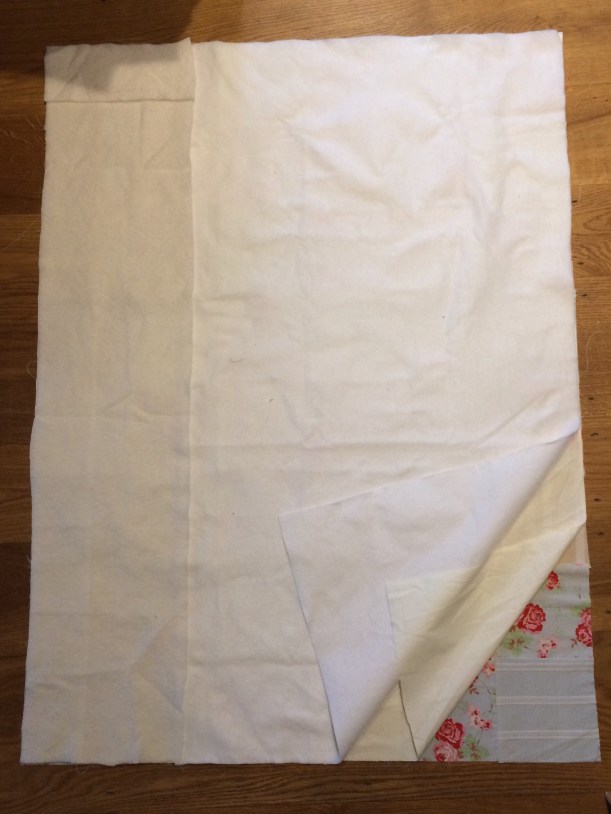
For the backing, I had to piece together bits of wadding and leftover curtain lining to make up the size I needed.
With right sides facing, lay the lining on the quilt top, then the wadding on top again.

I stitched around all four sides, leaving a gap through which to turn the quilt. Then the lace trim was sewn to the edge.
Finally I added a little “Sewchet” label.

I may go back and add a bit of hand quilting if I get time, but it actually doesn’t need it.
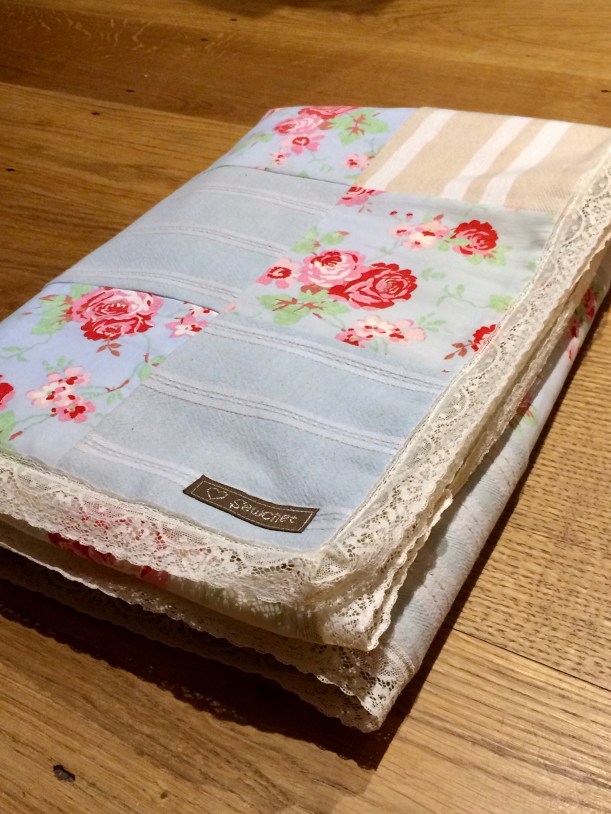
It’s just the right size to be a comforter on a single bed, or would make a cosy lap blanket for the sofa.


It took me six hours yesterday to make, so the fact that it will probably be sold for about a fiver has to be put to the back of my mind – but at least the fabric was free!
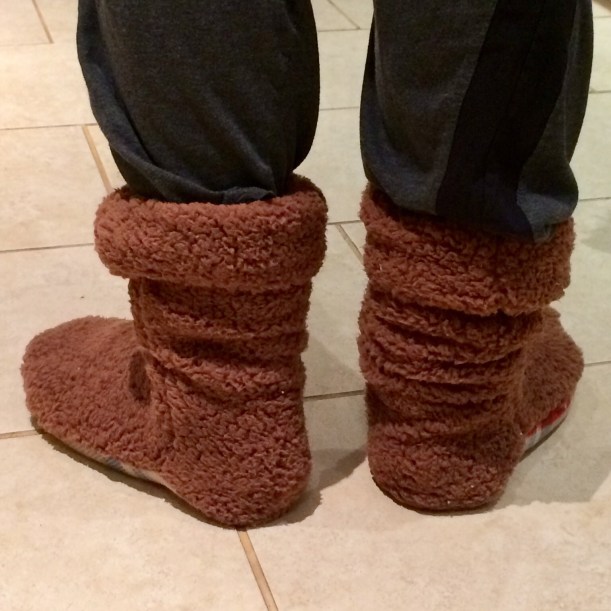
This month’s project for the Minerva Crafts Blogger Network was this pair of so-called ‘Lounge Socks’ for the Mister. To see more, follow the link to they full blog post: – LOUNGE SOCKS
My second Stitching Santa parcel was a sewing one from Ali who blogs at Thimberlina and it came in the guise of a stuffed-to-the-brim red Christmas bag.

On to my second glass of Bailey’s by now, as it had taken me almost an hour to open and photograph the many contents of my first parcel from Bekki at DYC, I started by emptying the bag out onto the coffee table. Just look at that little lot, every single one individually wrapped again!

This metallic top-stitching thread is for my overlocker, but could probably be used on the sewing machine, too. I’ve never used this, so am keen to have a go.

Some embroidery thread with a lovely sheen. This won’t hang around for long as I do a surprising amount of decorative hand stitching.

I just love this little tin, although I think it will become a travel sewing kit as it’s the perfect size to throw in my bag.

I love these! They’re going to be saved for those really special projects that deserve something more than my humble labels.

Next was this bag of treasure……

See what I mean? Those turquoise buttons in the middle caught my eye straight away, as did the sparkly one on the pin. Then I spotted a familiar item from the past in the form of a matchbox.

Isn’t that a blast from the past?

Inside were the tiniest cranberry-coloured beads that will be perfect for lots of different things, the first idea that springs to mind is edging for a crocheted wine glass cover to keep the flies out.

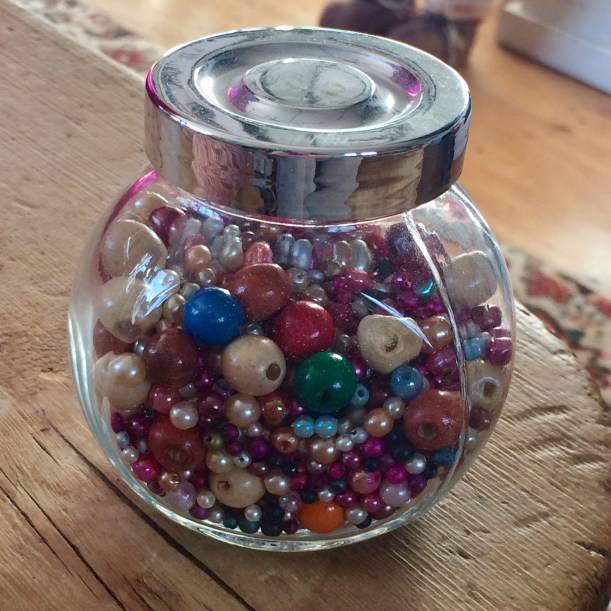
The very next present I opened was this jar filled to the brim with numerous beads in all shapes and sizes. I have a shelf in my sewing room with all my beads and buttons stored in these Ikea jars, so this will sit right next to them.
The Boys have already claimed these, so I’ll have to think of a project to which they can be added.
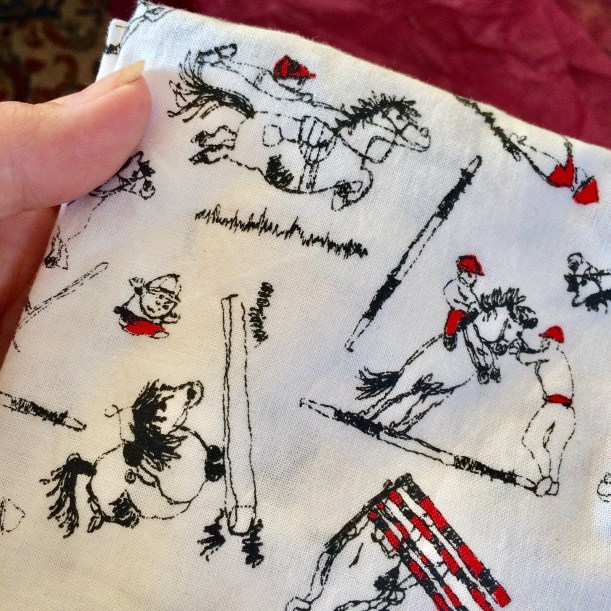
This horsey print fabric was earmarked for The Boys too…..but I’m going to keep it for myself ‘cos it’s cute and will be wasted on them:)
I’m hoping there will be enough of this lovely knit fabric for a Coco, as it’s thick and perfect for Winter. There’s a good couple of metres, so I’m hopeful there will be enough – watch this space.

Time for a little hydration in between the Baileys – Ali sent me some sparkling spring water from her home county!

I’ll be on Ravelry looking for inspiration for these three little Merino beauties!

Ali made me some beautiful coasters from this very same speech-bubble fabric a couple of years ago, so I was thrilled to unwrap a hexi caddy in matching fabric. Handmade by Ali, of course, and much admired by me when I’d seen several other versions on her blog earlier in the year. This will live on the table in my sewing room, keeping all my essentials close to hand. And if I feel stressed I’ll just read out loud some of those quotes – that’s sure to cheer me up!

Several bundles of homemade bias tape is such a timesaver and will be put to good use. I remember loving the blue and white fabric when I saw it made into PJs on Ali’s blog.

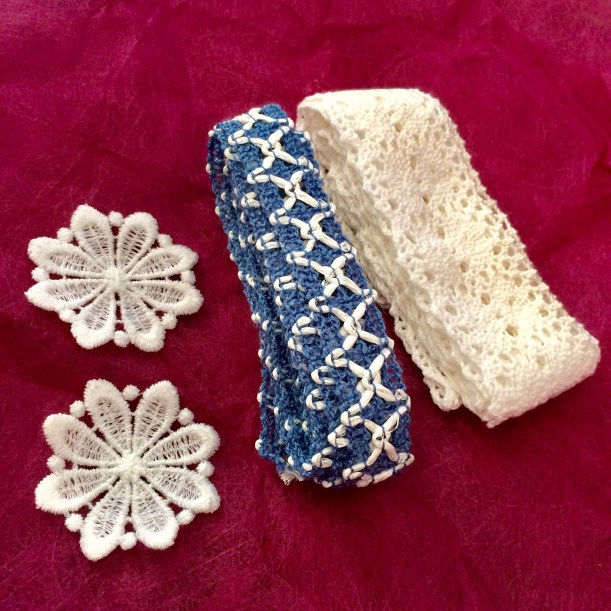
Lacy trims because one can never have too many.
Two chunky zips will come in handy as I’ve never got one when I need it:/

Such a pretty doily and so intricate that I don’t think Ali made this one (please correct me if I’ve just insulted you, Ali!). I made my mother two little beaded covers that keep insects out of wine glasses for Christmas, so I totally appreciate the work that goes into these tiny stitches.

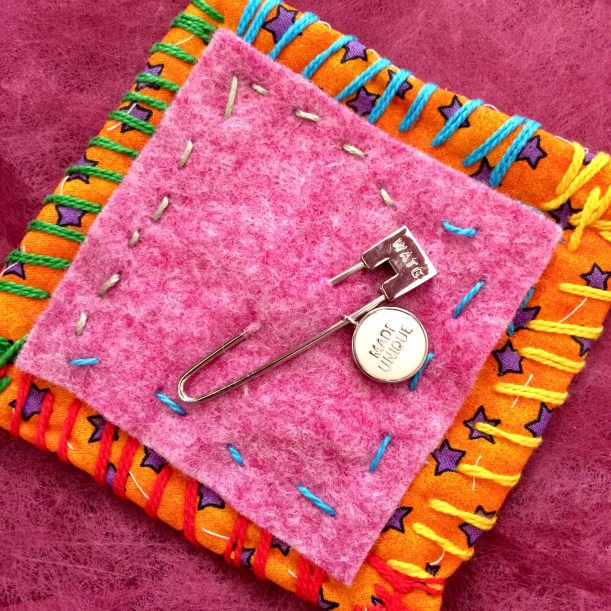
The next gift I opened made my heart skip a beat. I recall being totally inspired by the Raggedy Annie workshop that Ali attended, and here is one of the actual squares she made at said workshop! I recognise the sheep on the other side, but this side has a gorgeous pin from Wool And The Gang on it. I’d forgotten all about the workshop but, now I’ve had another read of the blog post, it will be a technique I’m trying in the New Year. You MUST head over to read Ali’s post to see what it’s all about!
Yay, my very own set of pattern weights and a bag to keep them in, too! I’ve made plenty for other people but somehow have never got around to making any for myself and end up using the weights from the kitchen scales most of the time.

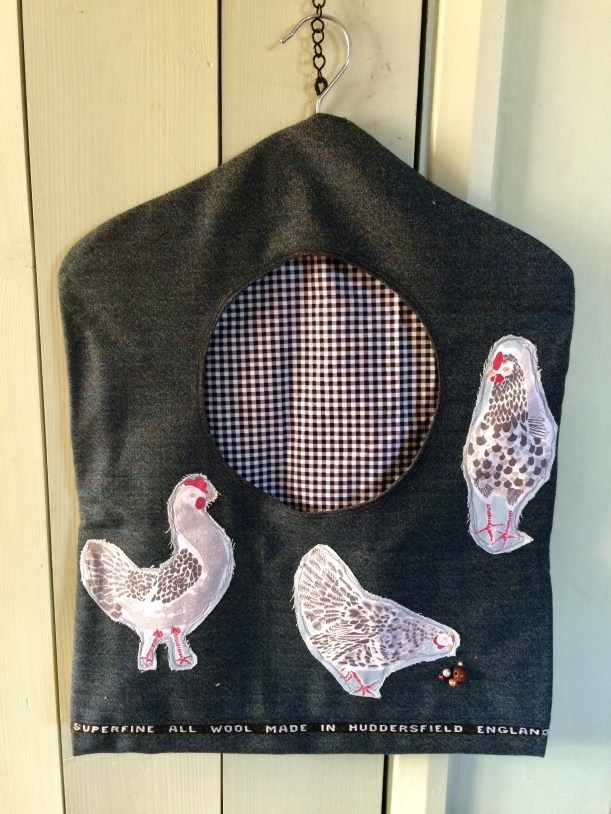
As I unwrapped my final gift I had my fingers and toes crossed that it might be one of Ali’s famous peg bags – and I wasn’t disapponted! She put a sneak peek on her blog or IG and you could just make out the front opening so I was a bit excited, especially as she personalised it with hens for me. I can tell you now that it won’t be a peg bag though, it’s far too good to be shut in the broom cupboard all the time. It’s going to be used in my sewing room to keep those tiny (1″) scraps of fabric that I can’t bear to throw out. The plan is to make ‘new’ fabric from the scraps and re-purpose them into a scrappy quilt eventually.
Last but not least was the card that Ali had included which threw in the casual remark that I was right at the top of her list of sewing heroes – not too much pressure for the coming year then!
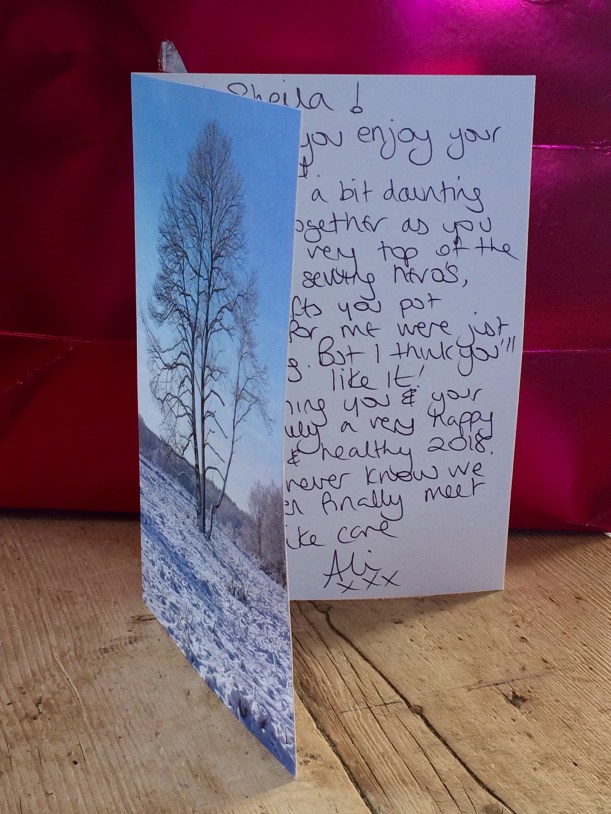
Seriously though, that is the nicest blog related compliment I’ve ever had, so ‘Thank you” Ali, and that goes for all of you wonderful, supportive Bloggers and IGers out there – what a fabulous community we are privileged to be a part of. Happy New Year to you all!!
Sheila xxx
Having been invited to a friend’s birthday party at the beginning of December, I found myself in the unusual position of knowing exactly what to make her as a gift.

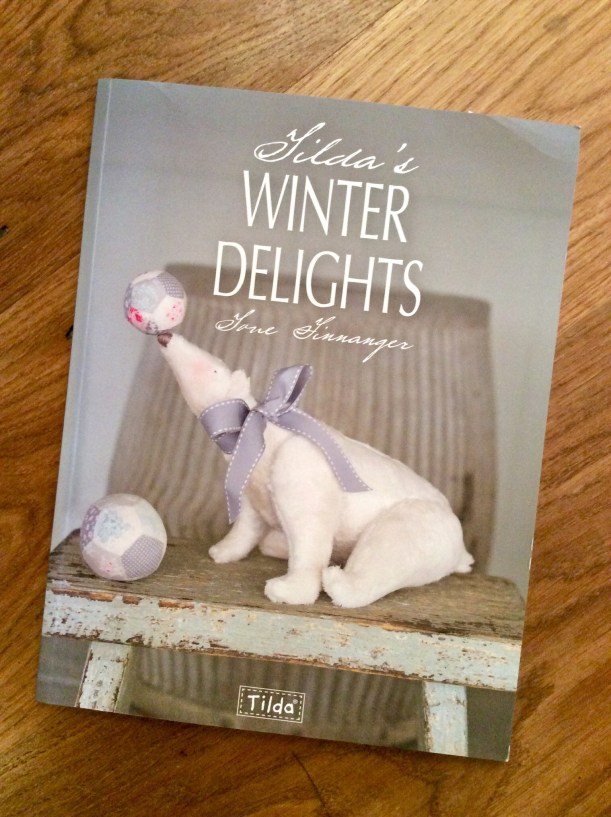
She had previously shown me a book purchase in which there was a typical Tilda doll, and mentioned that she loved them in all their whimsical weirdness. As I happen to own several of Tone Finnanger’s publications, it was an easy decision to actually go ahead and make one for the first time.
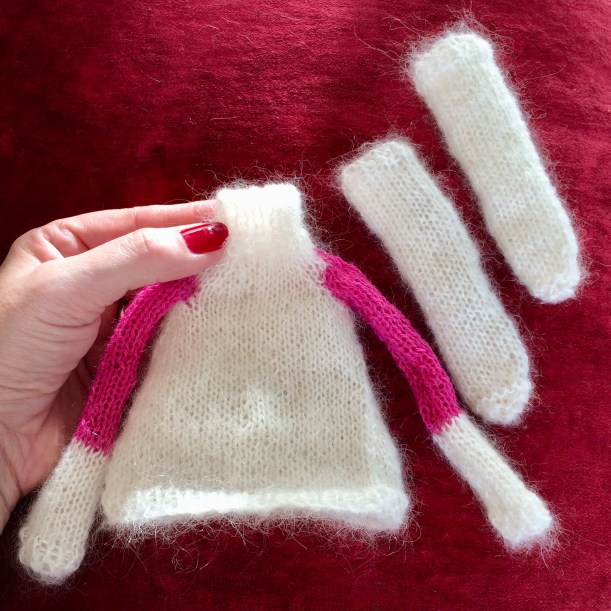
I had some wool left over from knitting the Westie, but had to add in some pink to make two-tone sleeves as there wasn’t quite enough of the cream. Although just a small project, the jumper and stockings took the best part of a day to knit – but aren’t they cute?
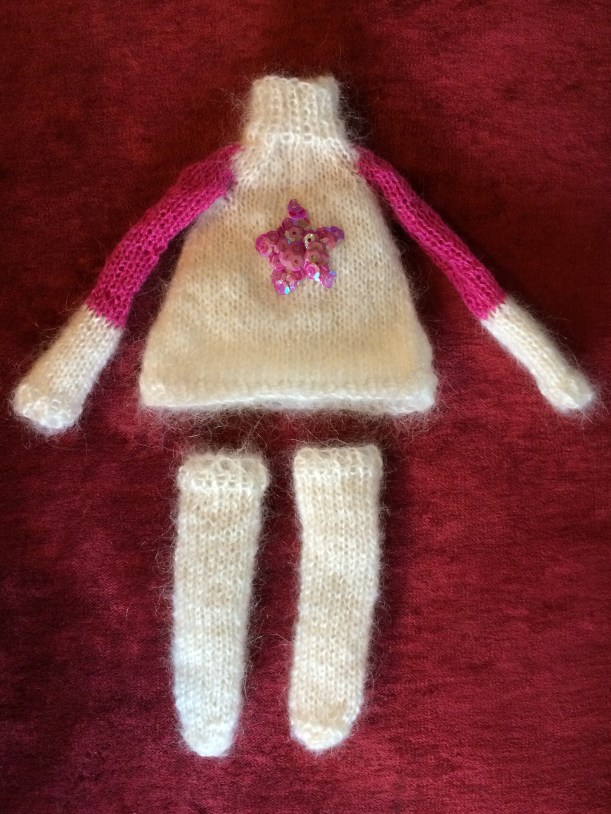
Cutting a star shape out of some firm interfacing, sequins were individually sewn on until a sequin star was achieved.

The use of pink sequins ties in with the pink sleeves.
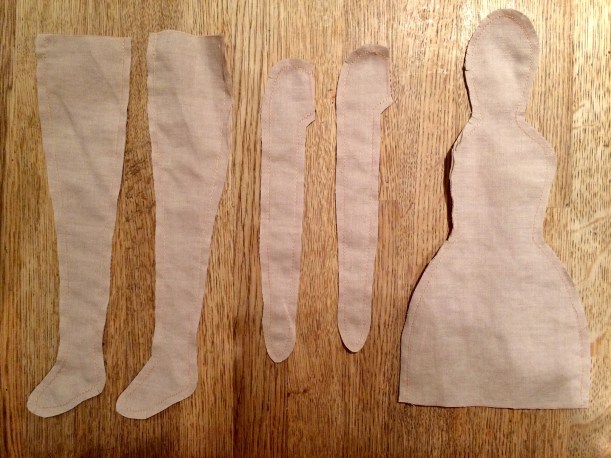
Now, on to the doll itself.
The instructions direct you to draw around the pattern pieces and sew BEFORE cutting them out. This is the best method when dealing with narrow pieces of fabric.

This is what you end up with and then comes the fiddly bit – turning them the right way out!!
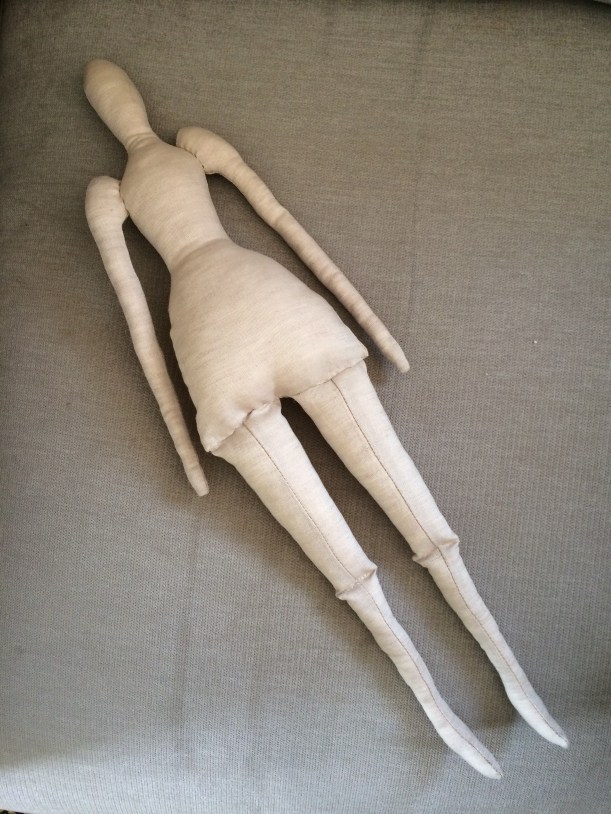
It took at least an entire hour to turn, stuff and assemble the doll, probably nearer two – then you end up with the weirdest proportioned doll you have ever seen!
Following the instructions to the letter, the hair was added.


I ran out of cream yarn so, instead of winding tiny balls for the side buns, I wound what was remaining around two miniature pom poms for the same effect.

Two dots for eyes were added along with a smudge of blusher, and she’s finished.


The trousers were a simple and quick finishing touch.

I added a thread chain at the base of her neck so she could be hung from a hook as well.

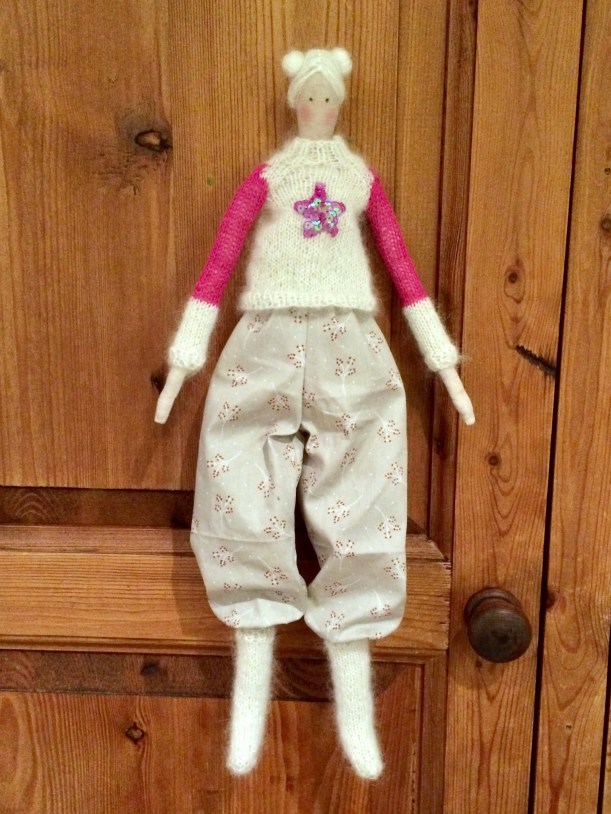
Here she is sat on my table just before being wrapped and gifted an hour later. I know, I know, yet another by-the-skin-of-my-teeth project!

My husband thinks it’s ugly and odd, and I kind of see where he’s coming from but, luckily, my friend loves it and that’s all that matters.
Will I make another one? Well, it’s time-consuming and extremely fiddly in parts, but Tilda’s creations are strangely attractive partly because they’re so unusual and Scandinavian in character, so I think I probably will. The fact that I have four of her books on my shelf is rather telling……
Early on in the Stitching Santa, I had already decided that I was going to make a project bag for my ‘Yarny’ recipient as I knew I had lots of odd balls of yarn lying about. In effect, this was to be a ‘free’ handmade extra to add to the parcel as my £10 budget had been spent entirely on yarn.
Rooting through my leftovers to see what colours went well together, this is what I ended up with.

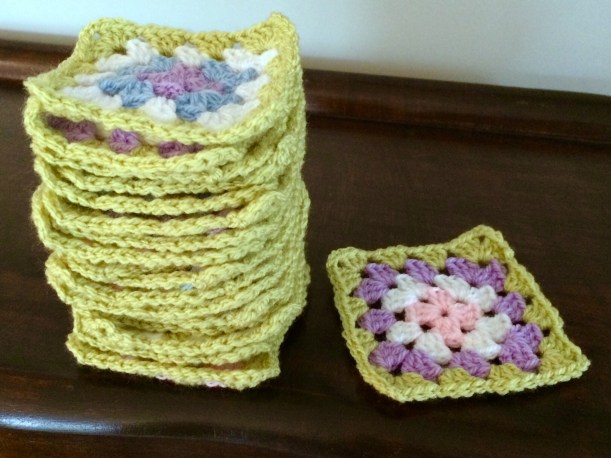
Quite nice and pastel-y, I thought, and the limited palette should be enough to make granny squares in a variety of colour combinations.
So, colours decided, I started on the squares and soon had a growing pile.
I used single crochet on the front to join the squares together, adding a bit of texture for interest.

I ended up with a rectangle of squares 10 wide by 3 high, and a base panel of 4 squares.

If you fancy making your own, you can use the photo below as a colour guide.

Obviously, the bag needed to be lined to prevent any knitting needles or crochet hooks slipping through. This was simply a process of cutting around the crocheted sections and adding a seam allowance.

Next, I crocheted the short edges of the bag together to form a tube.

Then the bottom panel was single-crocheted in place.
The lining was sewn by machine in the same way.
Two handles were crocheted as below with a starting chain of 75.

The handles were sewn in place by hand, before sewing in the lining.

The lining was just oversewn around the top edge only.

Here’s the finished bag: –


I added one of my labels, of course:)

It’s a good size for a jumper or something similar, so should prove quite useful to my secret recipient – let’s hope she agrees!
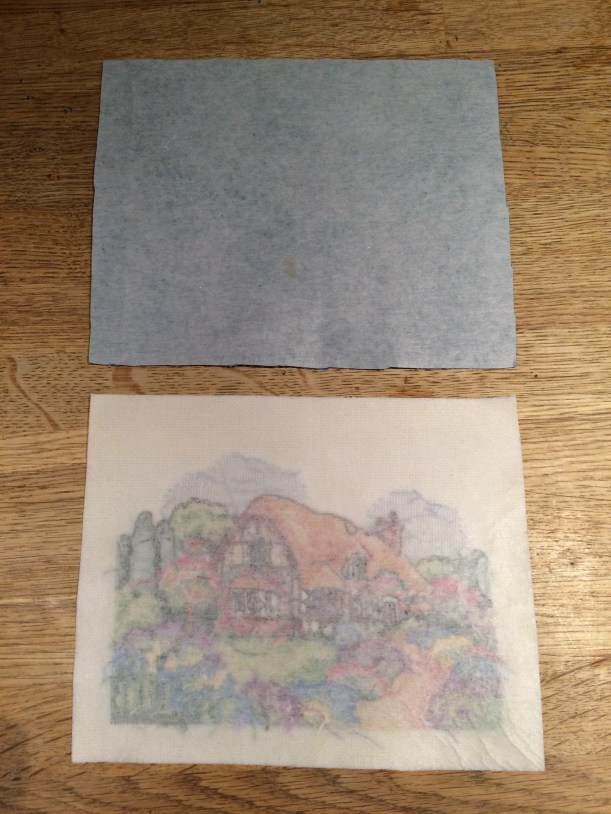
A couple of weeks ago I rescued this beautiful cross stitch from our local charity shop. It was mounted and framed but needed reinventing into something more usable in today’s modern life and was far too wonderful to leave there.

Only measuring a modest 5″ x 7″, I ummed and aahed about what to do with it for a while, having some brilliant suggestions on Instagram.
Ultimately, this is for one of my Stitching Santa recipients (I’m doing both sewing and yarny versions) so I wanted to make it a useful object. This lady is multi-talented across many craft disciplines, as are so many of my blogging pals, and she dabbles in cross stitch herself so I thought this would be perfect for her.
I decided to make a zipped pouch, about the size of a cosmetic bag, which could have a variety of different uses. Maybe for a portable cross stitch project, a small crochet or knitting project, or maybe as an actual cosmetic bag – it is rather swanky, after all!
So here’s a quick run-through of what I did, which might be informative if you have a similar piece of needlework that needs reinventing.
It had been spray-mounted to card and well laced across the back, so all that had to be undone. I then gave it a little steam press.

After trimming the needlework to a useable size, I used it as a template to cut two lining pieces and a back.

Iron-on interfacing was attached to the reverse of the front and back sections to stabilise the bag.
I used the covered tab method for the zip to give as neat a finish as possible (there are plenty of tutorials online on how to do this).

The zipper tabs should be about 1/4″ shorter than the width of the bag to ensure that they don’t get caught in the seam allowance when the bag is stitched together.

After inserting the zip, I topstitched close to the seam through the lining as well. This means that the fabric won’t get stuck in the zip when opening and closing.

OPEN the zip.
With lining-to-lining and front-to-back (right sides together) stitch all the way around, leaving a gap in the lining through which to turn.
Be sure not to catch the tabs in the seam as you sew.

Trim the tabs to reduce bulk.

Cut across all the corners before turning the right way out.
Close the gap in the lining either by hand or machine.

I added a coordinating leather tassel from my supplies.

The sequinned fabric is a small piece cut from a length of fabric that will become a dress later in the week. It adds a touch of glamour.
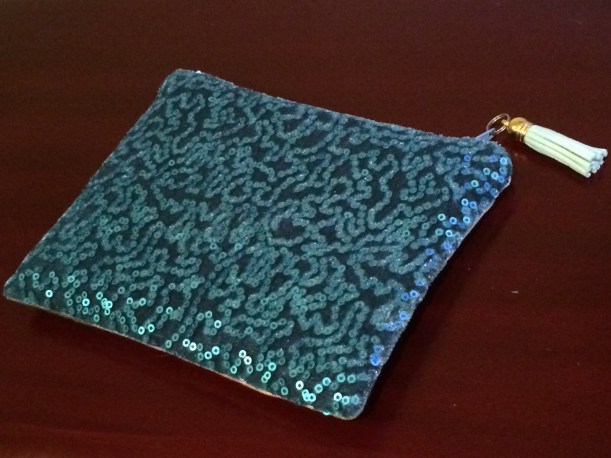
Some matching blue lining is a nice vibrant surprise when you look inside.
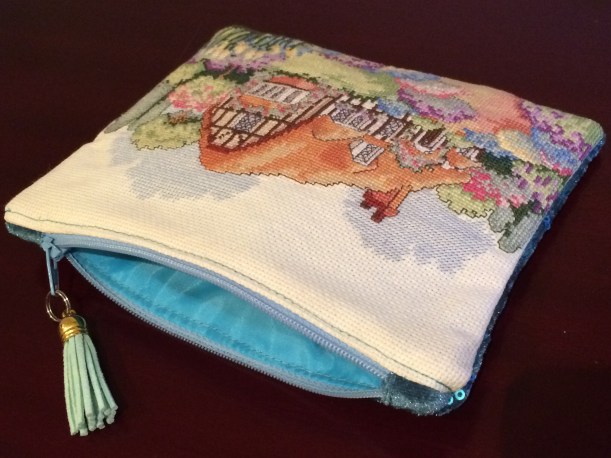
I hope she likes it!
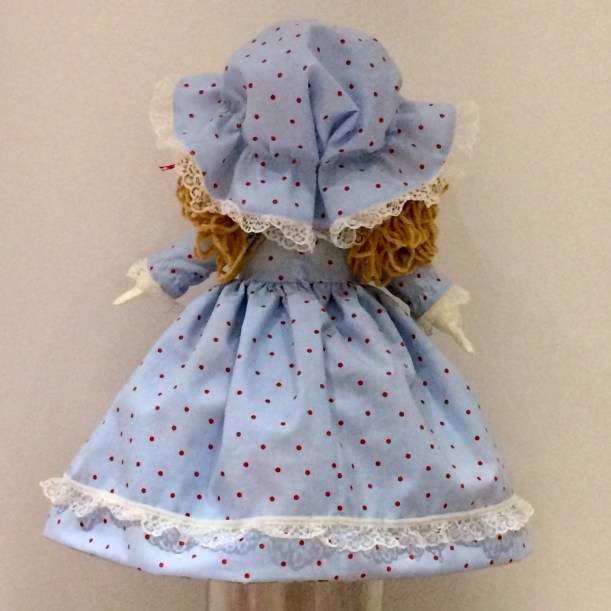
This has been gifted now, so I can share with you what I made for our granddaughter’s second birthday.
Do you remember having a Topsy-Turvy doll as a little girl? I do, and I also remember absolutely loving her, so I knew I was going to have to make one for our granddaughter.
I found a free tutorial at Keepsake Crafts and pretty much followed it to the letter. This is her version, a daytime/bedtime doll: –
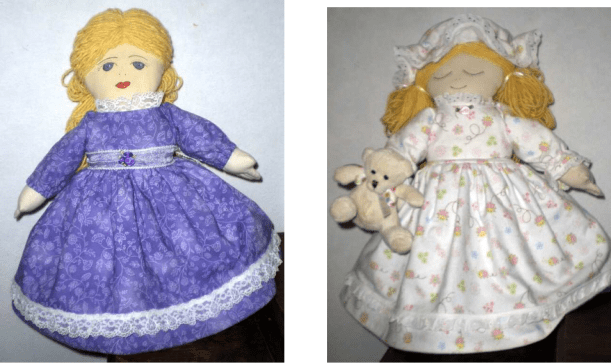
Although you can be more creative and do many other things like a Red Riding Hood/Wolf doll, or a Beauty/Beast doll, I decided to stick to the traditional daytime/bedtime doll.
You start off by embroidering the faces and I simply coloured in the eyes and mouth with permanent marker pen.
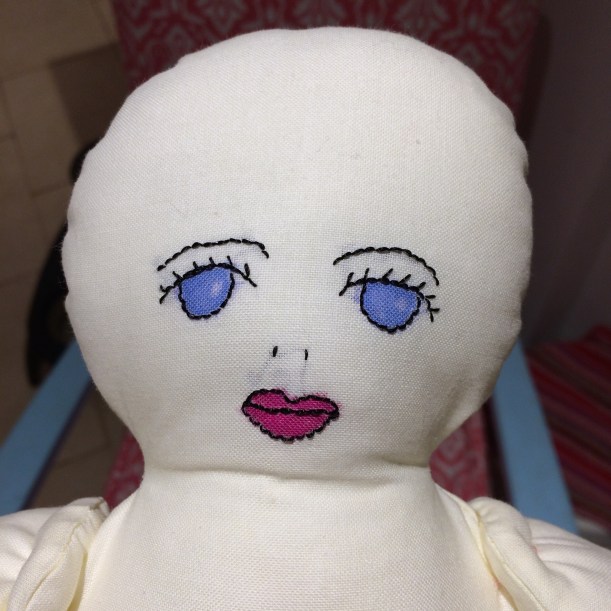
I wish I’d backed the faces with interfacing now, as the black embroidery thread shows through in places, but hey-ho.

When the body is assembled and stuffed, at this stage it looks a bit like Frankenstein’s experiment!

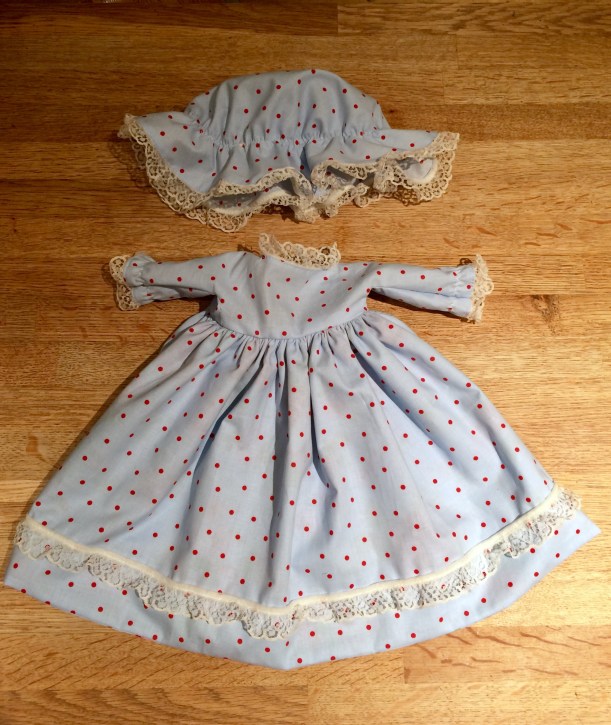
I used coordinating fabrics for each dress, originally from Ikea, I think; floral for the day dress and spotted for the nightgown and cap.

I had plenty of lace in my stash to trim both dresses.
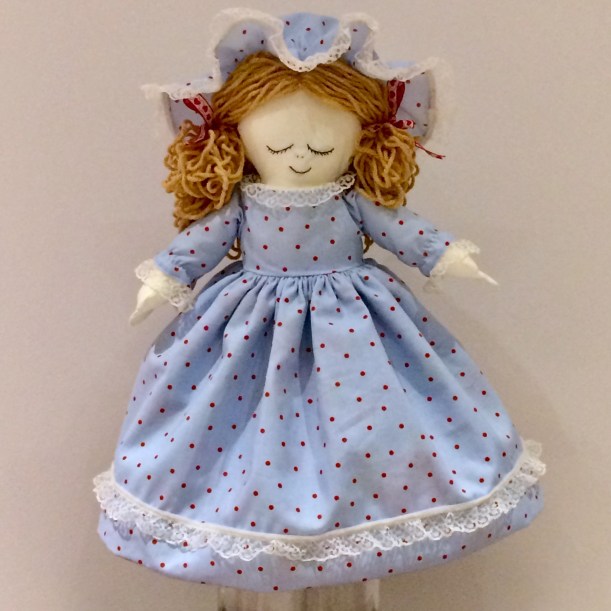
The hair was easy enough – just a ball of yarn wrapped around a book and sewn through all layers in the centre to keep it together.

The wig is then stitched on to the head, sewing over the previous line of stitching. Easy.

The daytime doll had her hair drawn back into a neat ponytail and tied with a bright red ribbon to go with her dress.

The bedtime doll had her hair in bunches held with some red heart ribbon.

A nice touch is to create fingers with three lines of stitching.

Here she is, all finished, in her daytime mode.

Doesn’t the hair look pretty from the back?

The sleepy side has a matching bonnet to go with her nightgown.


It’s a great tutorial which includes an easy to follow pattern, so why not give it a go for a little girl you know?
So, before I even knew who I would be sending a parcel to for this year’s Stitching Santa, I made this not-so-little sewing kit. Well, what needlewoman couldn’t do with a new sewing kit?
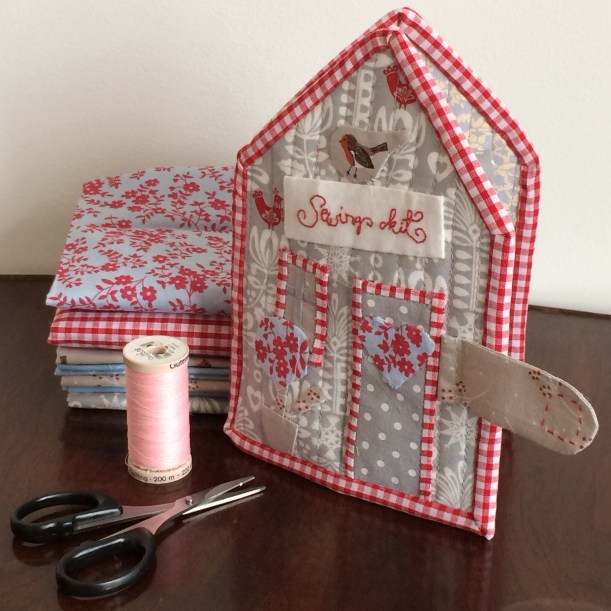
Made entirely with fabric offcuts from my collection, the pattern comes from Tilda’s Toy Box, although you could easily copy mine just from the photos as it is pretty straightforward.

Hopefully, you can recognise the shape of a house with its front door and a pot plant under the window.

A little robin perches on the sign above the door which, instead of the house name, says “Sewing Kit”.

The whole thing is quilted with a layer of wadding to add support.
Inside, there is a heart shaped pin cushion and two little pockets…..

…..a place to store hand sewing needles and embroidery scissors.

I’m adding my new labels to my handmade things now.

Including some “Handmade With Love” labels, buttons, pins and needles (all from my own supplies) will make the sewing kit more complete.
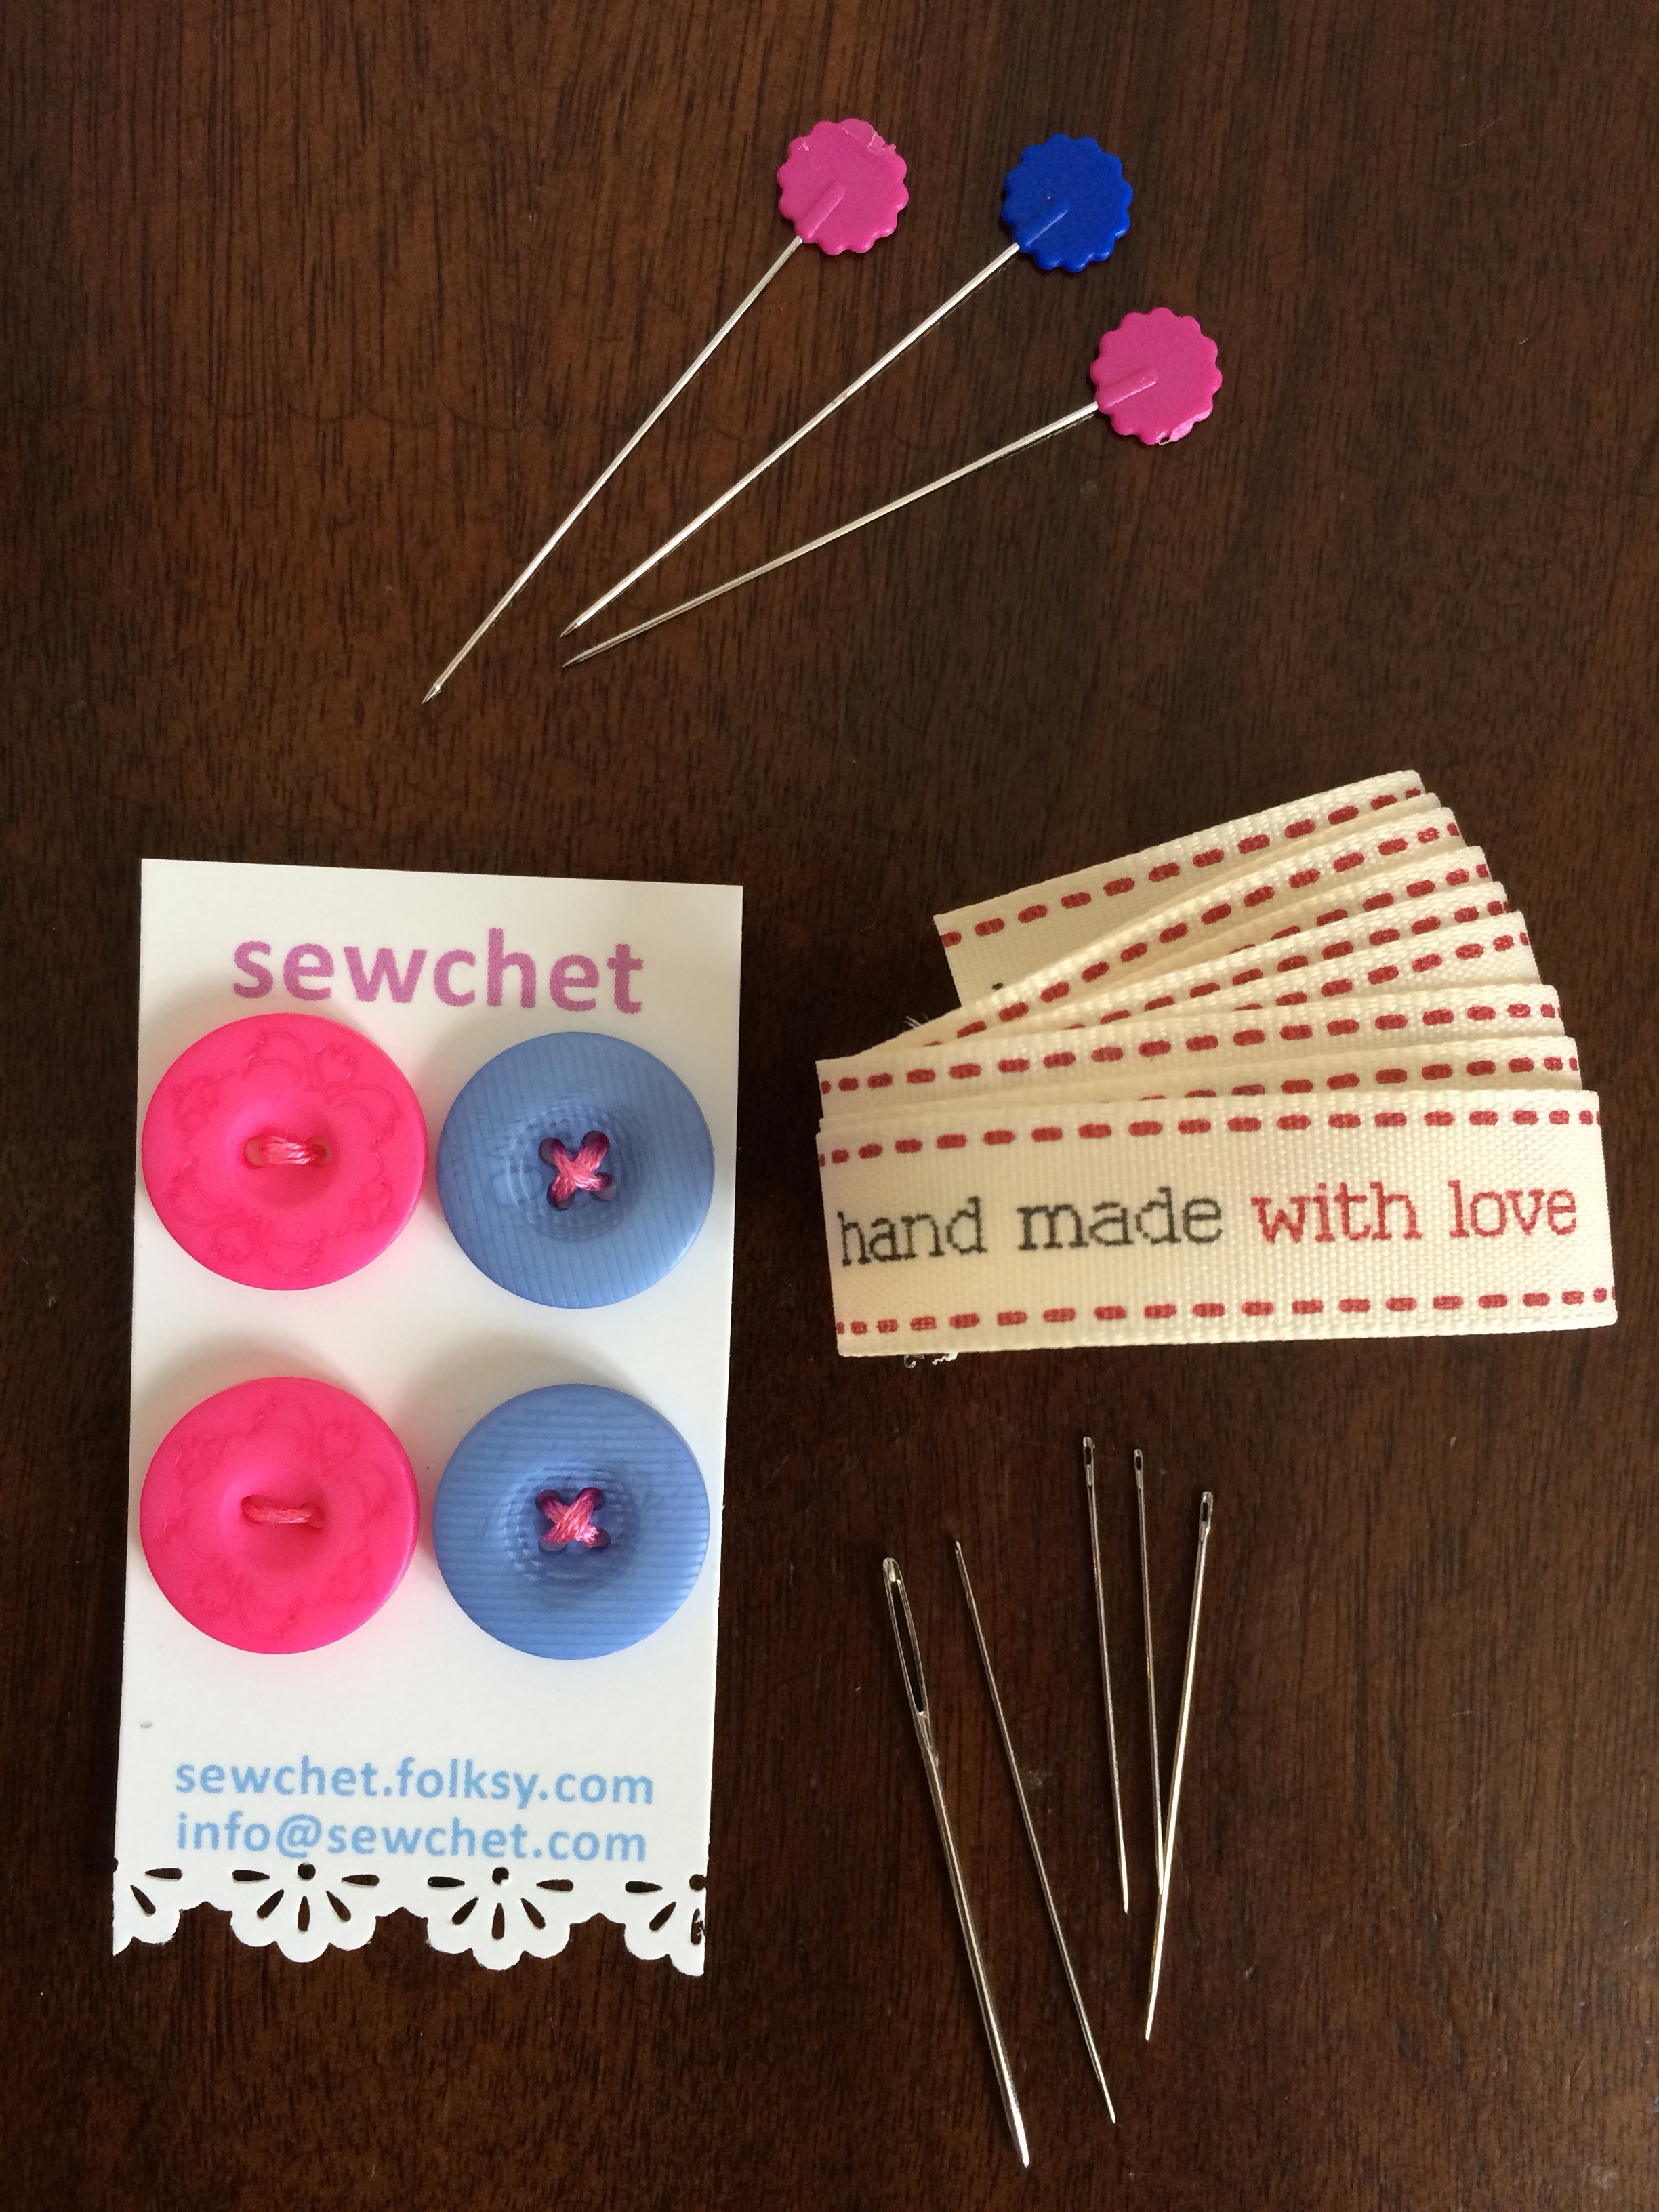
I haven’t included any scissors though, as I think I’m going to spend the whole budget on some fabric – a good pair of embroidery scissors could use it all up!


How are you getting on with your handmade gifts this year?
Sunday Sevens is a weekly blog series showing seven(ish) photos of your week outside the blog. Anyone can join in at any time.
1. Half term started well, with lazy mornings allowing plenty of time for a leisurely cooked breakfast every day.

2. My mother and sister came to visit for a couple of days, one of which was spent doing art and craft type things. We visited Ilminster Arts Centre and enjoyed a couple of hours at the current exhibition, together with tea and cake in the café and some time browsing in the shop.
3. I gave in to temptation and bought some handmade ceramic buttons. I don’t have a plan for them as yet, but they’re sure to be the perfect finishing touch to a future make.

4. On the way back home we made a short detour so we could try this Railway Carriage Café, as recommended by a friend a while back.

5. It was lovely inside, full of original character and a great choice of gluten free options on the menu.

6. Later that evening, my mum and sister both got their sketching pencils and paints out and had fun with a squash.

7. Next day, The Boys had two brothers around to play for the day whilst their mother went to work. No technology allowed (my rules!) so they were all worn out by the end of the day with ‘real’ playing.
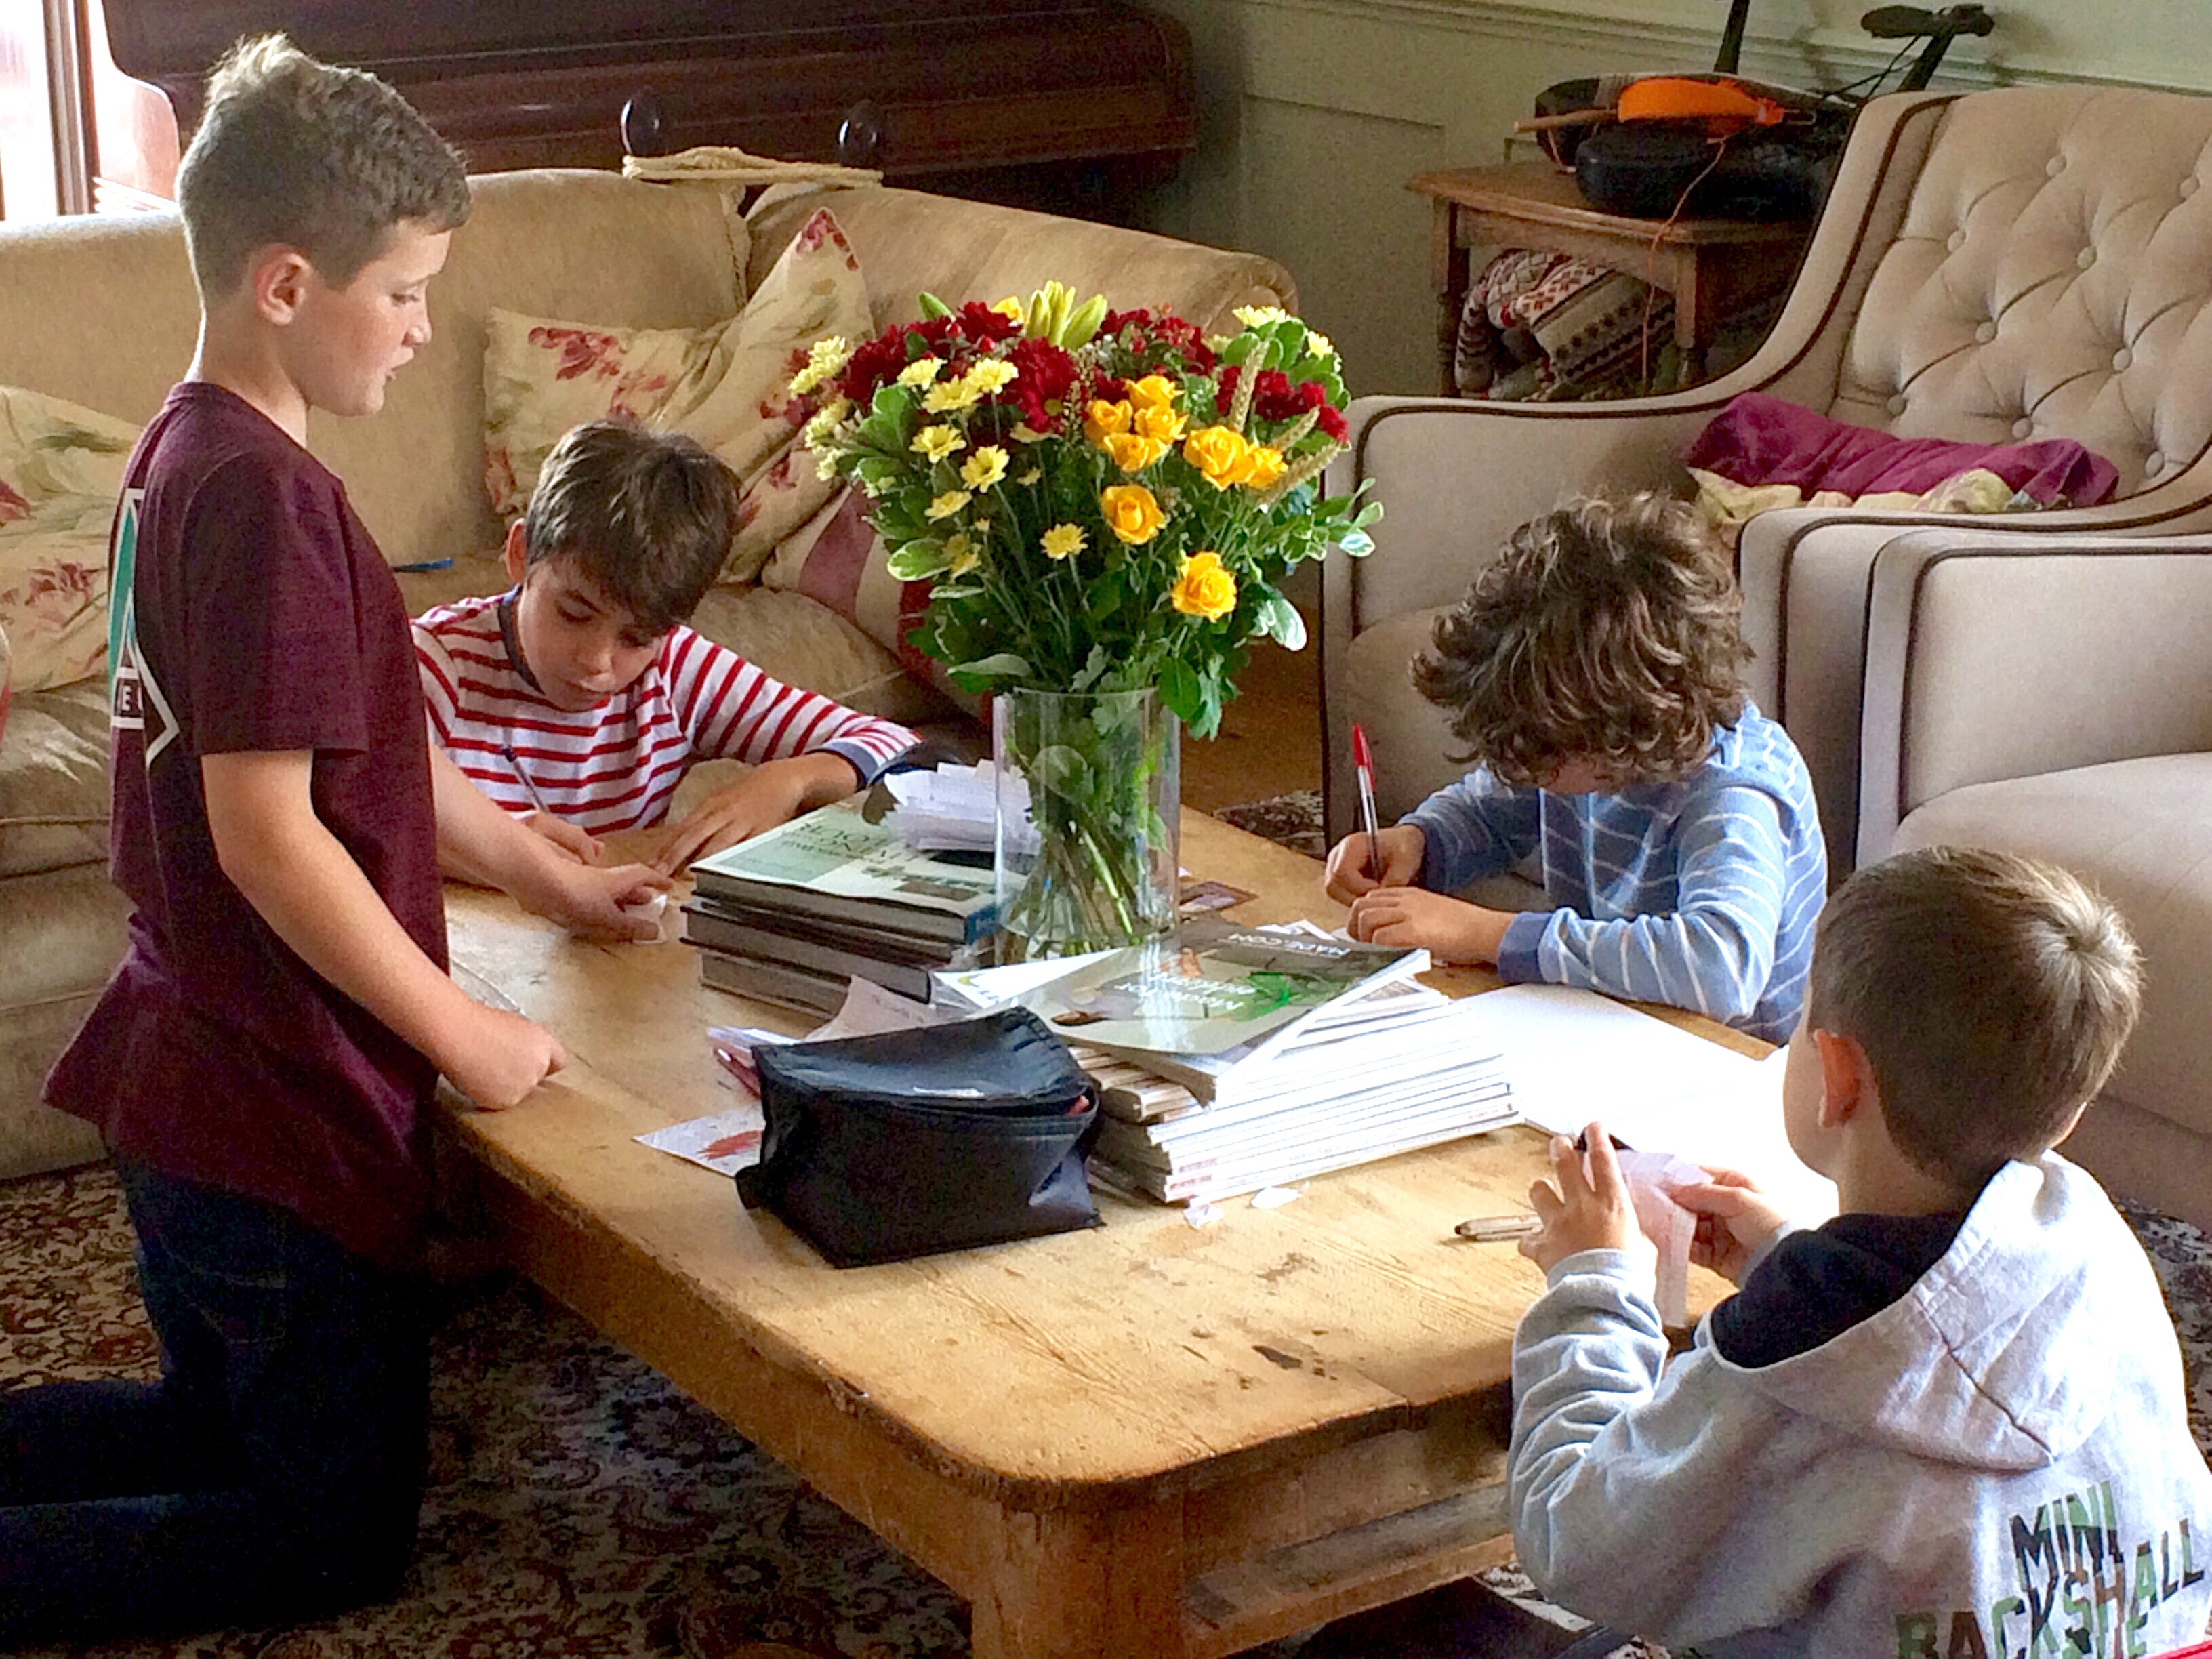
8. To wind down after their friends had gone, I let The Boys watch a film. They loved it and were totally engrossed, as you can see from this photo. The film?

9. Snow White, the original animation from 1937!

10. Christmas has taken over our local garden centre and the singing reindeer were back for a second year.

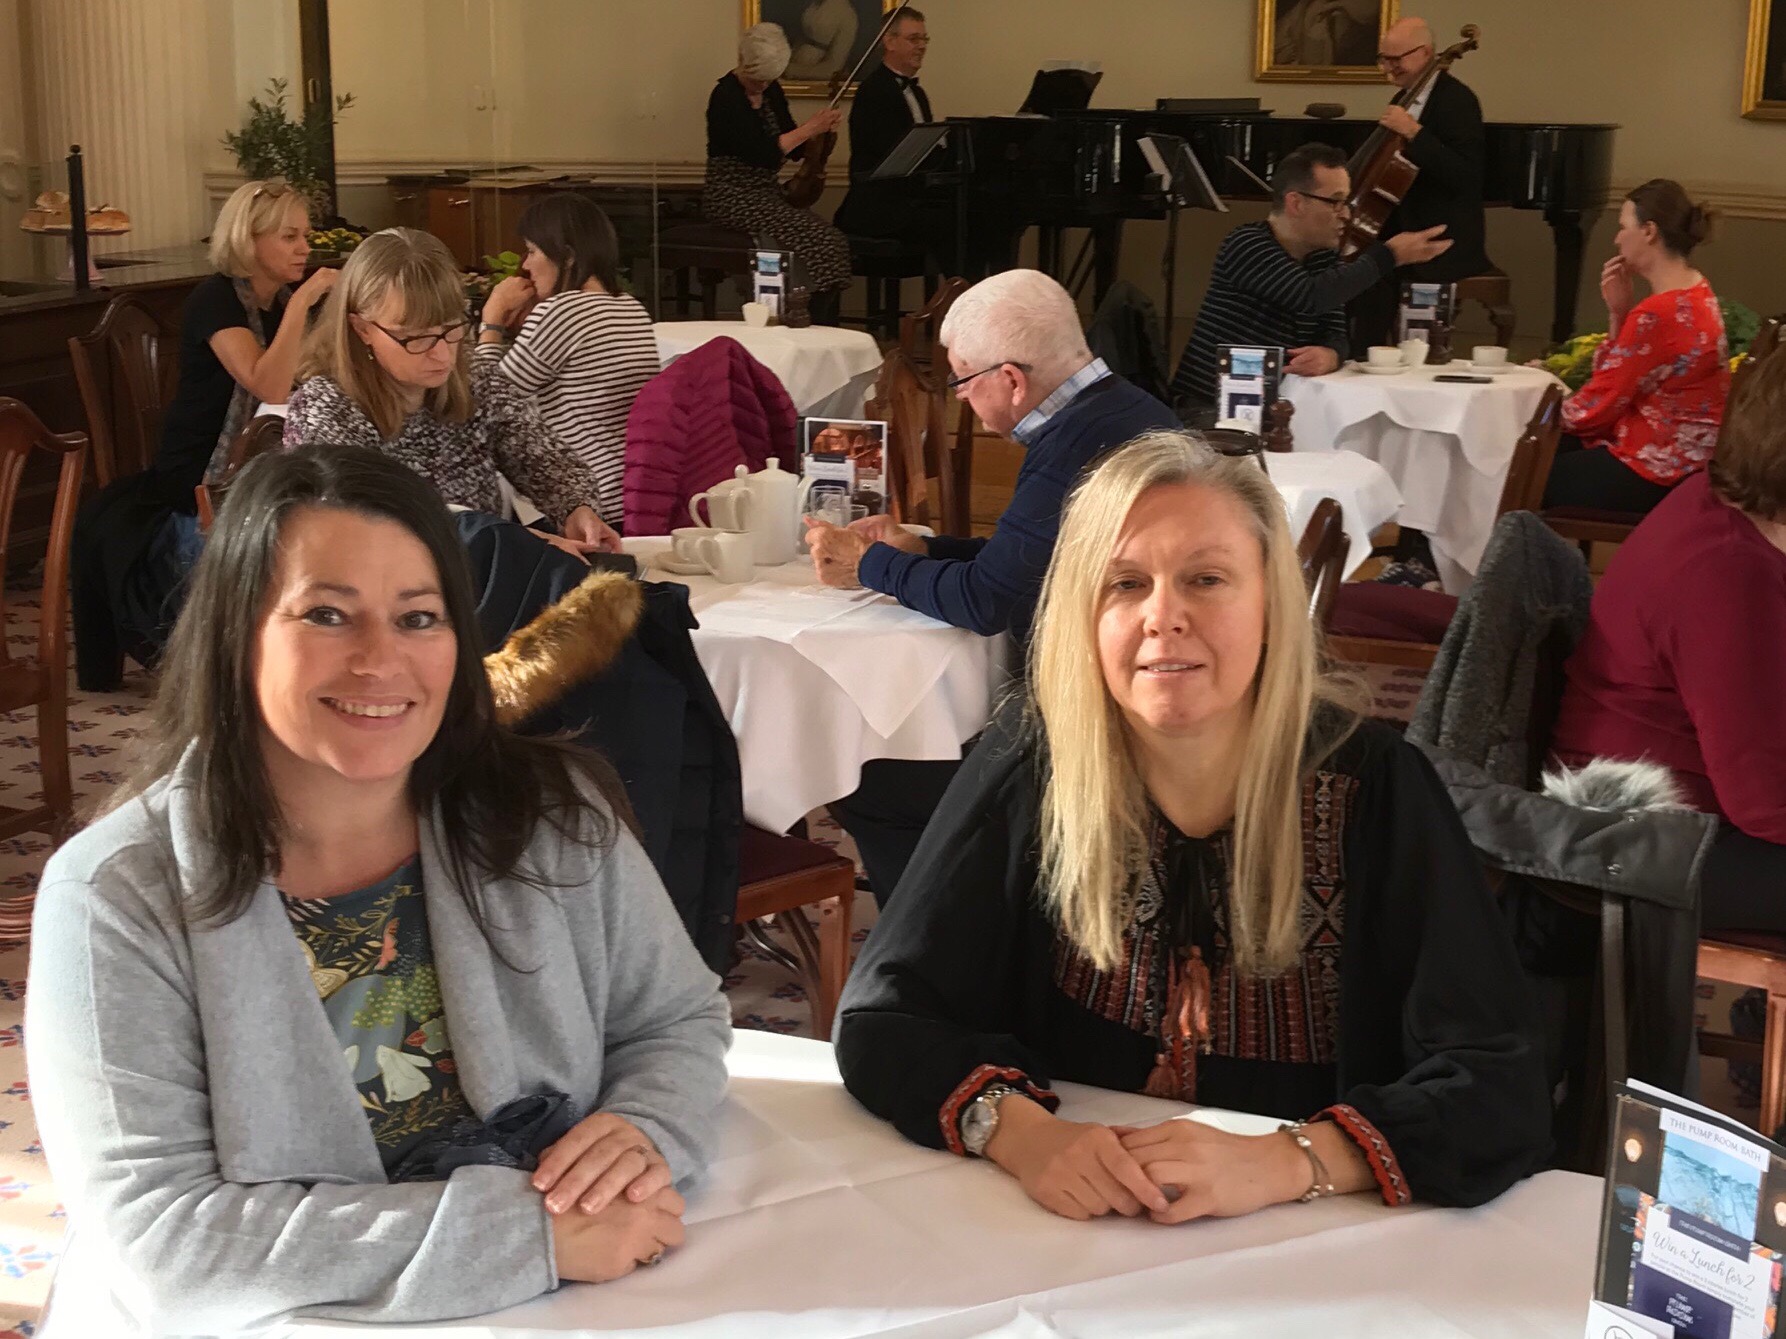
11. A family friend came to stay for the weekend and we went to Bath for the day, starting off with breakfast. You can just see the trio in the background who played some wonderful classical music whilst we ate.
12. A few hours later and we stopped to eat again, this time at Yo! Sushi, The Boy’s favourite treat.

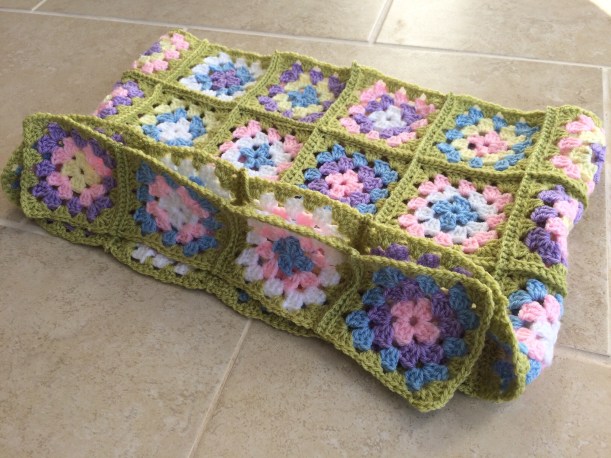
13. Crafty things still happened over the course of the week. Progress is good on my Eastern Jewels blanket.

14. I’ve included my new labels on a couple of things I’ve made for this year’s Stitching Santa parcel.

15. Yes, yet more made from the leftover lilac faux sheepskin – it’s the fabric that just keeps giving! I will reveal all in a future blog post.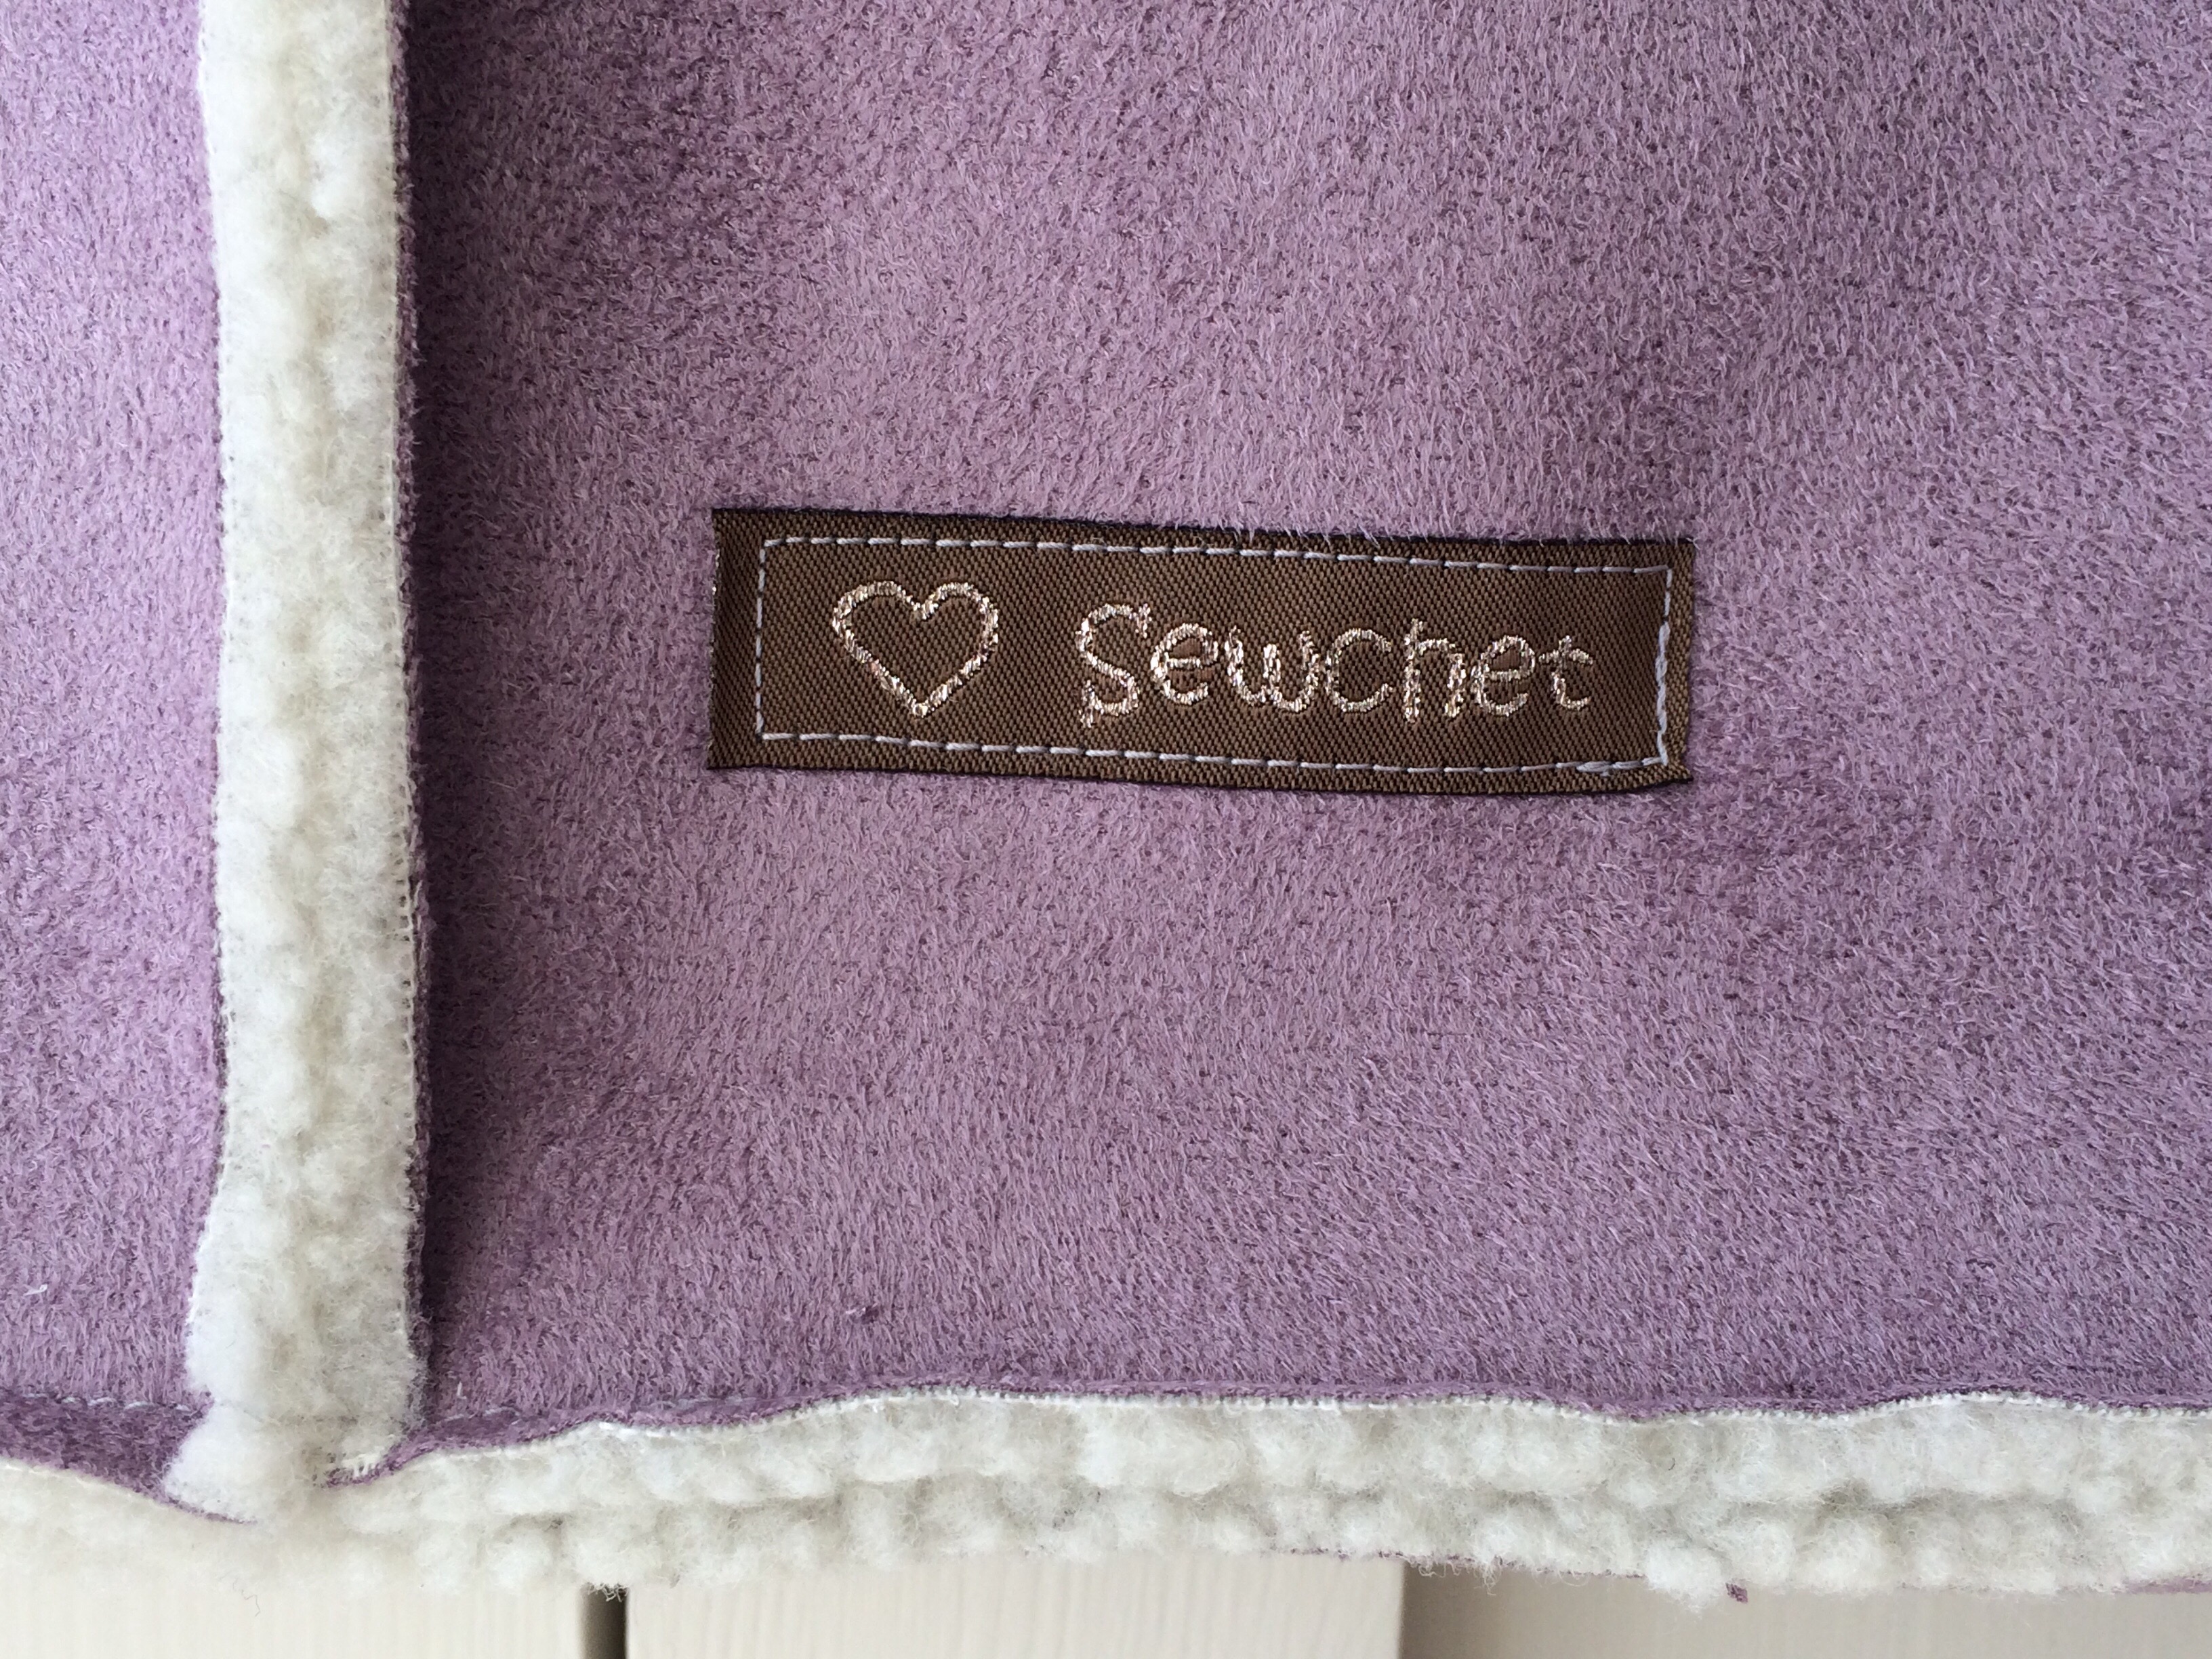
No.2 Son is at home for a second week of half term, but his little brother goes back to school tomorrow, so I’m looking forward to some time together before he goes back to boarding school. I hope your half term is going well, too!
Artist and tutor
a creative life on the spectrum
Everyday craft inspirations
Movin' On Up
Because We're All a Work in Progress
Previously Boys and Chickens, I have created a new blog to share my sewing adventure as 2018 is they year I plan to teach myself to sew! There will also be bits of crochet and cooking too.
Sewing, crochet, crafts, accessories, baking, tutorials,
small steps to a kinder world
Sew What... Sewing, Embroidery and handmade
"She is too fond of books and it has addled her brain." (Louisa May Alcott)
A life of books . . .
Official crafty blog for my Quiet Water Craft Etsy shop
Sewing, crochet, crafts, accessories, baking, tutorials,
my year of trying to be more creative in different ways
Sewing, crochet, crafts, accessories, baking, tutorials,
The latest news on WordPress.com and the WordPress community.
Adventures in dressmaking from an improving sewist!
Knitting, Sewing, Crafting
Sewing, crochet, crafts, accessories, baking, tutorials,
Sewing, crochet, crafts, accessories, baking, tutorials,
Sewing, crochet, crafts, accessories, baking, tutorials,
Sewing up a self-made wardrobe
Sewing, crochet, crafts, accessories, baking, tutorials,
Sewing, crochet, crafts, accessories, baking, tutorials,
My art work and other musings
Fabric, life, and all that
Sewing, crochet, crafts, accessories, baking, tutorials,
Sewing, crochet, crafts, accessories, baking, tutorials,
Making and creating
From Scraps to Quilts
here’s what I’m sewing...
Lesley blogging about her sewing projects
lathaminteriors.co.uk
Sewing, crochet, crafts, accessories, baking, tutorials,
What's happening in North Cheriton
Returning sewist, crafter and runner
My quest to sew a wardrobe of clothes which actually fit me
a blog about making things
the joy of creativity
My challenge: One year - I will not buy clothes - I will upcycle to make what I need - everything from underwear to evening wear! Join me for tips, exclusive BrawHem makes, and inevitably some hilarious disasters...
Go Sew Something
