Sewchet

Sewing, crochet, crafts, accessories, baking, tutorials,


23 Comments

Stitching Santa Part 2

My second Stitching Santa parcel was a sewing one from Ali who blogs at Thimberlina and it came in the guise of a stuffed-to-the-brim red Christmas bag.

On to my second glass of Bailey’s by now, as it had taken me almost an hour to open and photograph the many contents of my first parcel from Bekki at DYC, I started by emptying the bag out onto the coffee table. Just look at that little lot, every single one individually wrapped again!

This metallic top-stitching thread is for my overlocker, but could probably be used on the sewing machine, too. I’ve never used this, so am keen to have a go.

Some embroidery thread with a lovely sheen. This won’t hang around for long as I do a surprising amount of decorative hand stitching.

I just love this little tin, although I think it will become a travel sewing kit as it’s the perfect size to throw in my bag.

I love these! They’re going to be saved for those really special projects that deserve something more than my humble labels.

Next was this bag of treasure……

See what I mean? Those turquoise buttons in the middle caught my eye straight away, as did the sparkly one on the pin. Then I spotted a familiar item from the past in the form of a matchbox.

Isn’t that a blast from the past?

Inside were the tiniest cranberry-coloured beads that will be perfect for lots of different things, the first idea that springs to mind is edging for a crocheted wine glass cover to keep the flies out.

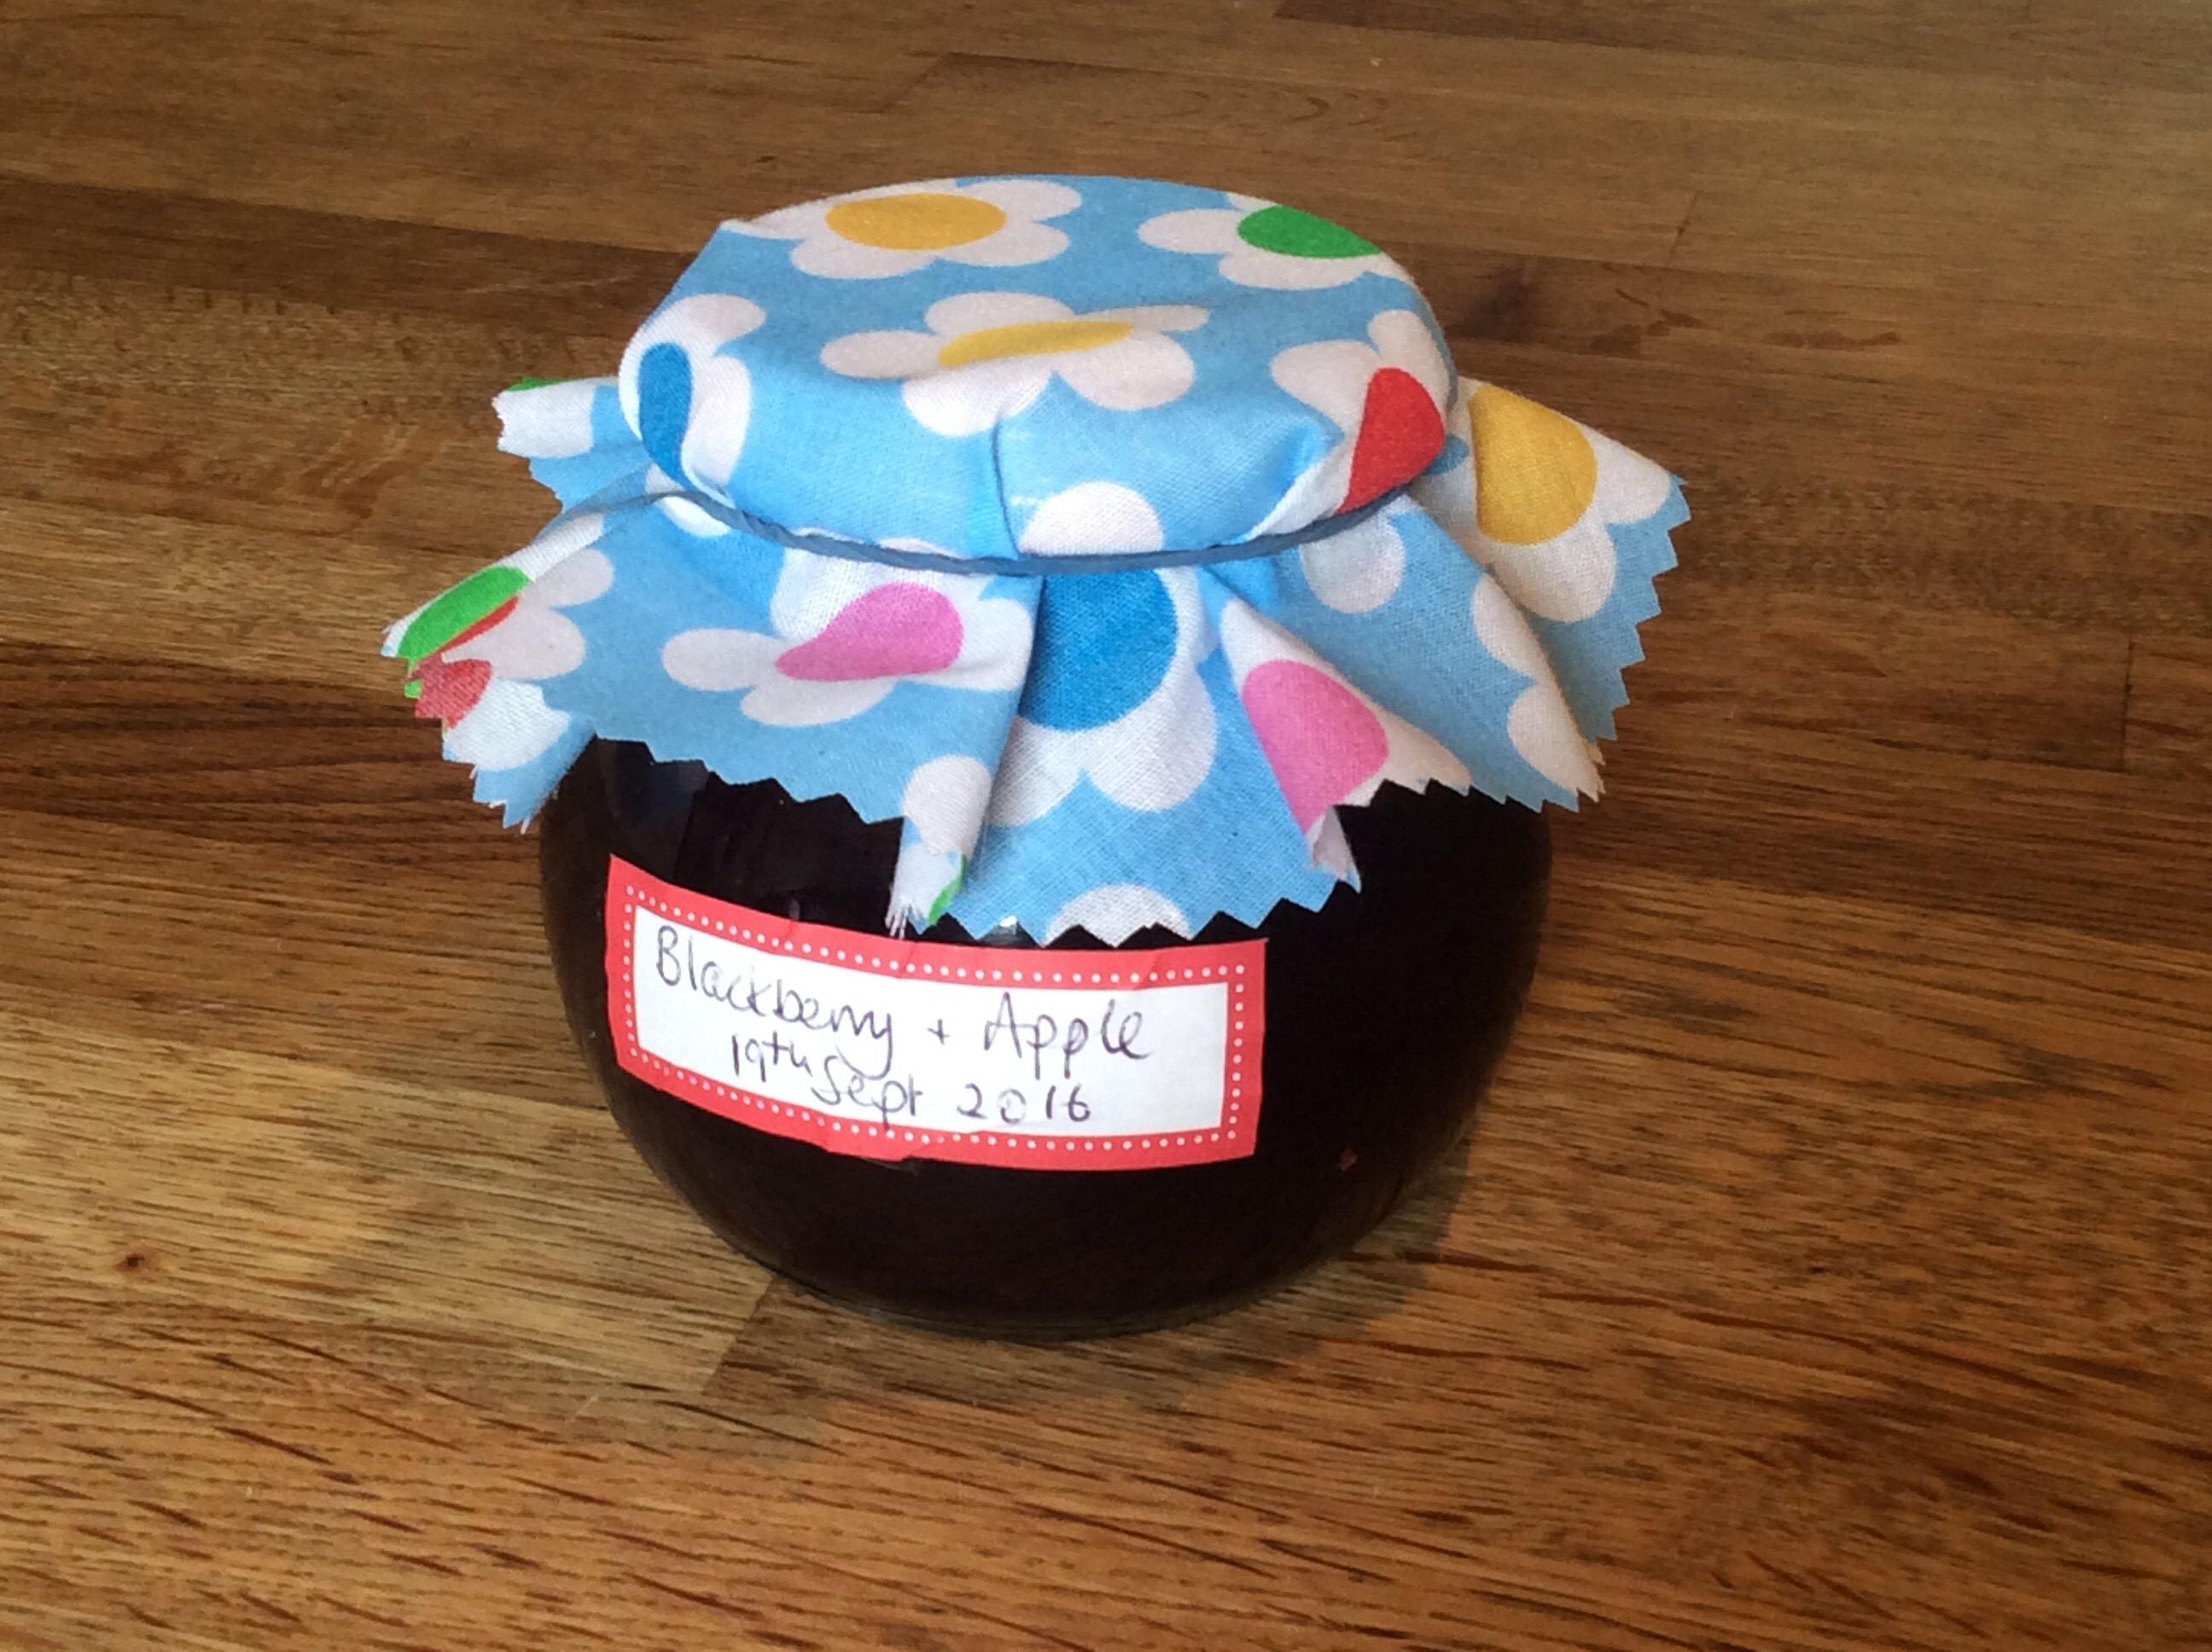
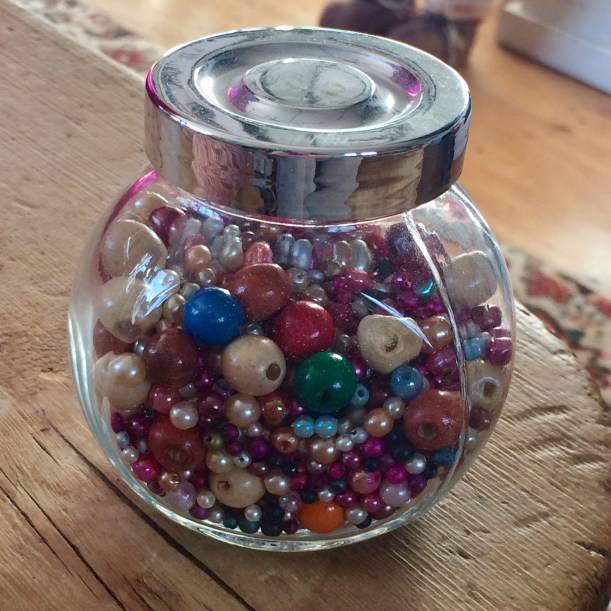
The very next present I opened was this jar filled to the brim with numerous beads in all shapes and sizes. I have a shelf in my sewing room with all my beads and buttons stored in these Ikea jars, so this will sit right next to them.

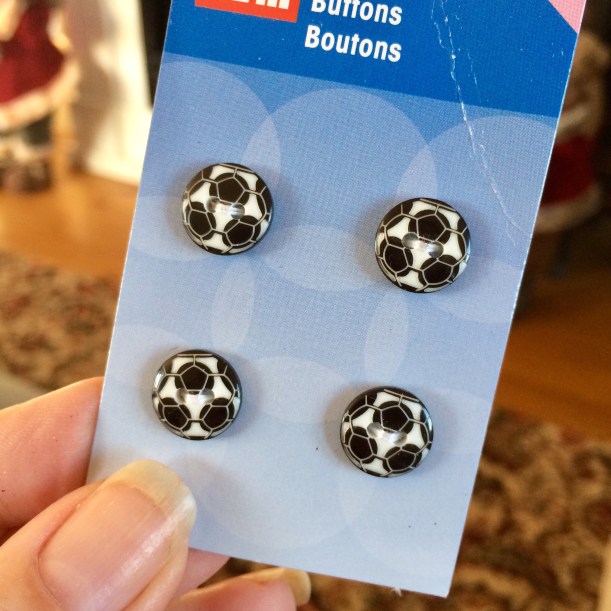
The Boys have already claimed these, so I’ll have to think of a project to which they can be added.

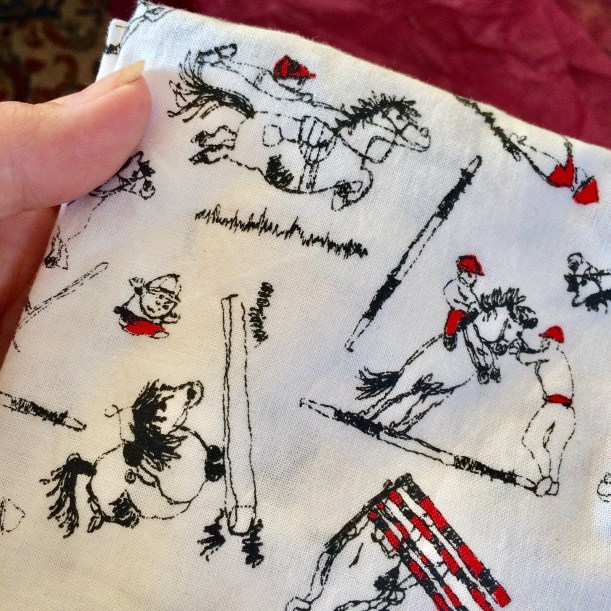
This horsey print fabric was earmarked for The Boys too…..but I’m going to keep it for myself ‘cos it’s cute and will be wasted on them:)

I’m hoping there will be enough of this lovely knit fabric for a Coco, as it’s thick and perfect for Winter. There’s a good couple of metres, so I’m hopeful there will be enough – watch this space.

Time for a little hydration in between the Baileys – Ali sent me some sparkling spring water from her home county!

I’ll be on Ravelry looking for inspiration for these three little Merino beauties!

Ali made me some beautiful coasters from this very same speech-bubble fabric a couple of years ago, so I was thrilled to unwrap a hexi caddy in matching fabric. Handmade by Ali, of course, and much admired by me when I’d seen several other versions on her blog earlier in the year. This will live on the table in my sewing room, keeping all my essentials close to hand. And if I feel stressed I’ll just read out loud some of those quotes – that’s sure to cheer me up!

Several bundles of homemade bias tape is such a timesaver and will be put to good use. I remember loving the blue and white fabric when I saw it made into PJs on Ali’s blog.

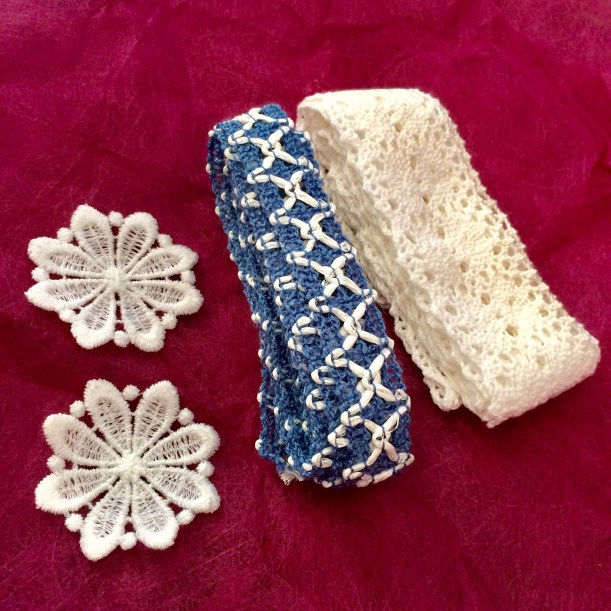
Lacy trims because one can never have too many.

Two chunky zips will come in handy as I’ve never got one when I need it:/

Such a pretty doily and so intricate that I don’t think Ali made this one (please correct me if I’ve just insulted you, Ali!). I made my mother two little beaded covers that keep insects out of wine glasses for Christmas, so I totally appreciate the work that goes into these tiny stitches.

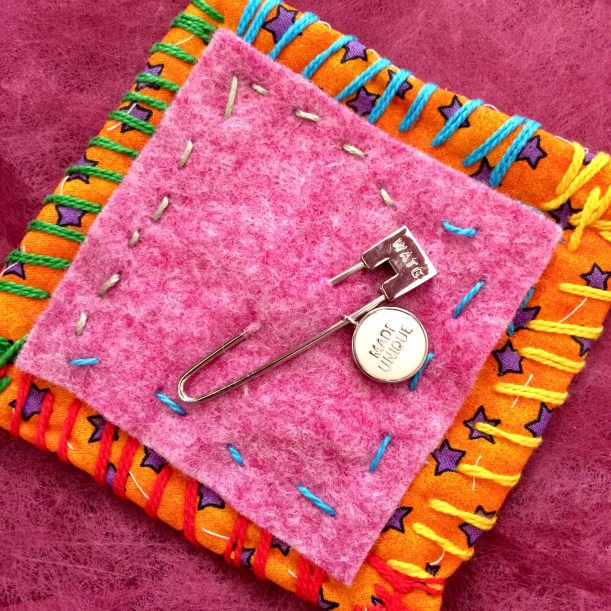
The next gift I opened made my heart skip a beat. I recall being totally inspired by the Raggedy Annie workshop that Ali attended, and here is one of the actual squares she made at said workshop! I recognise the sheep on the other side, but this side has a gorgeous pin from Wool And The Gang on it. I’d forgotten all about the workshop but, now I’ve had another read of the blog post, it will be a technique I’m trying in the New Year. You MUST head over to read Ali’s post to see what it’s all about!

Yay, my very own set of pattern weights and a bag to keep them in, too! I’ve made plenty for other people but somehow have never got around to making any for myself and end up using the weights from the kitchen scales most of the time.

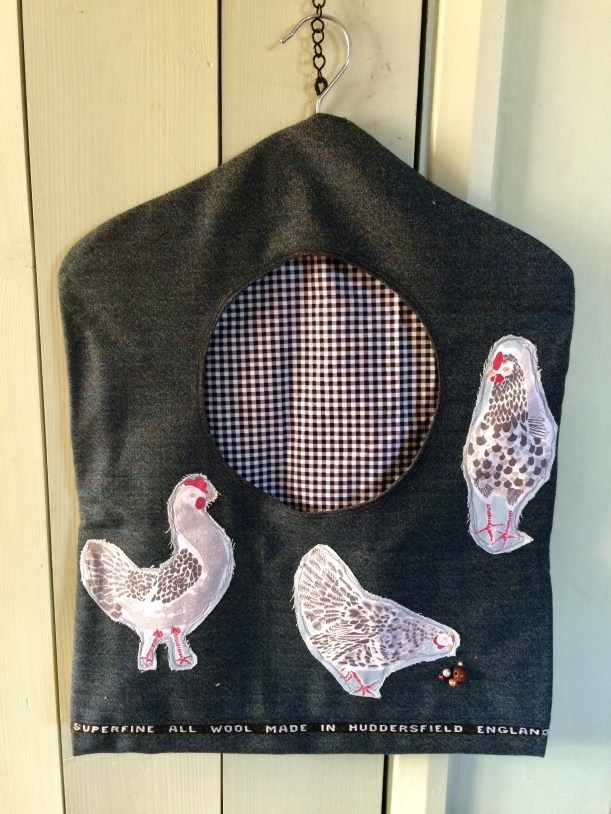
As I unwrapped my final gift I had my fingers and toes crossed that it might be one of Ali’s famous peg bags – and I wasn’t disapponted! She put a sneak peek on her blog or IG and you could just make out the front opening so I was a bit excited, especially as she personalised it with hens for me. I can tell you now that it won’t be a peg bag though, it’s far too good to be shut in the broom cupboard all the time. It’s going to be used in my sewing room to keep those tiny (1″) scraps of fabric that I can’t bear to throw out. The plan is to make ‘new’ fabric from the scraps and re-purpose them into a scrappy quilt eventually.

Last but not least was the card that Ali had included which threw in the casual remark that I was right at the top of her list of sewing heroes – not too much pressure for the coming year then!

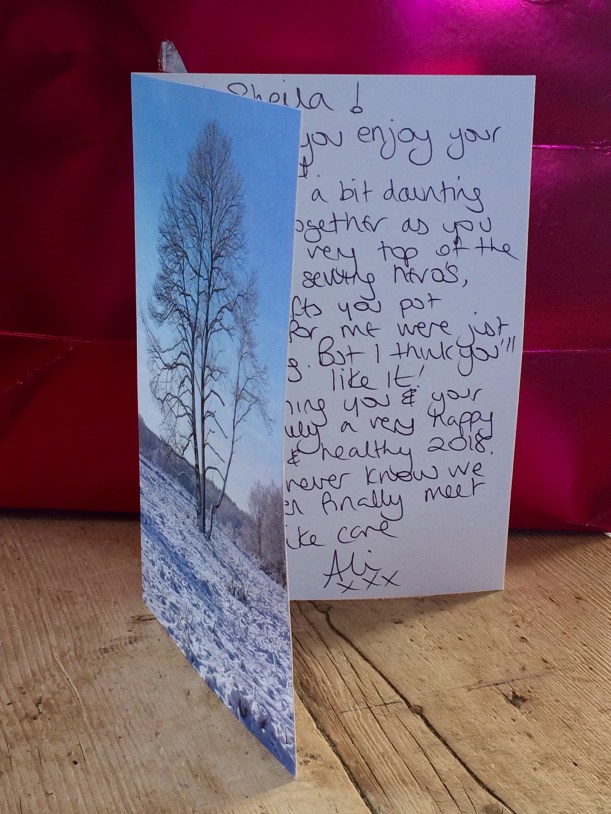
Seriously though, that is the nicest blog related compliment I’ve ever had, so ‘Thank you” Ali, and that goes for all of you wonderful, supportive Bloggers and IGers out there – what a fabulous community we are privileged to be a part of. Happy New Year to you all!!

Sheila xxx


44 Comments

#Stitching Santa Update – Upcycled Cross Stitch

A couple of weeks ago I rescued this beautiful cross stitch from our local charity shop. It was mounted and framed but needed reinventing into something more usable in today’s modern life and was far too wonderful to leave there.

Only measuring a modest 5″ x 7″, I ummed and aahed about what to do with it for a while, having some brilliant suggestions on Instagram.

Ultimately, this is for one of my Stitching Santa recipients (I’m doing both sewing and yarny versions) so I wanted to make it a useful object. This lady is multi-talented across many craft disciplines, as are so many of my blogging pals, and she dabbles in cross stitch herself so I thought this would be perfect for her.

I decided to make a zipped pouch, about the size of a cosmetic bag, which could have a variety of different uses. Maybe for a portable cross stitch project, a small crochet or knitting project, or maybe as an actual cosmetic bag – it is rather swanky, after all!

So here’s a quick run-through of what I did, which might be informative if you have a similar piece of needlework that needs reinventing.

It had been spray-mounted to card and well laced across the back, so all that had to be undone. I then gave it a little steam press.

After trimming the needlework to a useable size, I used it as a template to cut two lining pieces and a back.

Iron-on interfacing was attached to the reverse of the front and back sections to stabilise the bag.

I used the covered tab method for the zip to give as neat a finish as possible (there are plenty of tutorials online on how to do this).

The zipper tabs should be about 1/4″ shorter than the width of the bag to ensure that they don’t get caught in the seam allowance when the bag is stitched together.

After inserting the zip, I topstitched close to the seam through the lining as well. This means that the fabric won’t get stuck in the zip when opening and closing.

OPEN the zip.

With lining-to-lining and front-to-back (right sides together) stitch all the way around, leaving a gap in the lining through which to turn.

Be sure not to catch the tabs in the seam as you sew.

Trim the tabs to reduce bulk.

Cut across all the corners before turning the right way out.

Close the gap in the lining either by hand or machine.

I added a coordinating leather tassel from my supplies.

The sequinned fabric is a small piece cut from a length of fabric that will become a dress later in the week. It adds a touch of glamour.

Some matching blue lining is a nice vibrant surprise when you look inside.

I hope she likes it!


25 Comments

Portable Doll’s House

When Issue 62 of Mollie Makes dropped through the letterbox, it was a good one. See the text on the front saying “Kid’s Doll House”? 

Easily missed, I know, but when I opened it onto the relevant page I did a little virtual skip – this would be the perfect present for a little three year old girl in the family.

A fold-out doll’s house, ideal for taking out and about to keep any little girl entertained (and better than handing over your smart phone, any day).

The details were a joy to put together and customise with whatever scraps of fabric I had to hand.

See, I told you that bag full of two-inch scraps would come in handy one day. I can’t throw any fabric out, no matter how minuscule the leftovers.

The teeny tiny tea set could have Velcro on the back for an older child, to make it removeable. As this was for a toddler, I sewed them to the table permanently.

Some of the bits were embroidered by hand….

….and others were stitched on by machine.

Dolly herself also has a dress and some hair bows, but those will have to follow in the post as I didn’t have time to make them before we visited.

Here’s the bed which is open for the doll to get in. She even has a little removeable pillow.

Of course, she needs a bedside rug to step out onto.

A bedside table has open-topped drawers to store those hair bows, and a little lamp.

I added a last minute dog in its basket, for added fun. Kids love things that ‘do’ something, don’t they?

The bathroom had some lovely details, like the bubbles and towel rail. I embroidered the tap using metallic gold thread to make it more realistic.

Once everything had been sewn on, it was just a case of attaching the front to the back and then turning it right side out.

Roof on, handles added.


Isn’t that just the cutest front door?

So, the house opens up and lays flat for play, like this: –

To close it, you simply fold the side in…..

….fold the bottom up to meet the top and then fasten the popper.

It transforms quickly and easily into a ‘bag’ with carry handles – simple enough for any toddler to use without help.

The iron test is, of course, if the girl in question actually likes it.

What do you think?!


33 Comments

Sunday Sevens #101

Time for another Sunday Sevens as thought up by Nat at Threads & Bobbins – click here to find out more and how you can join in, too.

  1. The Boys both won their football matches quite convincingly this weekend. No.2 Son’s team won 9-0 and he scored a hat trick. No.3 Son’s team won 5-2.

2. I treated myself to this mug by Wrendale Designs – I love this particular range and I’m hoping this is the first in a collection that will fill the hooks on my newly renovated dresser. Might have to put them on my Christmas list though, as they’re a bit of a luxury at ten pounds each.

3. I have a few commissions already for Christmas and this is my favourite so far – four kids’ bobble hats. I’ve made a sample in cream complete with the fabulous pom pom, which I love. The commissioned hats will have faux fur bobbles though, as preferred by my client.

4. Sewing lessons are still going strong – this is one of my Thursday after school groups.

5. Looking ahead to this year’s #stitchingsanta, I have been collecting goodies as and when I see them and thought that one (or both) of these books would be good for the knitting one. Just one pound each in our local charity shop, I’m sorely tempted to keep them for myself…..

6. I also picked up this cute little pot which will be perfect for all those patés that I make.

7. Talking of cooking, this is a new favourite of my ever-hungry family – a sausage plait. Delicious hot or, even better, cold in lunch boxes to make a change from sandwiches.

8. Jam making began in earnest this week and I am so glad I invested in this gadget a few years ago. It’s a vegetable mill and takes the effort out of removing seeds from blackberries.

9. Batch one is labelled and in the store cupboard. This jar went to the chap who, very generously, put his surplus apples out on his wall for you to help yourself.

10. Friday evening promised to be one of the last opportunities to have a picnic, so 11 adults and 19 children met in the park for cricket and a picnic tea. I took a platter of paella, still piping hot from the oven. Yum!

11. No.3 Son finished his corduroy trousers in time for the Autumn chill which has just arrived.

12. I made a very successful batch of Yorkshire puddings. Sadly, they don’t always rise as well as this.

img_5106

13. Mr H-L has dropped two stones without really trying, annoying though that might sound. He now has two brand new suits costing £400 each which fall round his ankles at the slightest tug. What a waste!

14. We went to our dear friends’ house for a lamb roast on Saturday – what a great night that was!

15. I can’t finish without showing you their inventive solution to the toilet problem. With fifty guests and only one toilet, our host came up with this idea for a homemade urinal, situated around the side of the shed. A water bottle (the kind you get in offices) trimmed and attached to a pipe which led into a tray full of cat litter to soak up the liquid and any nasty smells – genius! There was even a privacy screen, battery powered light and alcohol handwash, too.


47 Comments

American Girl Doll’s Clothes

Last month, No.2 Son was invited to his girlfriend’s birthday party (they’re both ten) so I had to come up with an appropriate gift idea – no mean feat when you’re used to buying for boys.

I don’t know about you, but the amount of parties The Boys get invited to means that you can end up spending a small fortune throughout the year in presents, even though I try to spend no more than £10 maximum per child.

£10 doesn’t buy much nowadays, unless you opt for the useful book token which, despite being a great gift which kids love to spend, is hard to get excited about when you open it. You never hear “WOW! It’s just what I’ve always wanted – thank you!”

So I had a little think and remembered that this little girl had recently been to America on holiday and had come back with a “Truly Me” American Girl doll.

doll

Apparently, these dolls are a bit of a cult item in the USA with girls and women alike, and you can choose the skin, hair and eye colour to match your own.

With the doll itself costing $115 and each item of clothing costing upwards of $10, she, understandably, had a very limited wardrobe thus far.

So I decided to put aside a whole day and make some clothes for her.

With a bit of searching on the internet, I found several patterns suitable for an 18″ doll, and these are what I came up with.

Remember THAT hoodie I made earlier in the Summer? Well, I used some of the leftover fabric to make a sweatshirt for the doll with popper closures at the back.

fullsizerender73

I matched the sweatshirt with some purple elasticated jogging bottoms and that was one outfit completed.

american-girl-doll-pants-trousers

Using the same T-shirt pattern as for the sweatshirt, I made a plain white Tee to which I added a ruffle to jazz it up a bit.american-girl-doll-skirt

A velcro back was used this time.

The little lace-trimmed  A-line skirt took hardly any fabric at all and was whipped up in minutes, again with a velcro back fastening.

american-girl-doll-skirt-back

Next up was a simple dress which could be worn on its own or with the white ruffle tee as before.

american-girl-doll-dress-strappy

I knew a ‘proper’ dress would be appreciated, so this next one took a little more effort, adding full lining and ric rac trim at the waist and hem.

american-girl-doll-dress

I even inserted a back zip to make it more special.

american-girl-doll-dress-back

Finally, one more top, this time in blue, and a coordinating elasticated straight skirt with side splits.

american-girl-doll-sirt-and-topamerican-girl-doll-skirt-top

I can’t tell you quite how much fun I had making them all and, not only that, I worked out that, had similar outfits been purchased, the cost would have been upwards of £/$100!

And guess what? She said: –

“WOW! It’s just what I always wanted – thank you!”


42 Comments

Sunday Sevens #91

Sunday Sevens is a weekly blog series thought up by Nat at Threads & Bobbins – click on the link to find out more and how YOU can join in.

1. Back from Spain in the early hours of Wednesday morning (7th June – I’m still catching up), I had to get organised pretty instantly. The school fair was in four days time and I still had loads to do as, not only was I making things for the school,  but was also having a stand for The Stitch Academy AND running a fashion show for my students. 

I started by making samples for the Summer workshops which I would be advertising on my stand – Pyjamas and Sleep Mask, and an Owl Cushion/PJ Case.


2. Next, I made the Miette skirt by Tilly and the Buttons, also a future workshop or maybe weekly lessons. Raspberry coloured linen which hangs really well for this style.


3. The woman who loved my cross-body bags but wanted one in grey with a star on it had her wish granted! Luckily, she turned up at the fair wearing a grey T-shirt with a star on the front and snapped this bag up straight away.


4. The Elderflower cordial that had been brewing while we were on holiday was bottled and labelled. Here they are on the stall at the back on the far left. They all sold. Two one-litre bottles at £4 each and four 75cl bottles at £3 each, for anyone who is wondering how to price things at a school fair. It cost £2.74 for the sugar and lemons (the bottles were old lemonade ones) and sold for £20 – a nice little profit for their funds and SO easy to make.

The bunting I made for our wedding is hanging at the back of the tent:)


5. Mr. H-L actually made the marmalade this year as I was busy sewing. They’re the jars on the tray with the blue fabric ‘hats’. Ten small jars (half normal size) all sold for £1.50 each. They cost about £3 in total make and, again, the jars were recycled.

I also made forty scones on the morning of the fair so they were nice and fresh.


6. Oh, I almost forgot – after making the scones, I quickly traced off and made a Coco top as the fair wasn’t until one o’clock!!

7. My stand at the fair which was a huge success, enrolling more students and premiering my new adult classes to the villagers. A Tilly and the Buttons Margot Pyjamas workshop is almost booked up! (Thurs 14th July if anyone is interested).


8. A dozen of my students took part in a fashion show at the fair which they absolutely loved, showing off the things they had made over the past nine months since The Stitch Academy started.


9. No.3 Son stole the show with his antics!

10. He certainly made the most of his moment in the spotlight!


11. In other news….this cardboard city is a window display in a boarded up solicitor’s premises. Random, but brilliant.


13. N0.3 Son wanted to make the butter this time.

Here he is squeezing out all that lovely buttermilk which made some scones later in the day.

14. My Victorian butter paddles do their job nicely.

15. There, finished!

16. Perfect spread thickly on some Date and Walnut bread still warm from the oven!


17. ‘Chalky’, our Chalkhill Blue hen, laid her first blue egg!

18. The next day she laid her second, both of which were massive for such a small hen and this is the reason why – both were double yolkers!


19. Teaching pattern drafting to a student, this week, a basic trouser block.


20. I had almost finished a cardigan as a Christmas present from leftover yarn (thrifty, as ever) but ran out only to discover that it had been discontinued – oh s**t! 

I ended up unravelling four inches of a scarf in order to scavenge enough yarn to complete the cardigan. Luckily, the scarf was a) for me and b) REALLY long in the first place so no harm was done.


21. I got out all the components of my July make for the Minerva Crafts Blogger Network – but never got around to starting it. Next week, maybe.


22. Three homemade cards amongst those sent from our six (between us) children to Mr H-L on Father’s Day.

23. A pair of Star Wars flip flops, bottle of malt whisky, a coffee cake, homemade brandy truffles and, from his girls in Brighton, a dozen rock oysters!

24. What a great end to a hectic week!


53 Comments

Make-Your-Own Espadrilles

Another day, another birthday present to make, only this time it is something a bit unusual – a pair of handmade espadrilles!

I’ve made slippers and things along those lines before, but never a bonafide pair of shoes.

P1050948

The soles were by Prym and purchased online from The Makery in Bath.

P1050918

P1050919

The box includes templates for the uppers in various adult sizes, but I heeded advice from others who have previously made them and went down a size when making them. I cut out a UK size 5 for the recipient who has size 6 feet, and they fitted perfectly without slipping off.

P1050920

Although there were no instructions in the box, full step-by-step photographs can be found on the Prym website and it was those I followed.

If you are tempted to have a go at these be aware that seam allowances are NOT included – you have to add your own before cutting out!

P1050922

P1050923

I had a small amount of “Rosetta” fabric left over from making this cushion and make up bag, and decided to team it with a deep pink spotty lining.

The pattern consists of just two pieces – one for across the front and one for the heel.

P1050921

I added some fusible interfacing to the outside sections just to give the shoe some extra strength and stability.

P1050924

I also stretched a two-inch length of narrow elastic at the ankle edge just to make sure the shoes would stay on.

P1050926

The main fabric is sewn to the lining right sides together, then turned through a gap left in the stitching.

P1050929

I top stitched the elastic through all the layers for a strong and neat finish.

P1050931

P1050932

The toe section is sewn and turned in exactly the same way, cutting across the corners and notching around the curves as necessary.

P1050934

Next comes the fun bit!

You will need a leather needle to sew through the soles as the wedged point makes light work of it where a standard needle would hurt your finger after a while.

P1050938

The heel section is pinned to the sole…..

P1050935

….inserting the pins at an angle as shown below.

P1050936

I used three strands of embroidery floss to secure the fabric to the sole, using a blanket stitch.

P1050939

When the heel section is stitched on it should look like this: –

P1050940

Next, the front is pinned on in a similar fashion, overlapping the heel section.

P1050941

P1050942

Blanket stitch is used all the way around the front and also to join the sides together.

P1050952

A “hand made with love” label adds a personal touch.

P1050943

That’s it – finished!

P1050950

P1050949

P1050951

I thought I’d better show you what they look like on – have you any idea how difficult it is to take photographs of yourself wearing shoes?!

P1050946

In the end I put my feet up on the table in my studio……

P1050945

P1050947

I’m pleased to report that the recipient was very pleased with her bespoke shoes and put them on immediately – they fit perfectly!

Has anyone else handmade their own espadrilles before?


10 Comments

Jam, Flowers and WIP

Wow, we’ve got loads of blackberries this year! Sadly we won’t have as many next year because, whilst we were away, my son thoughtfully pruned the overhanging branches (quote – “Only the ones with no blackberries on”). He has unwittingly removed most of the growth that was going to produce next year’s fruit!! Hey ho, these things happen. blackberries

blackberryThe Girls eat as many as they can reach; it’s hilarious watching the way they flap with all their might in an effort to jump higher to get to the juicy, ripe ones which are just out of pecking distance!

hen eating blackberriesI am going to make as much blackberry and apple jam as I can this year in the hope that it will last longer. First two batches are in jars awaiting ‘hats’ and labels. I always give some away as Christmas presents paired with matching jars of homemade marmalade or another jam, so gingham hats and raffia ties are a must!

Jam making small

They look rather nice as homemade gifts go!

Homemade jam gift small

For our own use, I transfer jam from the jars into a lovely vintage jam pot. The lid was dropped onto the tiled floor and, unfortunately, didn’t survive, but I still love it.

vintage jam potsmall

Of course, there’s always a little bit left over that has to go through Quality Control….

Homemade jam small

If you let your hens free-range as we do, you’ll know that growing flowers in the garden is nearly impossible so my lovely husband brings home glorious blooms on a regular basis. Even so, the cheeky chickens still hop onto the coffee table to peck at the stamens! These should be safe though, as they’re well out of the way up on the dining table.

Vase of liliessmall

Liliessmall

I know lilies are associated with funerals and many people don’t like them for that reason, but I absolutely love, love, LOVE them!

Stargazer Lilysmall

I wouldn’t dream of removing the stamens that stain everything a dark orange either; they’re just so pretty:)

Lily close upsmall

I wish I could paint – I would have my own watercolour floral masterpieces clinging to the walls like wallpaper….but alas my creative talents lie in a different direction.

Talking of which, here are a couple of WIPs – this one just waiting the addition of a few bits of hardware that are marked by eBay as ‘dispatched’…

Granny stripes smallGranny square flowers smallIncreasing base small

…and this one. In the words of Rolf Harris “Can you guess what it is yet?”.

WIPsmall

And no, it’s not another basket. Intrigued? Watch this space….!


2 Comments

Homemade Fudge

It’s that time of year again – School Fair!  This begs the question: “What-to-make-that-kids-will-want-to-buy?”. It has to be cheap for two reasons;

  1. It’s a donation – you don’t get costs refunded
  2. Children have about two pounds to stretch around the entire fair


I decided to do something different to the usual fairy cakes and hit upon the idea of fudge in two flavours – “Chocolate” and “Vanilla & Raisin”.

Fudge is sweet (so kids will love it) and simple to make, the ingredients are cheap and I thought I could package it up to look appealing.

This is the Chocolate…

Image

and this is the Vanilla.

Image

Mmmmm, delicious!

Image

Here’s what I did:

Ingredients: –

397g can condensed milk

150ml single cream

450g demerara sugar

115g butter

  1. Melt all the ingredients in a large, non-stick pan over a low heat, stirring until the sugar dissolves.
  2. Bring to the boil then simmer for 10-15 minutes, stirring continuously and scraping the base of the pan.
  3. Continue until a sugar thermometer reads 118°C – this is vital, or the fudge won’t set.
  4. Transfer to a mixer and beat until very thick and only just beginning to set.
  5. Pour into a 20cm square tin, lined with baking parchment, and leave to set before cutting into squares.


For chocolate, add two tablespoons of cocoa powder at step 4.

For vanilla (and raisins) add one teaspoon of vanilla extract (and two tablespoons of chopped raisins) at step 4.

Image

I found some small cellophane bags here www.wrappingsandbows.co.uk

Image

I designed some simple labels to attach to each bag with the price clearly stated.

Image

Pricing is tricky but, as this was my donation, I just added up the cost of the ingredients and packaging and divided it roughly between the number of bags created. I put two squares of each flavour in each bag and made twenty-eight bags, plus plenty of offcuts which could be bagged up and sold off cheaper (if you haven’t already succumbed to temptation and eaten them as you go along!).

Image

I think they look quite saleable, don’t you?

Here they are all lined up in bread baskets, ready to go.

Image

Image

Image

So there you have it – handmade fudge, simple but perfect idea for school or village fairs!


Leave a comment

Homemade Bread and Butter

I’ve had a very productive day today – not in the studio this time, but in the kitchen. If I’m not in my studio bent over the sewing machine, then I will be found in the kitchen conjuring up some culinary masterpiece (I wish!) for my family.

I cook from scratch pretty much all the time, so baking a couple of loaves was nothing new, but today I really went back to basics and decided to have a go at making the butter too.

I bought this gorgeous book through Country Living magazine (UK version) last year, as much for the lovely photography as for the content itself.

Image

Butter has always been a little bit of an enigma for me and one of the few pre-packaged foods that I buy ready made. If I’m completely honest, making my own has been a scary prospect and shop bought butter (not spread/margarine) has very little in the way of additives so I’ve been happy enough to buy it until now.

The chapter on ‘Dairy’ has been thumbed through plenty of times, and the pictures make it look so simple that this morning I decided to take the plunge and make my own butter.

Image

I have the requisite KitchenAid (in Pistachio Green, no less!) so beating the double cream to the stage where the liquid and solids separate took under a minute. Then it really was just a case of squeezing the butter under a cold running tap to get rid of as much buttermilk as possible and putting it in a dish in the fridge.

That’s it.

Virgin unsalted butter ready to use – amazing! The whole thing took less than five minutes; add another if you want to knead in a little salt to taste.

We tried it immediately on some olive bread that I made yesterday – delicious! And soooo quick and easy that, not only do I wonder why I have never tried before, but I will never buy ready made again. I just need to remember to keep a pot of double cream in the fridge at all times.

Image

You can buy the book at Amazon UK. (I was not asked to review this book, it’s just so great I had to tell you about it:))

P1020860

Ebay now, to try and find a pair of vintage butter pats and stamps…