
In case you hadn’t noticed, Christmas is just around the corner – nine days, to be precise and I’ve got a great last-minute make for you; a personalised Christmas sack for that special little person in your life.

I’m not joking when I say last-minute as I made TWO personalised sacks yesterday afternoon, each one taking about two and a half hours from start to finish. They’d make great gifts, too, with a little something popped inside and they only cost £12.94 each to make so won’t break the bank.
This is the parcel that arrived from Minerva Crafts: –
 For each sack you will need:
- 1m jute luxury hessian (56″ wide)
- 2m gingham fabric for lining (45″ wide)
- 15cm square of red felt, 22.5cm square of light brown felt and a 22.5cm square of dark brown felt.
Trim your gingham fabric to the same size as the hessian – 39″ x 56″.
Put the offcuts to one side as you will use these for the tie and the fabric letters.
Draw a reindeer on a sheet of paper and cut out the individual elements separately.

Cut these out of the felt squares using the picture below as a guide.

Stitch the nose and eyes onto the felt face – I used free machine embroidery throughout to achieve a ‘scribble’ effect which works well on children’s gifts.

Fold your hessian in half and arrange the felt pieces in the centre as shown.

Hessian has an open weave which tends to move quite a lot, so either tack your appliqués on first or use LOTS of pins to keep them in place while you sew them on.
I loathe tacking so I opted for pin overkill instead.

With the reindeer face stitched securely in place, it’s time to move on to personalising your sack.
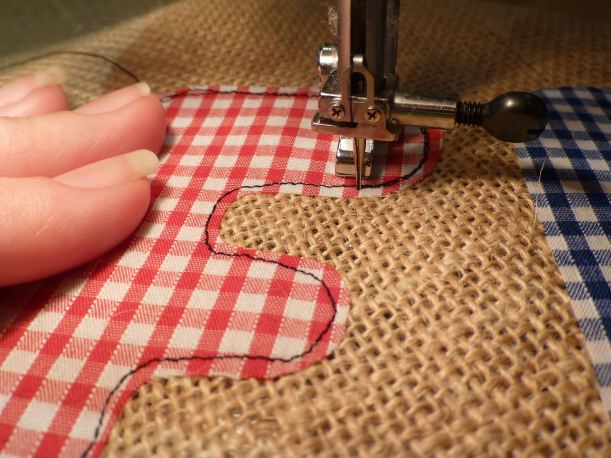
You can download a suitable font or just freehand it like I did onto thin card. As I was making two sacks I had both blue and red gingham offcuts to cut the letters from. I also decided to use some paper backed fusible web to secure the letters to the hessian before stitching them.

Arrange the letters evenly in a curve around the bottom of the reindeer, remove the paper backing and iron in place.
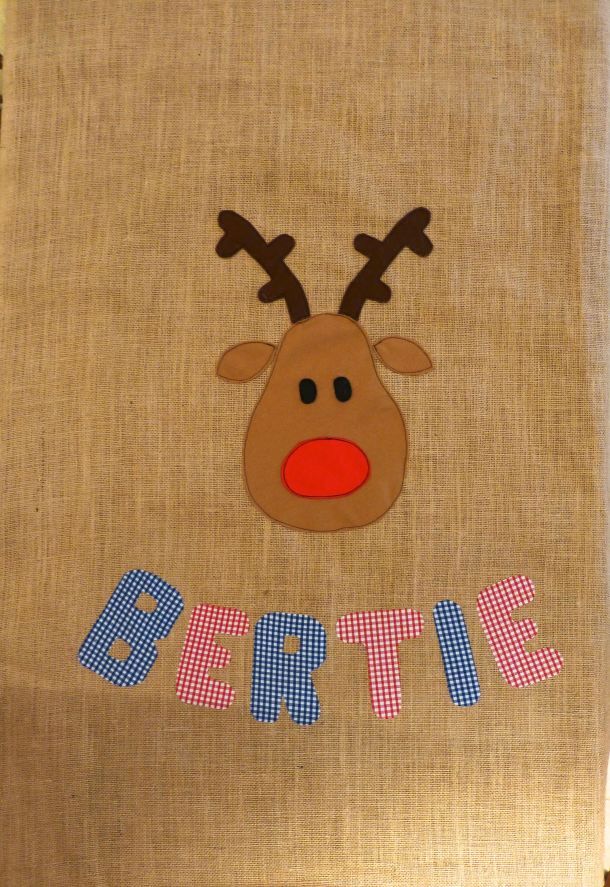
Two rounds of stitching on each letter gives a good effect.

When all your stitching is done, sew the top edge of the sack to the top edge of the lining with right sides together (sorry, no photo). Press the seam flat to create a crisp edge.
Then, lay your fabric out on a large table or on the floor and fold in half lengthwise, right sides together to create a ‘tube’.
Pin all the way around, leaving a gap in the lining where shown through which to turn. (I forgot to photograph this step on the first sack so the lining is shown in red).

Put pins at 8″ from the top edge and 9″ from the top edge – this will be a break in the stitching to provide a channel for the tie.


Sew all the way around the three sides with breaks in the stitching as described above.
Trim the corners and turn the sack through to the right side. Sew the lining closed at the gap through which it was turned. Press.

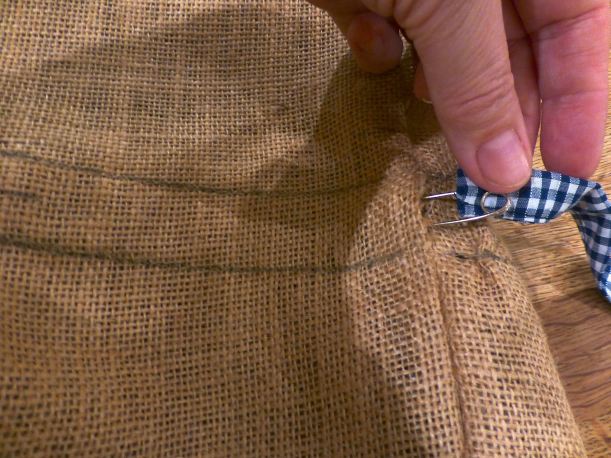
With a soft pencil or tailor’s chalk, mark two parallel lines all the way around at 8″ and 9″ from the top edge of the sack. Pin through both layers of fabric. Stitch along the lines.

For the tie, use your remaining offcuts of gingham to assemble a length that measures about 70″ x 2″.
Fold in and press 1/4″ at each short end.
Fold in and press 1/4″ along each long edge.

Bring the folded long edges together enclosing the raw edges.

Stitch close to the edge to finish your tie.

Use a safety pin to thread the tie through the channel in the gap left for this purpose.
And that’s it – finished!

A beautiful sack which any child would be delighted to have on Christmas Day to pop all their opened presents into.

They’re huge, too, I would have added The Boys to the photo for scale except that the sacks are a surprise for them.
You’ve still got time, so who fancies whipping up a Christmas Sack for their little boy or girl?
