Sewchet

Sewing, crochet, crafts, accessories, baking, tutorials,


11 Comments

Needlecases & Pin Cushion

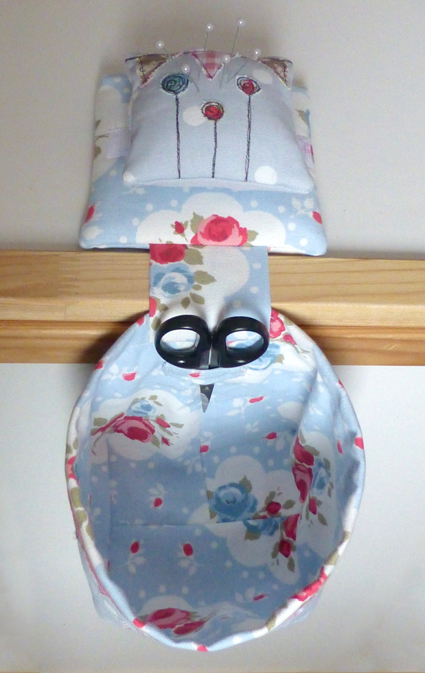
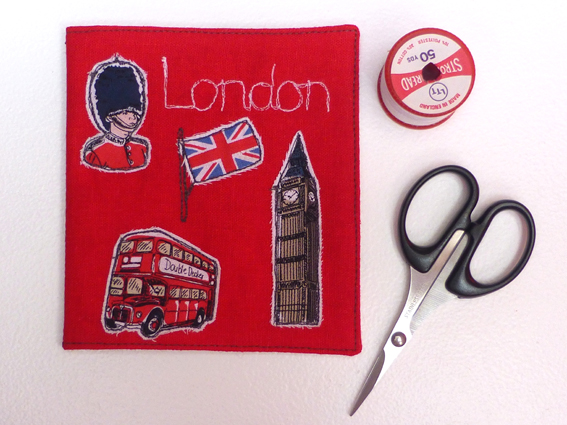
I suppose it’s only a natural progression after making a pin cushion to want to make a new needlecase too? Well it was to me anyhow, so I browsed Pinterest (as if I needed an excuse) and my favourite was one by Loopy Linnet which was so lovely that I made my own version;

Needlecases - 01

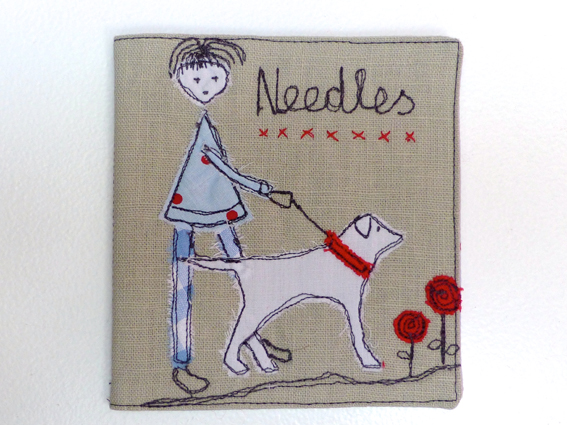
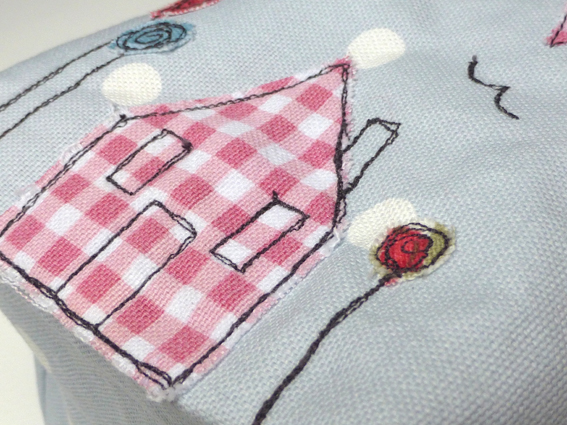
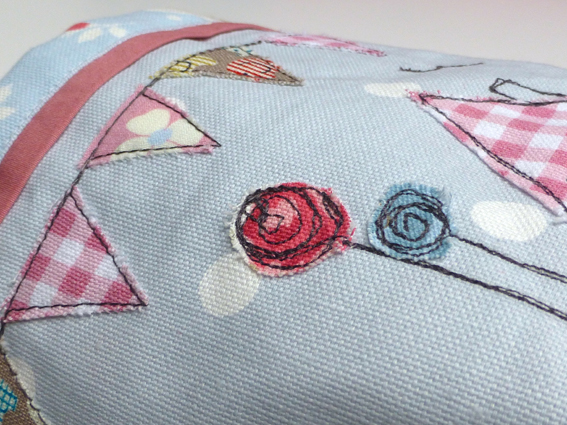
Lovin’ the way the new sewing machine makes free motion embroidery so easy and so much fun.

Needlecases - 03

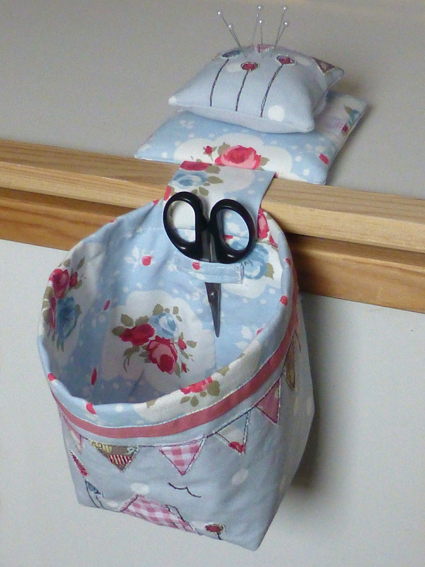
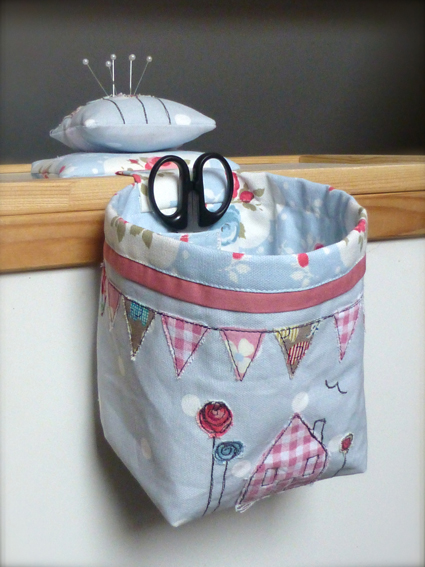
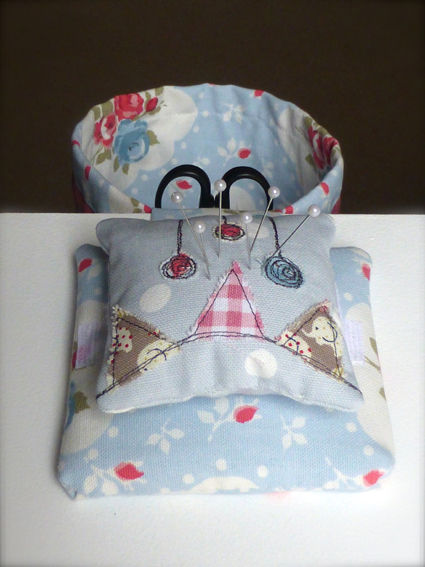
This one is for me to keep and use in my sewing room but I was inspired to come up with a new design and make some to sell in my Folksy shop.

I had some remnants of red linen left over from a dress I made recently (that’s for another post one day) and I remembered some fabric that I bought on a whim ages ago (knowing it would be useful for something).

Needlecases - 06

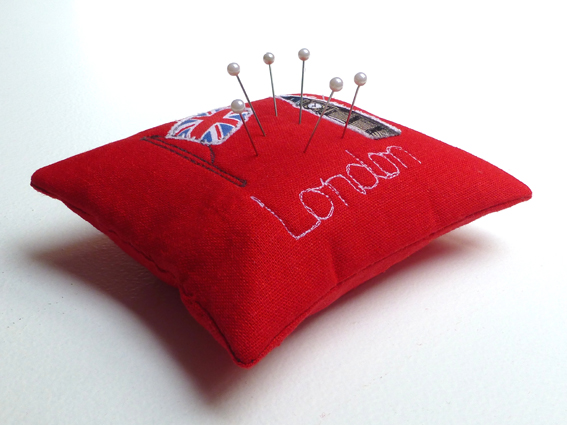
It’s a great London-themed poly-cotton with images that could quite easily be appliquéd individually using my favourite scribble-stitching.

Needlecases - 08

So I decided to go the whole hog and create a very commercial item that will hopefully appeal to a broad market, yet is still very much a craftsman made piece.

And these are what I came up with…

Needlecases - 10 Needlecases - 16

Needlecases - 17

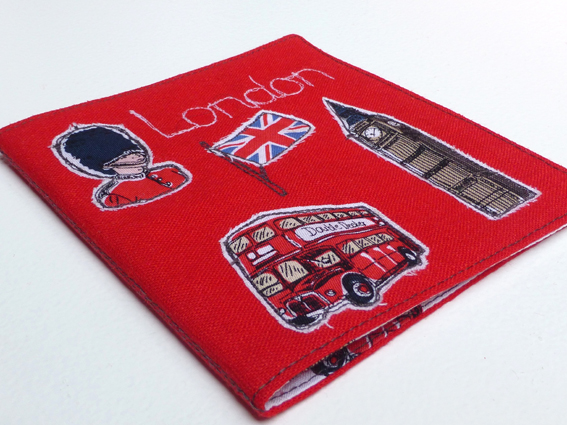
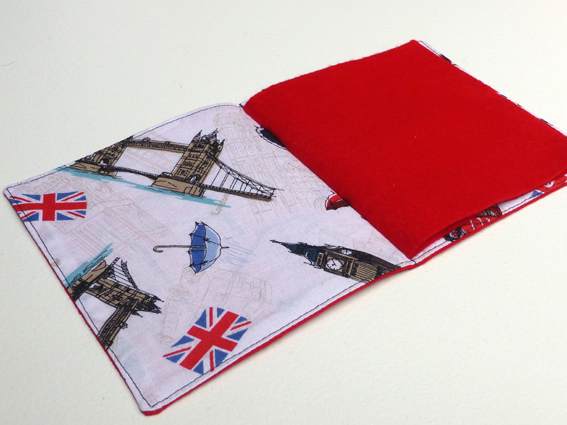
They are stiffened with interlining and lined with the London print fabric.

Needlecases - 12

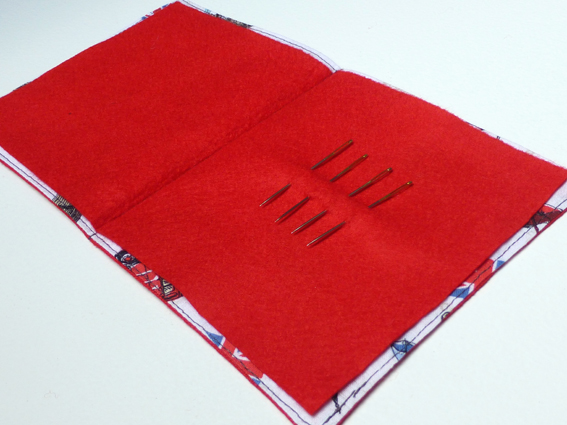
They are quite generous in size at 4.5 x 5″ so I decided to keep the bulk to a minimum by only adding one ‘book’ of felt in which to store needles. These are big darning needles so you can see that there’s space for loads more…

Needlecases - 13

I took a ‘Lifestyle’ shot for scale…

Needlecases - 18

In an effort to think with my business head on (difficult for Crafters) I designed some matching pincushions to encourage multiple purchases.

Pin Cushion - 19

Pin Cushion - 21

Pin Cushion - 22

They are so light in weight that they can be included in the parcel and posted at no extra cost which should be quite appealing, especially to overseas buyers. I’m thinking that they would be great gifts to family living abroad as the price is reasonable and the international postage is low.

I’ve got some beige linen as well, so I’m going to come up with some designs using that too. They’re quite quick to construct after the first one – I always cut a template out of card once I’ve finalized a design, and you usually find more efficient methods after you’ve made a few, don’t you?

Pin Cushion Needlecases - 25

So that’s it – my new “London Collection” of patriotic needlecases and pincushions!


15 Comments

Pin Cushion & Thread Catcher ‘Tadah!’

I don’t know about you but, although I do a LOT of sewing, I don’t even have a pin cushion which means grappling with loose pins from the tub and dropping most of them on the floor….so I thought it was about time I made one.

A pretty one. Not just a functional one.

When I first had my own studio I promised myself that I would indulge my girly desires to make pretty accessories whenever the need arose – and now the need has arisen.

After browsing Pinterest for pin cushion designs, I came across this one by Curry Bungalow – genius!!

thread catcher

It consists of a detachable pin cushion and a thread catcher weighed down by a covered bathroom tile. Such a clever idea and, hopefully, it will save me hoovering after every sewing session:)

You can buy the pattern here as an instant download PDF which is what I did as soon as I saw it! You just know when something is exactly what you’ve been looking for don’t you and, if you’re anything like me, can’t wait to get started.

One of my favourite textile artists is Pants and Paper and I love this particular design of hers on an iPad mini case:-

iPad mini case

One of the reasons I bought my new sewing machine was to do more free machine embroidery as my old one just wasn’t up to the job. I could never seem to get consistent stitching and it was always missing stitches despite using a new needle each time. My new one is ace, so simple and quick to set up and the results are fantastic even for a free machine embroidery novice like me.

I kind of already had an idea how to combine the original pattern with the design I had in mind, and I just had to adapt it to the size tile that I had leftover from a kitchen refit ten years ago in my old house (well, I can’t throw spare tiles away; they might come in handy one day!!)

The entire project was created using scraps of fabric leftover from various other makes, so it satisfied my craving for a craft fix without costing a single penny – bonus!

This is the detachable pin cushion which fastens to the thread catcher via a strip of velcro (hook and loop tape) on the covered tile;

Pincushion thread catcher - 13

Pincushion thread catcher - 03 Pincushion thread catcher - 05

Here’s the thread catcher with a handy little loop for storing your embroidery scissors;

Pincushion thread catcher - 07

Here’s how it looks from the front;

Pincushion thread catcher - 02

Some close up detail…..

Pincushion thread catcher - 06 Pincushion thread catcher - 04

And finally….

TADAH!

Pincushion thread catcher - 09 Pincushion thread catcher - 01Pincushion thread catcher - 10 Pincushion thread catcher - 08

I chose some scraps of ‘Rosetta’ by Clarke & Clarke for the lining so the inside is just as pretty as the outside!

Pincushion thread catcher - 11

The tile does a brilliant job of securing the whole thing to the worktop right next to the sewing machine. In fact the entire design works so well that I have no idea how I’ve managed over forty years of sewing without one!Pincushion thread catcher - 12

I’m thrilled to bits with it and it looks soooo pretty in my studio. In case you missed it, here’s the link to the pattern again Pin Cushion Thread Catcher so why not have a go at making one for yourself?


5 Comments

Passing on traditional skills to the next generation

A baby of the Sixties and growing up in the Seventies (with no television) meant, as children, we made our own entertainment.  We were either outside making dens from dawn ’til dusk or inside playing board games or……making things.

Grannies the country over were teaching their young grandchildren their make-do-and-mend skills – borne out of necessity, but usually incredibly beautiful to boot.                                            Fascinated, we watched with admiration and awe the speed at which these ‘old’ women worked those needles to create something useful in order to extend the life out of something seemingly knackered. (In reality, my Gran was only forty-odd – but they didn’t age as well back then, did they?!)

Wisely, knowing that in order to succeed the idea has to come from the child and not suggested by the adult, my Gran waited until we inevitably begged to be taught how to do ‘it’ too. Gradually we learnt how to knit, sew and crochet with the most patient of teachers to guide us.

I can’t really express how grateful I feel to be given such a gift by my late Grandmother; the pleasure I get from these skills she taught me is immeasurable. I even made a living from sewing in my twenties, but now I just pick up the needles (or hook) for relaxation and the sheer joy of it.

So, when my eight year old son came running in from a tennis tournament, threw his stuff down and said “Now will you teach me how to crochet please?”, I knew the time was right!

This is the very first time Bertie picked up a crochet hook, still hot and sweaty from tennis…

Bertie crocheting

And it doesn’t stop there!

My son’s girlfriend, Frankie, is twenty-three and she wanted to learn…..

Frankie

…..and my sixteen year old niece, Alice, was next in the queue;

Alice small

Alice's crochet small

Bertie also drew up plans for a doll that he wanted to make;

Doll

Here he is, sewing all the bits by hand;

Doll2smallDoll3small

I am sooo thrilled that I have been able to pass these skills on  – I only hope that the popularity of crafting continues so that they will in turn hand down the skills to the next generation.  Just ten years ago, pre-recession, I was convinced the arts of sewing, knitting and crochet were to be lost forever and it’s fabulous to see more and more people wanting to learn.

At the end of a long crafting day, the kids were desperate to sleep outside.  The boys slept in a tent and Alice stayed over especially so she could sleep on the day bed – I did tell you that it was comfy, right?  Here they all are, reading books just after sun down and just before the fairy lights start twinkling automatically at dusk….perfect!

Sleeping outsidesmallHave you passed on your traditional crafting skills to anyone, or created a lovely outside crafting space?


10 Comments

New Range, Outdoor Living and Crochet!

Blimey it’s been a busy couple of weeks – so much so, this is my first post in a fortnight and I can’t fit it all in!  I’ve been quite productive on the creative front and have loads to show you, so I will try to catch up in the next few days and hope you’re not too bored…

First up, the most exciting event.  Well, for me, anyway because I cook loads. Our ‘old’ range cooker pretty much gave up the ghost after seven years of hard labour and I kind of decided that, as you get what you pay for, I might as well upgrade seriously.

This is the old one…

Old range small

..and this is the lovely new RED one!

New range small

(If anyone knows how to change an oven thermostat and repair a grill element, we have an electric range cooker with ceramic hob going begging…!)

Four ovens including a slow cooker and five induction rings on the hob – I’m in cooker heaven, seriously, and I need to make more jam.  We’ve just finished the last of last year’s jam and the new crop of blackberries is looking promising, although it’s a fine line between them being ripe enough to pick and the hens deciding when they’re ripe enough to eat.  At least they can only reach the lower berries so we should still have plenty for jam making.  About another four weeks, I reckon, before the first berries turn black and sweet.  It’s a thornless bramble which is perfect for the garden, and domestic varieties are always much larger, juicier and sweeter than their wild cousins. They also ripen earlier which means the picking season is extended – good news for our household of blackberry lovers.  Blackberry and Apple Crumble anyone?

Blackberries small

We only have a small, young apple tree and an elderberry bush in our (quite large) garden which means shade is almost non-existent and, in this current heatwave, makes it too unbearably hot to enjoy the garden. The hens have commandeered the elderberry bush so my lovely husband created a shady retreat just for me!

Gazebo up, it needed bunting obviously. Well, doesn’t everything look better with a string or two of bunting??

Bunting small


Then, I had a brainwave and decided to utilize the under-used daybed from my sewing room as an outdoor sofa.  After a bit of under-the-breath muttering and “Why do want me to put the bed outside?”, husband complied.

I covered the ‘sofa’ with some patchwork throws I made thirty years ago – very faded and a bit worn, but I tell myself that it adds to the rustic charm!

Lace quilt small

Padded quilt small

I piled it up with loads of squashy cushions including the crocheted ones I made recently and it looks soooo inviting that everyone who comes to the house dives straight in and that is where they stay!

Kids small

Day bed small

I even get to use it too sometimes!  There’s nowhere nicer to relax and enjoy a bit of crocheting with a G&T.

Me small

This is what I’m working on, curled up in a cosy corner of my new favourite place…..

Granny blanket 3small

Granny blanket 4small

…..Ta da!

Granny blanket 2small

I’ve got a few more ‘Ta da’ moments to share with you in the next few days, so watch this space!

In the meantime, here’s a snippet of my latest work-in-progress using Drops Paris Cotton – it’s already my favourite project to date!

Greengate small


2 Comments

Annaprashan Gift

The weekend is over so it is time to reveal the project I was working on last week for which I showed you how to make some custom bias binding.

Sarita is my husband’s cousin’s little girl who celebrated her Annaprashan on Saturday, to which we were invited. Not being Indian or Hindu ourselves, I looked up all about this ceremony and discovered that, whilst gifts are not expected, silver and gold are traditional items to present. After a bit of indecision, I decided to leave tradition to the immediate family and create something myself, eventually settling on a personalized quilt.

I found some sweet fabric with an elephant motif which was perfect and couldn’t have been more appropriate – the most widely worshipped Hindu god deity is Lord Ganesha: The Elephant God.

Seeking inspiration from here, I made this: –

12small13small

14small15small

I used tailor’s chalk to mark out the quilting lines and then quilted the whole thing by hand!  It was hard work, but so much more aesthetically pleasing than machine quilting don’t you think?

19small

The letters were backed with interfacing before being appliquéd on with a close zigzag stitch.

16small

I used free machine embroidery to write the words on the heart, going over it twice for definition and trying to keep it quite ‘scribbly’;

17small

Here’s a close up of that fabulous elephant fabric…

11asmall

…and here’s how it looks on the reverse;

13small

I love the look of trust in Sarita’s face while she looks intently at her grandfather as he offers her some rice, her first taste of solid food (the whole concept behind this traditional ceremony);

Sarita's first taste

She was so good and not at all overwhelmed by all the attention and rituals that go hand in hand with this type of ceremony.

Here she is with her proud parents afterwards;

Sarita, Gav & Sucheta

I hope the quilt is a keepsake that she will treasure in the years to come and, who knows, it might become an heirloom to pass on to her own daughter one day?

20small22small

I think a personalized quilt like this would make a perfect gift for any occasion where you’re not sure what to give, whether it’s a gift for an Annaprashan, a Christening present or other celebration – so what are you waiting for, get quilting!


6 Comments

Tutorial: How to make your own Bias Binding

Ok, so buying it ready-made is easy and convenient but it’s not cheap and what if you can’t get the right colour to finish your project?

That was my dilemma this week, so I made my own bias binding to coordinate perfectly and I thought I’d show you how.

First off, you need to find the bias of your chosen fabric which is really easy.  If you pull along the grain (parallel to the edge), the fabric won’t stretch (unless it’s a knit fabric) and if you pull it at 45° to the grain it will stretch as demonstrated below: –

Image

Using tailor’s chalk, mark lines on your fabric on the bias at 1 1/2″ intervals (or the width suggested by your bias maker).

Image

Cut along the lines

Image

Image

With right sides together, pin two strips at right angles to each other as shown: –

Image

If you’ve gone to the edge of the fabric your corners will already be cut off, if not, you can do this now, then sew together.

Image

Press the seam open.

Image

Repeat, joining as many strips as you need to make the required length.

With wrong side facing up, insert the corner of the leading edge into the bias maker. Using the metal bar, pull very gently along the length of the fabric, ironing as you go.

Image

When you have completed the entire strip, fold in half right sides together and press.

Image

If you don’t have a bias maker, get one – they’re indispensable.  However, you can also make bias binding without a tool, it’s just a bit more fiddly. Here’s how: –

1. Cut your strips as before

2. Fold in half, wrong sides together, press along fold.

3. Open out and bring in outside edge to meet the fold. Press.

4. Repeat with other edge.

Done!  Now you have bespoke bias binding to coordinate with your project!

Image

I know, you’re dying to know just exactly what my project is, aren’t you?

Well you’ll have to wait until after the weekend because it is a present for someone very special and I don’t want to spoil the surprise, but here’s a sneak preview for now…

Image

Lots of photos to come so follow the blog to see them.

In the meantime, why don’t you have a go at making your own bias binding and show me what you’ve made with yours?


8 Comments

Crochet Cushions & A Nosy Chicken!

I finished these “rainbow” cushions a couple of weeks ago and have been meaning to show you, so this morning I pulled my finger out (along with the camera) and set to it.  Amber, our “Amber Star” hen, took the precise moment I was about to press the shutter to investigate the new additions to her familiar walking ground. 

Image

Are you allowed to have favourites? I love that hen – she is sooo bold!  She has masses of character and keeps the puppy in line (who has learned that she WILL get a peck if she gets too close!).

I laid a work-in-progress blanket on the sofa to set the scene; this corner is where I put my feet up of an evening and settle down with my crochet to watch TV, while my ever-patient husband has the sport (on silent) on his iPad beside him.  He’s a keeper – he lets me watch Midsomer Murders, Poirot, Lewis (and other such stuff that he hates) on the 60″ HD TV and he watches football on a 10″ screen without complaining!

Anyway, Amber very obligingly turned around to pose for the camera. Isn’t she lovely?

Image

I love this combination of colours (thank you Lucy at Attic 24) and used them to make two cushions, one in ‘Raindrop’ stitch and the other in ‘Ripple’.

Here is the smaller, Raindrop cushion…

Image

…and this is the back made from a gorgeous fuchsia sweater from my stash of felted woollen jumpers.

Image

I made a simple envelope-style back so that I could crochet a lovely contrasting trim in turquoise.  I just love the different coloured buttons.

Image

The Ripple cushion cover is huge and I don’t actually have a large enough feather insert for it yet, so I borrowed a smaller one from another cushion just to take the photo:)

Image

The reverse is made from part of a £3-00 charity shop find; a cream utility, pure wool, blanket with faint blue stripes running through.

Image

I left the original label on it – I don’t know why really, I suppose to shows its vintage origins. I think it adds authenticity to it and a bit of quirky character which I like.

Image

More contrasting trim and bright buttons…

Image

…and here is the “Ta Dah!” moment with them both looking very cheery on my sofa (after the hen finally got bored and disappeared into the kitchen to eat the dogs’ food, much to their disgust).

Image

Don’t you just adore crochet; it makes me feel all happy inside to see rainbow coloured cushions (and blankets) scattered around my home – and even happier knowing that I’ve made them all.


1 Comment

Ascot Ladies Day – What to wear??

Formal dress with on-the-knee or below length skirt, shoulders covered, hat or substantial fascinator.  That’s the easy part, but what actually to wear?

I have just one hat which I bought second hand over ten years ago.  I still love it and see no point in buying another.  It was a designer bargain and it comes out for weddings and Ascot and, as it is a classic navy, goes with everything.

I have a navy leather Osprey handbag (a bargain from TKMaxx) and some L K Bennett navy wedges (another bargain from Kilver Court) so the accessories were sorted.

I bought a lovely red-with-white-polka-dots dress from TKMaxx for our first wedding anniversary last month when we went to Geneva and haven’t worn it since.  Red and navy are great together, so I decided to go with that.

But I don’t own a suitable jacket.

It was Monday and Ascot was on Thursday so, knowing I could spend an entire day shopping and still not find what I was looking for, I popped over to Hanson’s fabric warehouse in Sturminster Newton with an aim to making one.

What a fabulous place, I love going there!  I wanted a bolero style and ended up going for this one by Simplicity: –

Image

I really wanted navy silk and couldn’t believe it when they didn’t have any:(

Anyway, as I only needed one metre of fabric and lining, I bought navy linen and red silk.  My theory being that both would be useful additions to my wardrobe and, at less than forty pounds including the pattern, a bargain to boot!

I don’t know if you can see on the picture of the pattern above, but I made the navy one in style B and the red one in style F.

This is the navy one; slightly longer in length and with a straighter neckline: –

Image

I bought some gorgeous coat lining which looks fabulous,

Image

The only gripe I had was with the actual pattern itself – it really was too simple and the lack of tailoring lets it down in my opinion. For instance, the lining was too simple without any facings and the armhole edges were just overlocked which was awful.  I found some black satin ribbon in my stash and bound the raw edges with it and it looks much better now.

Image

I prefer to buy Vogue designer patterns which are very advanced, but are more likely to take ten hours rather than the two that this one took!  I didn’t have much time and anyway, this really was the only style I liked in all the pattern books that would suit the outfit.

When I made the red one I altered the pattern slightly so that the lining was inserted differently and is consequently much neater.

Image

Look at this finishing – much better!

Image

The silk is a dupion with a slub effect – it shimmers as the light changes.  Here’s a close up.

08small

I put the finished outfits together on a hanger and decided to go with the red jacket, which is ironic considering I would have bought navy silk had it been in stock:)

09

So this is me, champagne in hand, ready to go….

10small

…and this is with my lovely friend Andrea with whom I had a fabulous day!

11small

Do you want to see some more?  Yes?  OK then; this is Dawn on the way up in our minibus.

And, yes, we are drinking champagne at 8.30 in the morning:)

13small

These are the other girls we went with.

23

At the Winner’s Enclosure waiting for Her Maj to arrive….

12small

And here she is!

25small

They hand round a Carriage List so you know who’s in which carriage.  It seems Rory Bremner hob nobs with royalty!

21small

24small

This was a typical crowd around one of the many champagne bars…..

19small

…and this was the champagne list.  £80 for the cheapest bottle!!!

20small

Here are a few photos of the outfits and hats on display –

22small

18small

17small

16small

15small

14small

So that’s the story of my Ascot Ladies Day outfit dilemma – what did you wear?


Leave a comment

Crochet Glastonbury Festival Bag!

Well, the festival season is here upon us once again and I happen to live near to the biggest and best – Glastonbury! 

Whilst I’m not actually going this year, two of our daughters are stewarding for free tickets and the eldest son is taking the traditional route in.  By that, I mean he bought a ticket and is not planning to climb over the fence.  (Did you know that Michael Eavis is on record as saying how disappointed he is at the lack of ingenuity shown by would-be festival crashers when trying to sneak in for nothing?).

We used to be able to hear the music from our house but, since moving seven miles further east, no longer have that (dubious) pleasure.

I digress….

The first event was in 1979 and attracted 1,500 party-goers at the cost of £1 each (including FREE milk from the farm!), but it wasn’t until ten years later that Eavis used it as a fundraiser for CND, raising £20,000 for the cause. 

Image

Last year (2013) saw 175,00 ticket holders paying £210 each and raised £2,000,000 for charities and local good causes!

So what images spring to mind when thinking of the Glastonbury (or, more accurately, Pilton) Pop Festival?  Think hippies, rainbows, love, peace, cannabis, wellies, mud, sunburn etc. (although my husband refers to the annual migrants as “smelly soap-dodgers”!)

Taking the optimistic view and thinking ‘sunshine and rainbows’, I designed some free-form crochet bags in the “Hippy-Chic” style.

Would you like to see them?

Of course you would!

Here is my very lovely daughter modelling them together with that other festival staple – wellies (well, my Dubarry’s actually): –

Image

Here’s a close up of the front showing that gorgeous “ripple” pattern…

Image

…and the back is felted wool.  Fully lined with contrasting blue fabric with white polka dots, there is a pocket inside for your mobile ‘phone and it closes with a magnetic clasp.

Image

Here’s the other one: –

Image

This was made in one piece so the back is a continuation of the front.

Image

Lovely spotty fabric for the lining and this shows the ‘phone pocket and magnetic clasp –

Image

Are they “Festival” enough for you?  Both crochet Glastonbury Festival bags are available from my shop on the link at the top of the page – go on, unleash the hippy in you!


2 Comments

Handmade Recycled Greetings Cards For School Fair Or Summer Fête

Blimey I’ve been a busy bee creating all manner of loveliness for the School Fair tomorrow!

Earlier in the week I made some fudge and then I designed a summer fête inspired box in which to display them.  I was trying to think of some quick, easy and cheap ideas for making something which would sell at the fair, when I remembered the forty-or-so sheets of recycled brown card left over from making our wedding invitations last year.  Bingo!  Greetings Cards would be all those things and should make a good profit for the school.

I sketched and cut out some card templates of several different designs, then cut the shapes out of scraps of wrapping paper.  Keeping in mind the necessity to appeal to all ages and both sexes, I chose a mixture of colours and cut out the following; bunting, balloons, kites and ties.

I stitched the shapes with a basic straight stitch on the sewing machine and embellished some of them with glued-on paper clouds.  The cards were left blank to make them suitable for any occasion, apart from a few that were printed with ‘Father’s Day’ as it is the day after the fair.  I wrote my website on the reverse so that, if they don’t sell, I can put them in my shop for sale:)

Image

So far forty cards have cost nothing, so I bought 50 manilla envelopes for £1.29 and 50 see-through bags for £2.75.  They look MUCH more professional presented this way and each card has still only cost 8p! (Not including my time, obviously).  This serves another purpose though, as it protects the cards from damage and dirt as they get handled.

Image

Now, what to do about a box?

Knowing that people like to rummage through everything easily, I decided to customize a shoe box to make a long, thin “shelf” type display box.  This is what they look like….

Image

I’m secretly quite chuffed with the whole thing!  Hopefully that’s given you an idea of a quick and easy craft make for your school fair or summer fête – handmade greetings cards for just a few pence each.