Sewchet

Sewing, crochet, crafts, accessories, baking, tutorials,


128 Comments

Tutorial: Crochet Poncho

This last week has been pretty miserable weather-wise in South Somerset. I have managed to walk the dogs on several days but mostly they put one paw on the doorstep, feel the rain and high-tail it back indoors. They’re most definitely fair-weather walkers which is a shame because I quite like walking in the rain.

On the plus side, being cosied up in front of a roaring fire has had its advantages in that I’ve been finishing some WIPs (and starting some others…) and I actually have one ready to show you complete with a tutorial!

This one was relatively straightforward – I wrote the pattern as I went and got it right first time…with no unpicking at all! Or should I say “frogging”. That’s a lovely word that I’ve only just come across but I think I’ll use it in future:)

Anyway, drum roll please…..

…………………………Tadah!

crochet poncho

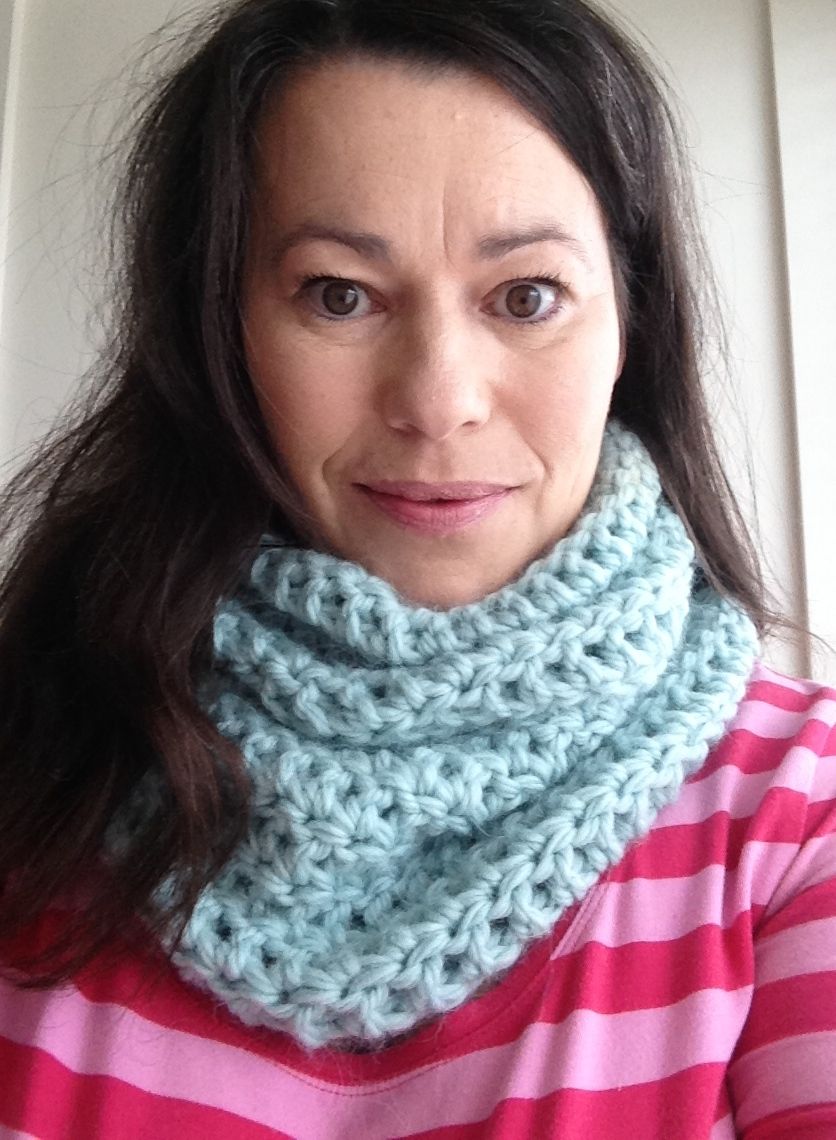
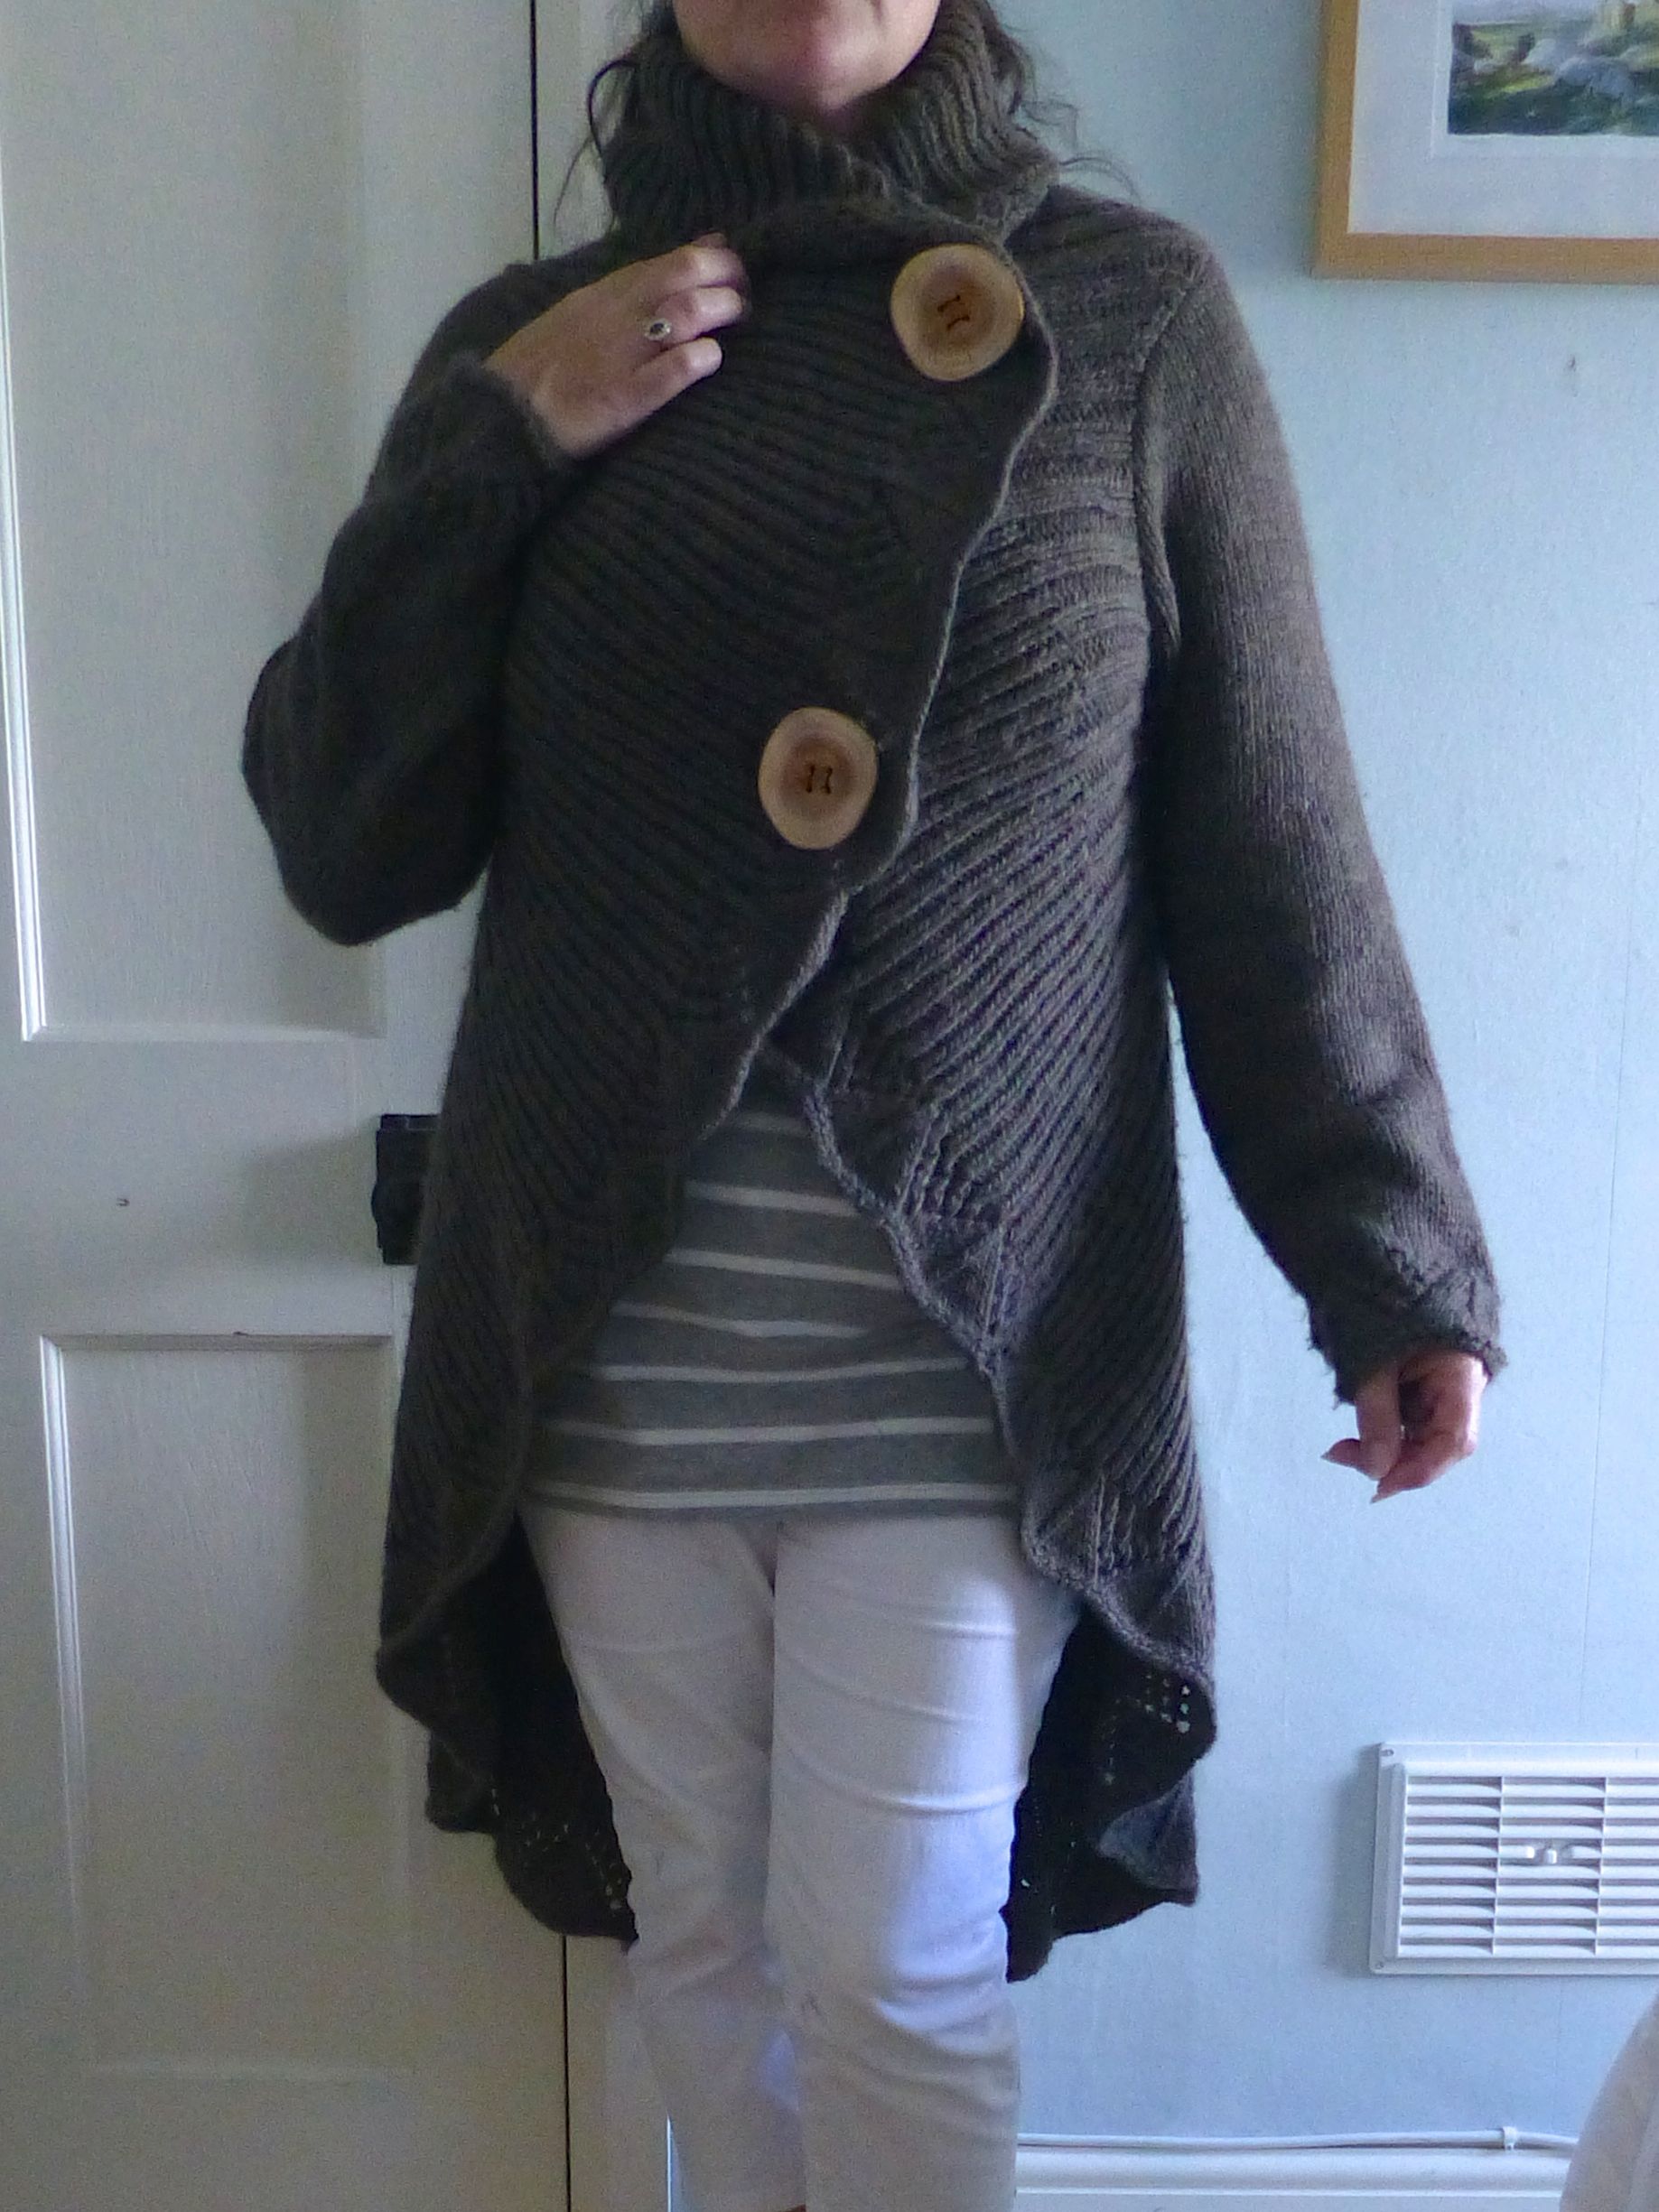
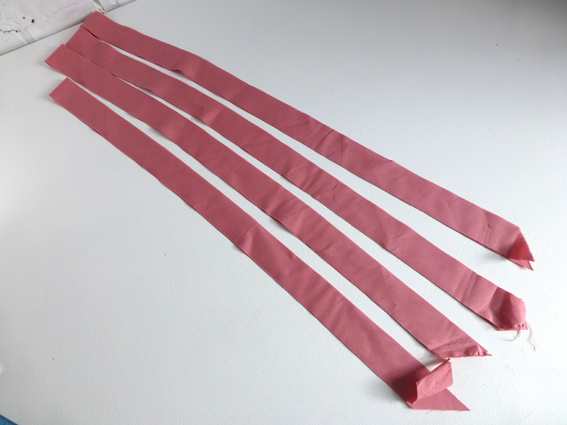
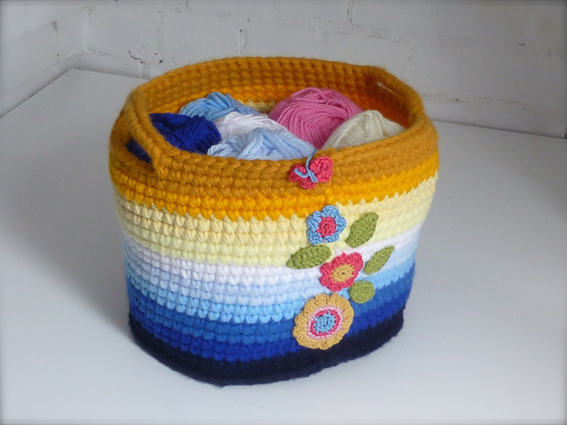
Most of the poncho patterns out there seem to be decorative rather than functional and I wanted one that could replace a coat and scarf, so I designed this one with a toasty cowl neck that can be rolled up around my face if it gets windy.

crochet poncho3

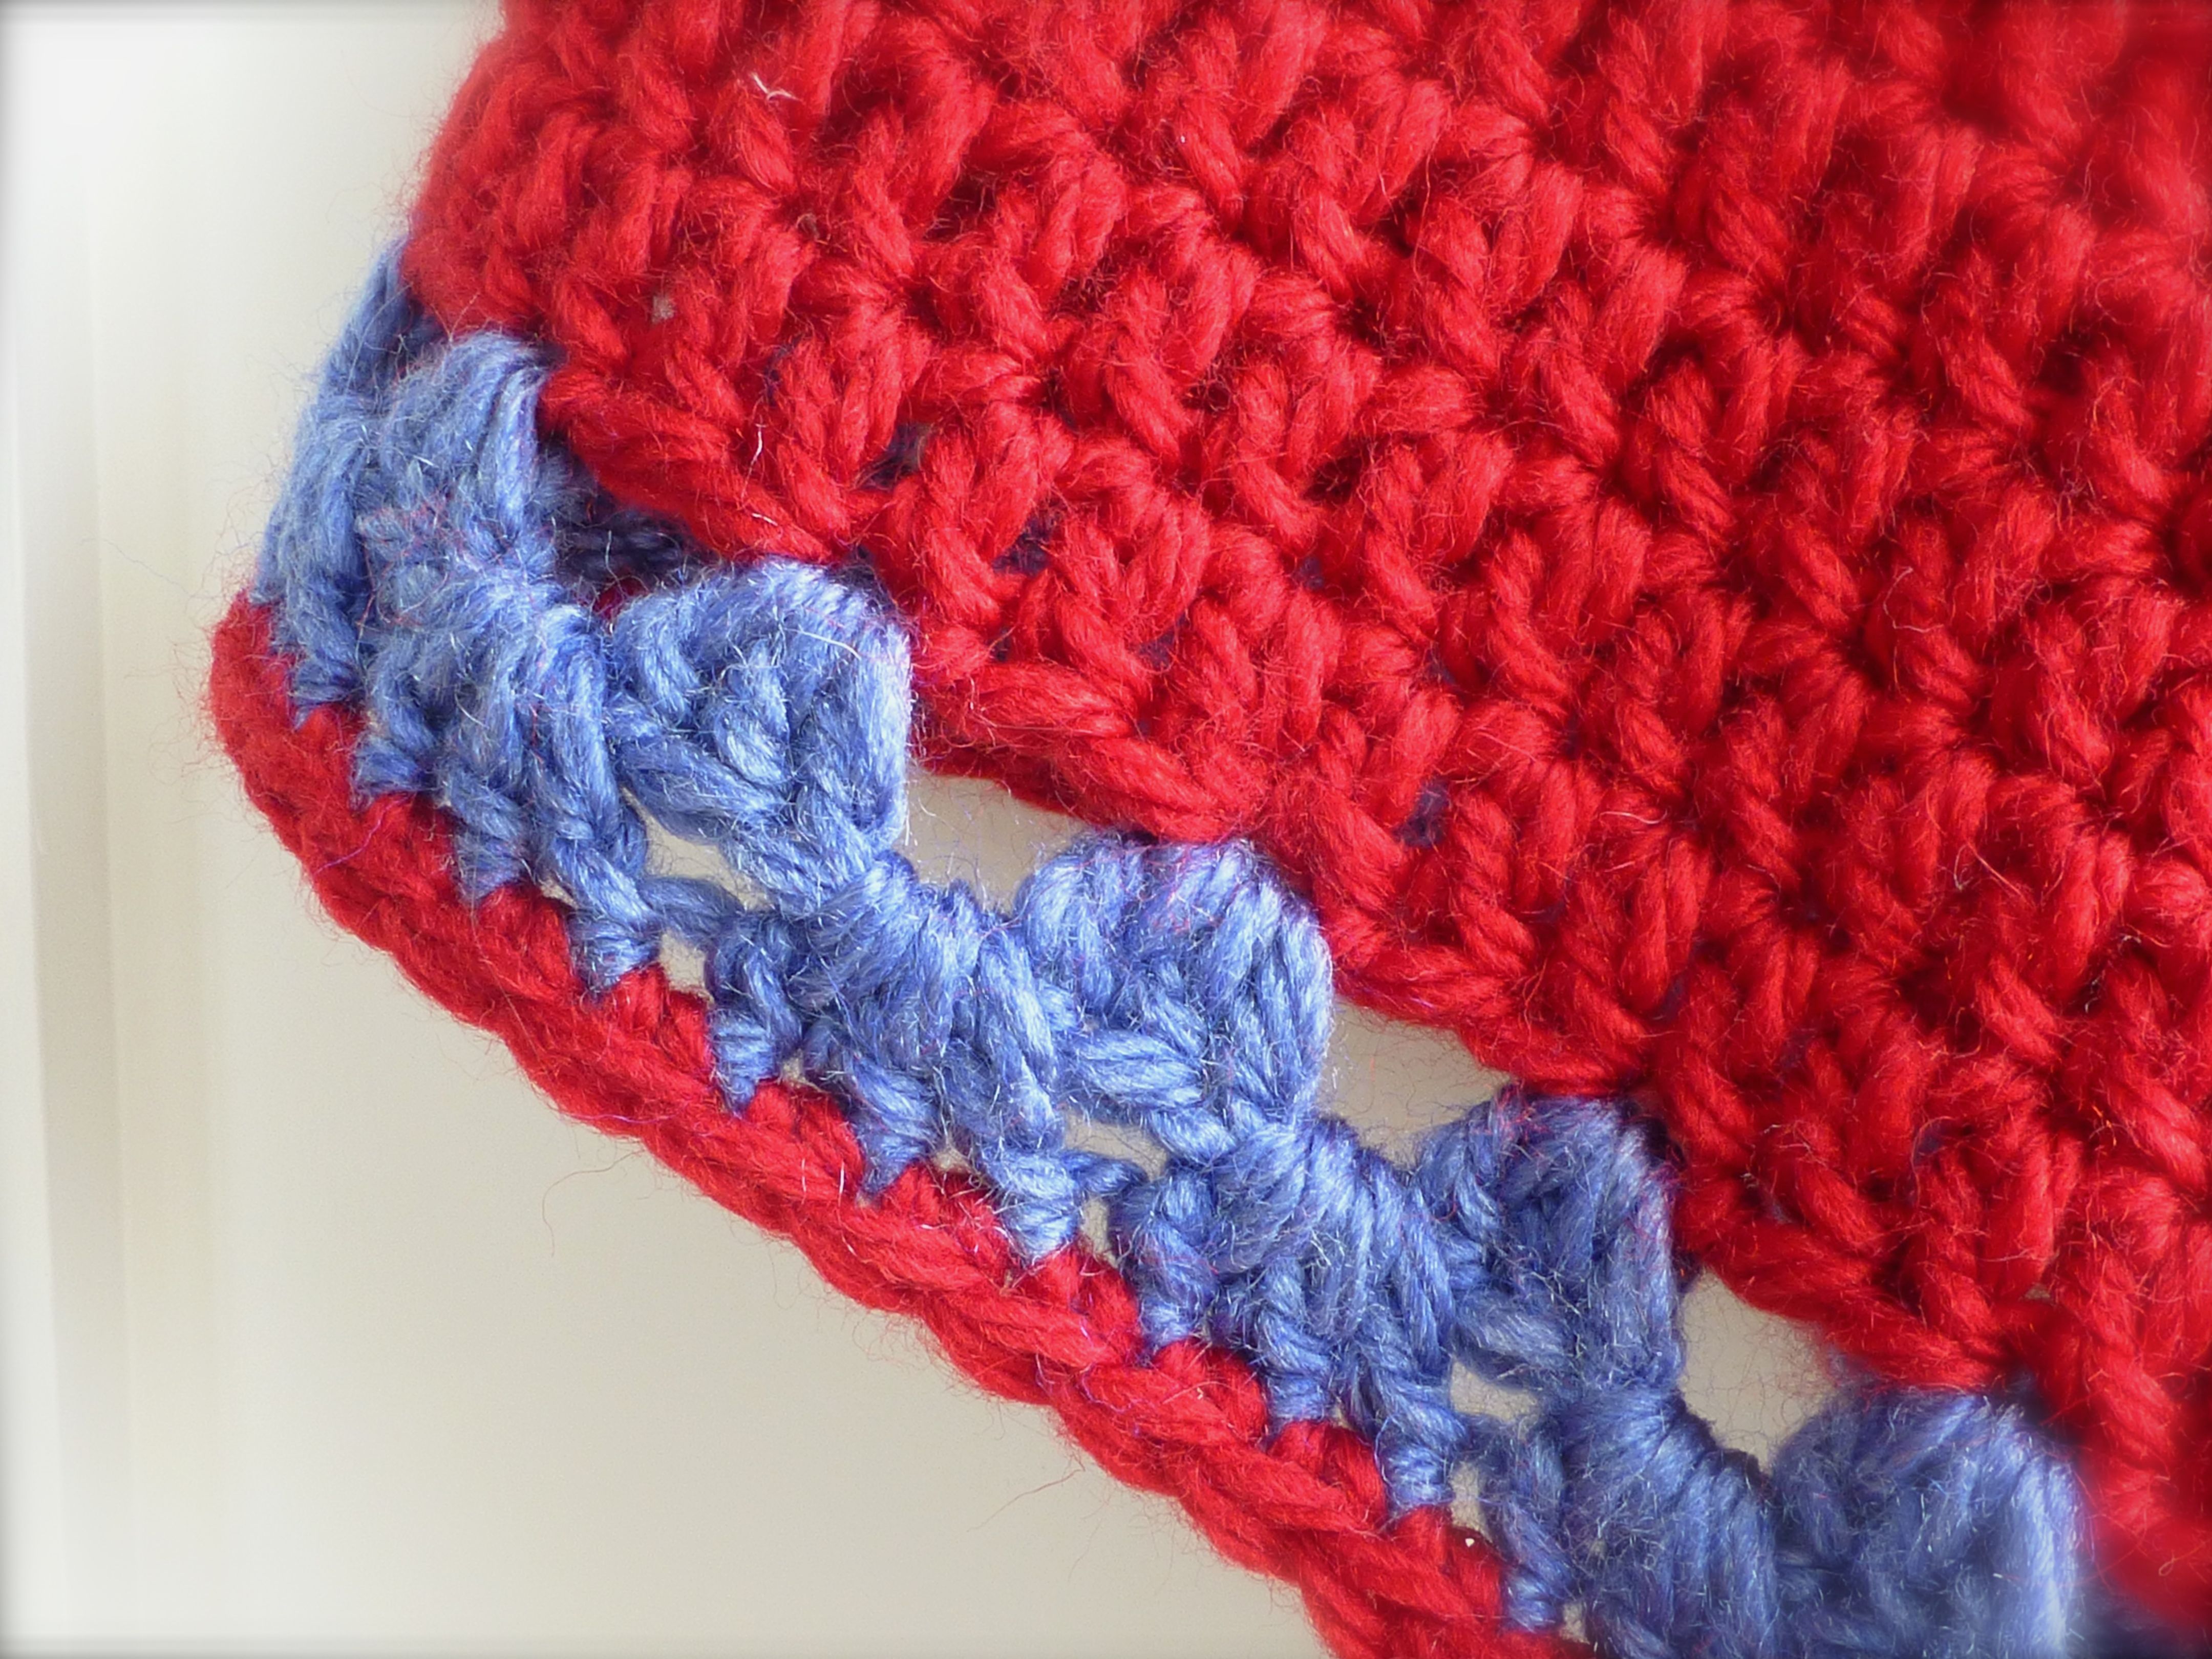
Two rows of granny stripe in blue were added at the bottom edge for a bit more interest.

crochet poncho4

Impossible to get a decent selfie but this gives you an idea of what it looks like on;

crochet poncho5

I love it!

It crochets up really quickly and could be finished in two or three evenings so why not have a go? Here are the instructions: –

CROCHET PONCHO

You will need: 5 x 100g super chunky yarn in Red and 1 x 100g in Blue (I used “Life Super Chunky” by Stylecraft with 25%wool)

10mm crochet hook

Tension: 6 rows and 9tr in 10x10cm

Cowl

In Red, Ch50, sl st in first chain to join round

*Ch3, 1tr in each st to end. Join with a sl st into ch3* Repeat ** until your work measures 8″ (20cm) then continue on to work the Poncho

Poncho

Ch3, 1tr, ch1, 2tr all into next stitch (centre back), 1tr into next 26 stitches, 2tr, ch1, 2tr all into next stitch (centre front), 1tr in each stitch to end.

Subsequent rows are all treble crochet, increasing at centre back and front as follows: 2tr, ch1, 2tr

Repeat until your arm length measures 20″ (50cm)

Change to Blue in the sl st to join the last round.

Ch3, 2tr,*sk 2, 3tr* Repeat ** to end increasing at centre back and front as before. Join with a sl st.

Repeat last row.

For the final row, work 1dc into each stitch to end. Fasten off and weave in ends.

And there you have it! A lovely warm crocheted poncho to see you through Autumn:)

crochet poncho2


15 Comments

Tutorial: – How To Make A Crochet Cowl In Three Hours!!

Last week I bought two skeins of Debbie Bliss “Roma” with a particular project in mind – a cosy cowl for myself.

As this only takes two skeins, I splashed out on this luxury yarn which is a beautifully soft mix of Merino and superfine Alpaca in a gorgeous shade, Duck Egg. At £8.95 per 100g ball it costs just under £18.00 to make which is well worth it considering the quality of the wool.

Even though I was writing the pattern as I went, I had the finished cowl around my neck within just three hours of hooking my first stitch. Not bad for an evening’s work, though I say so myself!

This was made possible by the use of super chunky yarn and a super sized crochet hook, the combination of which creates a loose textured cowl which drapes softly.

Thursday

There are lots of patterns out there but I had a go at designing my own as I went, combining several elements into one design and tailoring it to fit me exactly.

IMG_1211

I decided to use exclusively treble crochet (US double) to keep it simple and let the wonderful yarn take centre stage.

I also decided to make it wider at the bottom so that it would drape lower and keep my chest warm, but make it narrower at the neck for a snug fit to keep the wind out.

IMG_1214

IMG_1226

IMG_1230

Apologies for the slightly scary stare – that’s what happens when I take selfies!!! Anyway, you get the idea – a really cosy cowl to keep you warm on a cold day. So, without further ado….

COSY COWL PATTERN

You will need: –

2 skeins of any super chunky yarn (I used Debbie Bliss “Roma” in Duck Egg – £8.95 each from the Wool Warehouse)

12mm crochet hook

Tension: 7 stitches and 5 rows to 10 x 10cm

Instructions: –

Ch50 and join with a slip stitch into your first chain to continue working in the round.

Round 1. Ch3, 1tr in each ch to end. Join with a sl st into your first ch3 (50 st)

Rounds 2-4. Repeat Round 1 three more times (50 st)

Round 5. Start decreasing for the neck; Ch3, 1tr into next 12 stitches, tr2tog, 1tr into next 24 stitches, tr2tog, 1tr in each st to end. Join with a sl st (48 st)

Round 6. Ch3, 1tr into next 11 stitches, tr2tog, 1tr into next 23 stitches, tr2tog, 1tr in each st to end. join with a sl st (46 st)

Round 7. Ch3, 1tr into next 10 stitches, tr2tog, 1tr into next 22 stitches, tr2tog, 1tr in each st to end. join with a sl st (44 st)

Round 8. Ch3, 1tr into next 9 stitches, tr2tog, 1tr into next 21 stitches, tr2tog, 1tr in each st to end. join with a sl st (42 st)

Round 9. Ch3, 1tr into next 8 stitches, tr2tog, 1tr into next 20 stitches, tr2tog, 1tr in each st to end. join with a sl st (40 st)

Rounds 10-16. Ch3, 1tr into each st to end. join with a sl st (40 st)

Round 17. Ch2, 1dc into each st to end. Fasten off and weave in loose ends.

Such a simple, quick pattern with only 17 rows of crochet – I think this cowl is definitely going to be made in various different shades for Christmas presents….!


5 Comments

Tutorial: How To Make A Bedside Book Pocket

My two youngest boys share a room (out of choice, not because we’re too mean to give them a room each!).

It’s a good size double but with all their toys etc. in there, there wasn’t enough playing space left when they had single beds, so we had to seriously consider bunk beds.

I loathe bunk beds.

Not only are they ugly, but they’re often not the best use of space, so I designed a set of bunks that fit wall-to-wall (keeping the floor totally free for a den underneath) and hubby made them. And they even cost less than it would to buy the cheapest pine bunk beds on the market so a bit of a bargain to boot – and I do love a bargain:)

They still need painting and both the climbing-wall ladder and fireman’s pole need fitting, but at least they’re functional in the meantime.

The only problem we have with them sharing a room is that one wakes early (6 ish) and the other likes a bit of a lie-in (7 ish) resulting in the light being switched on and a grumpy boy:(

The solution was simple enough – fit each cabin out with it’s own light so No.2 son can read without waking No.3 son. We chose the type of lights that run on batteries rather than rewire the whole room; you know the kind, you click the front to switch on and off and they’re often used for garages or inside cupboards where there’s no power.

The other issue was that, as they can’t have a bedside table or a shelf, they needed somewhere to keep a book handy.

This is what I came up with;

10

It just hangs over the edge and fastens with a velcro strip on the inside so it would work equally well for any wooden (or metal) bed frame or bunk bed.

09

They work really well and the boys were (a little bit too) excited with such a simple gift. This is how they look (I really must get the paint out!) –

11

You can just see the lights on the wall.

So, here’s how I made them…

1. To fit the average sized book, cut two pieces of fabric and one piece of interlining 21″ x 8″

01

2. Sandwich the interlining between the two pieces of fabric, wrong sides together, and baste around all four sides.

02

3. On the front pocket edge, pin and stitch some bias binding (tutorial here).

03

4. Fold the pocket up 7″, pin in place then baste down the sides.

04

5. Pin more bias binding around the entire outside edge…..

05

….mitring the corners for a neat finish.

06

6. Stitch carefully in place, making sure to catch the back of the binding as well. If you miss a bit like I did (!) don’t panic. Remember that it’s on the reverse and can’t be seen so just catch-stitch in place by hand.

7. Sew a 6″ strip of Sew ‘n’ Stick velcro to the top on the reverse side….

07

…et Voilá!

08

8. Stick the adhesive part to the inside of your bed frame and attach your finished pocket to it.

09

The Boys couldn’t wait to get in bed last night and try them out and what’s more it worked this morning – No.2 son woke early and stayed in bed quietly reading to himself until his brother woke up!

Don’t they look snug?

photo-34

I know we’ll have to change the light batteries regularly but it’s worth the inconvenience. They’re bright enough to read by but, because they each have their own ‘cabin’, light from one does not disturb the other. Result!!

Have a go at making your own version or look out in my Folksy shop for some in the near future:)

(Please link back to this page if you want to use this article on any other site – thanks!)


9 Comments

How To Turn A Cardigan Into A Coat (and More Charity Shop Finds)

Now the excitement of Yarndale is over I can’t wait to start ‘making’ again.

I’ve got several crochet projects on the go but there’s nothing like a bit of sewing for an instant fix and, as Autumn is trying to oust our Indian Summer, I turned my attention to my Winter wardrobe.

That makes me sound like I rotate my clothes according to the seasons in an incredibly organized fashion. I don’t – they’re all hanging in the same place (except the ball gowns which have their own space). There are a few items that I like but don’t wear simply because they’re not easy to actually wear.

Confused? I’ll show you what I mean.

Take this John Rocha cardigan that a friend passed on to me, I suspect because she had the same problem. It sports an enormous shawl collar that makes the cardigan shift backwards so I find myself constantly hauling it back forward over my shoulders. It also has a kind of waterfall effect at the front which gapes so you need to wear another cardigan underneath to actually keep warm!!!

before

I had decided to donate it to the charity shop but then asked myself “What would Shawn do?”

Although this is a very modest refashion compared to her standards, it works and now I have a new garment at no cost!

Here’s what I did: –

1. Wrap the cardigan around until it fell the way I wanted it to and pin in place.

2. Sew two buttons to the left side of the cardigan (remember these from my Yarndale Booty?)

button

3. Cut a piece of scrap leather to use as a backing for your buttonholes. This stops the yarn from stretching out of shape and gives it strength.

4. Pin to the reverse of the cardigan and (right side facing) make two buttonholes on the right hand side of the front to correspond with your button placement.

buttonhole

The buttonholes are virtually invisible from the front and this is what they look like on the inside;

leather back

The finished coat is a real winner that will get lots of use which isn’t bad considering it’s been sat in my wardrobe for about a year now!

after

I love the cosy cowl neck and this proves my theory that eye-catching buttons really can make an outfit:)

I had a couple of other things to take to the charity shop anyway and, as is often the case, came home with more than I took in!

First were these ice-cream sundae glasses at £1.25 each which the boys will love;

sundae

Then I spotted this framed print of Harlech Castle for £2.99;

castle

It’s already hanging in one of the spare bedrooms;

framed

Most excitingly are these four pillowcases for 50p each – pure white and the finest crisp Egyptian cotton;

pillowcases

Initial thoughts are to make some napkins out of them – I should be able to get at least twelve which I could embroider or crochet to turn them into something quite special.

Any other ideas?


6 Comments

Tutorial: How to make your own Bias Binding

Ok, so buying it ready-made is easy and convenient but it’s not cheap and what if you can’t get the right colour to finish your project?

That was my dilemma this week, so I made my own bias binding to coordinate perfectly and I thought I’d show you how.

First off, you need to find the bias of your chosen fabric which is really easy.  If you pull along the grain (parallel to the edge), the fabric won’t stretch (unless it’s a knit fabric) and if you pull it at 45° to the grain it will stretch as demonstrated below: –

Image

Using tailor’s chalk, mark lines on your fabric on the bias at 1 1/2″ intervals (or the width suggested by your bias maker).

Image

Cut along the lines

Image

Image

With right sides together, pin two strips at right angles to each other as shown: –

Image

If you’ve gone to the edge of the fabric your corners will already be cut off, if not, you can do this now, then sew together.

Image

Press the seam open.

Image

Repeat, joining as many strips as you need to make the required length.

With wrong side facing up, insert the corner of the leading edge into the bias maker. Using the metal bar, pull very gently along the length of the fabric, ironing as you go.

Image

When you have completed the entire strip, fold in half right sides together and press.

Image

If you don’t have a bias maker, get one – they’re indispensable.  However, you can also make bias binding without a tool, it’s just a bit more fiddly. Here’s how: –

1. Cut your strips as before

2. Fold in half, wrong sides together, press along fold.

3. Open out and bring in outside edge to meet the fold. Press.

4. Repeat with other edge.

Done!  Now you have bespoke bias binding to coordinate with your project!

Image

I know, you’re dying to know just exactly what my project is, aren’t you?

Well you’ll have to wait until after the weekend because it is a present for someone very special and I don’t want to spoil the surprise, but here’s a sneak preview for now…

Image

Lots of photos to come so follow the blog to see them.

In the meantime, why don’t you have a go at making your own bias binding and show me what you’ve made with yours?


4 Comments

Presentation Box With Bunting

If you saw yesterday’s post about the handmade fudge I created for the school fair, you may remember that I was just going to take it along in a bread basket.

Well, I thought that, since I had gone to the trouble of making the fudge and packaging it nicely, I could be a bit more creative with the presentation. 

An hour later I had made this: –

Image

Inspired by this tiny scrap of leftover “Afternoon Tea” wrapping paper which was just too pretty to throw away…

Image

…I decided the colour scheme could be pink and blue with paper bunting.

Here’s what I did….

  1. Paint the outside of a shallow cardboard box (I used the lid off a box of photocopier paper) in blue and the inside in pink.  I used acrylic paints which dried super-quickly.
  2. Using parcel tape, stick two wooden skewers at an angle to the inside-rear of the box.  Paint pink.


Image

3.  Using PVA adhesive, glue down a piece of wrapping paper to the inside base of the box.  (I didn’t have enough to cover the entire       base, so I painted a strip down each side in pink beforehand).

Image

4.  Attach a length of string between the top of the skewers using parcel tape.

5.  Draw a small triangle onto a piece of card and cut out to make a template for the bunting.  Fold your wrapping paper and place the template short edge along the fold.  Draw around, and cut out.

Image

Image

6.  Paste a small amount of glue onto the inside of your bunting pennant, hang over the string and press together.

Image

Image

And there you have it – a suitably themed box in which to present your homemade goodies for sale.  They look much cuter in this rather than the bread basket, don’t they?

Image

A presentation box complete with “Afternoon Tea” wrapping-paper bunting – perfect for selling sweets, chocolates or small gifts on your stall at your school fair or Summer fête.


2 Comments

Homemade Fudge

It’s that time of year again – School Fair!  This begs the question: “What-to-make-that-kids-will-want-to-buy?”. It has to be cheap for two reasons;

  1. It’s a donation – you don’t get costs refunded
  2. Children have about two pounds to stretch around the entire fair


I decided to do something different to the usual fairy cakes and hit upon the idea of fudge in two flavours – “Chocolate” and “Vanilla & Raisin”.

Fudge is sweet (so kids will love it) and simple to make, the ingredients are cheap and I thought I could package it up to look appealing.

This is the Chocolate…

Image

and this is the Vanilla.

Image

Mmmmm, delicious!

Image

Here’s what I did:

Ingredients: –

397g can condensed milk

150ml single cream

450g demerara sugar

115g butter

  1. Melt all the ingredients in a large, non-stick pan over a low heat, stirring until the sugar dissolves.
  2. Bring to the boil then simmer for 10-15 minutes, stirring continuously and scraping the base of the pan.
  3. Continue until a sugar thermometer reads 118°C – this is vital, or the fudge won’t set.
  4. Transfer to a mixer and beat until very thick and only just beginning to set.
  5. Pour into a 20cm square tin, lined with baking parchment, and leave to set before cutting into squares.


For chocolate, add two tablespoons of cocoa powder at step 4.

For vanilla (and raisins) add one teaspoon of vanilla extract (and two tablespoons of chopped raisins) at step 4.

Image

I found some small cellophane bags here www.wrappingsandbows.co.uk

Image

I designed some simple labels to attach to each bag with the price clearly stated.

Image

Pricing is tricky but, as this was my donation, I just added up the cost of the ingredients and packaging and divided it roughly between the number of bags created. I put two squares of each flavour in each bag and made twenty-eight bags, plus plenty of offcuts which could be bagged up and sold off cheaper (if you haven’t already succumbed to temptation and eaten them as you go along!).

Image

I think they look quite saleable, don’t you?

Here they are all lined up in bread baskets, ready to go.

Image

Image

Image

So there you have it – handmade fudge, simple but perfect idea for school or village fairs!


3 Comments

Small Crochet Storage Baskets

When I first kitted out my craft studio I pretty much sourced everything from Ikea just to get started – their storage solutions are ideal, not to mention cheap. But, being the creative person I am, it is all a bit too functional and I’m trying to come up with ways to personalize my space with handmade alternatives.

Take these plastic tubs that are currently in my studio for example: –

Image

They’re the perfect size – just not ‘me’.

I got to thinking about the work-in-progress basket I made a few weeks ago (below) and thought I could come up with something along the same lines, but much smaller.

Image

I came across these little baskets here and love the different, but toning colours, and the band of cream that ties the three baskets together visually. I wanted baskets that could hang from a hook though…

Image

After playing around with size, tension and colours, I made these three little baskets with a single hanging loop which are stiff enough to do the job perfectly.

Image

Image

Image

I love them!  Sooo much nicer and more tactile than the plastic tubs. 

I will work out a tutorial for them so, if you want to make your own small crochet baskets – follow the blog and don’t miss out!


2 Comments

Tea Cosy Tutorial

There has been quite a lot of interest in my ‘Camper Van’ and ‘Hen’ tea cosies, so here is the tutorial I promised.  I would love to see any that you make – post your photos on my Facebook page:)

Image

You will need: –

  • a sheet of A4 paper
  • 1/4 metre of fabric of your choice
  • 1/4 metre lining fabric
  • 1/4 metre polyester wadding
  • motif (for appliqué)
  • iron-on interfacing
  • matching thread
  • cotton tape
  • bias binding

On an A4 sheet of paper, use a large plate to draw the rounded corners of the tea cosy.

Image

Using the paper template you have just made, cut TWO each out of your main fabric, lining and some polyester wadding.

Image

Take your chosen motif (I cut out a Camper Van from the Fryett’s range) and iron onto fusible interfacing.

Image 

Cut roughly around the motif and pin onto one of your main pieces of fabric. Stitch all around the motif three times. You can be as neat as you like, although I “scribble-stitched” using the freehand machine embroidery method.  This allows the fabric to fray very slightly and adds to the rustic charm.  You could use a close zigzag stitch if you prefer, to enclose the raw edges for a neat finish.

Image

Trim the excess fabric from the finished appliqué.

Image

Cut a 4″ (10cm) piece of non-stretch cotton tape.

Image

Fold the tape in half and pin to the right side of one of your main fabric pieces as shown to form a small handle.

Image

Pin your fabric, right sides together, sandwiching the cotton tape in between.  Pin your lining, right sides together.  Stitch all the way around the curved edge, leaving the bottom, straight edge, free.

Image

Turn and press.

Trim the wadding by 1/2″ (1cm) all the way around.

Image

Slip the lining inside the cosy, wrong sides together to hide the seams.  Now insert the wadding in between the fabric and the lining (front and back) as below.

Image

Pin the bias binding around the bottom of the cosy, enclosing all three layers.

Image

When you get to the end, cut to length and fold under before pinning over the cut end.

Image

Sew close to the edge of the binding.

Image

And there you are – finished!

Image

You can customise it to suit your style using any motif.  Here’s a variation with more free machine embroidery.

Image


This is one I made out of beige linen with a hen appliqué.

Image

Feel free to share on your own blog; a link back to this page would be appreciated:)


Leave a comment

Crochet Edge Cushion Tutorial

If you like the crochet edge cushions and would like to have a go at making one for yourself, I’ve put together a tutorial to help you.

If anything is not clear, please let me know and I’ll amend it.

So, here goes!

You will need: –

  • A 30 x 50cm cushion pad
  • A piece of fabric 34 x 53cm for the cushion front
  • A piece of fabric 34 x 65cm for the cushion back
  • Yarn for the crochet edge (I used Drops Muskat Cotton and a 4mm hook)

Image

1.Make a narrow hem on one short edge of each of your pieces of fabric – this will be the opening edge.

Image

2.Take your back piece and, wrong sides together, fold the hemmed edge in 12cm. Press and pin.

3.Pin front to back, wrong sides together and stitch around the three raw edges with a 5mm seam.

Image

4.Trim seam to 3mm. Turn inside out and press.

5.Stitch a 10mm seam around the same three sides, this time enclosing the raw edges.

Image

This creates a “French” seam which stops any fraying (and is really neat!)

Image

Your cushion cover is made and now for the exciting part…

6.Cut a length of yarn about eight times the width of your cushion cover and blanket stitch all around the opening edge.

Image

7.Row 1 – 3 dc into each blanket stitch (English terms are used)

Image

Row 2 – ch 1, *dc into 1st foundation stitch, skip 2, 5 tr into next foundation stitch, skip 2* Repeat to end, filling any remaining stitches    with dc.

Image

8.Close with a slip stitch and pull yarn through to finish.

Voila! A gorgeous cushion cover with the prettiest crochet edging.

Image

I would love to see your versions – post photos to my Facebook page (link on top right of this post).

If you would like to use this on your blog, please link back to this page.

Have fun:)