I’m hosting a Crafternoon to raise funds for Comic Relief – this Red Nose Day event was thought up by Mollie Makes magazine.
Keep abreast of all the news, including events near you, on The Big Comic Relief Crafternoon Facebook page.


I’m hosting a Crafternoon to raise funds for Comic Relief – this Red Nose Day event was thought up by Mollie Makes magazine.
Keep abreast of all the news, including events near you, on The Big Comic Relief Crafternoon Facebook page.
Having received many compliments and enquiries about the clay gift tags I made for Christmas this year, I thought I’d show you how easy it is to make your own.
Aren’t they lovely?

After having spent many a long hour hand making presents for the majority of family and friends this Christmas, what better way to set them off by making gift tags too?
In common with so many other like-minded folk, I have always kept last year’s Christmas cards with the explicit purpose of re-inventing them as gift tags on next year’s presents and this year was no different.

Although we only give to close family and friends, with six children of our own the gift list soon grows to a sizeable read and I find myself needing more tags than I can produce through recycling alone.
Enter from stage left: A solitary bag of Das Air Drying Clay, bought with this very project in mind a couple of years ago, but only recently rediscovered after a drawer clearing-out session.

Ah ha! (I thought, in one of those ‘lightbulb’ moments). I could use those cookie cutters in my cookie cutter drawer (what – doesn’t everyone have one?) to make just one personalized gift tag for everybody which could also double up as a tree decoration!
So, equipment gathered, let the crafting commence!

The clay should be worked in your hands for a minute or so – this softens it and makes it easier to roll.
Using a cookie cutter, press into the clay and wiggle slightly to separate the shape from the main body of clay.
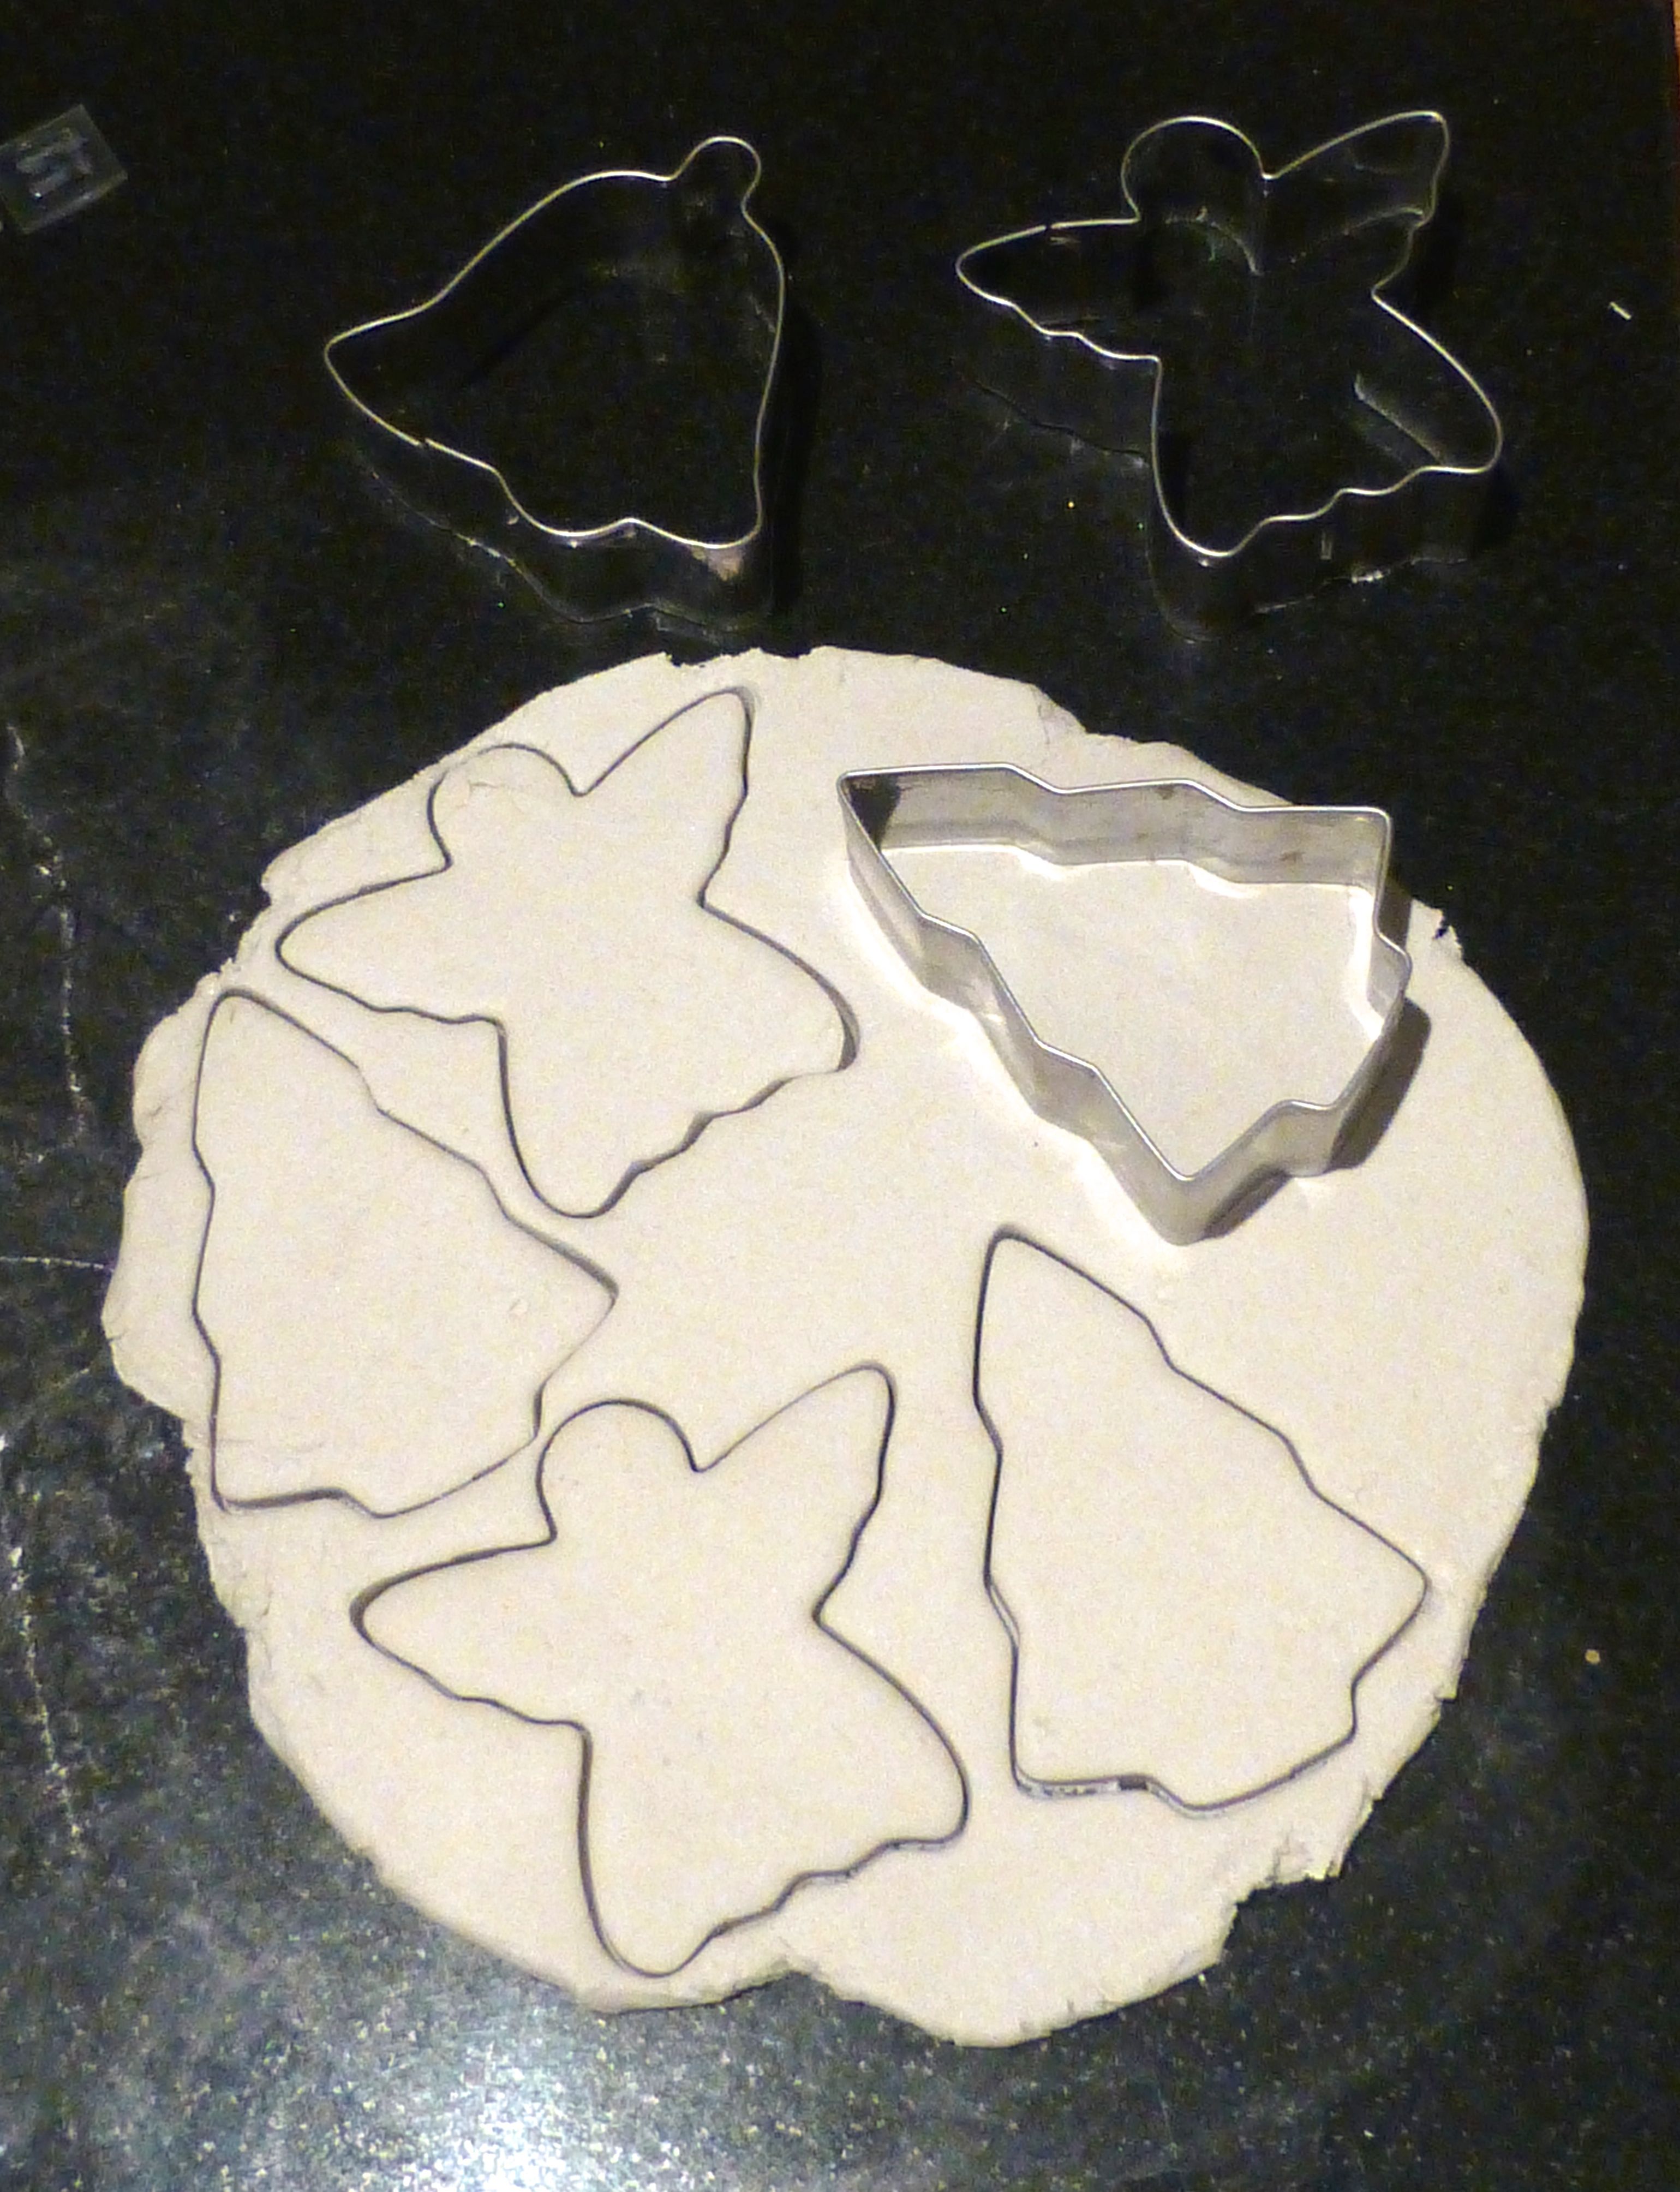
Lift carefully and smooth any rough edges using your finger.
I used alphabet stamps to impress names into the wet clay.

Take a skewer or knitting needle and push through the top of the shape to create a hole from which to hang your tag.

Place on a tray and leave at room temperature until completely dry – mine took three days! You will know when they are dry as the wet clay is grey initially and gradually turns white from the outside edges in towards the centre.
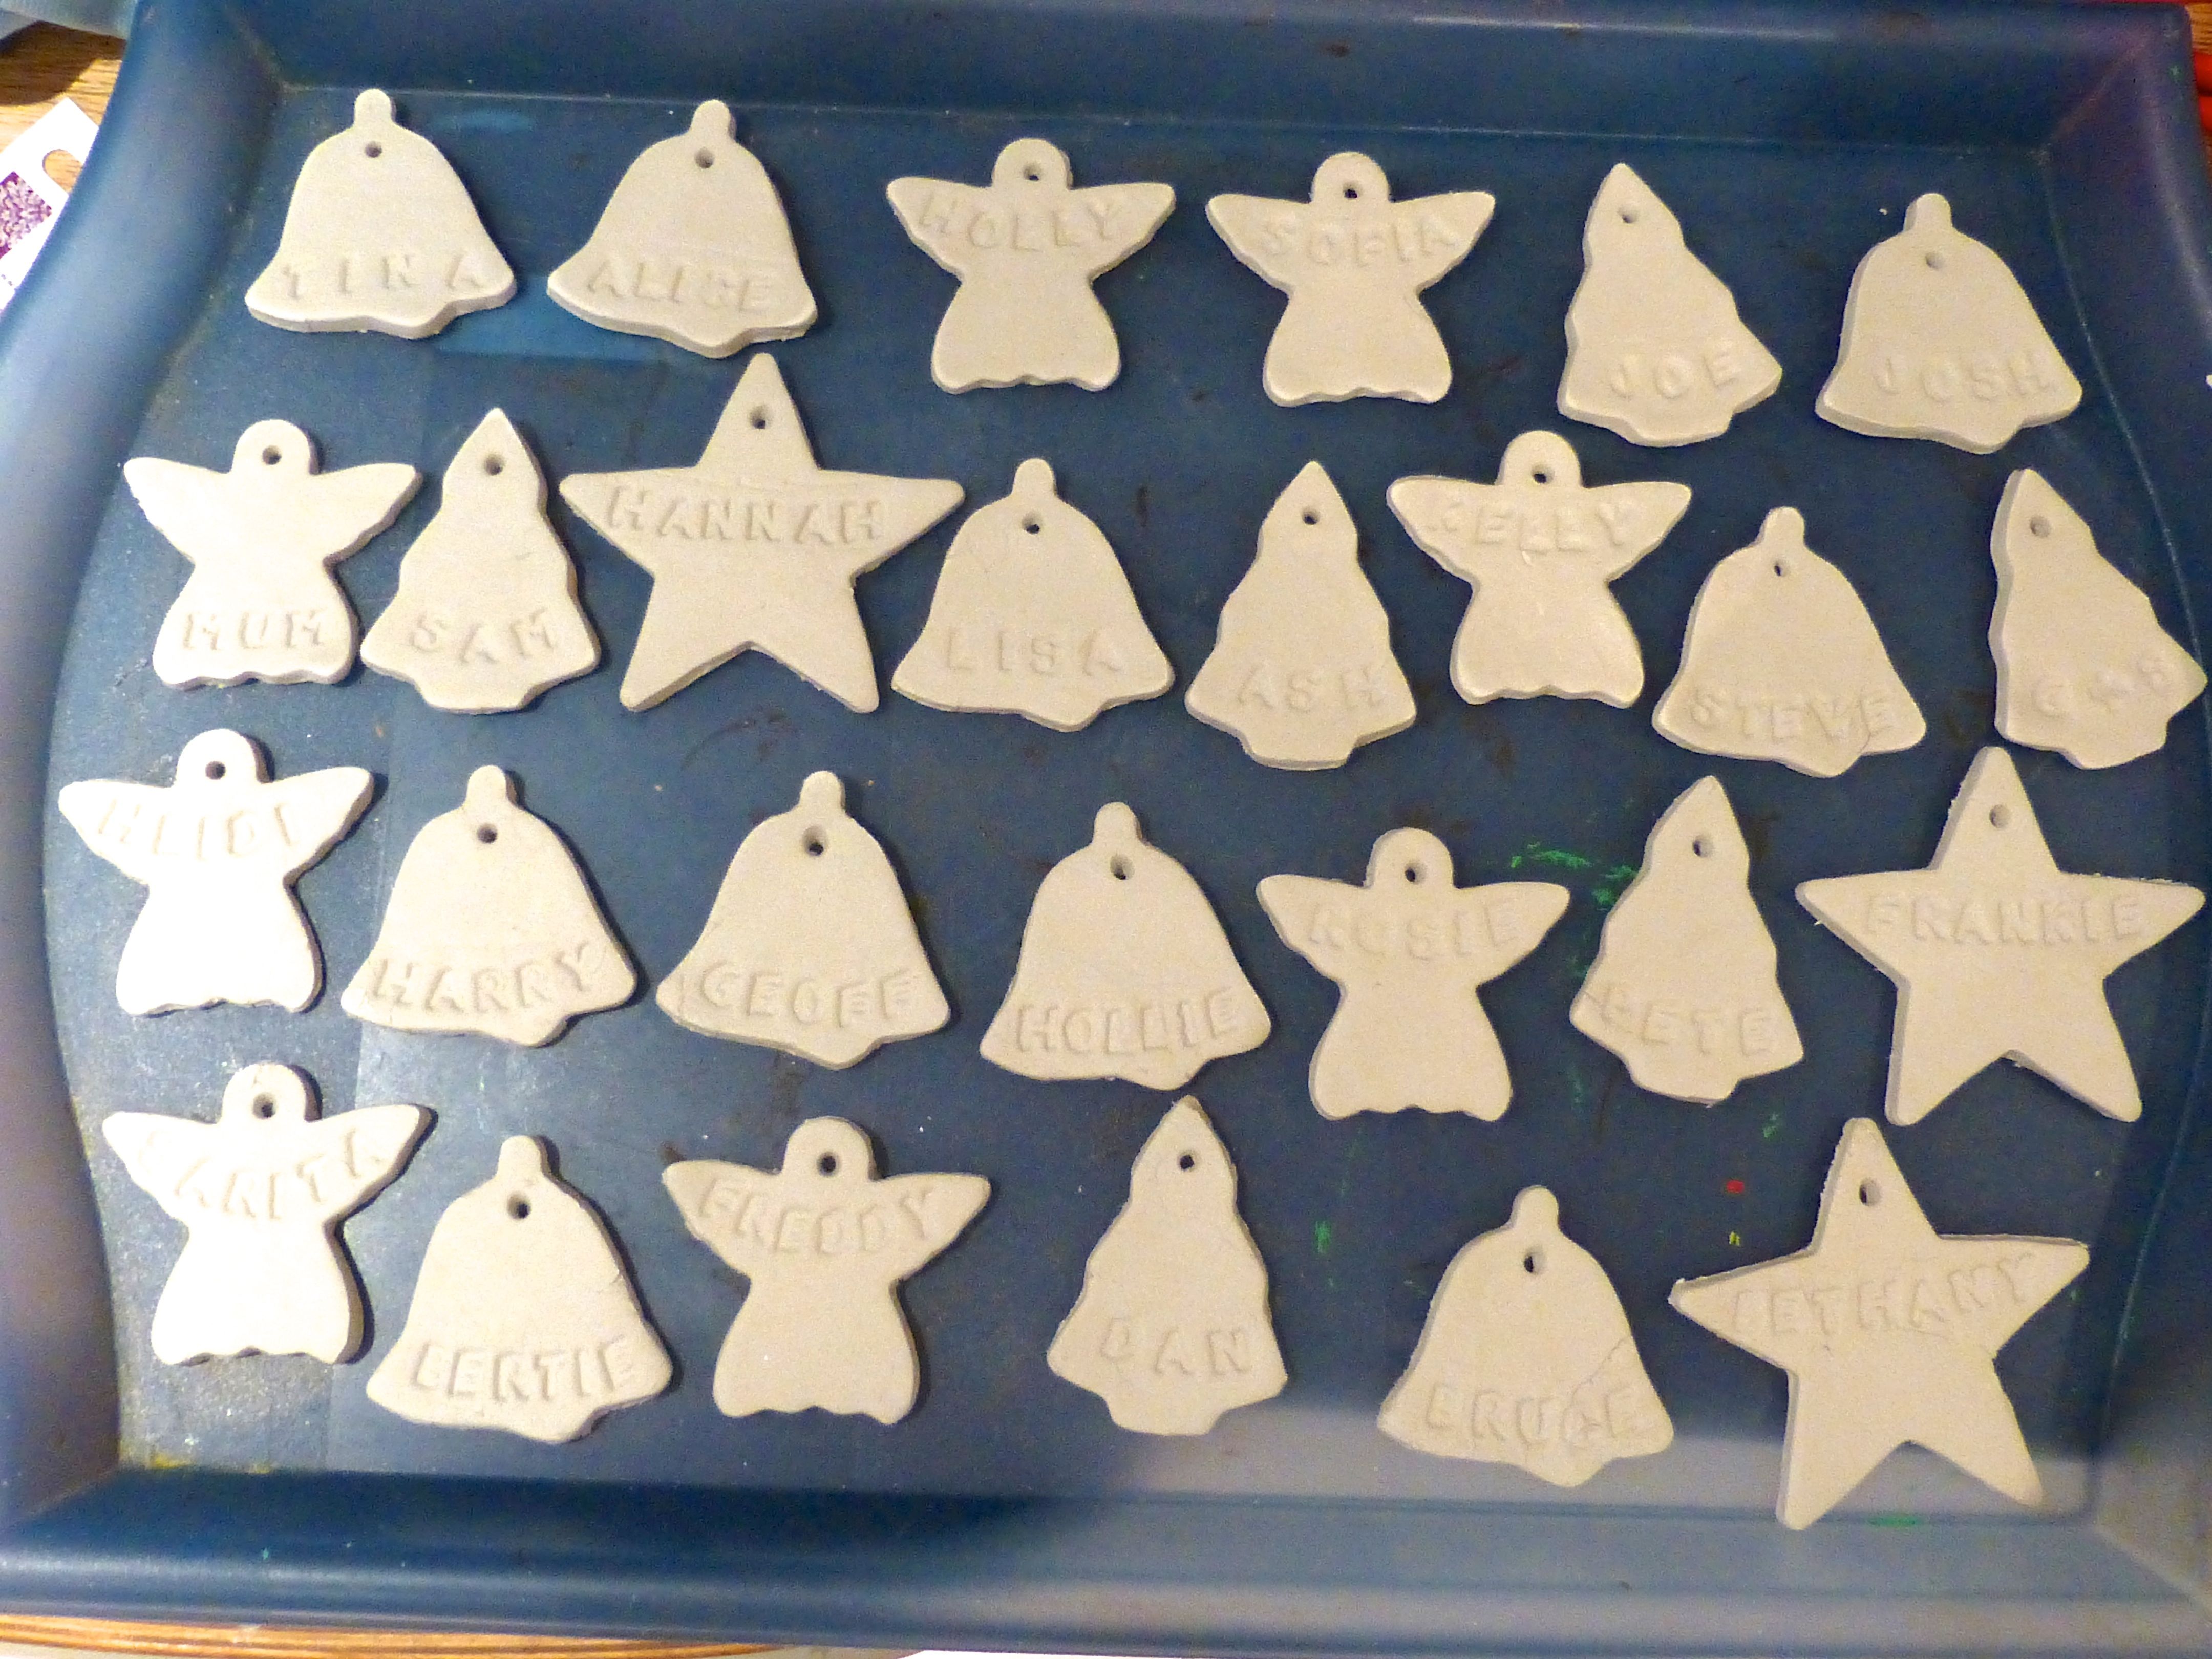
You can leave them like this or paint them – it’s up to you.

Watercolour paint gives a translucent effect, or you could rub off the paint while still wet to give a subtle wash effect to the lettering. A coat of varnish will protect the paint an make it more durable.
You can also use acrylic paint or even PVA glue sprinkled with glitter!
I chose to leave mine plain largely because I ran out of time, but they still add a special touch to gift-wrapping – especially if there is a beautiful hand made gift inside.
What’s really nice though, is the thought that this is a gift that will come out year after year as an ornament on a tree and, hopefully, they will remember me as it is hung in place.
I may try making more clay gift tags next year, starting early enough next time to give myself time to paint them!
And thus, my Resolution for the coming year shall be: “Try Something New”
I couldn’t show everything because, quite frankly, I seem to have had creative diarrhoea this year and that’s too much for anyone to see!!
So, here we are with a few of my favourites. Just click on the picture to go straight to the relevant blog post.


I hope you endured enjoyed the little journey into my recent past – please join me as I create my future!
Wow, what a Christmas and New Year – this is the first time I’ve turned my computer on since before Christmas! Although I have been keeping up with Blogland on my mobile and realize that I am probably the last one to show off the gifts from my #sewingsanta.
Shame on me:(
Lisa from Stitched Up From The Start organized a Secret Santa involving the swap of sewing gifts and Jodie from Jodie’s Adventures In Sewingland was given the task of trying to find me a suitable sewing related surprise, which must have been quite difficult as;
a) we are new to each other
b) my creative passions are varied and not restricted to just sewing.
Well, Jodie obviously took the time to look through my blog and, very thoughtfully, included some goodies that indulged my other crafting obsessions.
Here’s what I was lucky enough to receive!
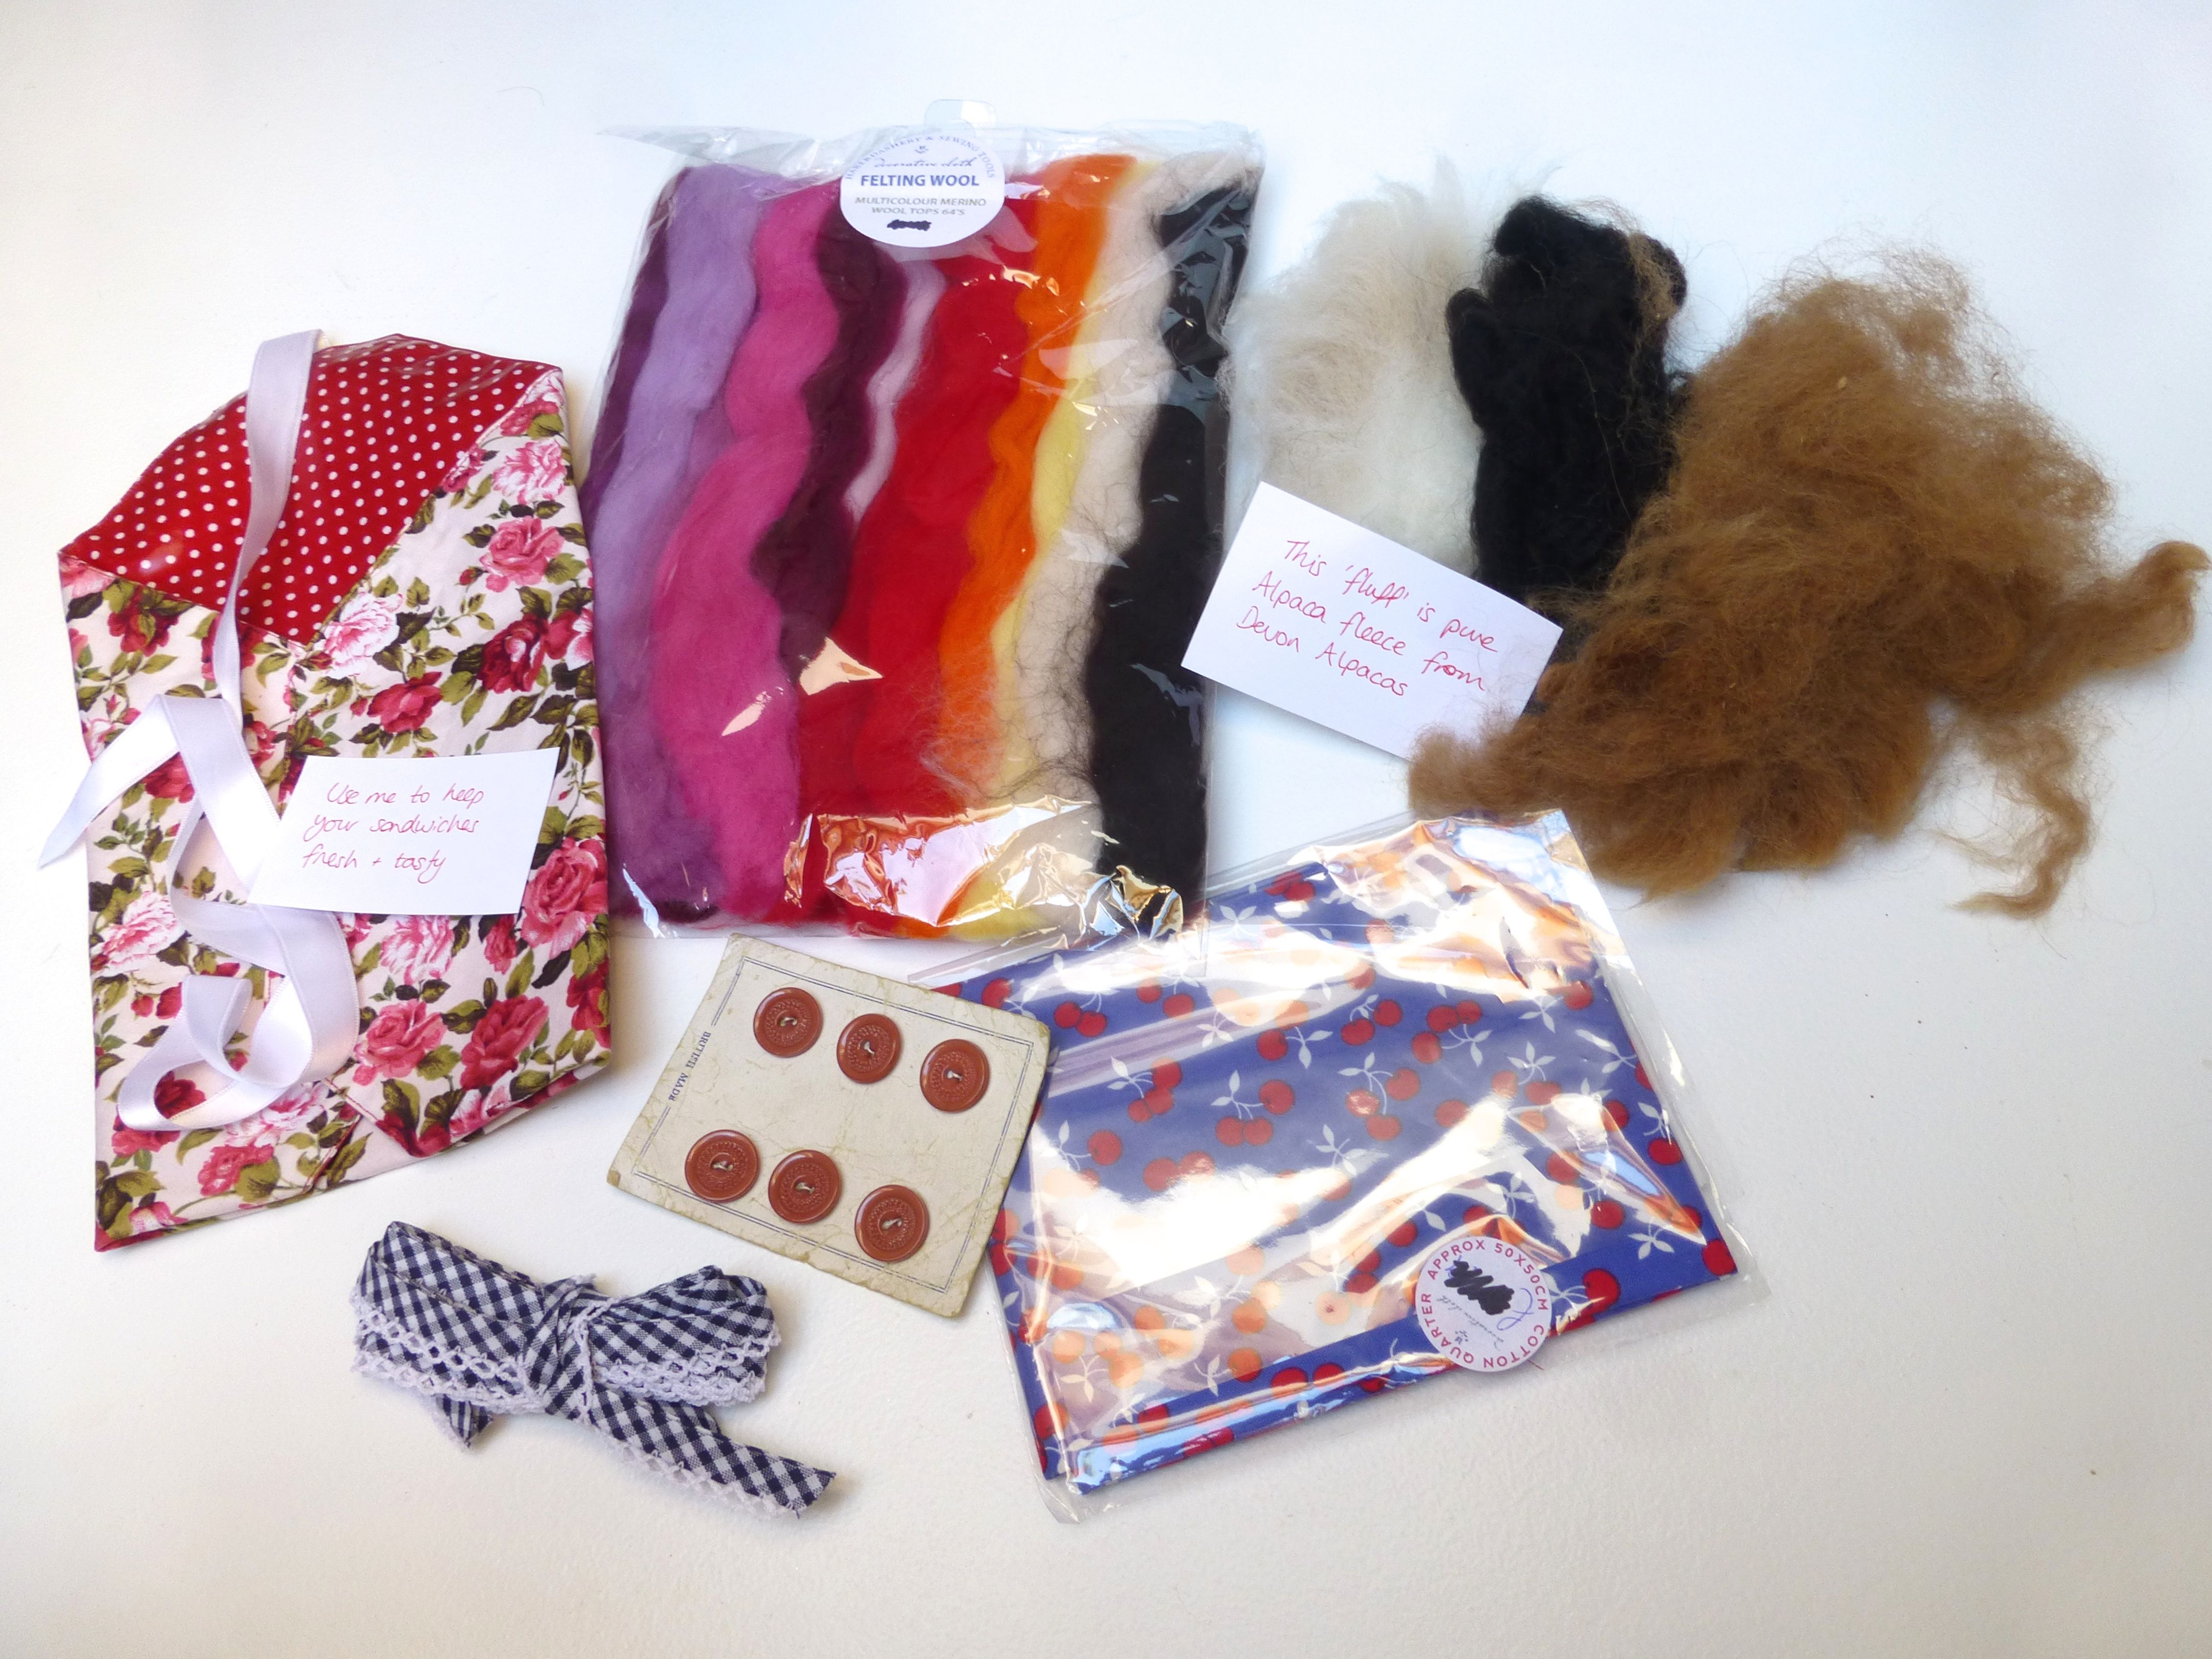
A stunning fat quarter of bright red, white and blue cherry fabric with a small scale pattern – perfect for the little projects that I love creating so much;

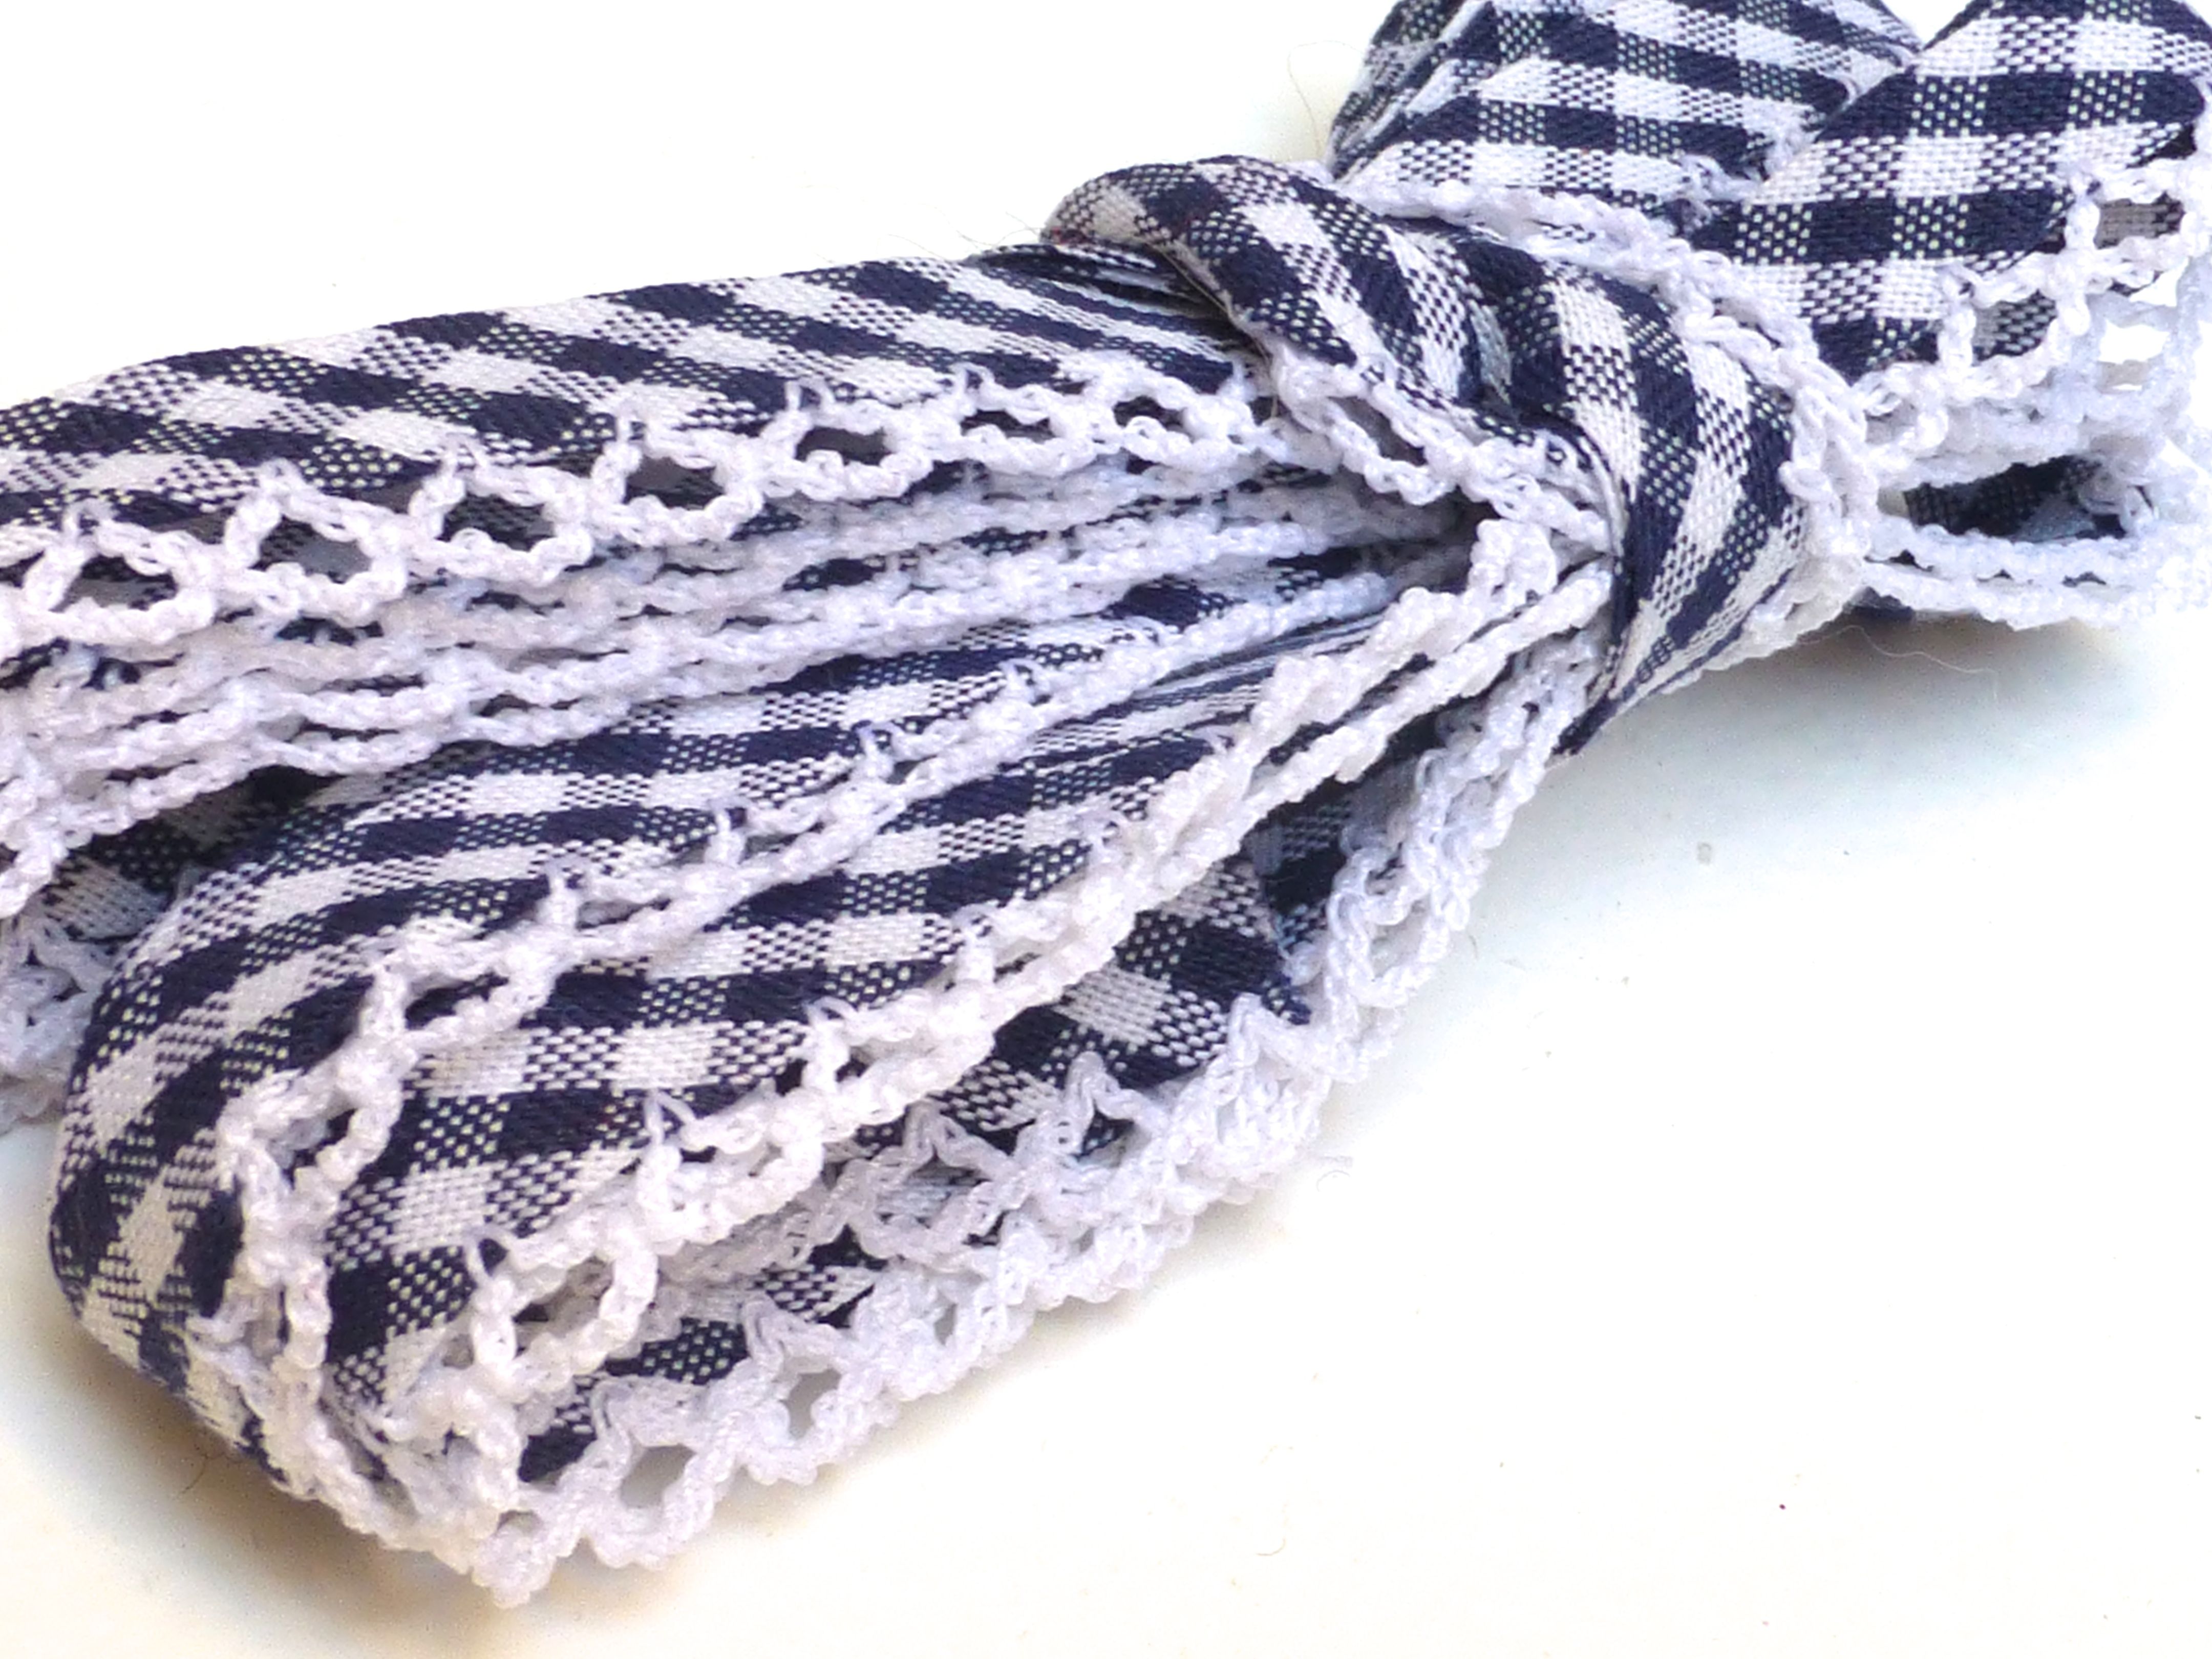
Some beautiful gingham ribbon with a delicate crochet edge;
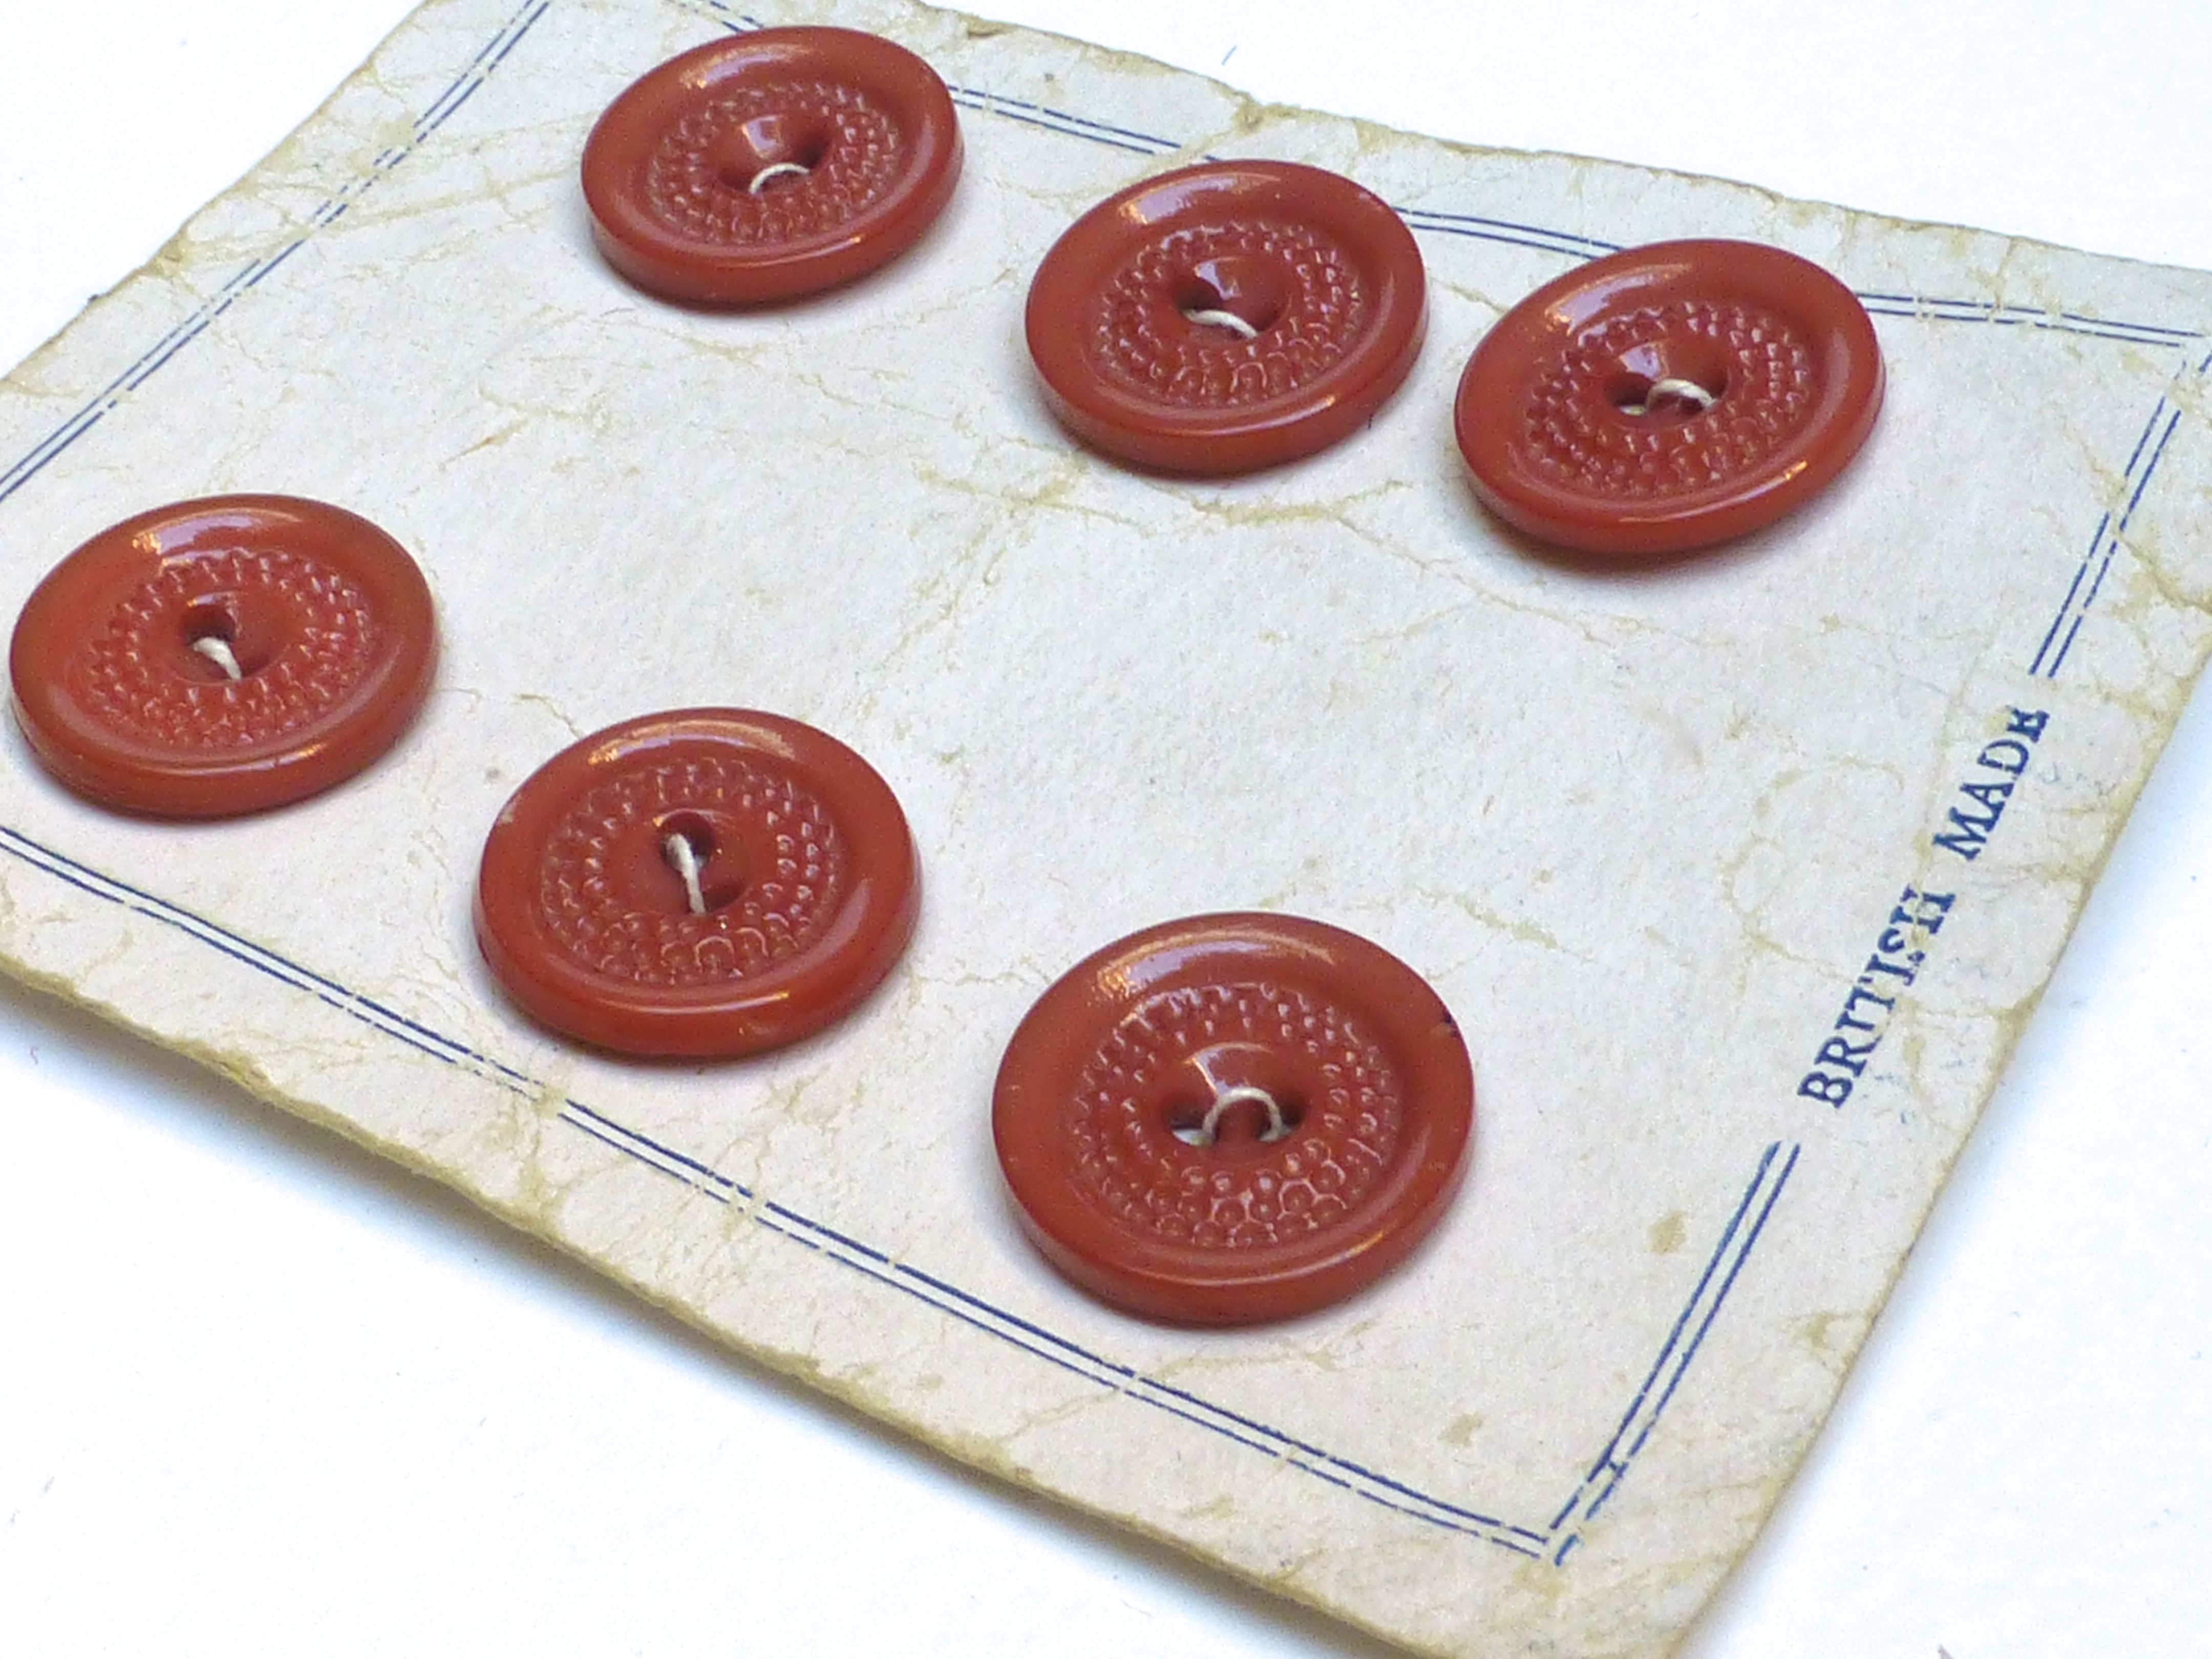
Some real vintage buttons – this girl must have read about all those buttons I couldn’t resist buying at Yarndale!
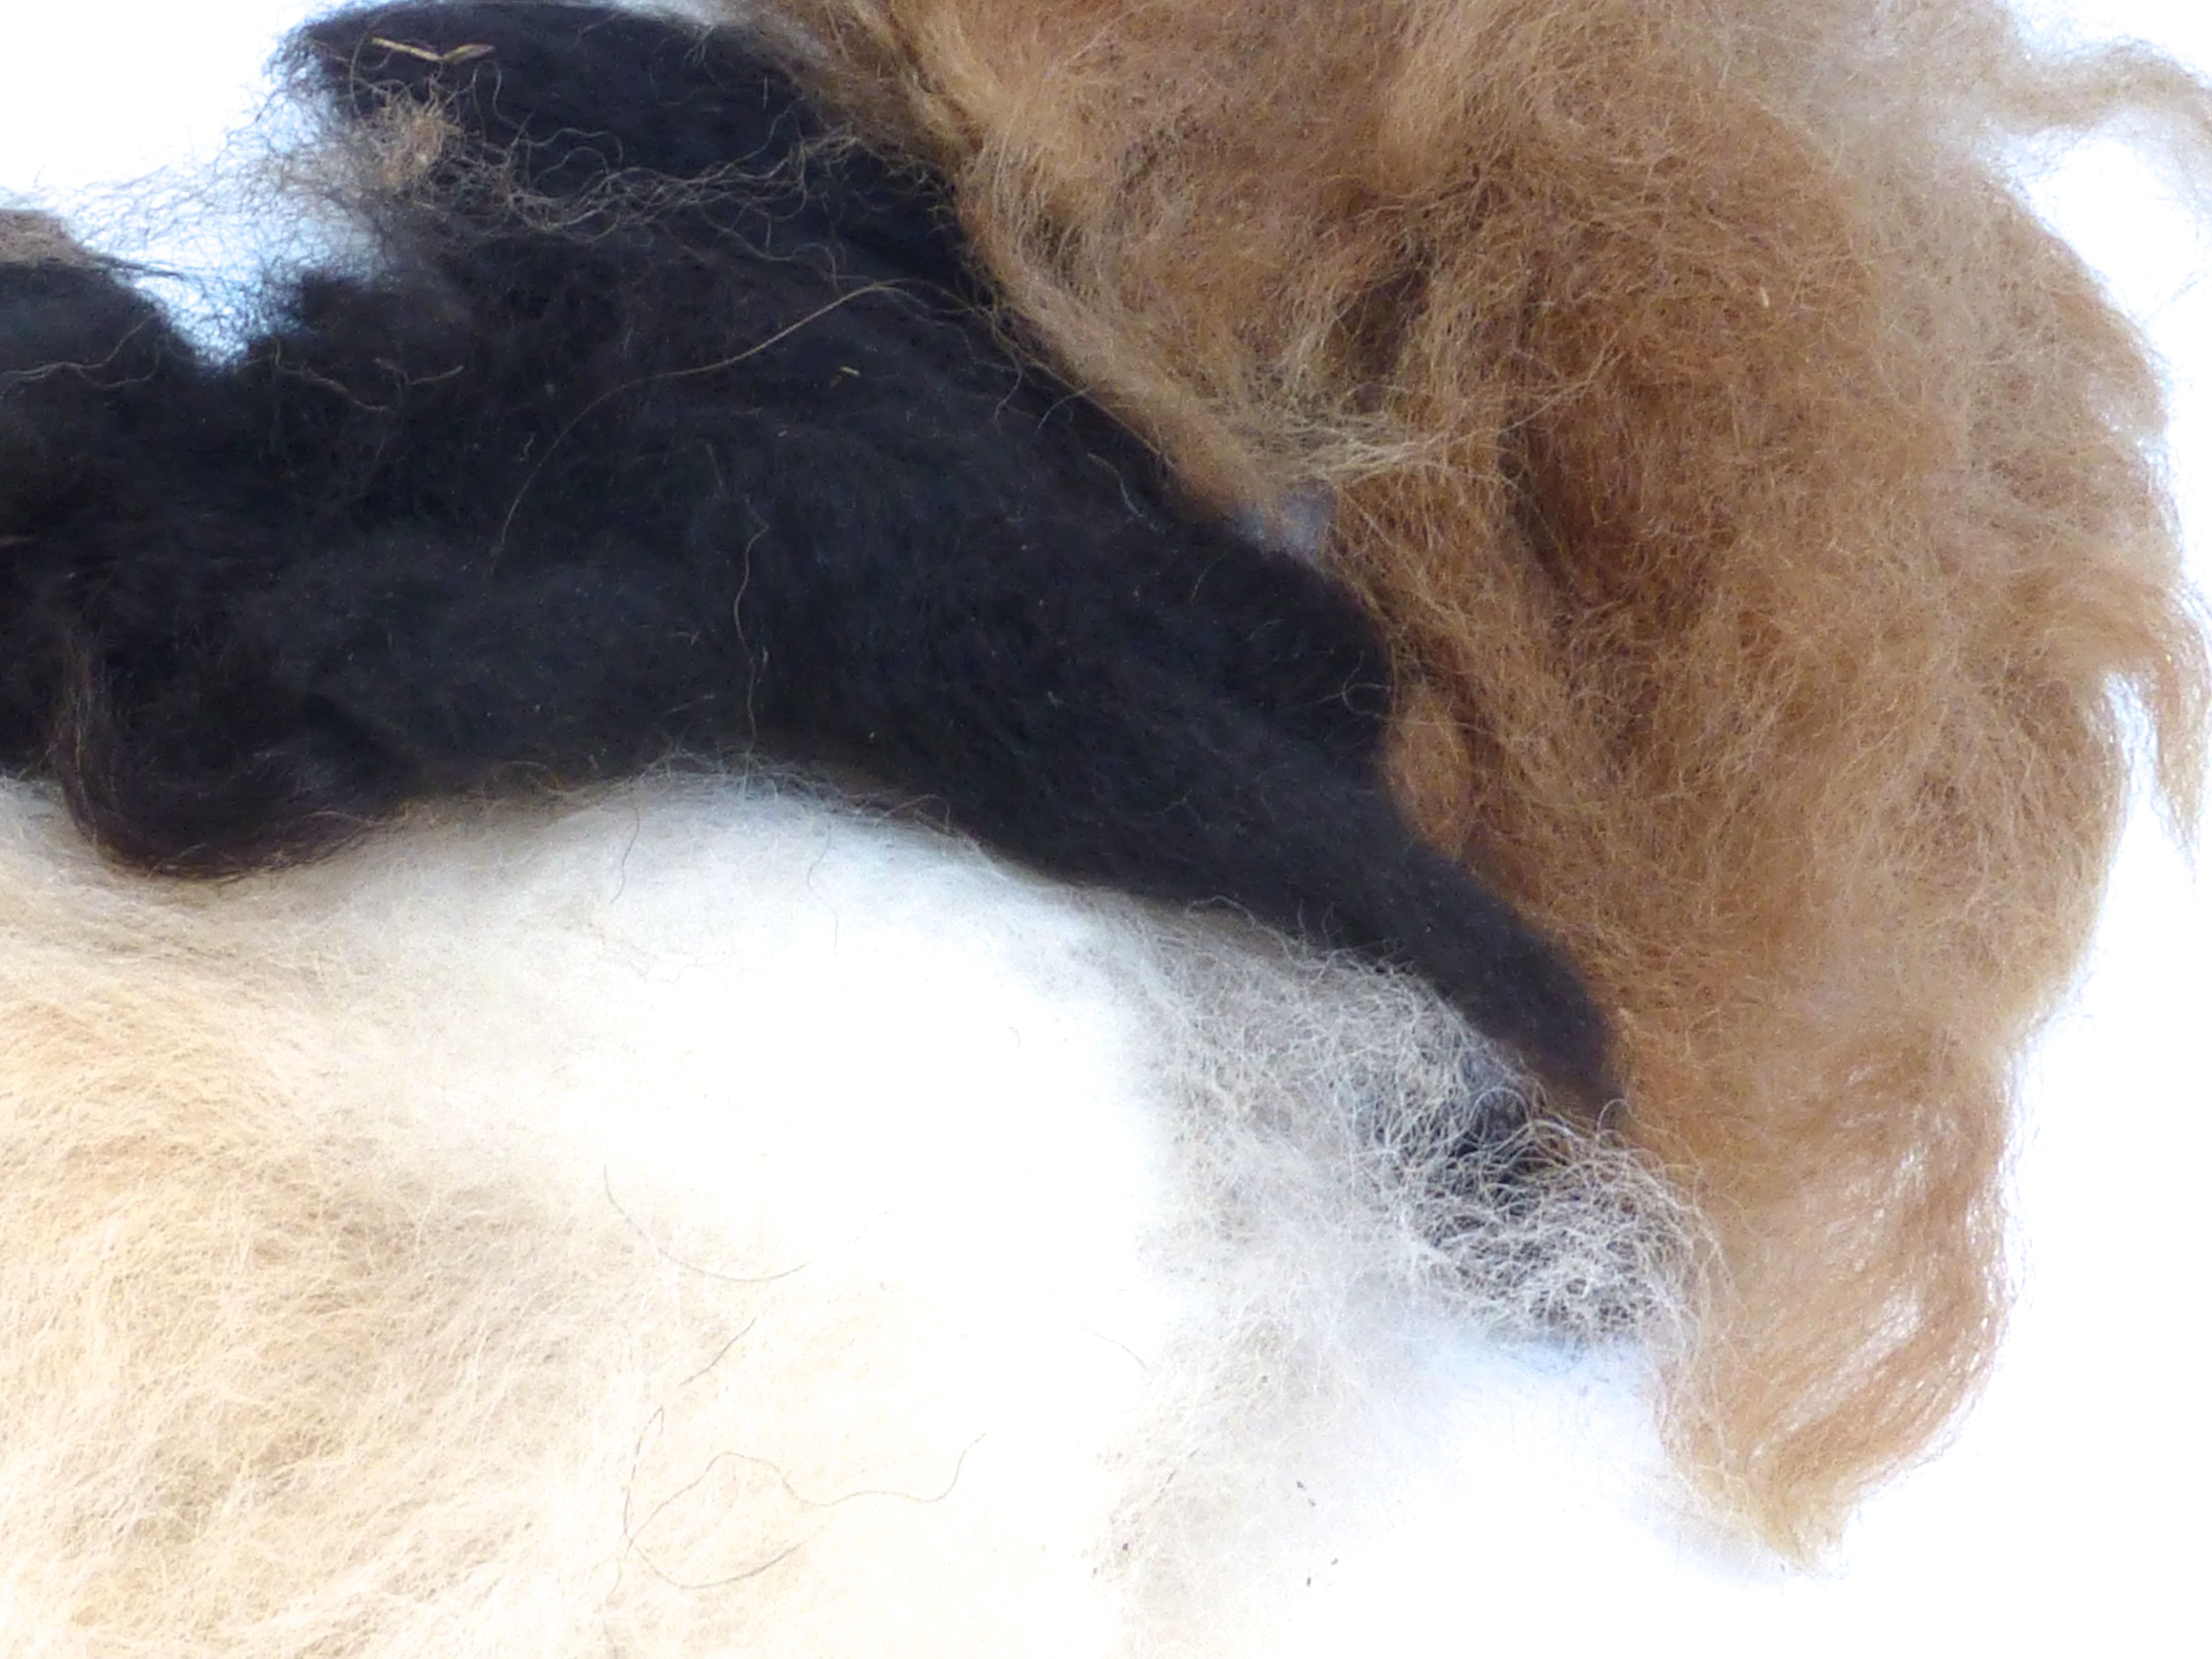
My first foray into needle felting was a little Robin Brooch that I made for Beth at After Dark Sewing. Jodie only went and bought me some fabulous fulling to continue experimenting with!
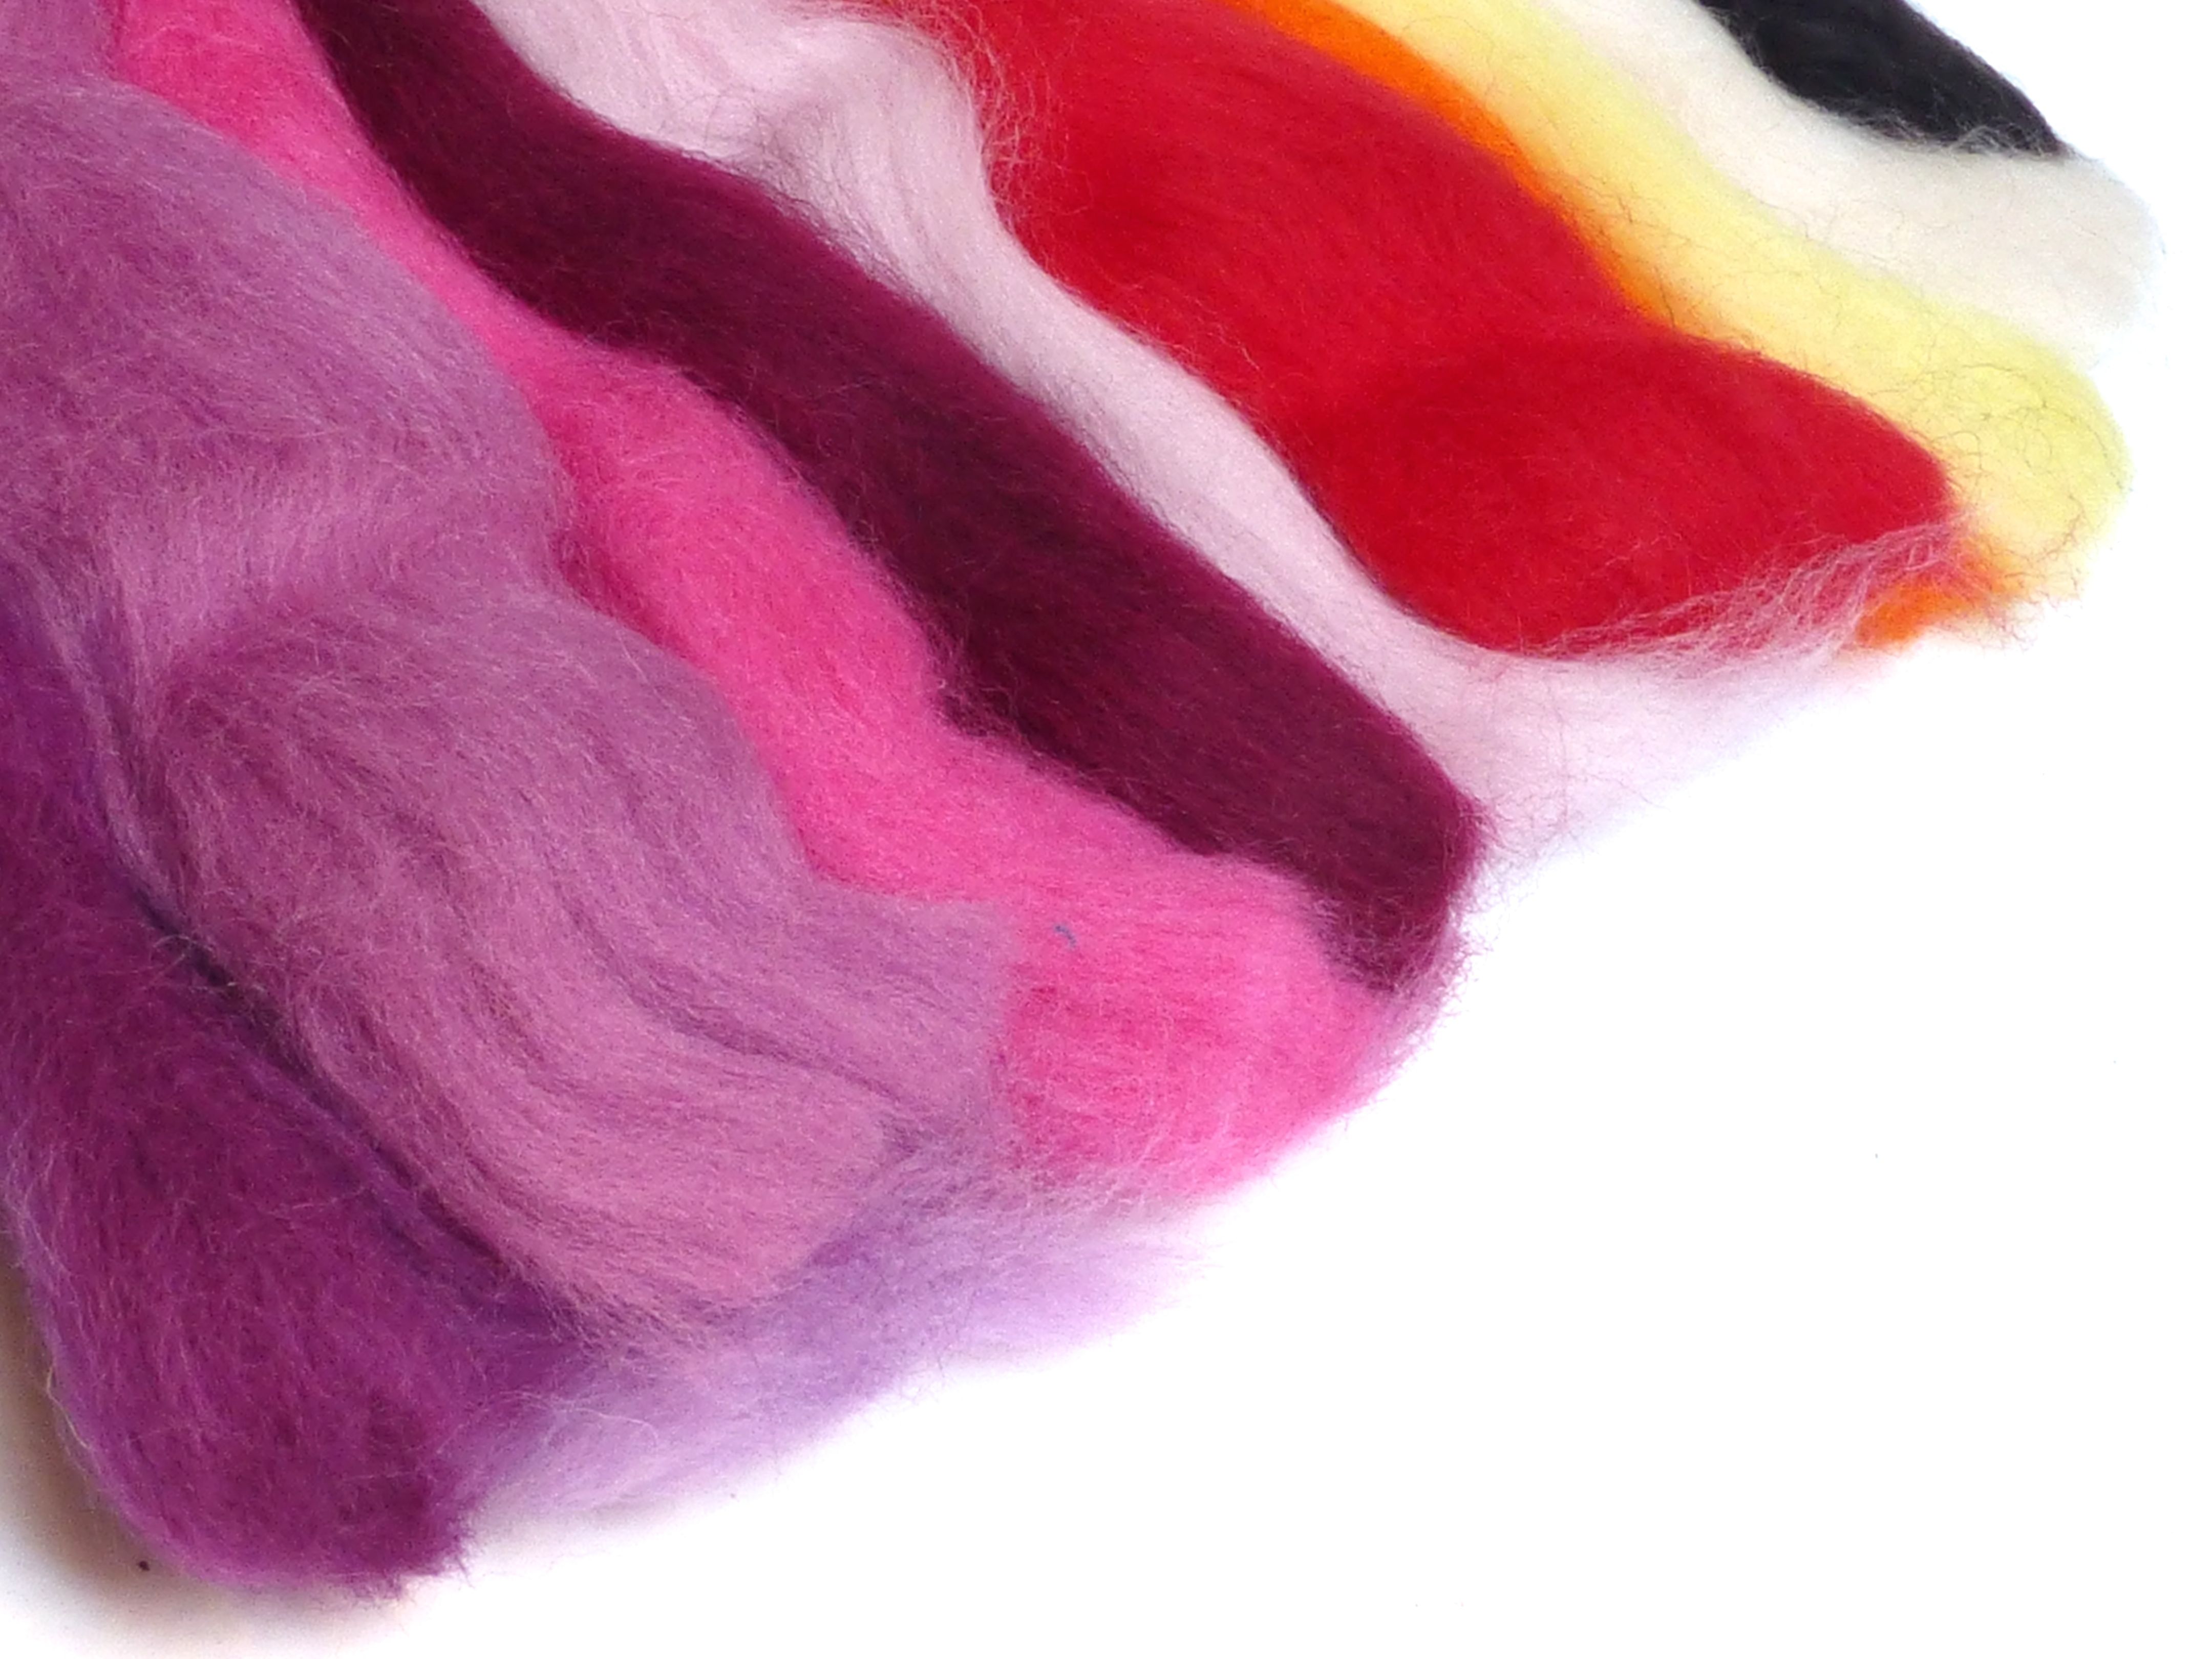
The wool from some Devon Alpacas was an inspired choice – thank you Jodie!
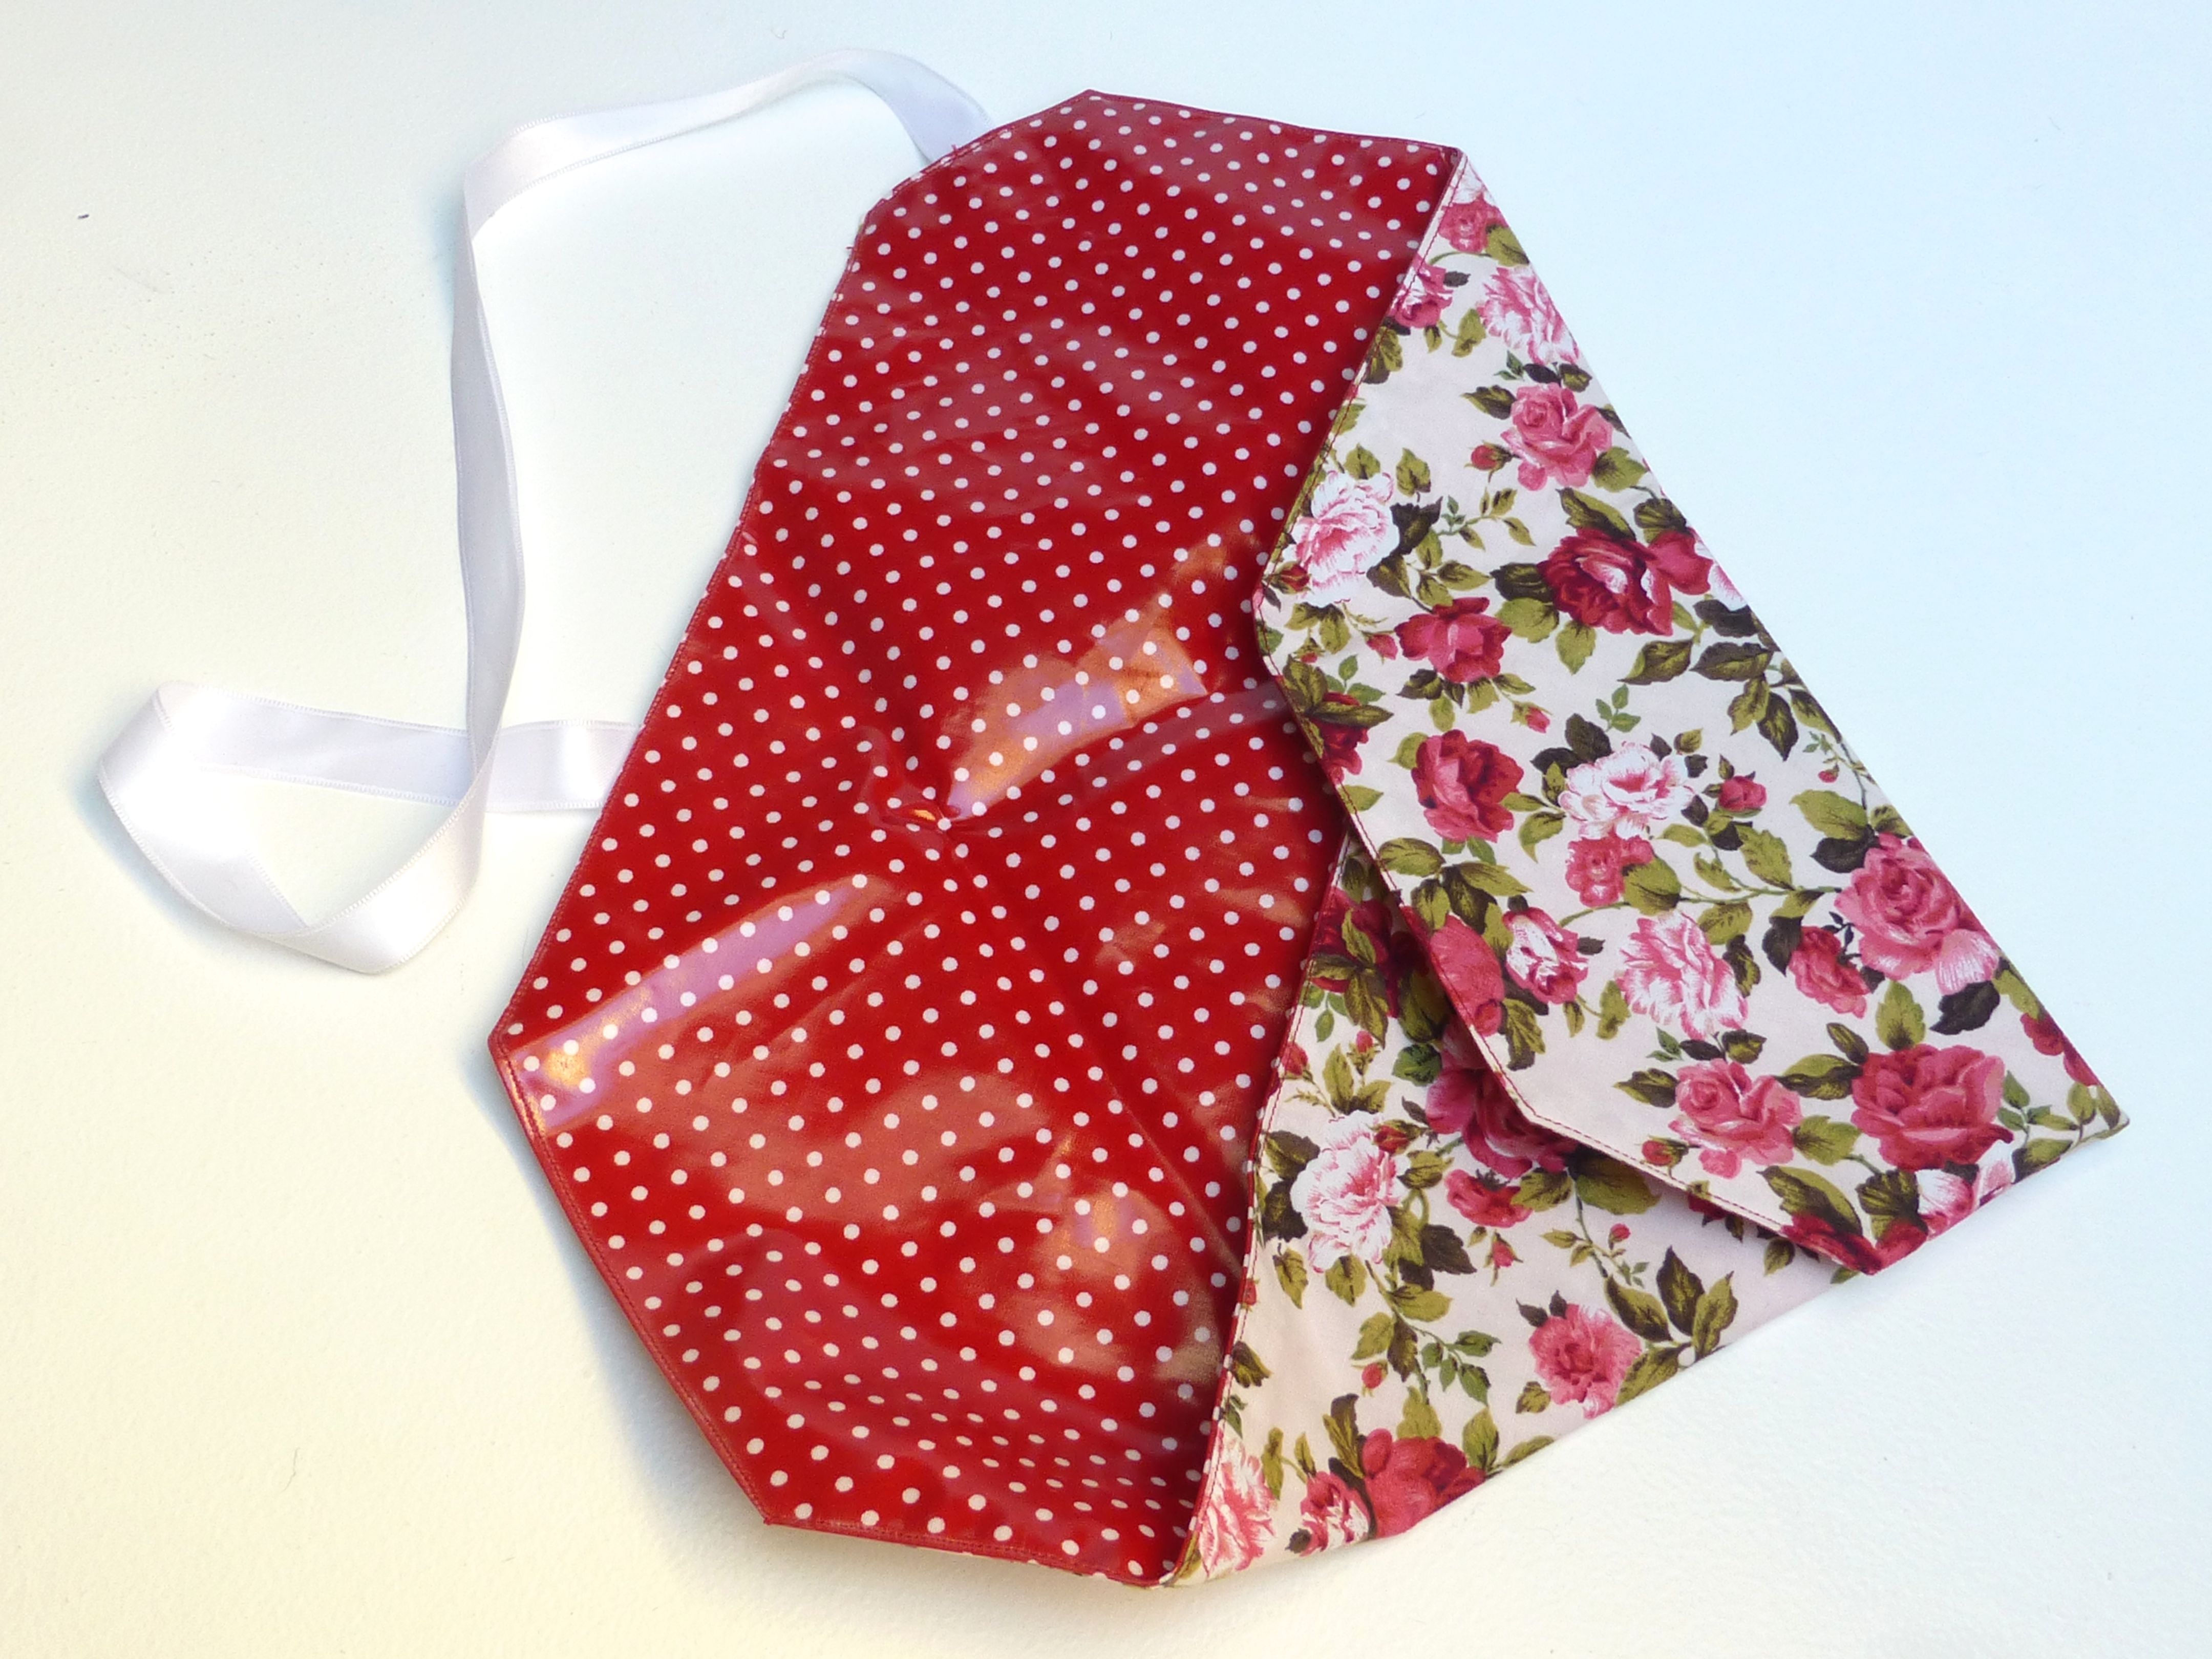
Also included was what I initially thought was another fat quarter, this time in a vintage-style ‘Roses’ print, wrapped in a white satin ribbon;
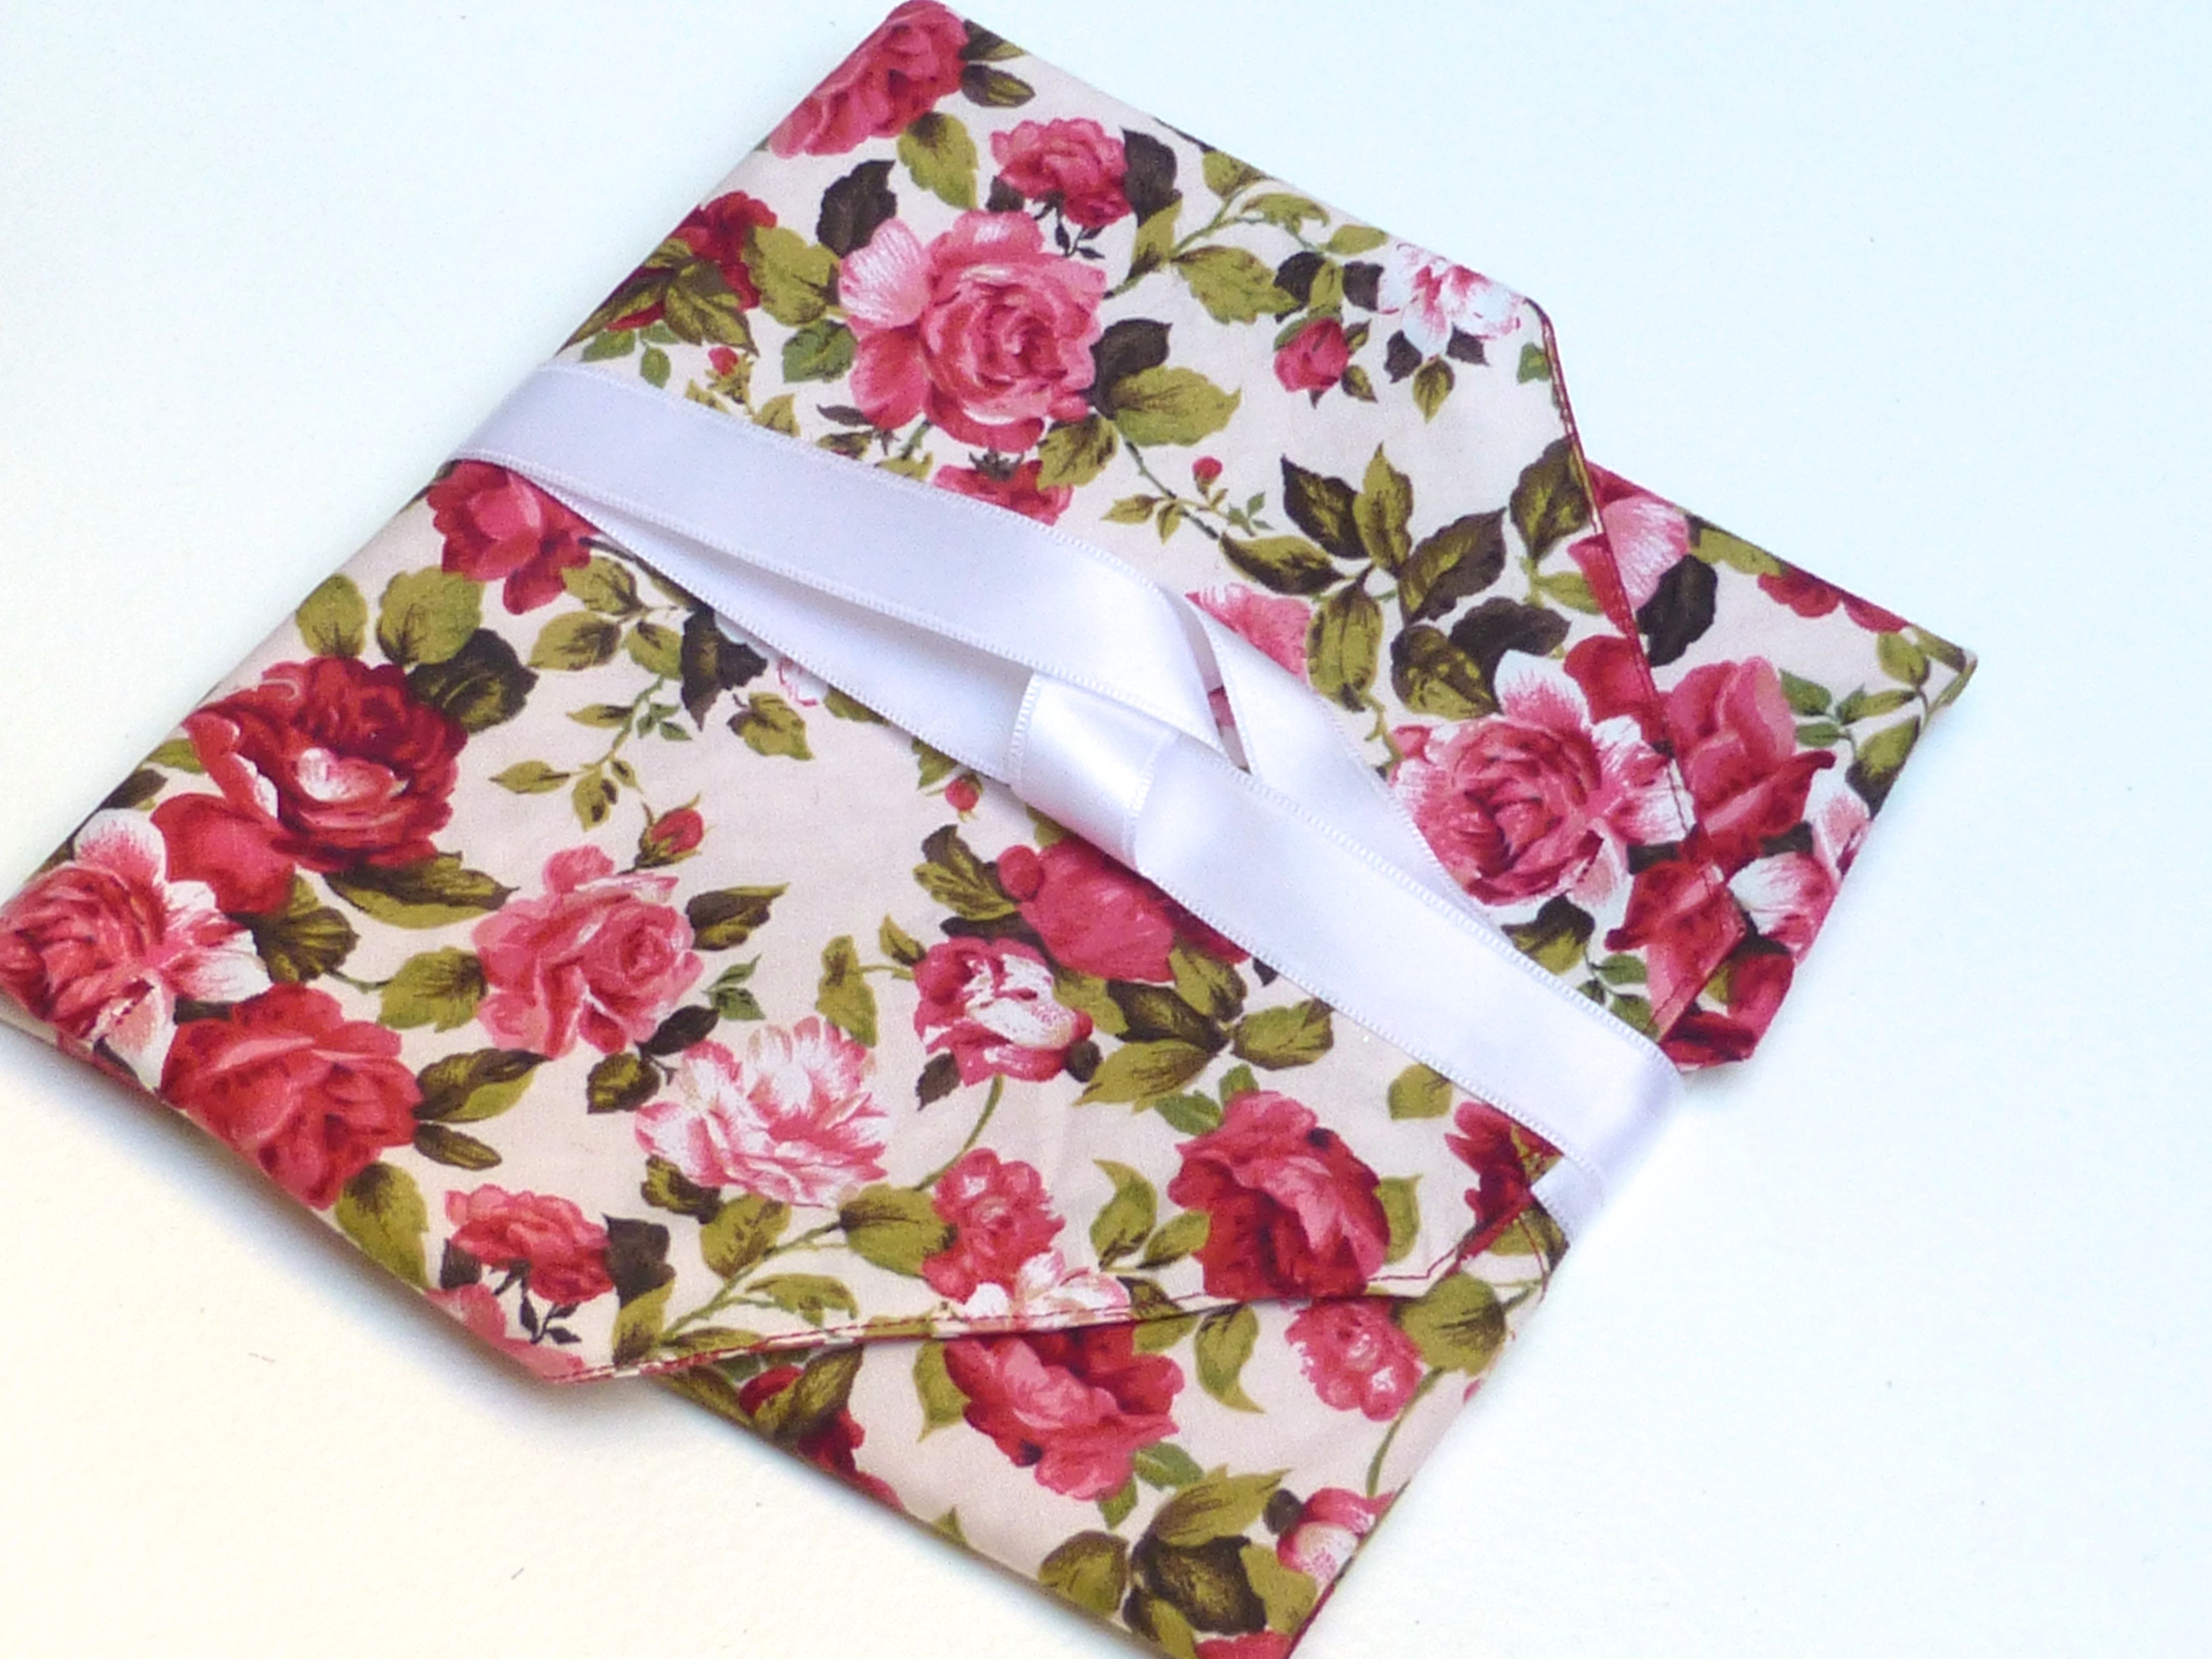
On closer inspection it turned out to be a beautifully made sandwich wrap, lined with wipe clean oilcloth in vibrant red and white polka dots!
This is the Christmas card that Jodie sent;
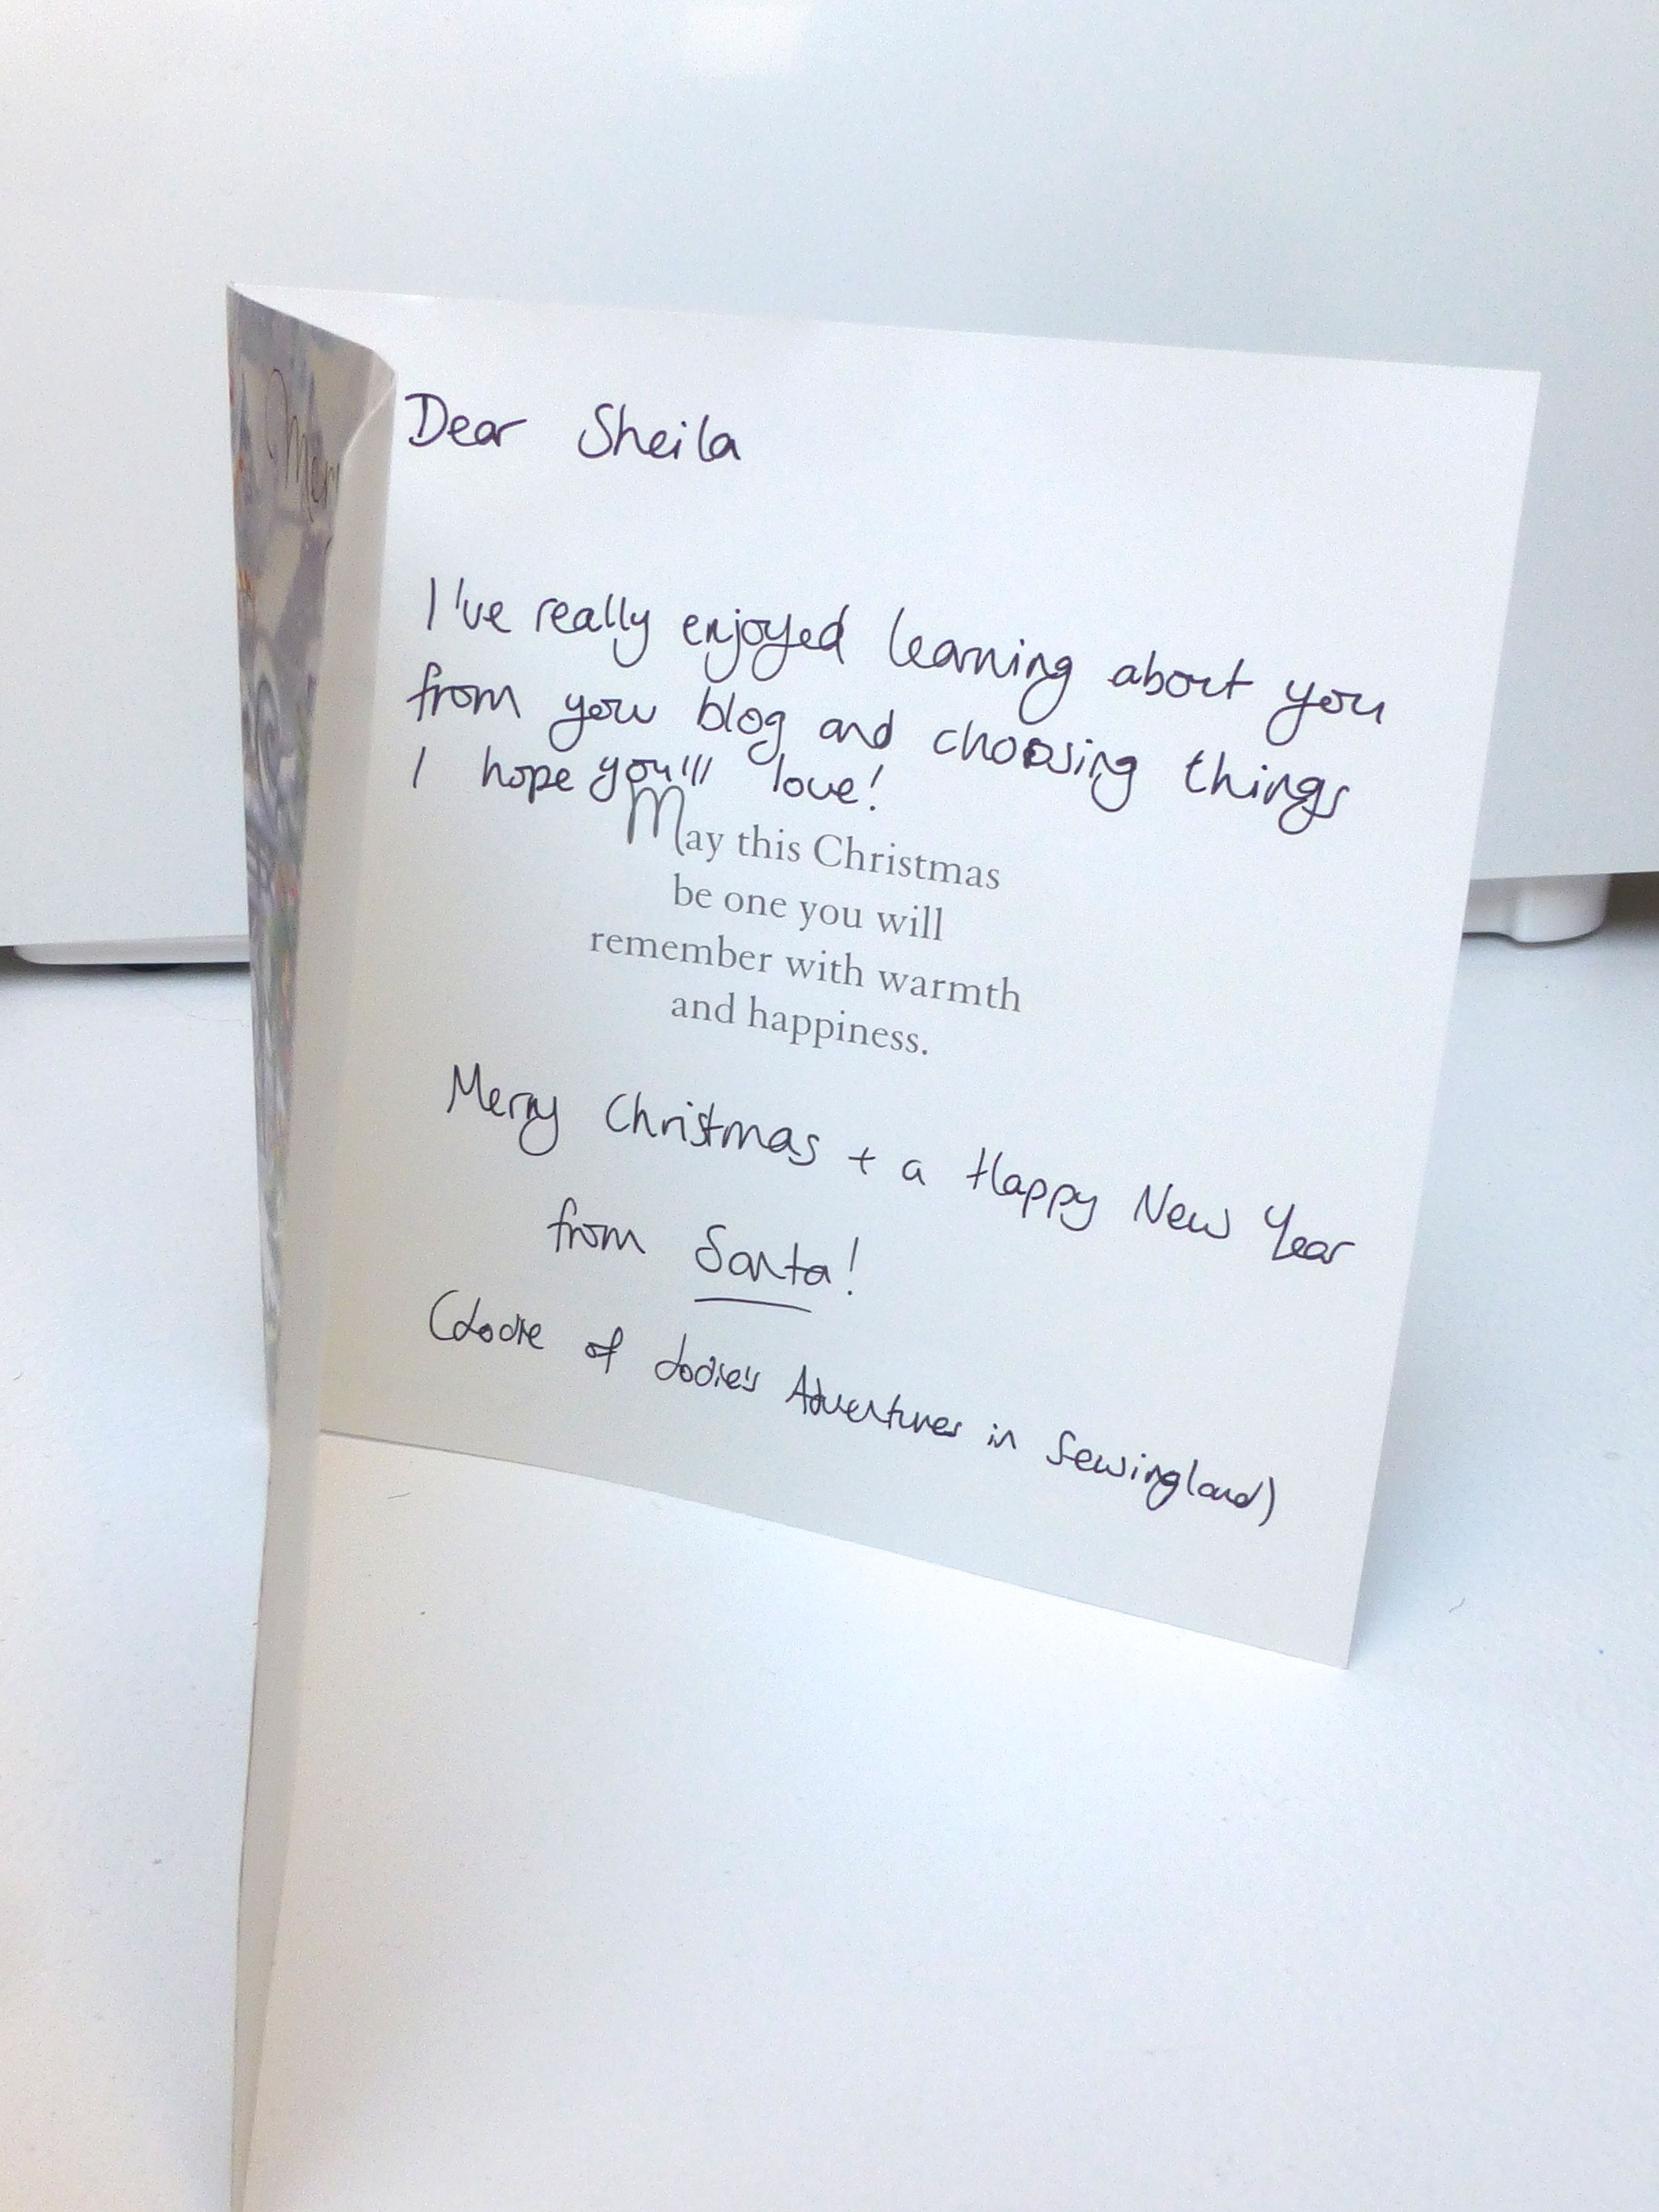
Many thanks again Jodie – I really am soooo pleased with my gifts and cannot wait to come up with some designs that will do them justice and I will, of course, show them on my blog when I do.
Happy New Year!
I am quietly fuming after being (very kindly) informed that someone is selling my Greengate Style Baby Poncho pattern on eBay, even using the original photograph from my blog!
It’s not just the fact that they are making money from my design, but that people are paying for it when it is available for free. Maddening.
Anyway, being the sharing, caring folk that we Crafters are, I have another tutorial for you – a Bookbound Journal.

I made mine using part of a hide of turquoise leather that I had leftover from a previous project, but you could use boiled wool, felt, cardboard – anything really. This was constructed entirely from stuff I had already so was completely free to make, which was essential as it went into my #sewingsanta parcel and I had already reached my spending limit.
So, here we go.
How To Make A Bookbound Journal
You will need: –
16-20 sheets paper (I used a mix of plain, squared, lined, coloured and notelet)
Cover Material which doesn’t fray (Leather, Cardboard, Felt, Boiled wool etc)
Waxed Cotton/Strong Thread
Magnetic Closure
Bradawl/Craft Knife
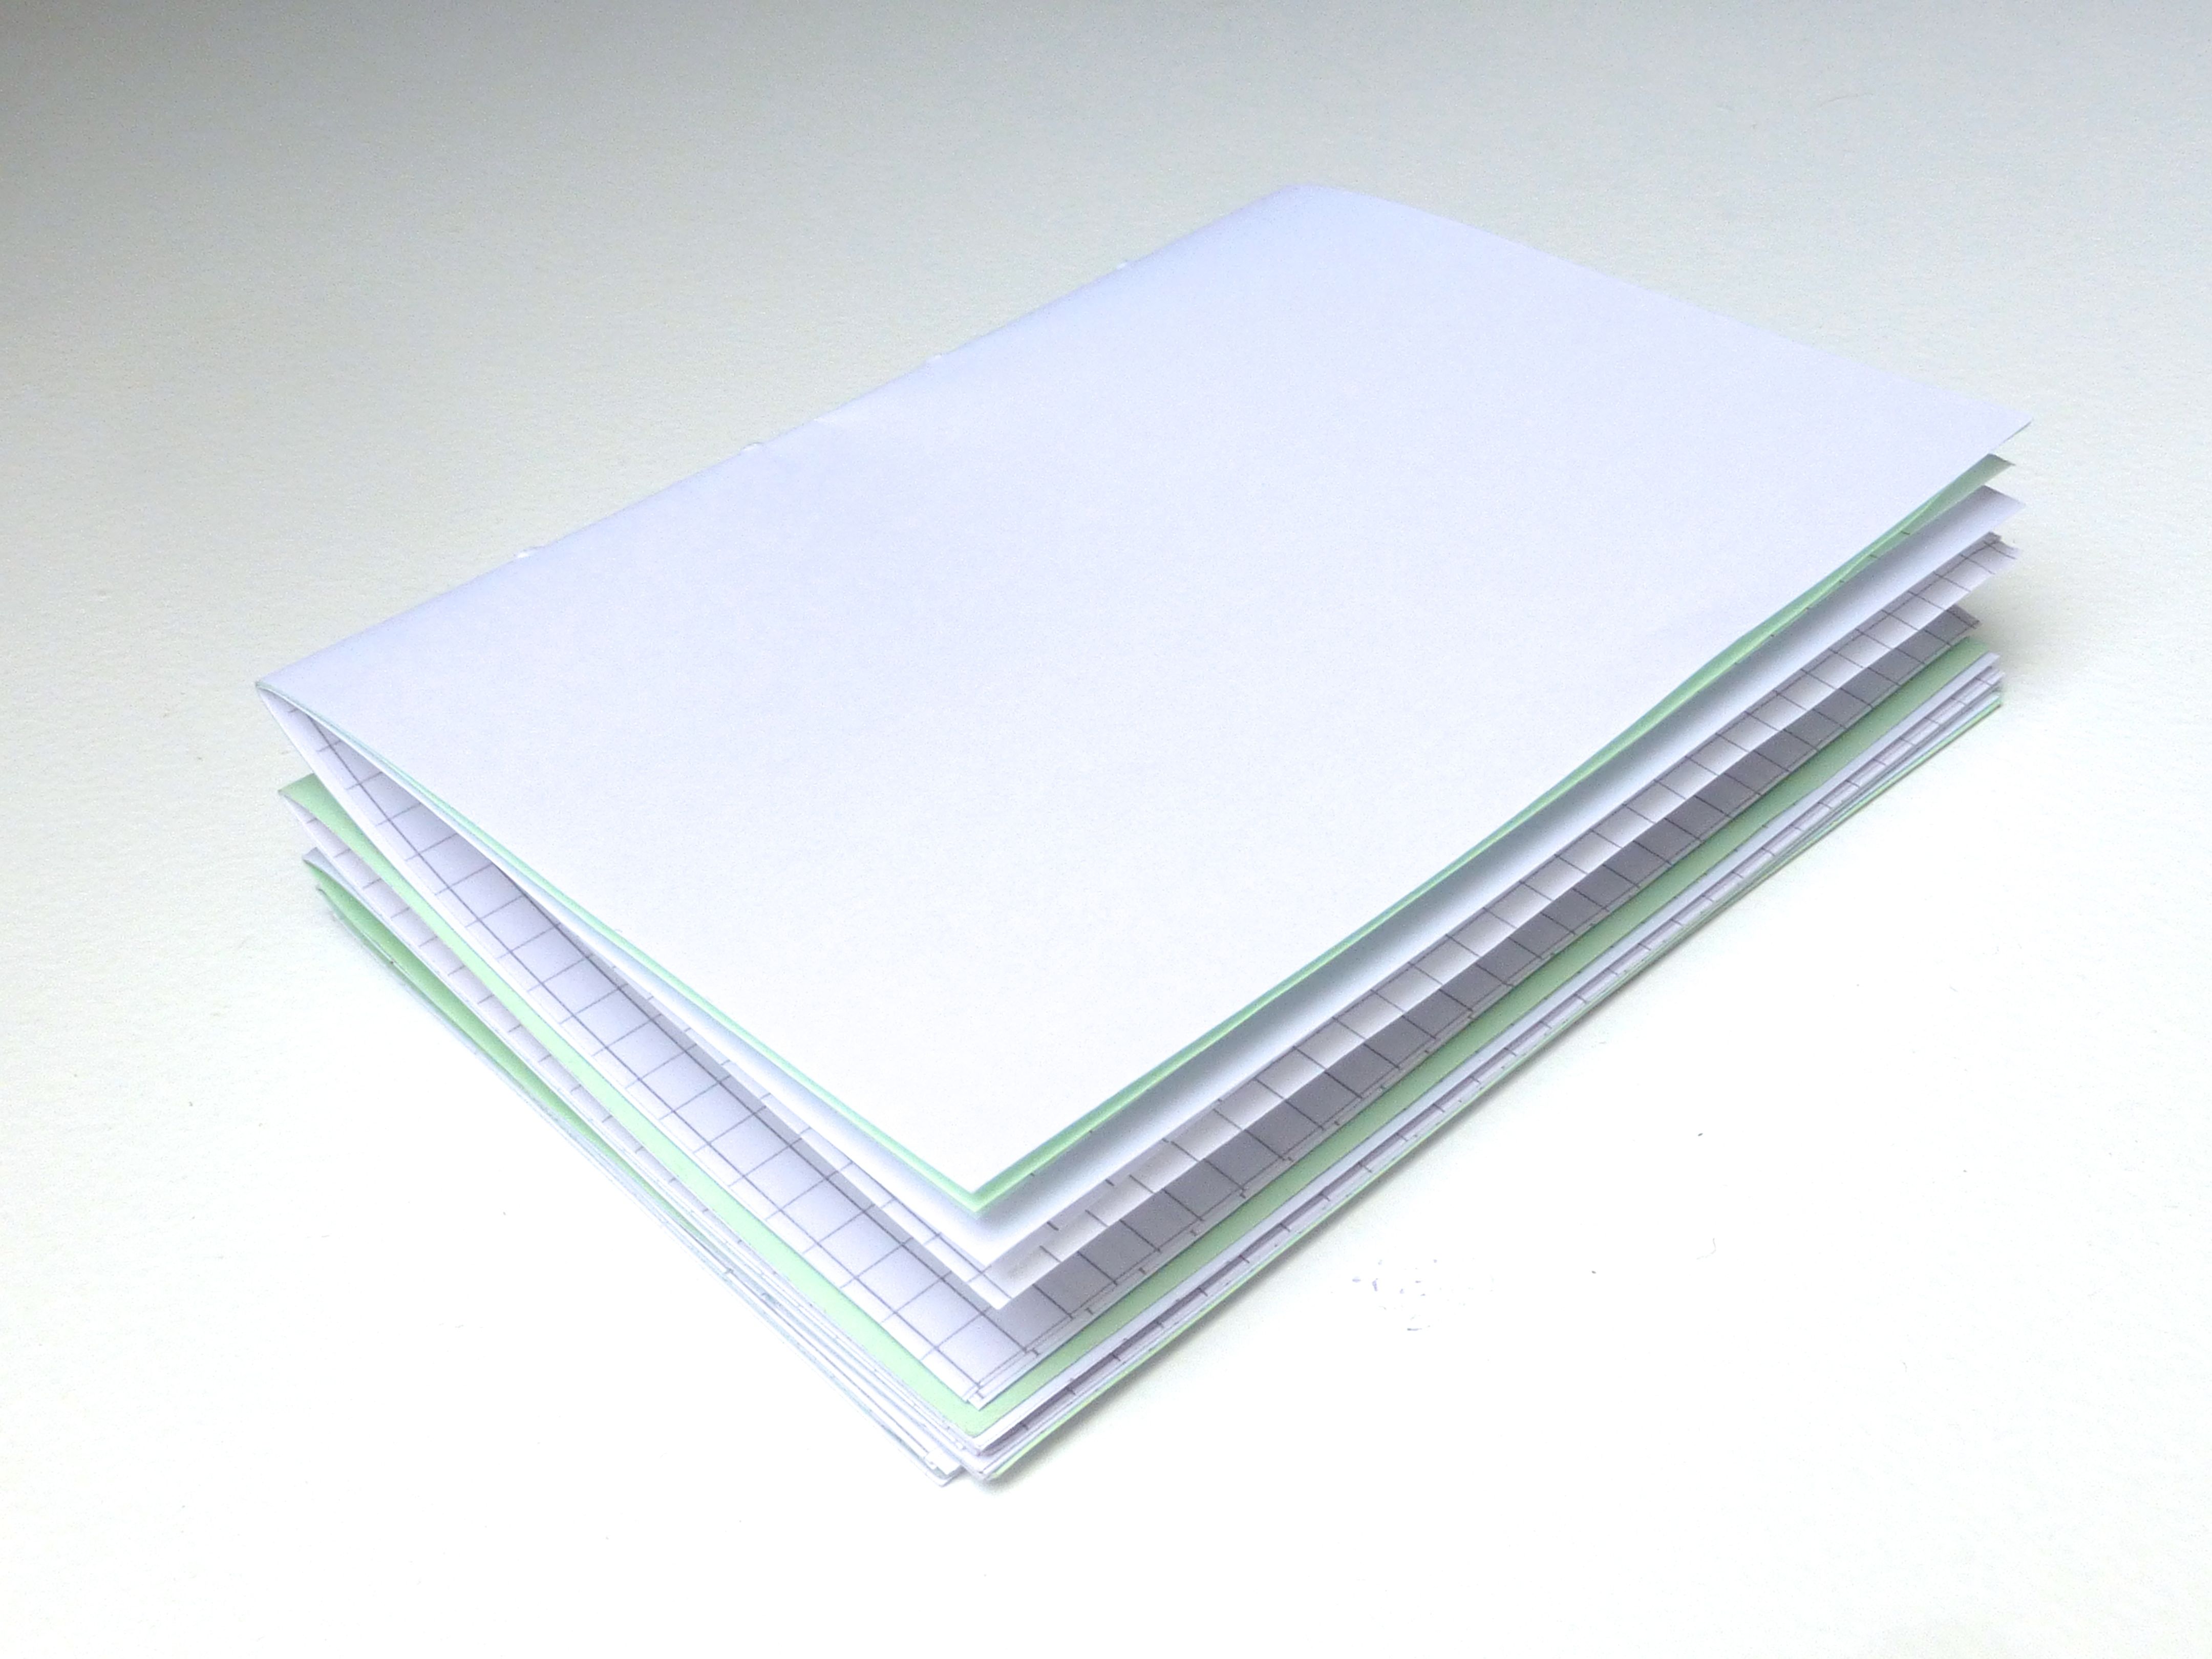
1. Stack your paper in piles of 4 or 5 and fold in half to make a ‘signature’. I made 4 signatures to go in my book.
2. Using a bradawl or other sharp pointed tool, pierce four holes through the fold at regular intervals making sure you go through all the layers of paper.


I use an old magazine underneath to protect my table.
3. Fold and stack all your signatures neatly together and lay on your chosen cover material. Cut around leaving about half a centimetre all round.
If you want to make a flap to close the journal, you can extend the fabric as shown below.


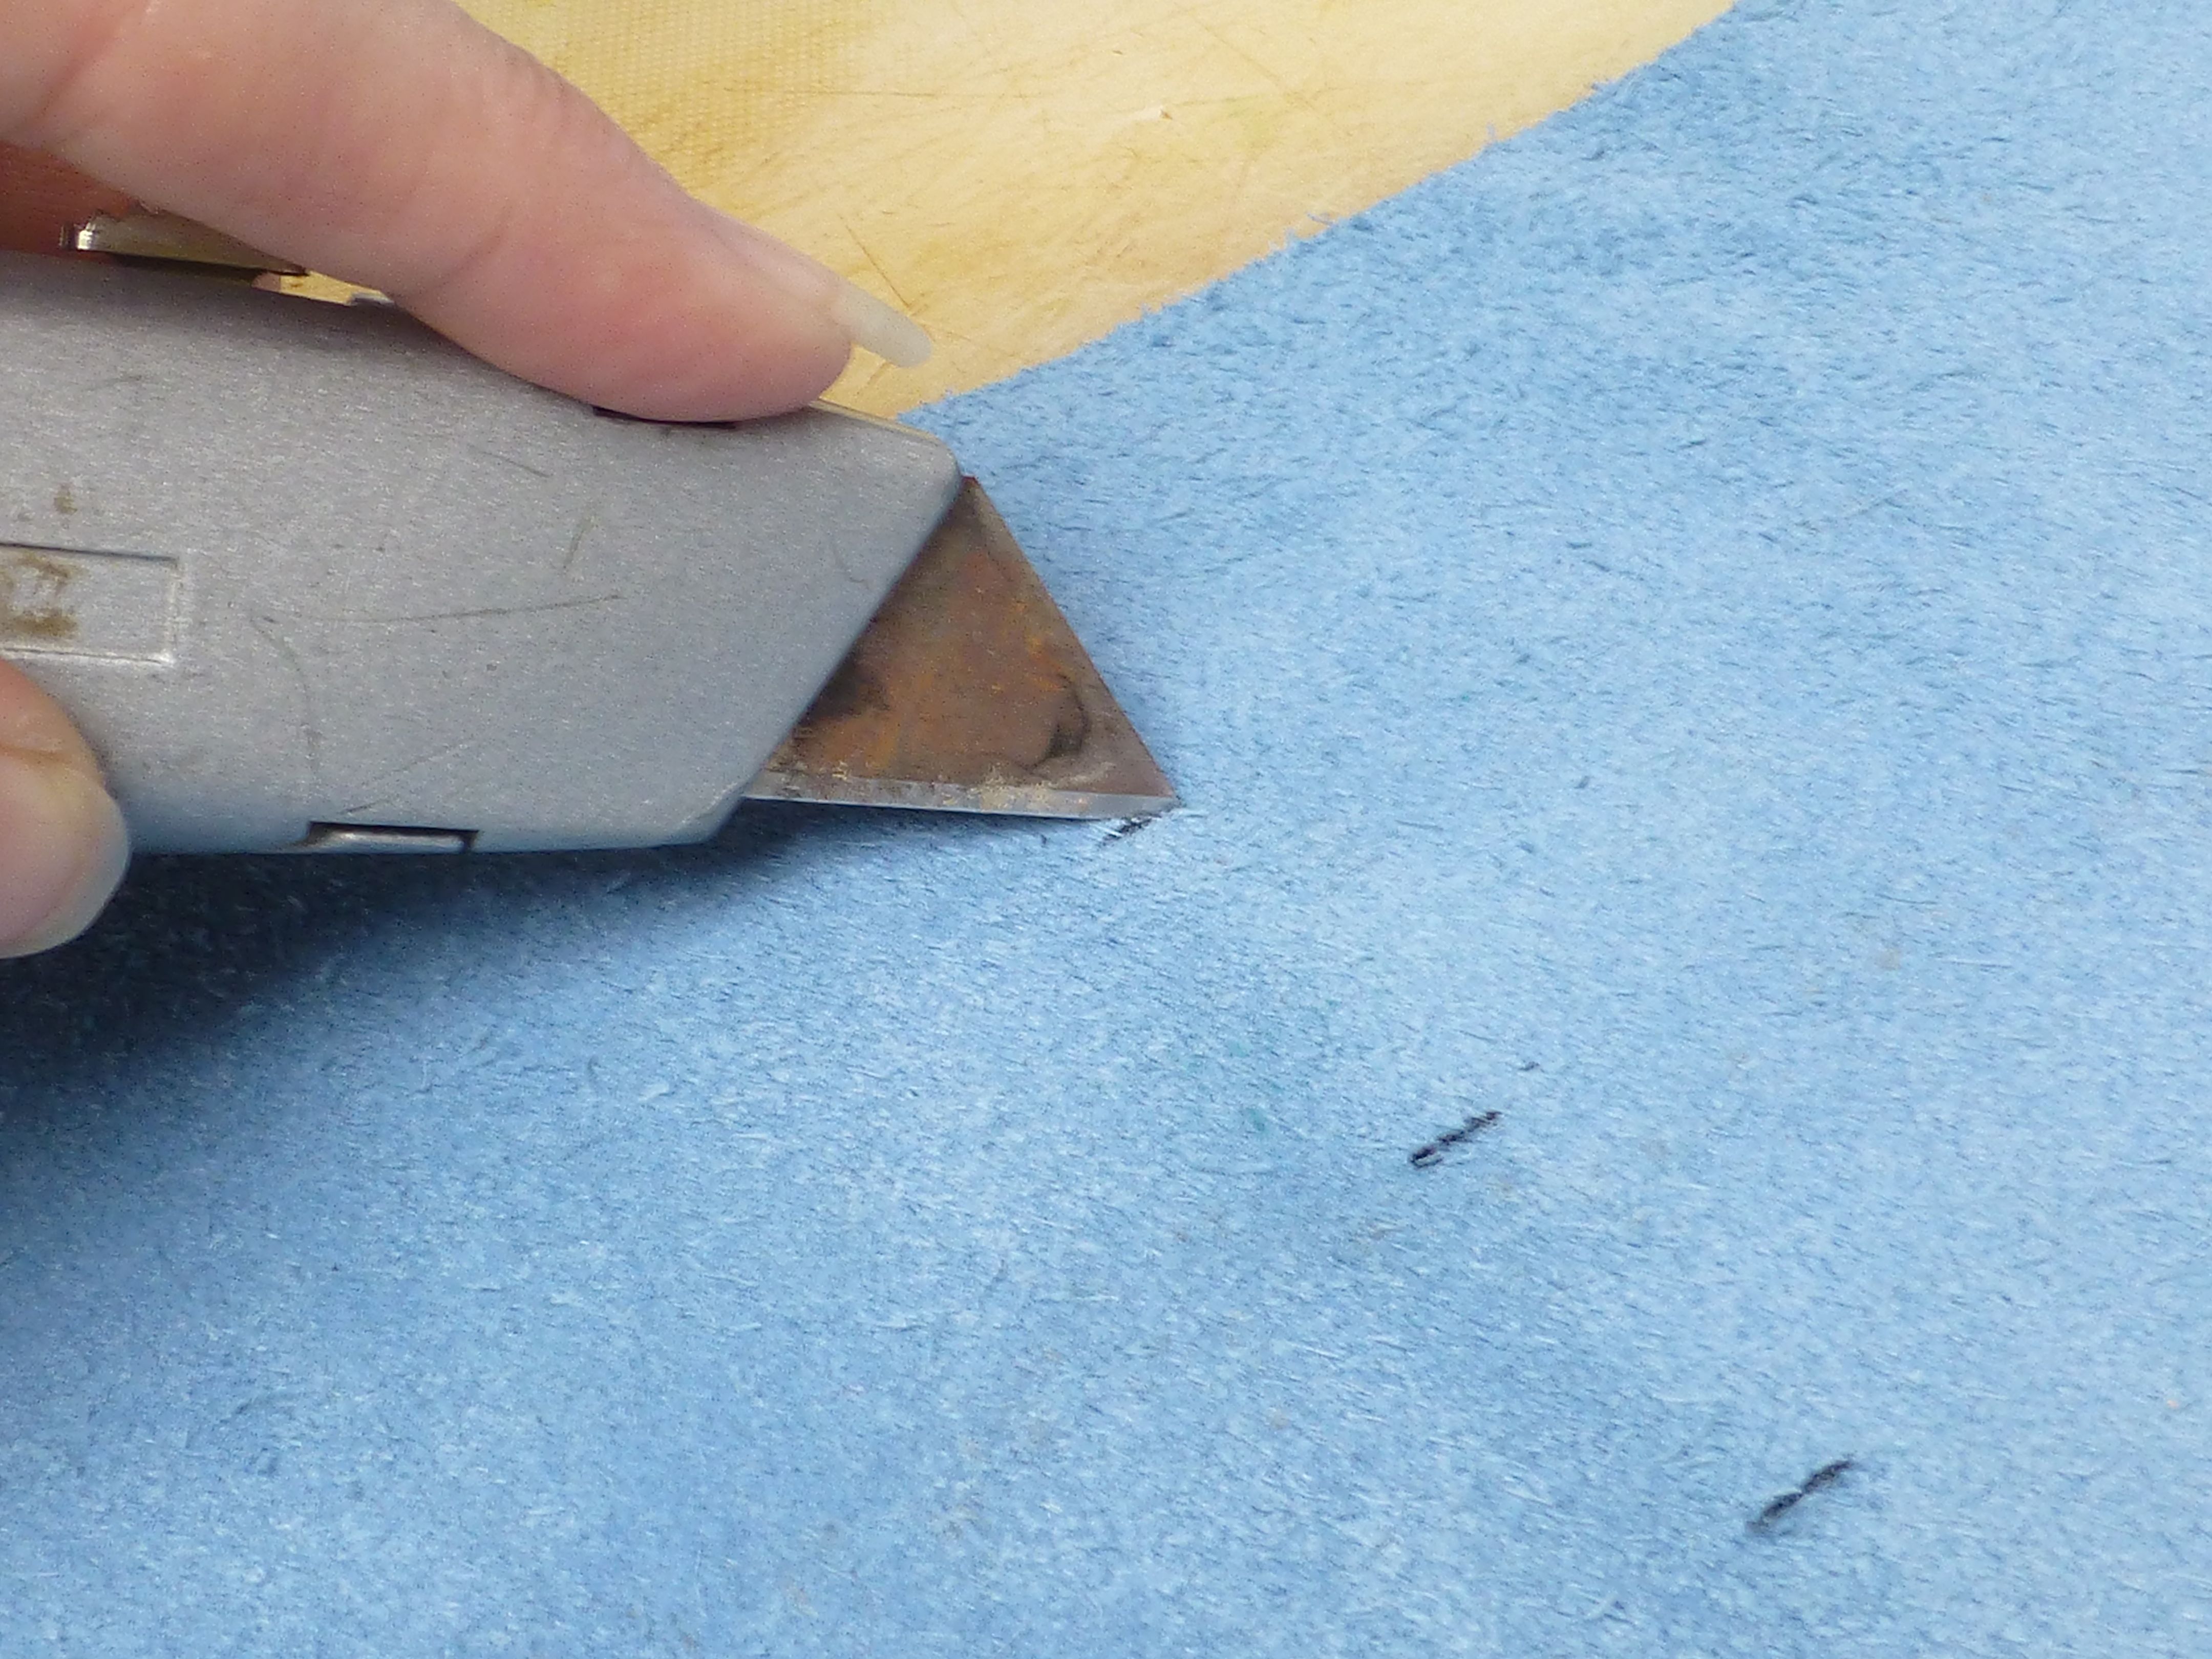
4. Mark a line about half a centimetre onto the fabric, directly in line with the holes in the signatures.


5. Cut through the fabric at these markings using a craft knife.
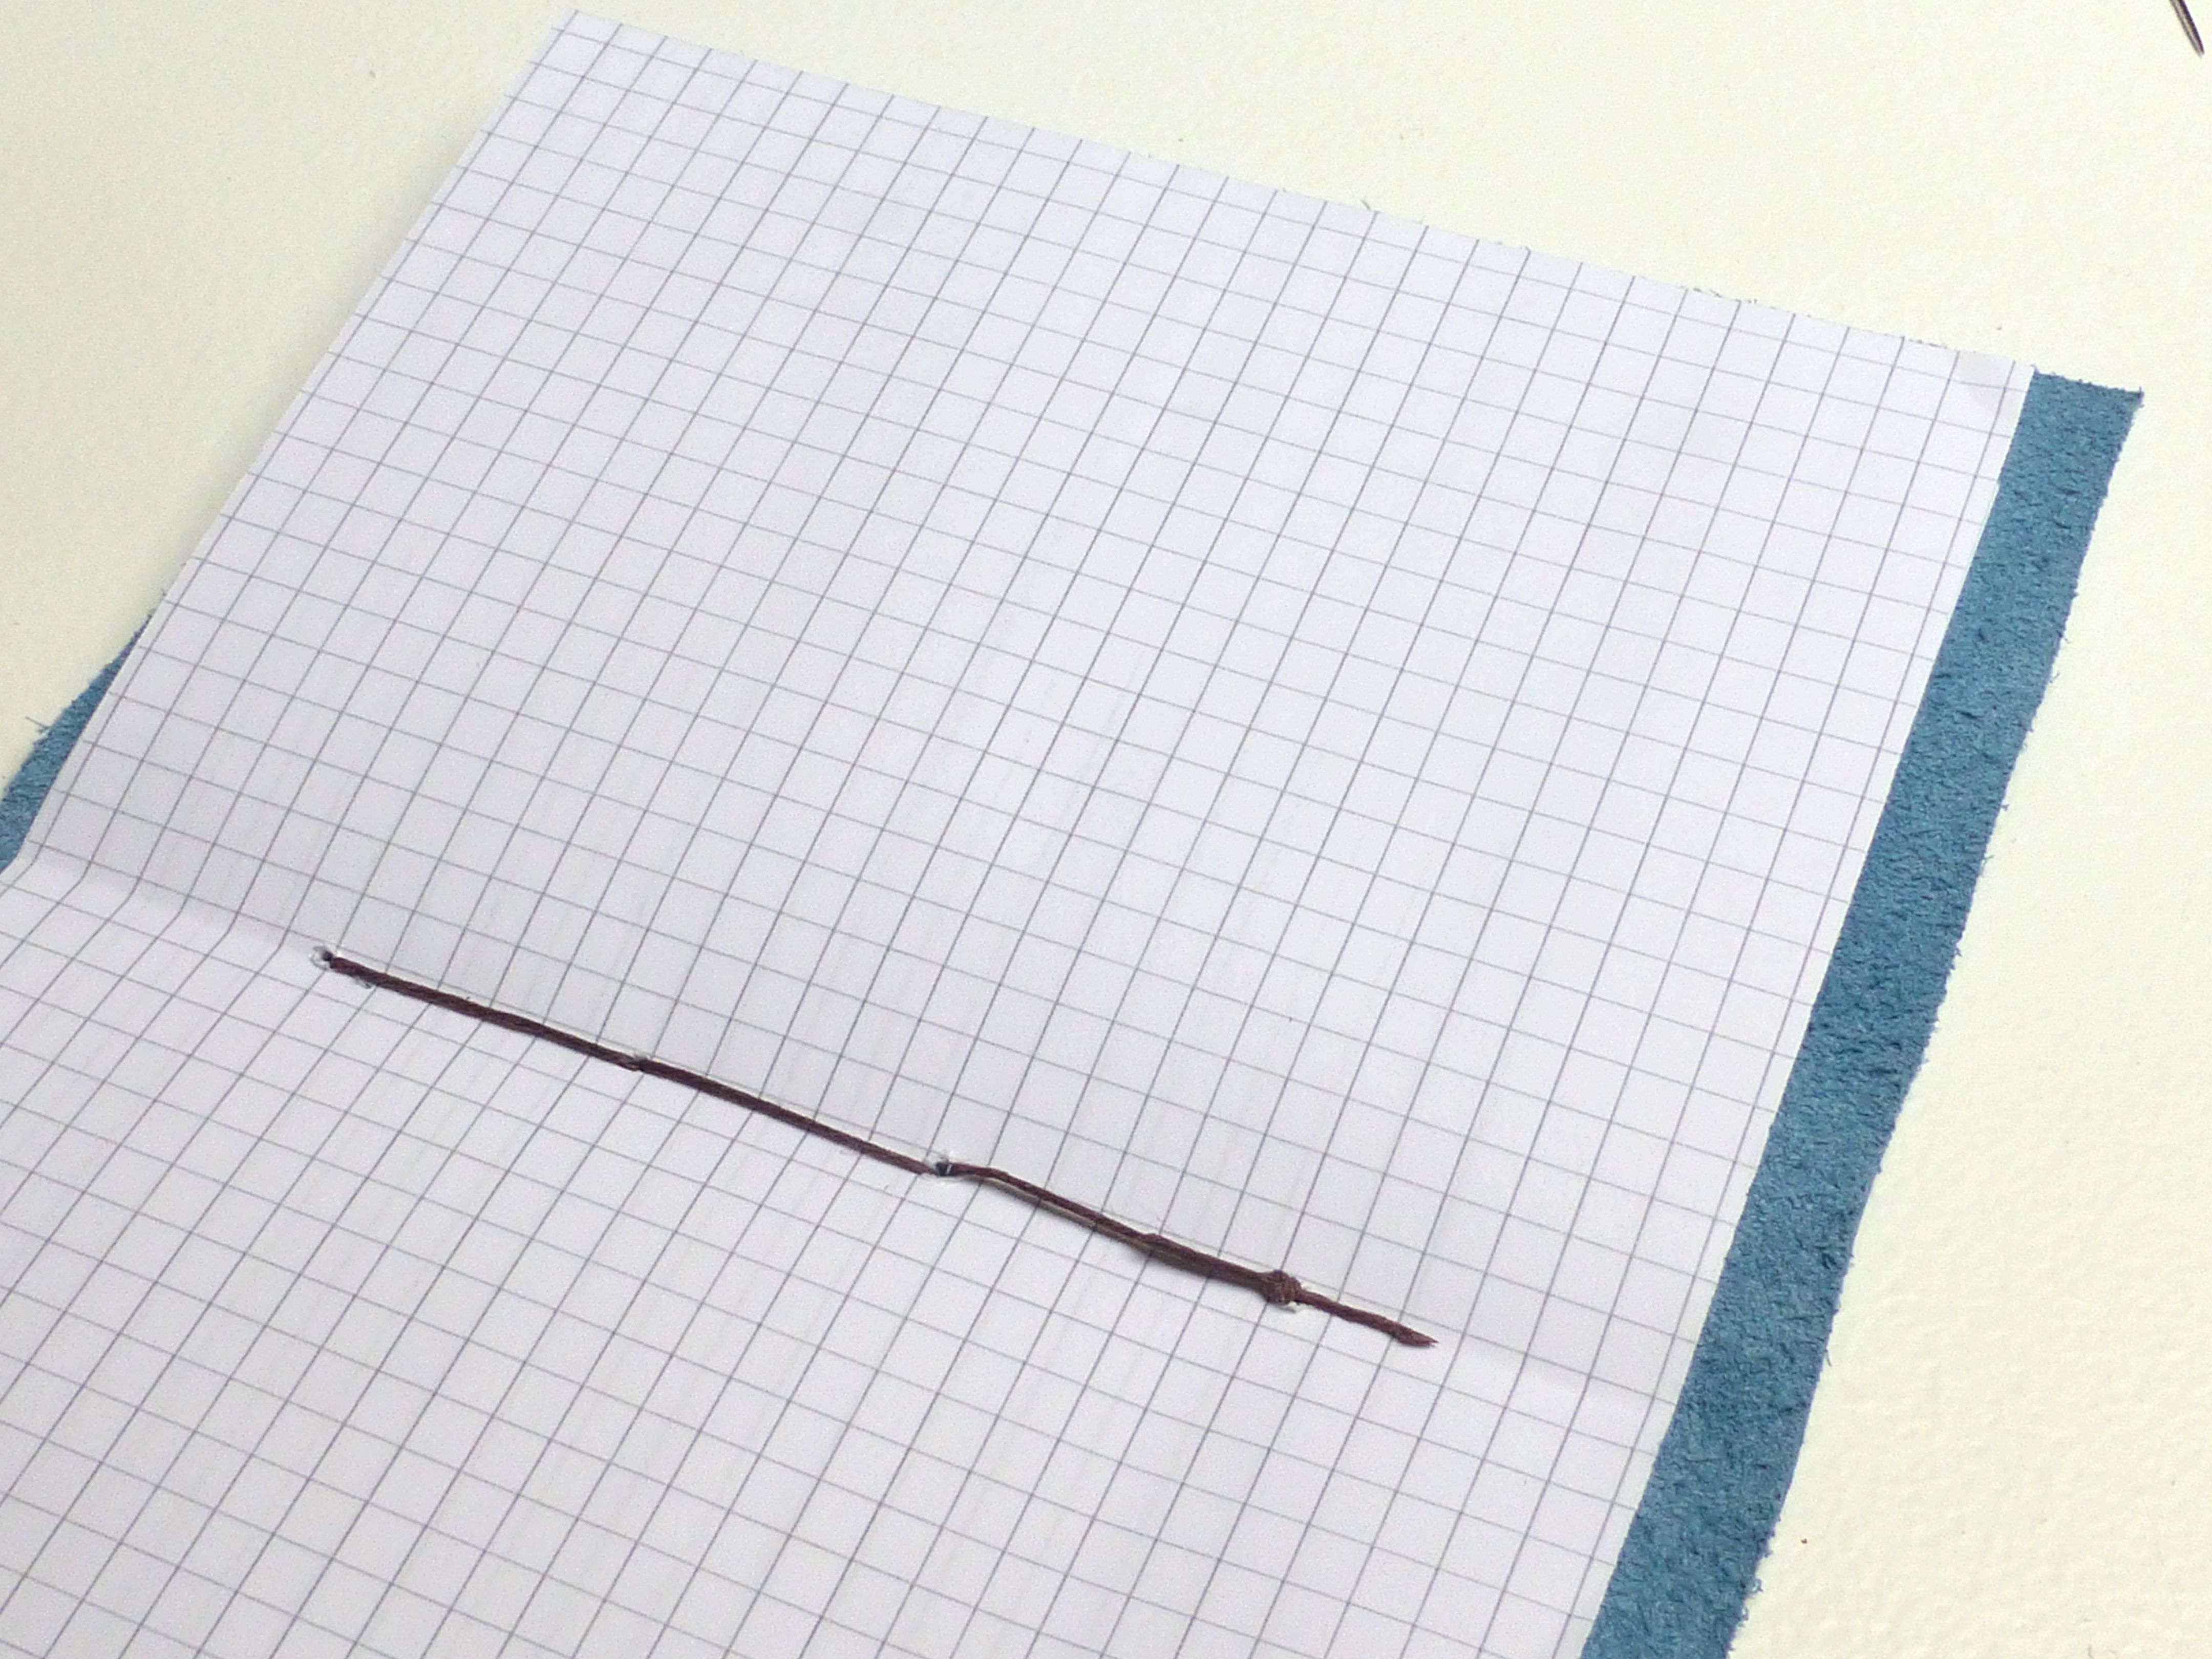
6. Thread a needle with a length of waxed cotton (or strong thread) twice the measurement of the spine of your journal.

7. Starting at the bottom, pass the needle through the hole in the first signature and the slit in the cover from the inside to the outside as shown below. Leave a tail of thread about 5cm long.

8. Pass the needle back through the second slit and signature.

10. Continue in this way until you reach the top, then weave your way back down to the bottom in the same way.


11. Tie the ends together and trim for a neat finish.


12. Add all the other signatures in the same way.


13. If you’ve added a flap, now is the time to add a closure of your choice. It can be a simple length of leather knotted at one end, slipped through a slit and wrapped around or a magnetic snap fastening as I have used.
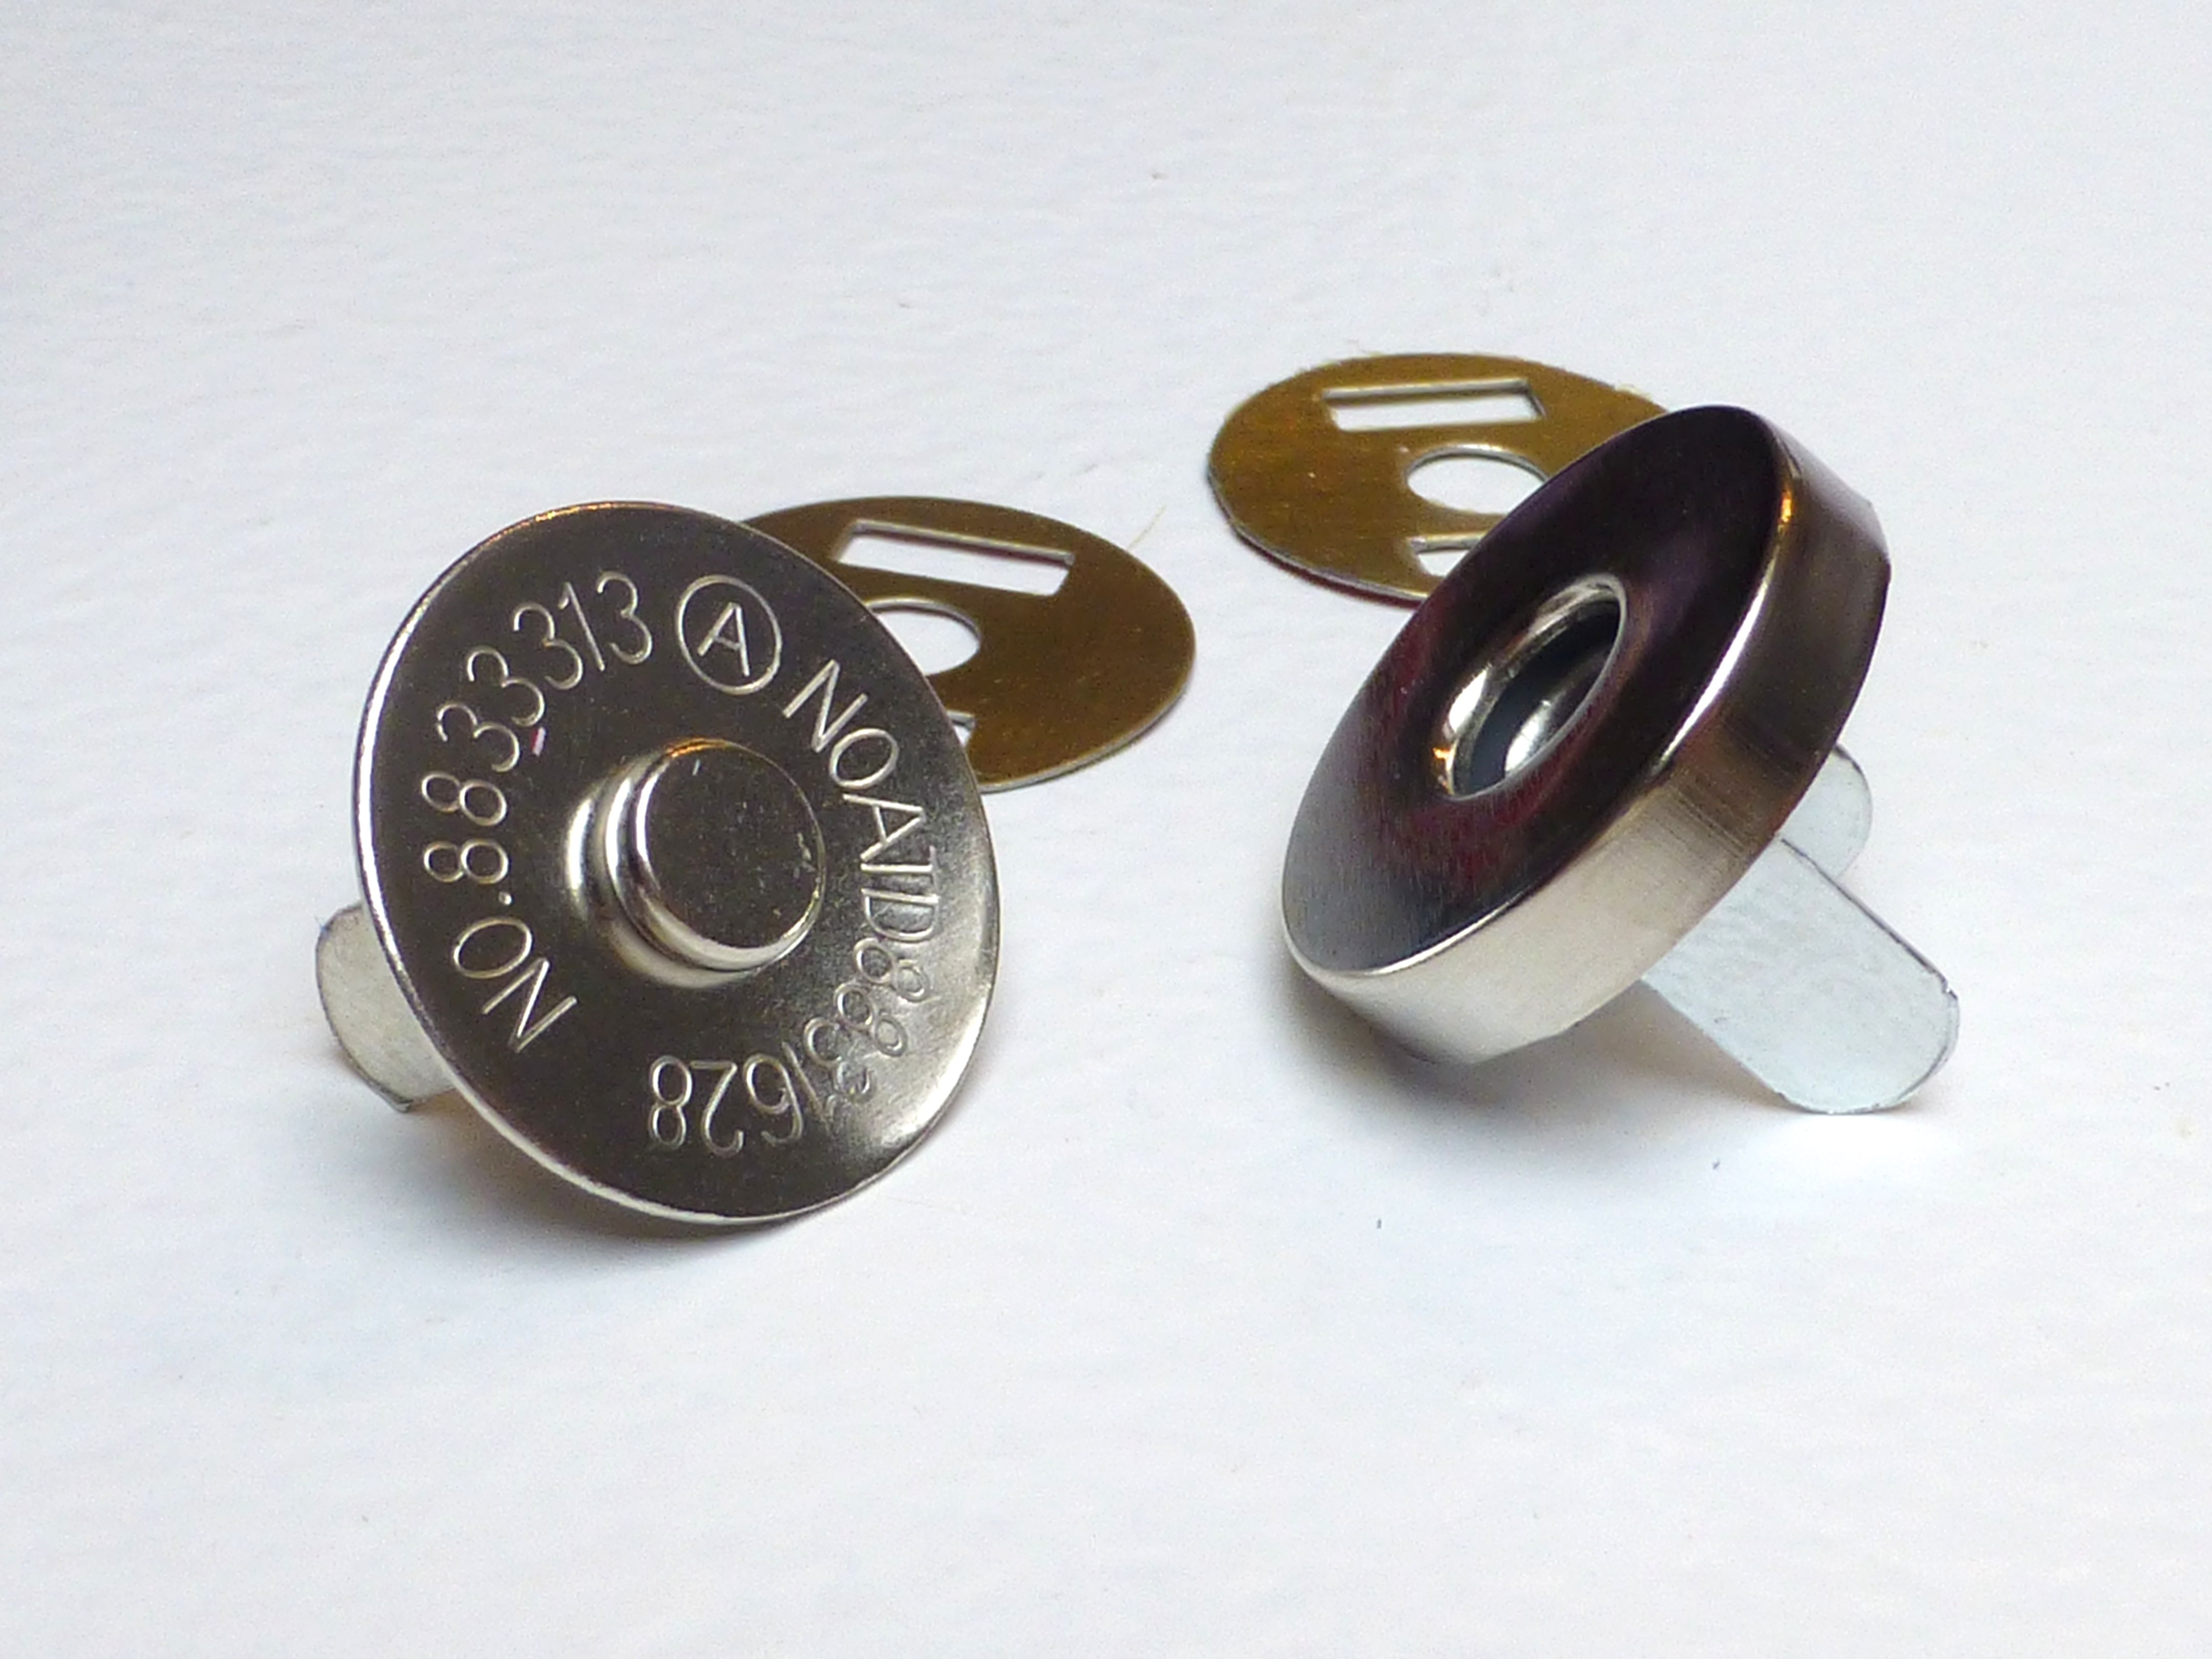
14. Attach following the manufacturers instructions and cover the snap with a decorative feature button or piece of fabric. I made a bespoke needle felted button using three colours.


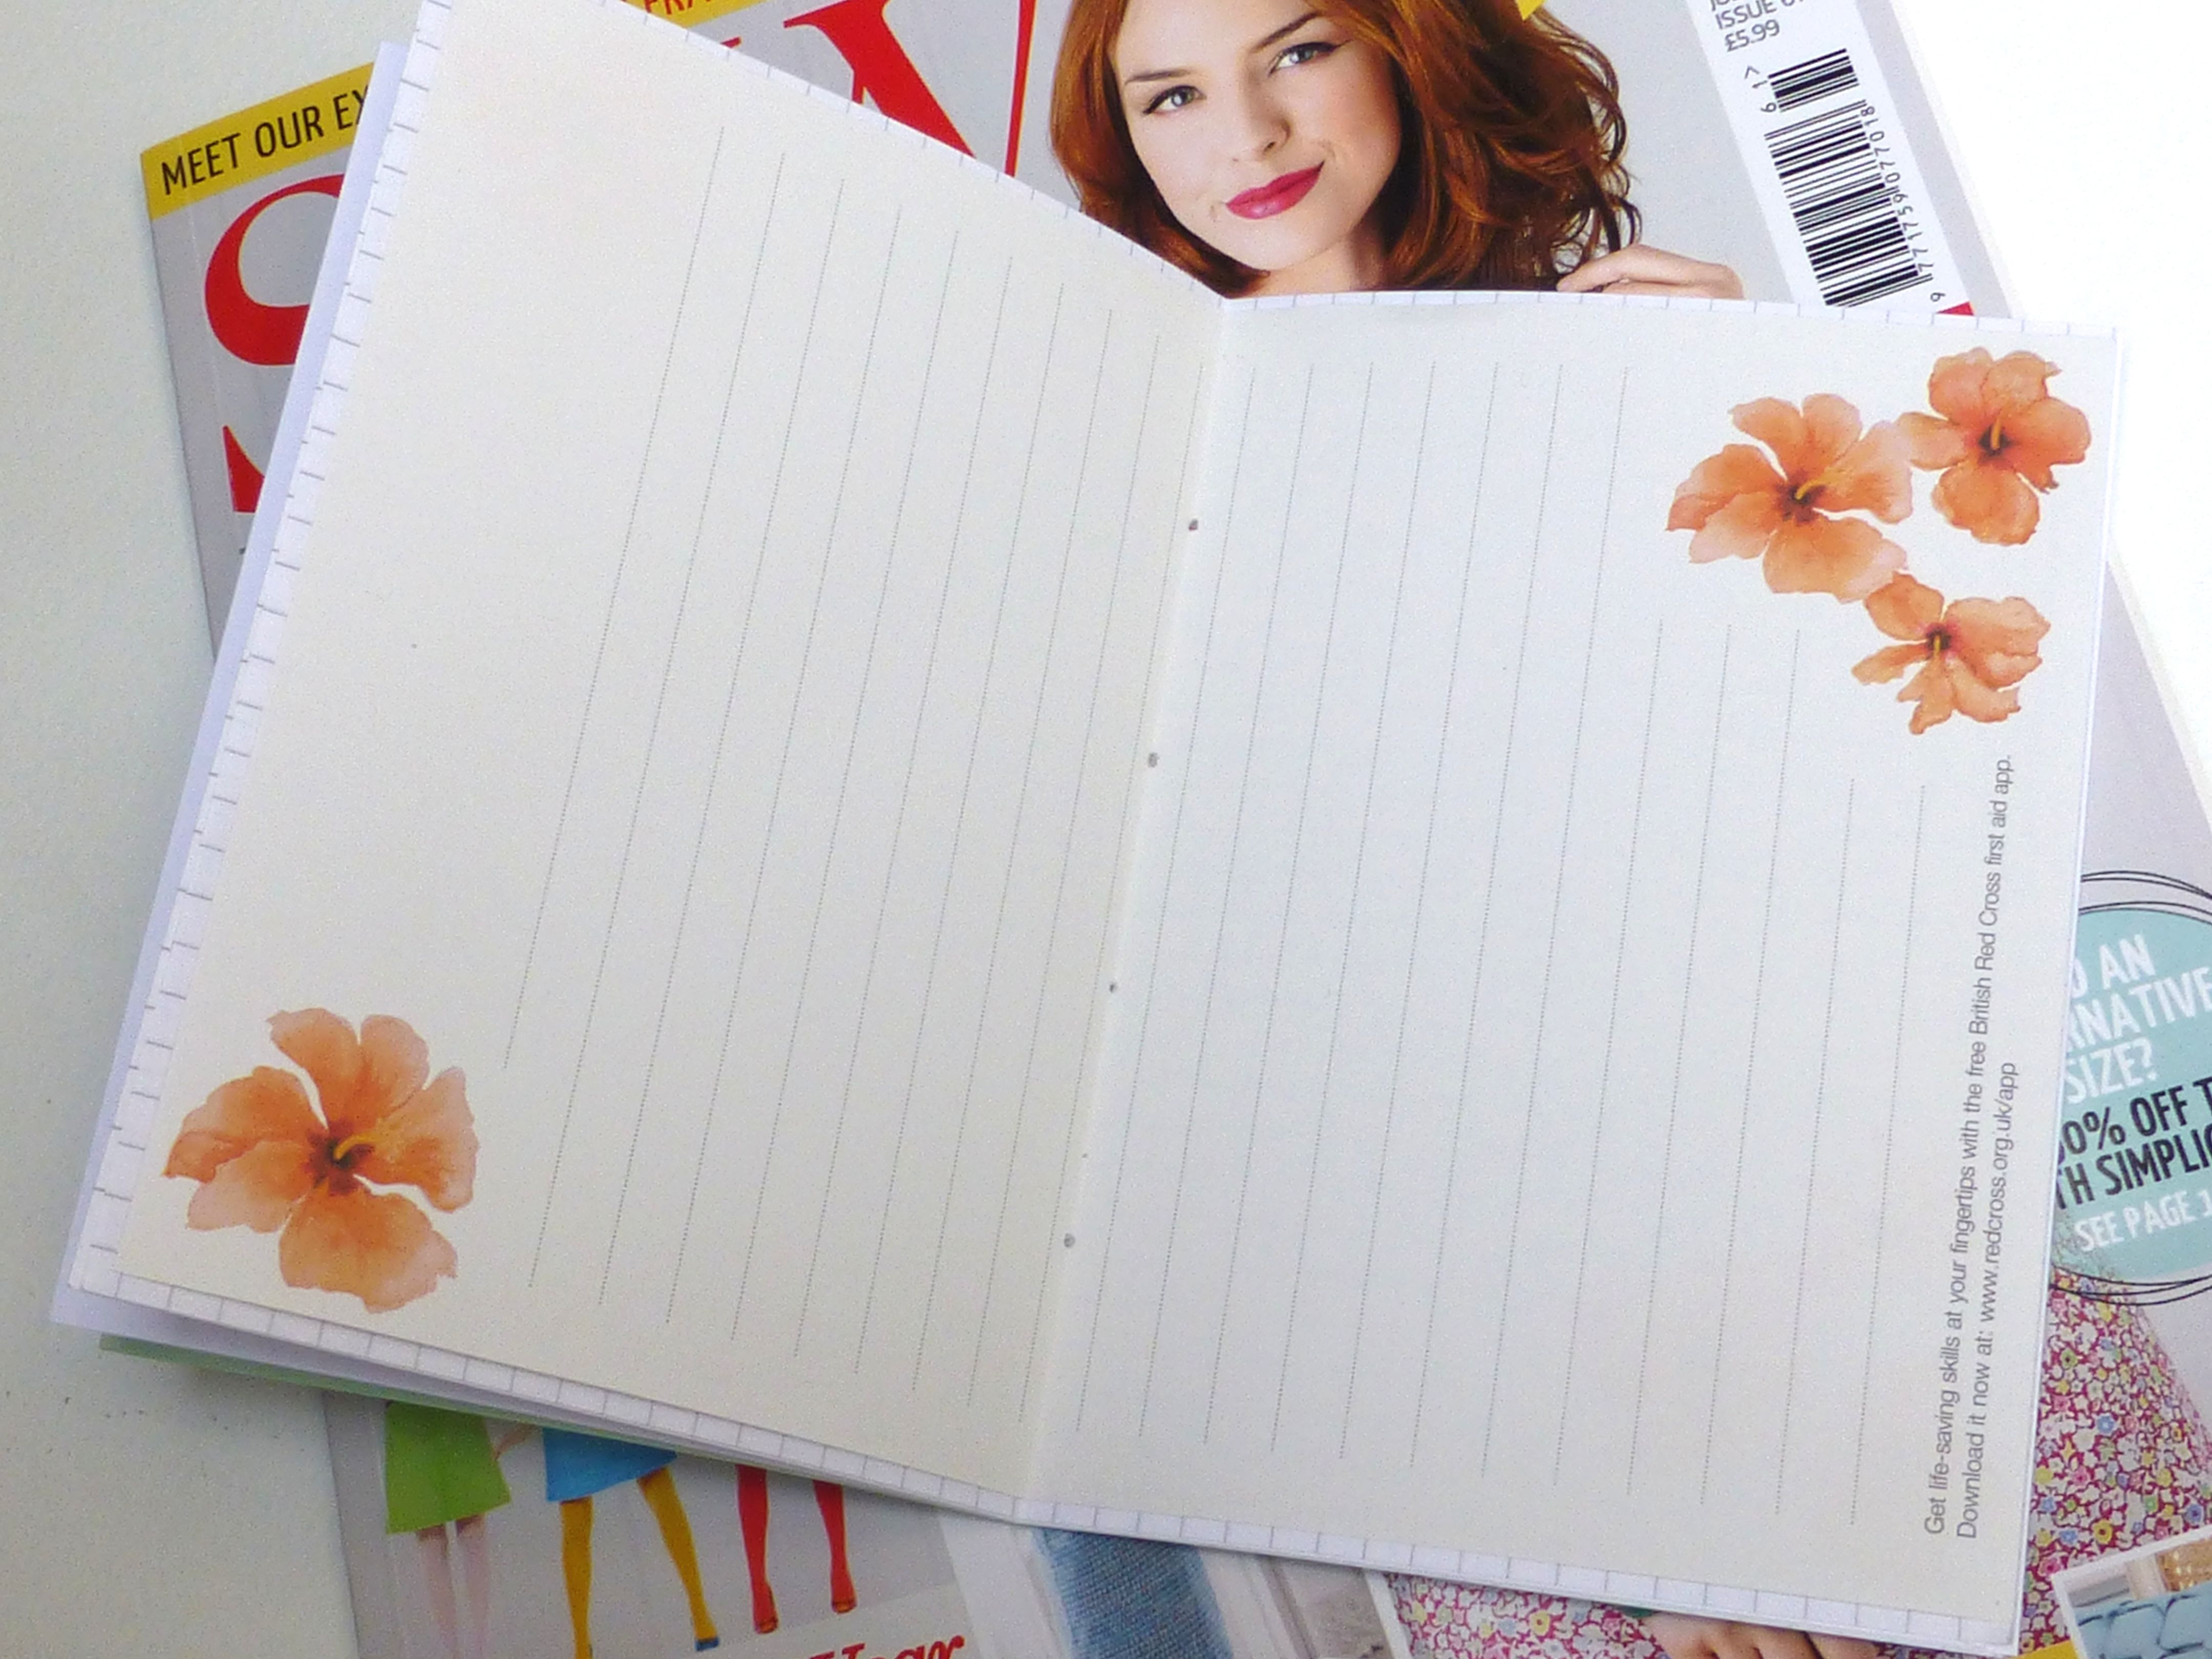
You could use handmade paper with deckled edges to make it really special, or just stick to printer paper to keep it simple, but I rather like using several different types of paper to make it more interesting.

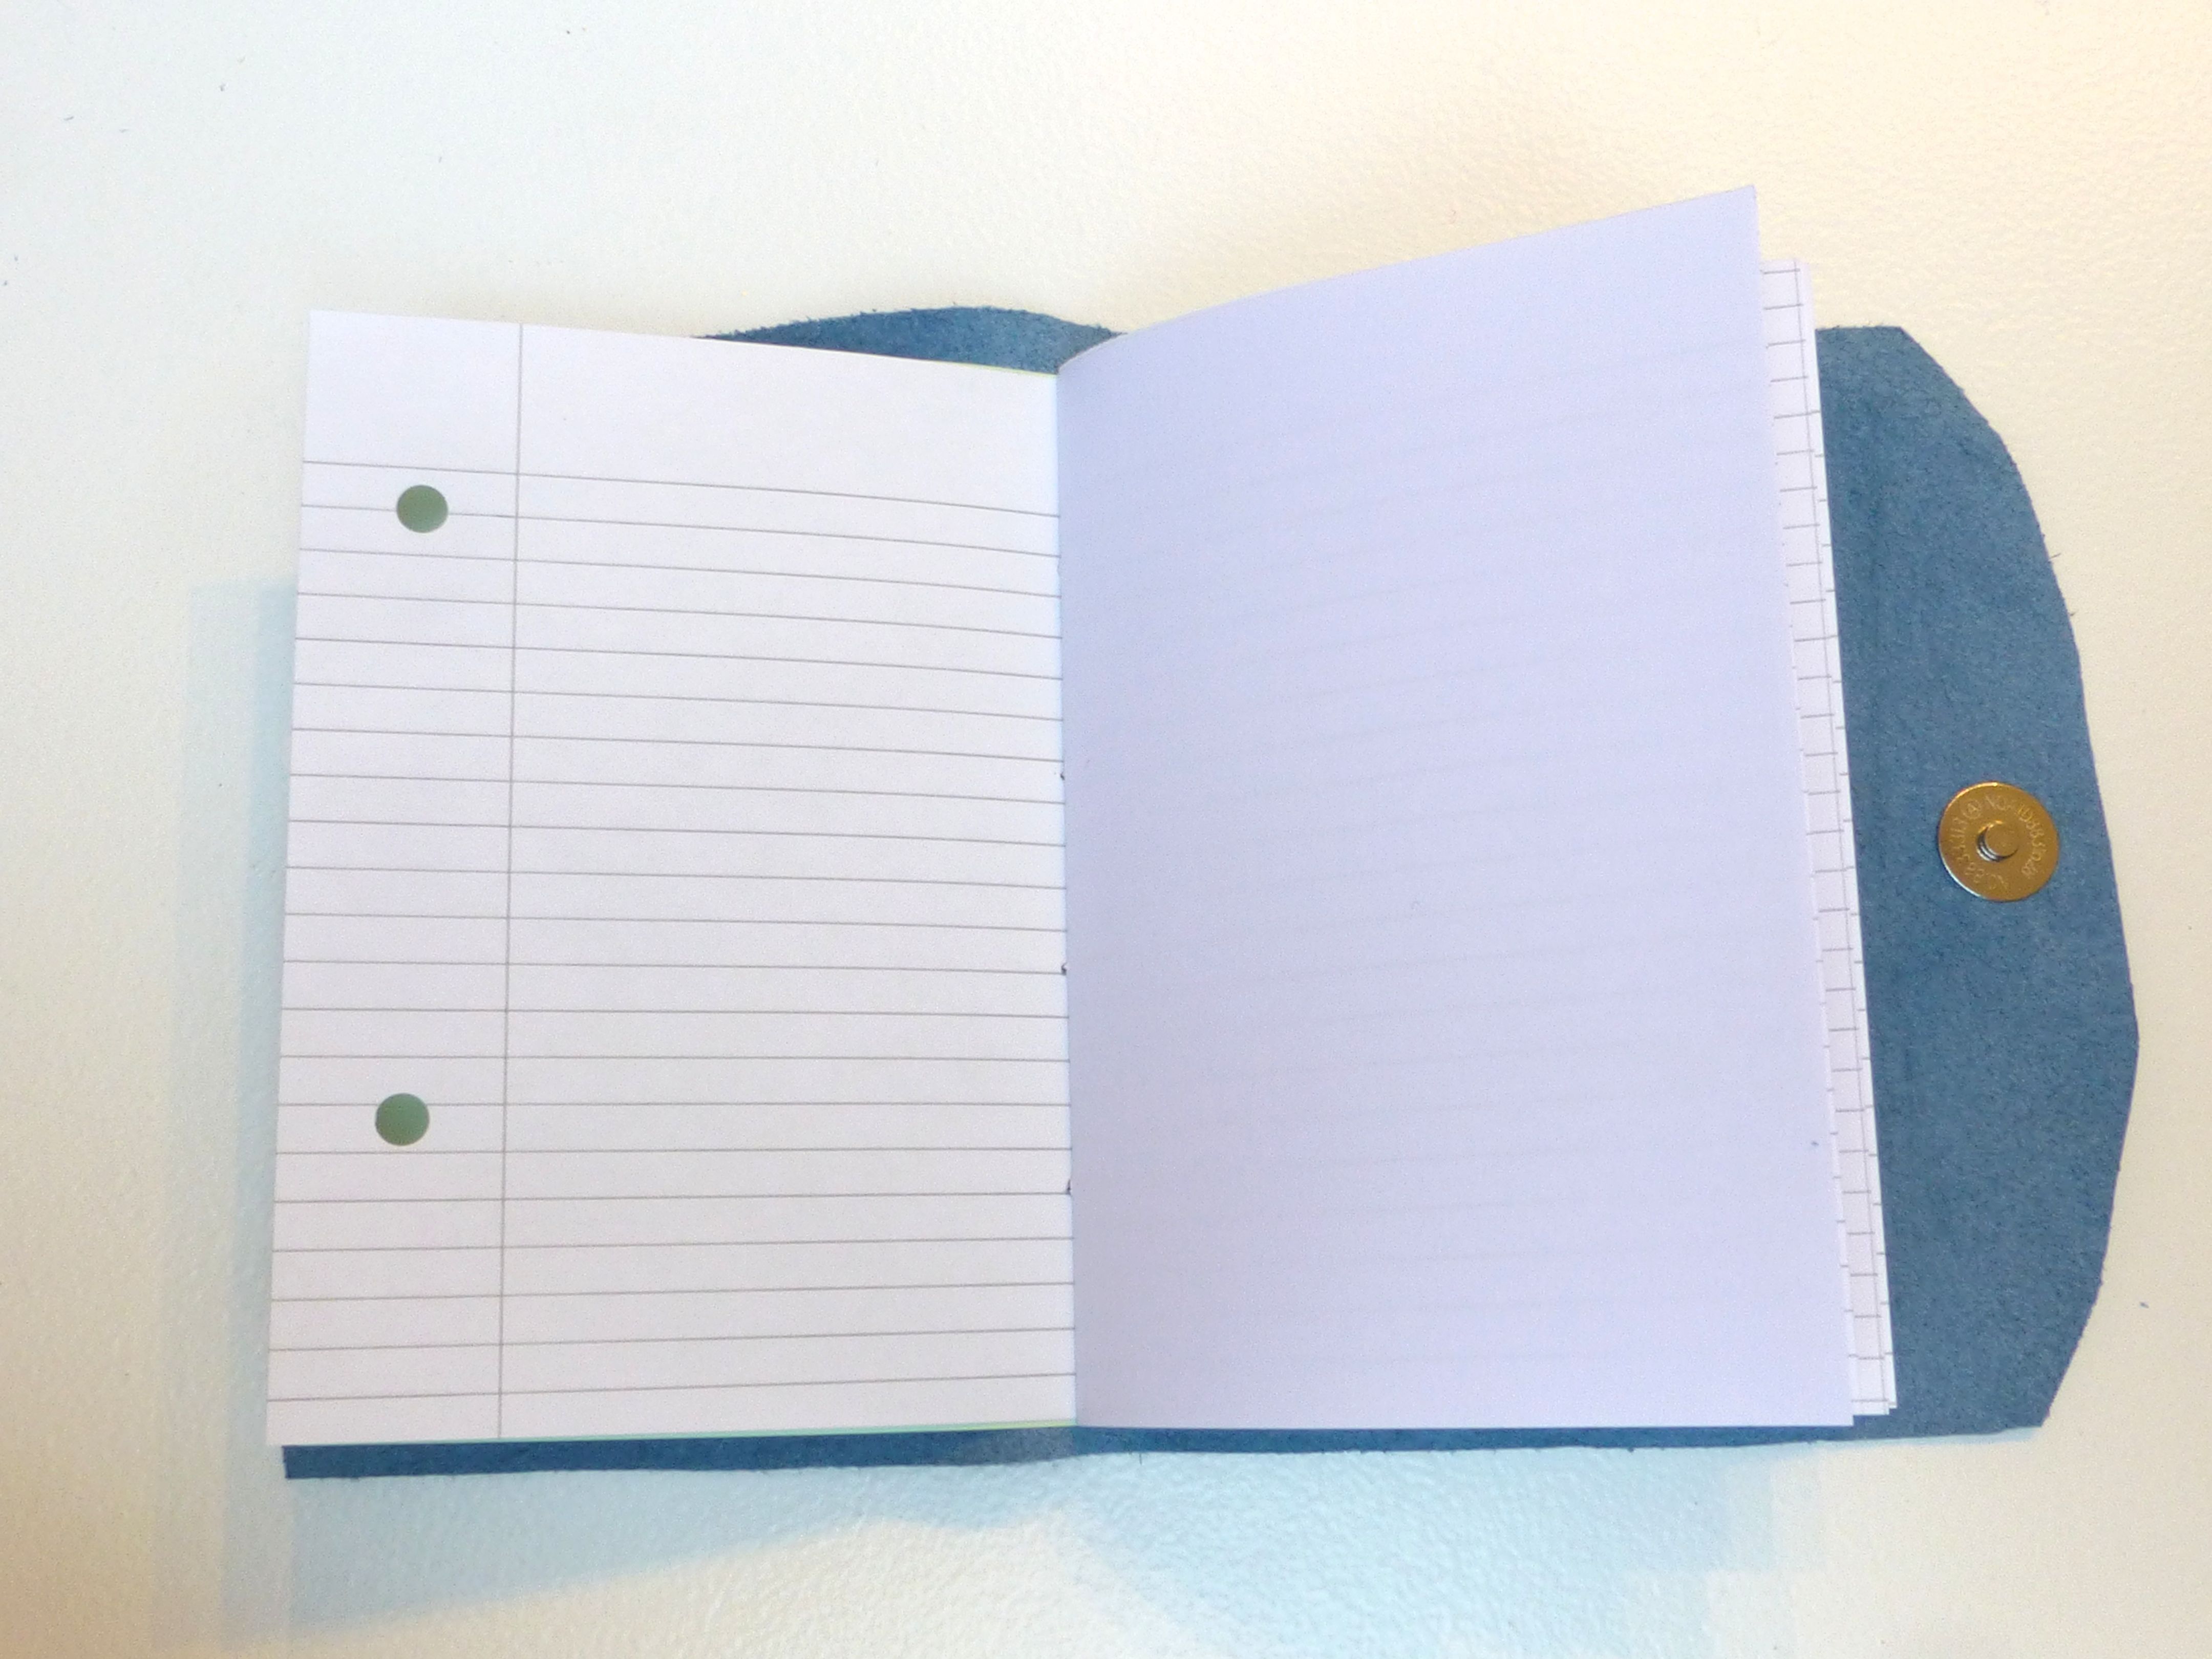
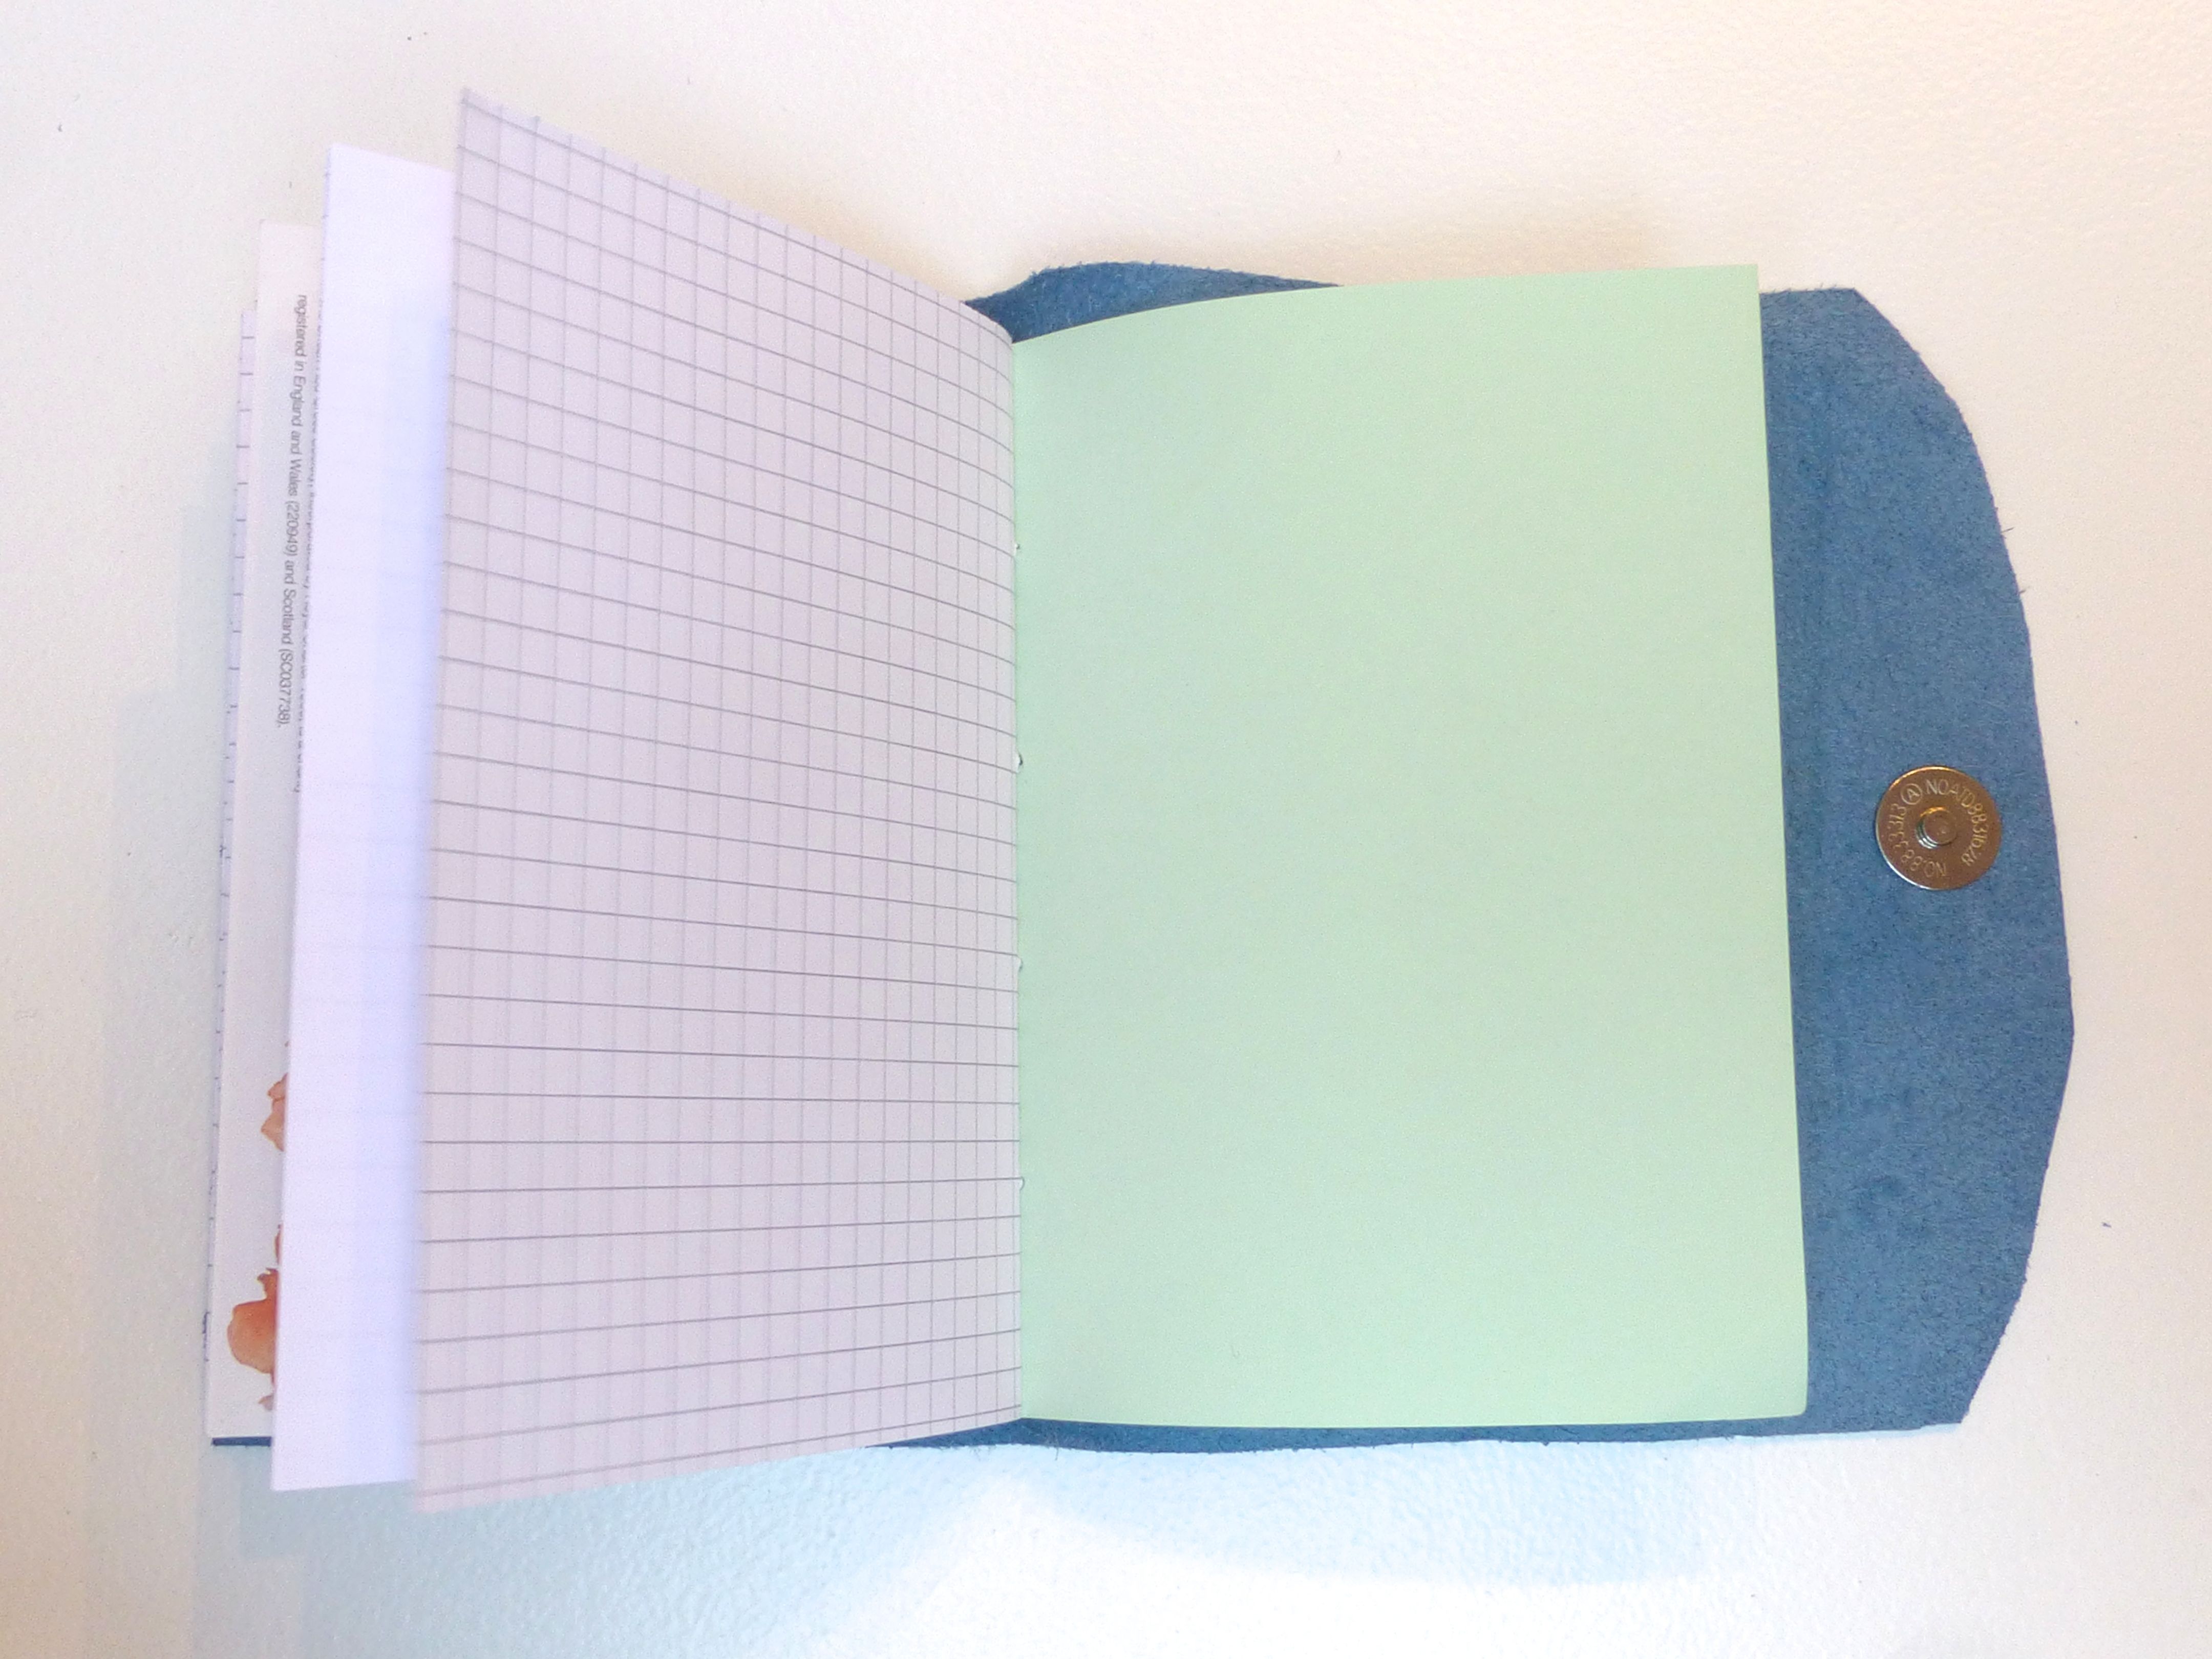
I can’t show you what it looks like from the top because it is personalized with the recipient’s initial, but you get the idea.

I wrapped it up, popped it in the parcel along with lots of other goodies (blogged about here) and posted it First Class today, so somebody should be getting a big box from #sewingsanta in the post tomorrow! How exciting!
Just a quick post today to show you a few of the things I’ve made for my #sewingsanta recipient (who remains anonymous!).
I spent the maximum limit of ten pounds ages ago so I thought I’d take some time to sew some little gifts with fabric and bits from my stash. This way it’s not cheating because they haven’t cost a penny other than my time spent creating them.
These are the added extras – and boy have I had fun!
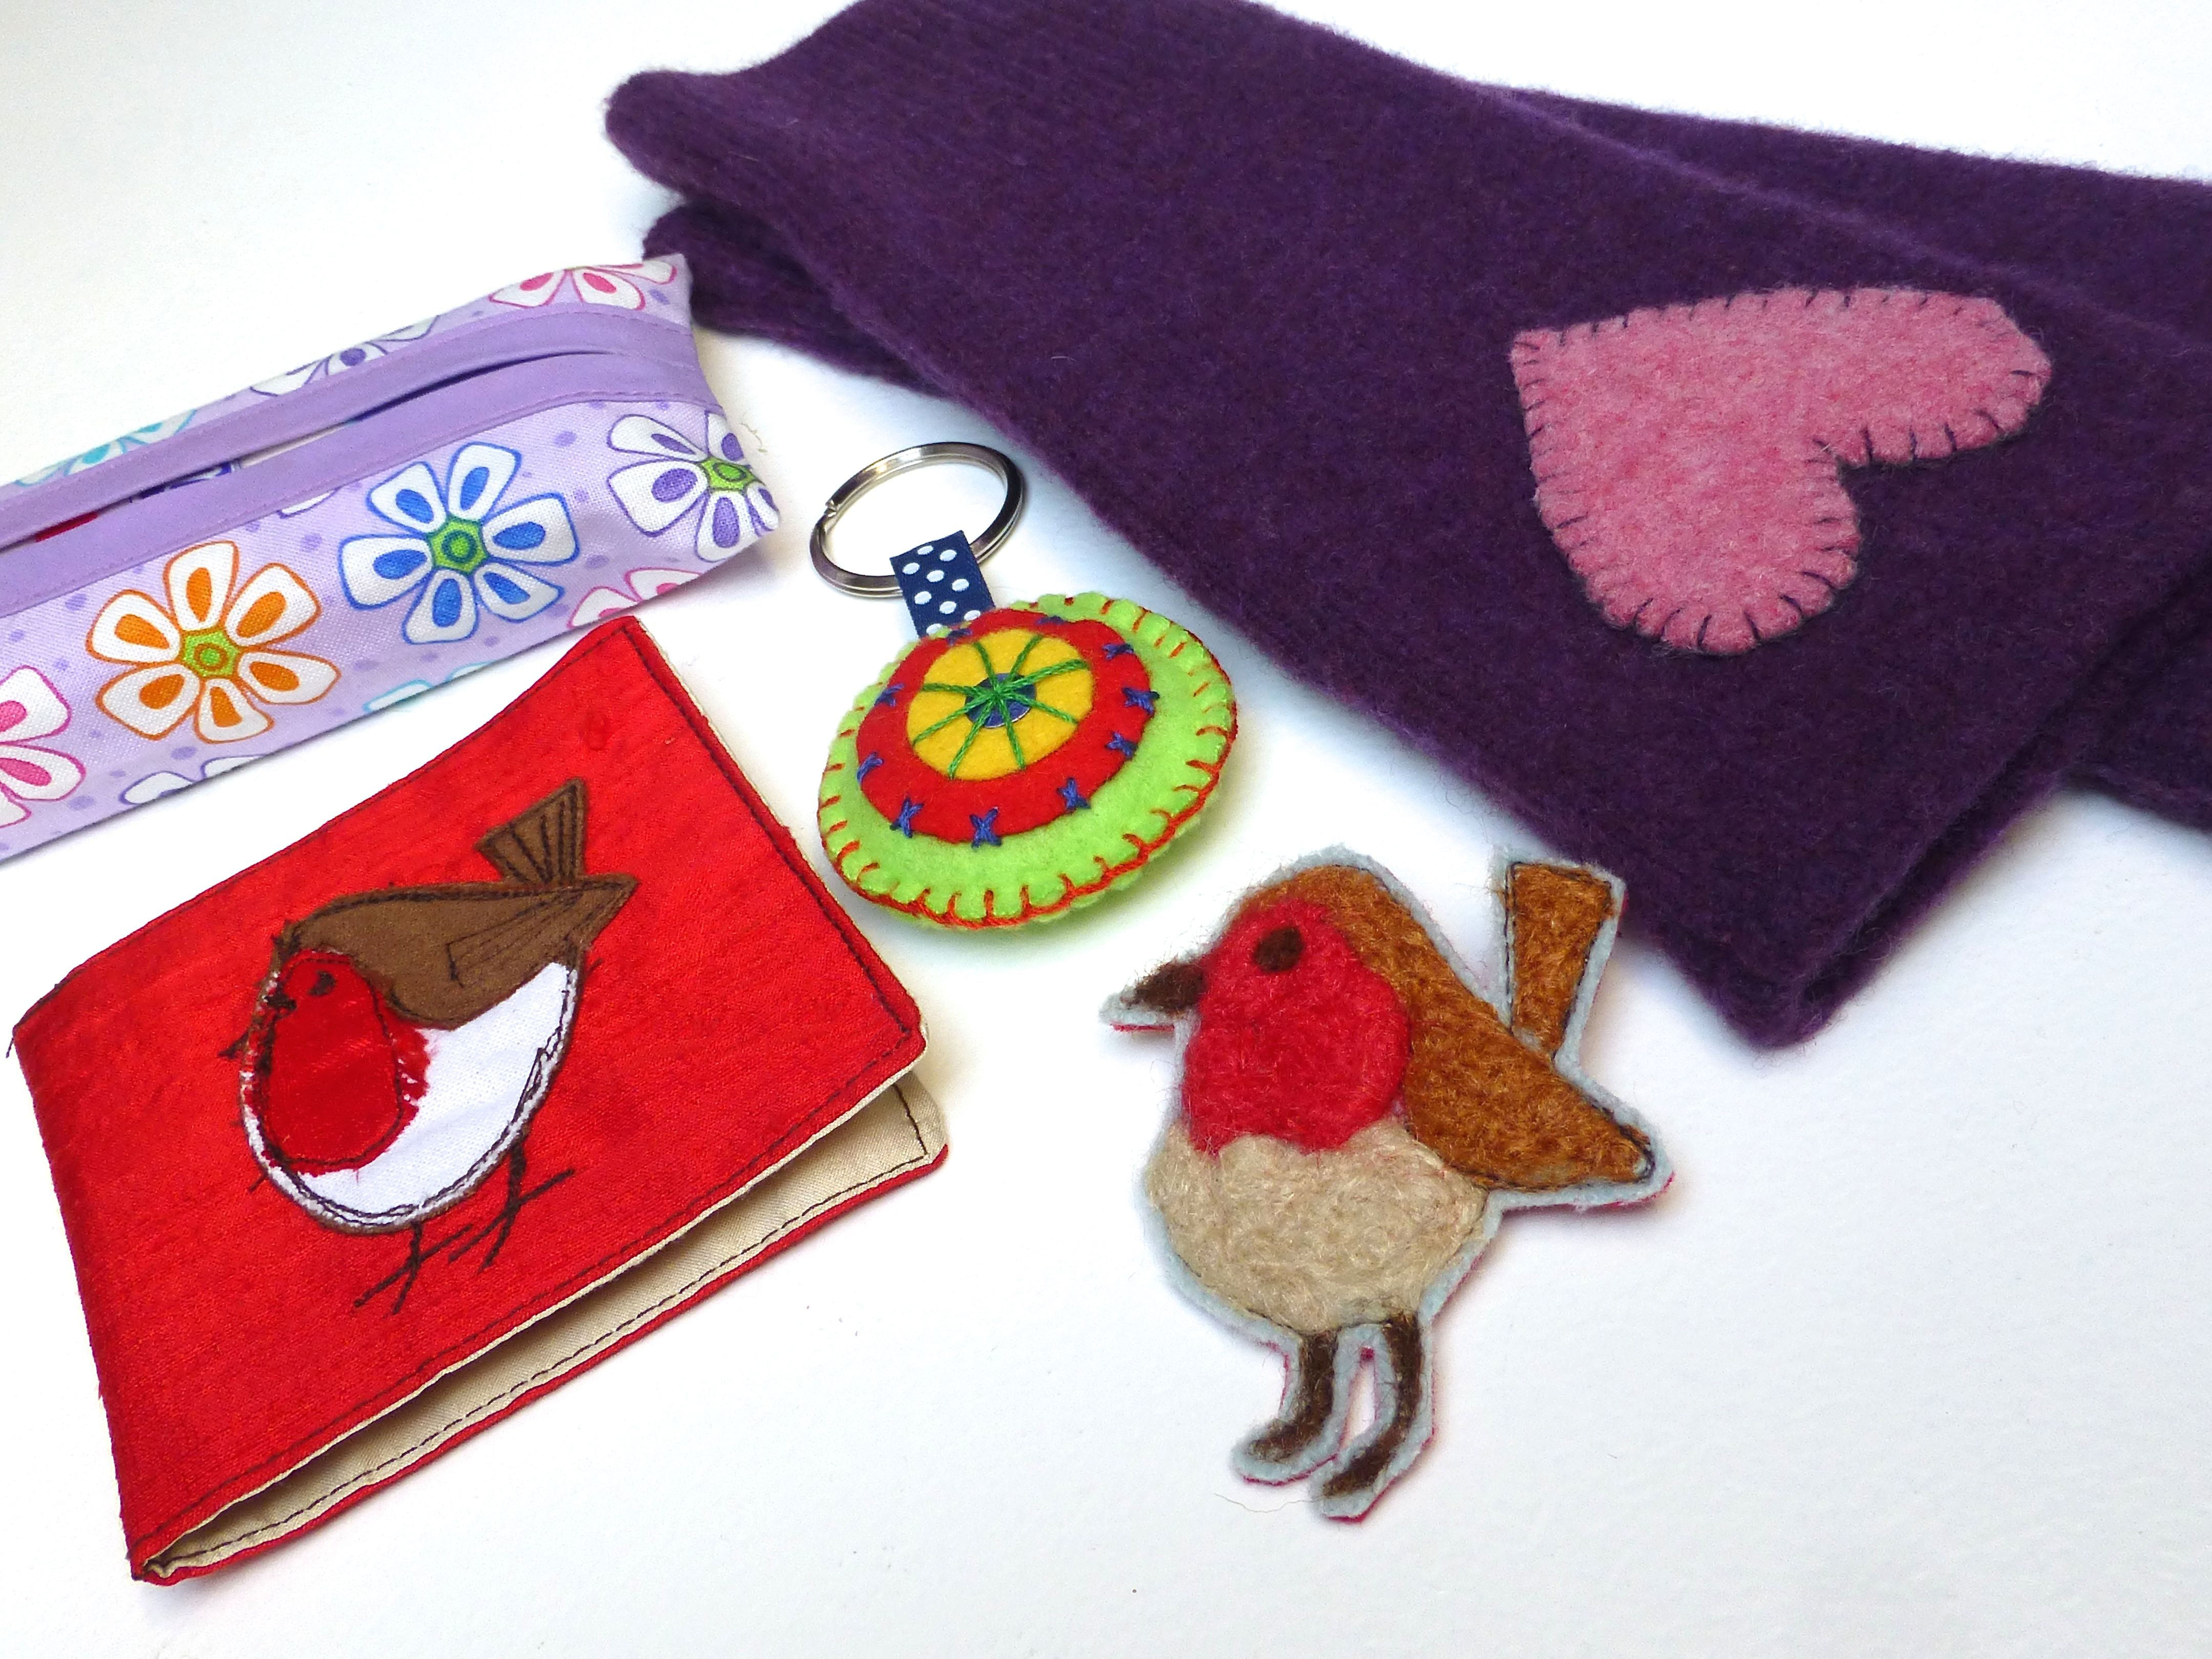
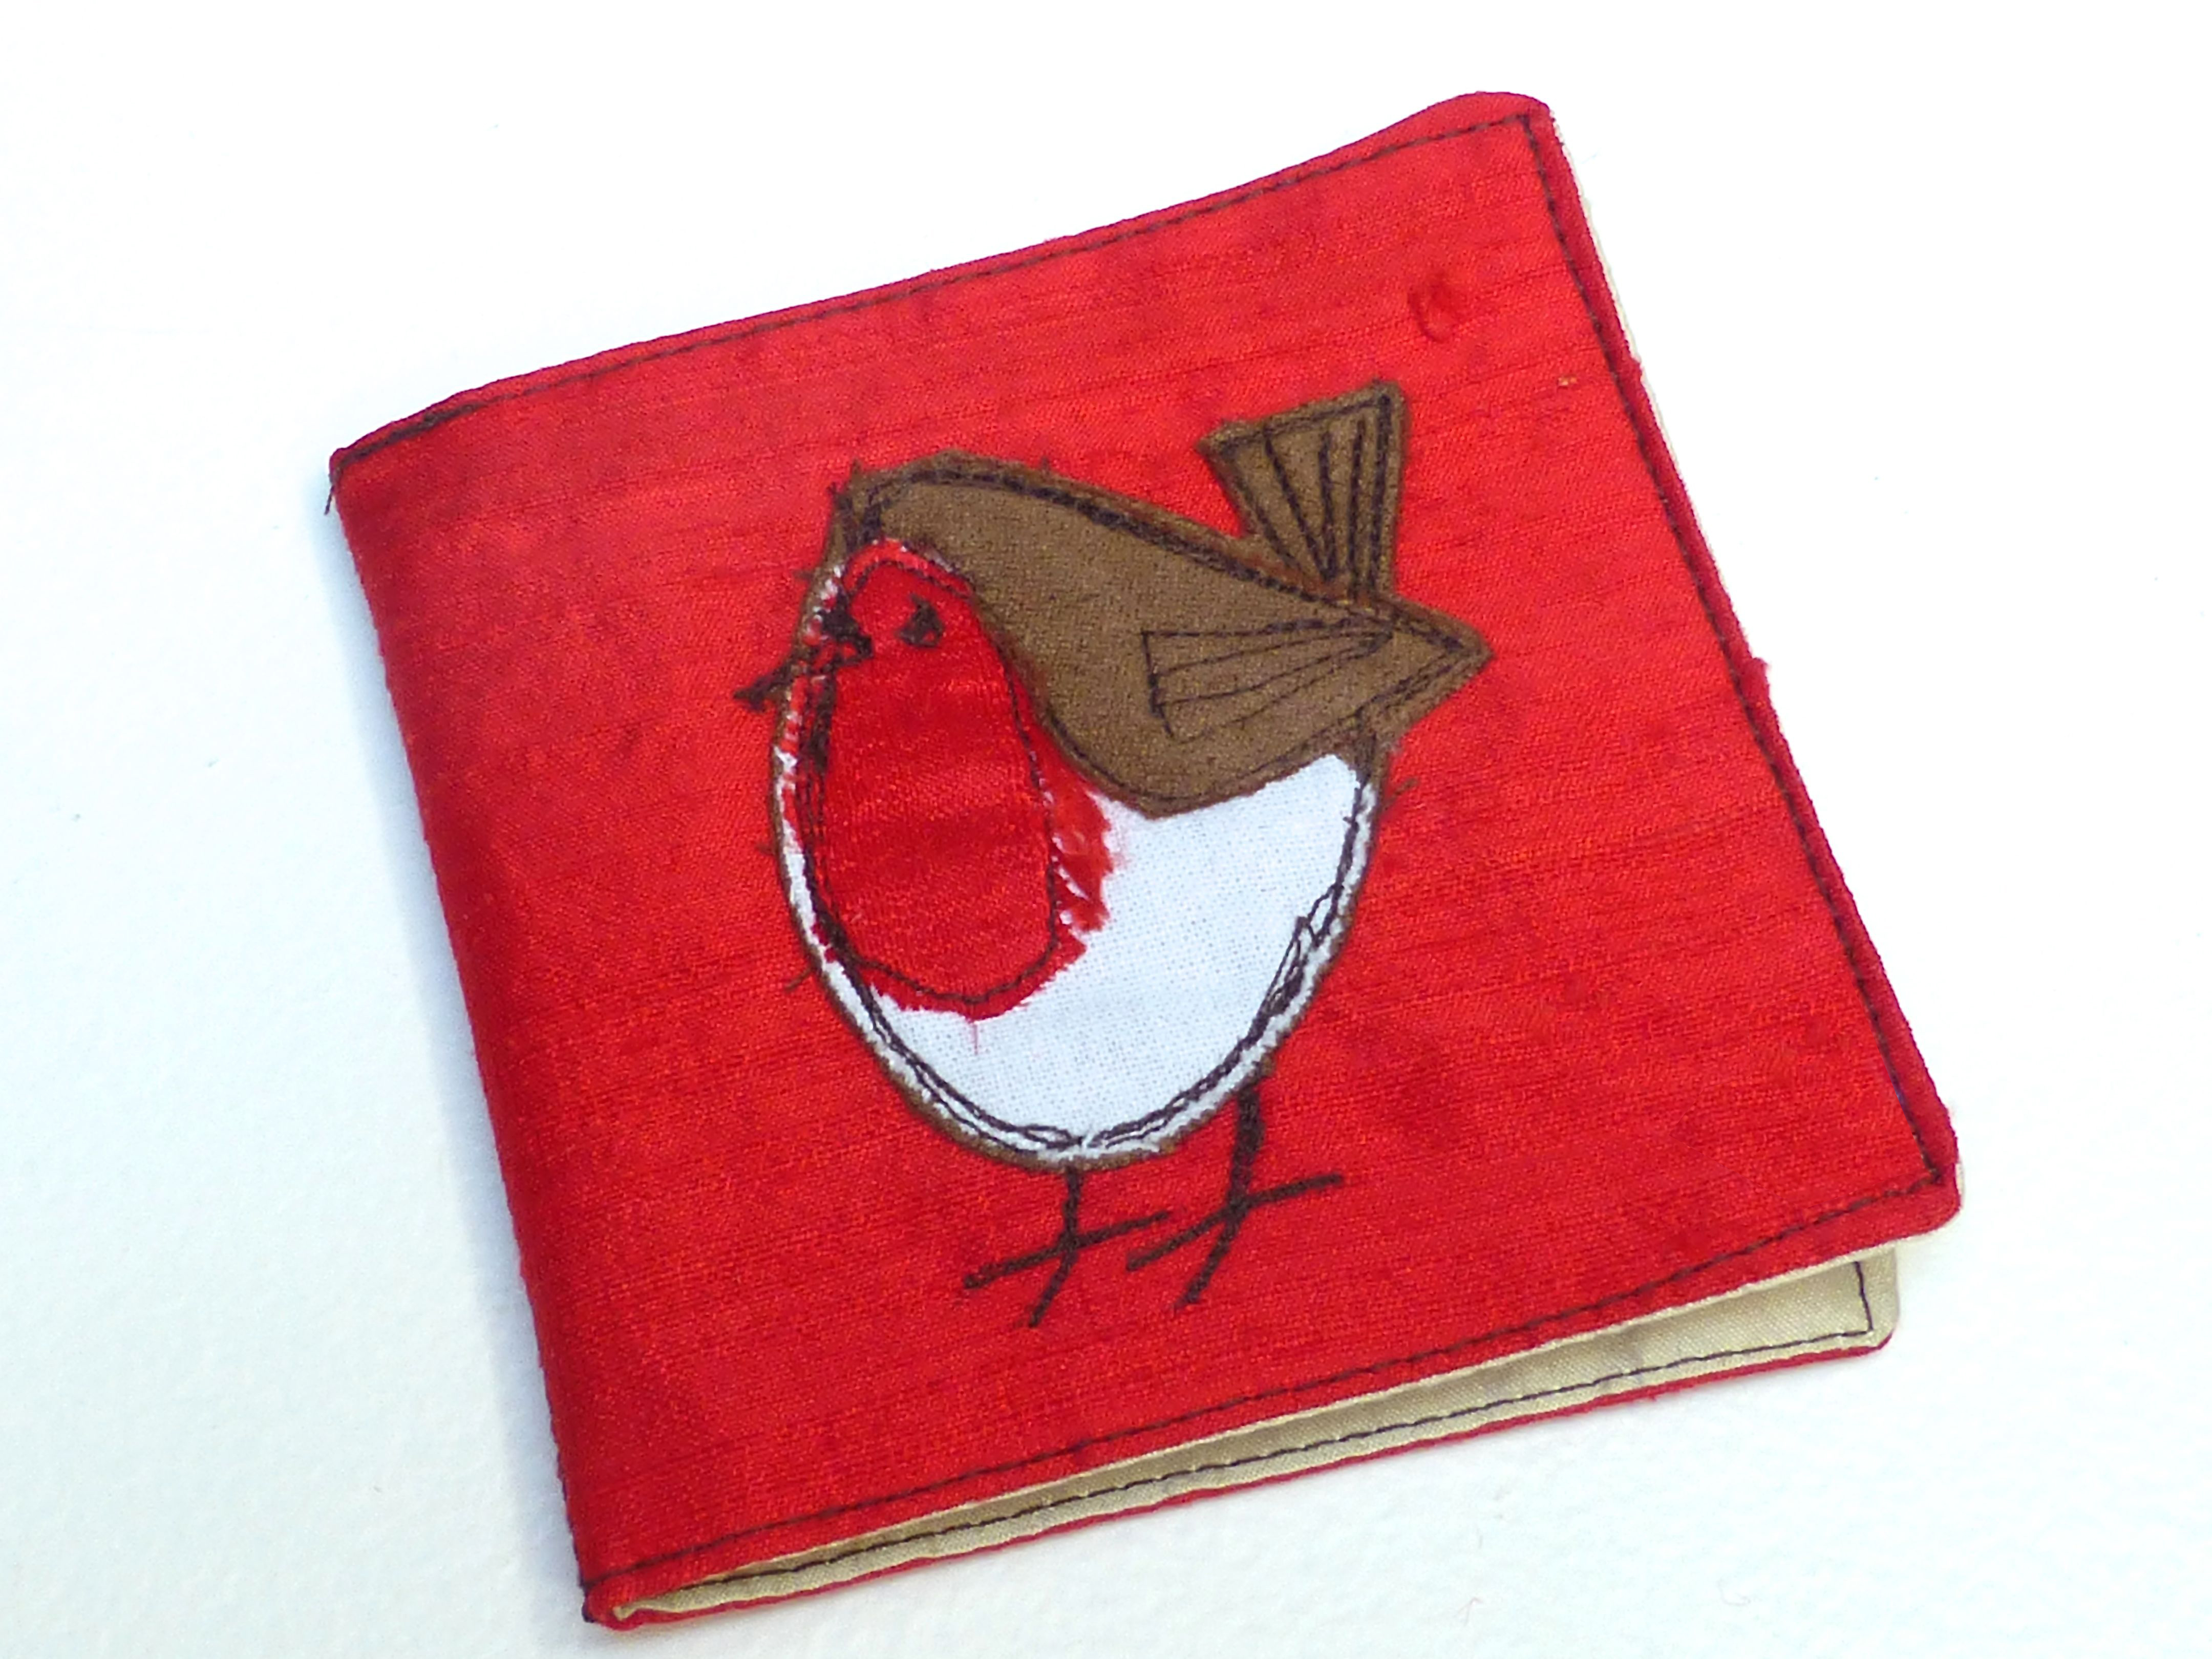
This needlecase is made from remnants of silk – red on the outside and gold on the inside.
A cute little mandala key ring using scraps of felt and ribbon.

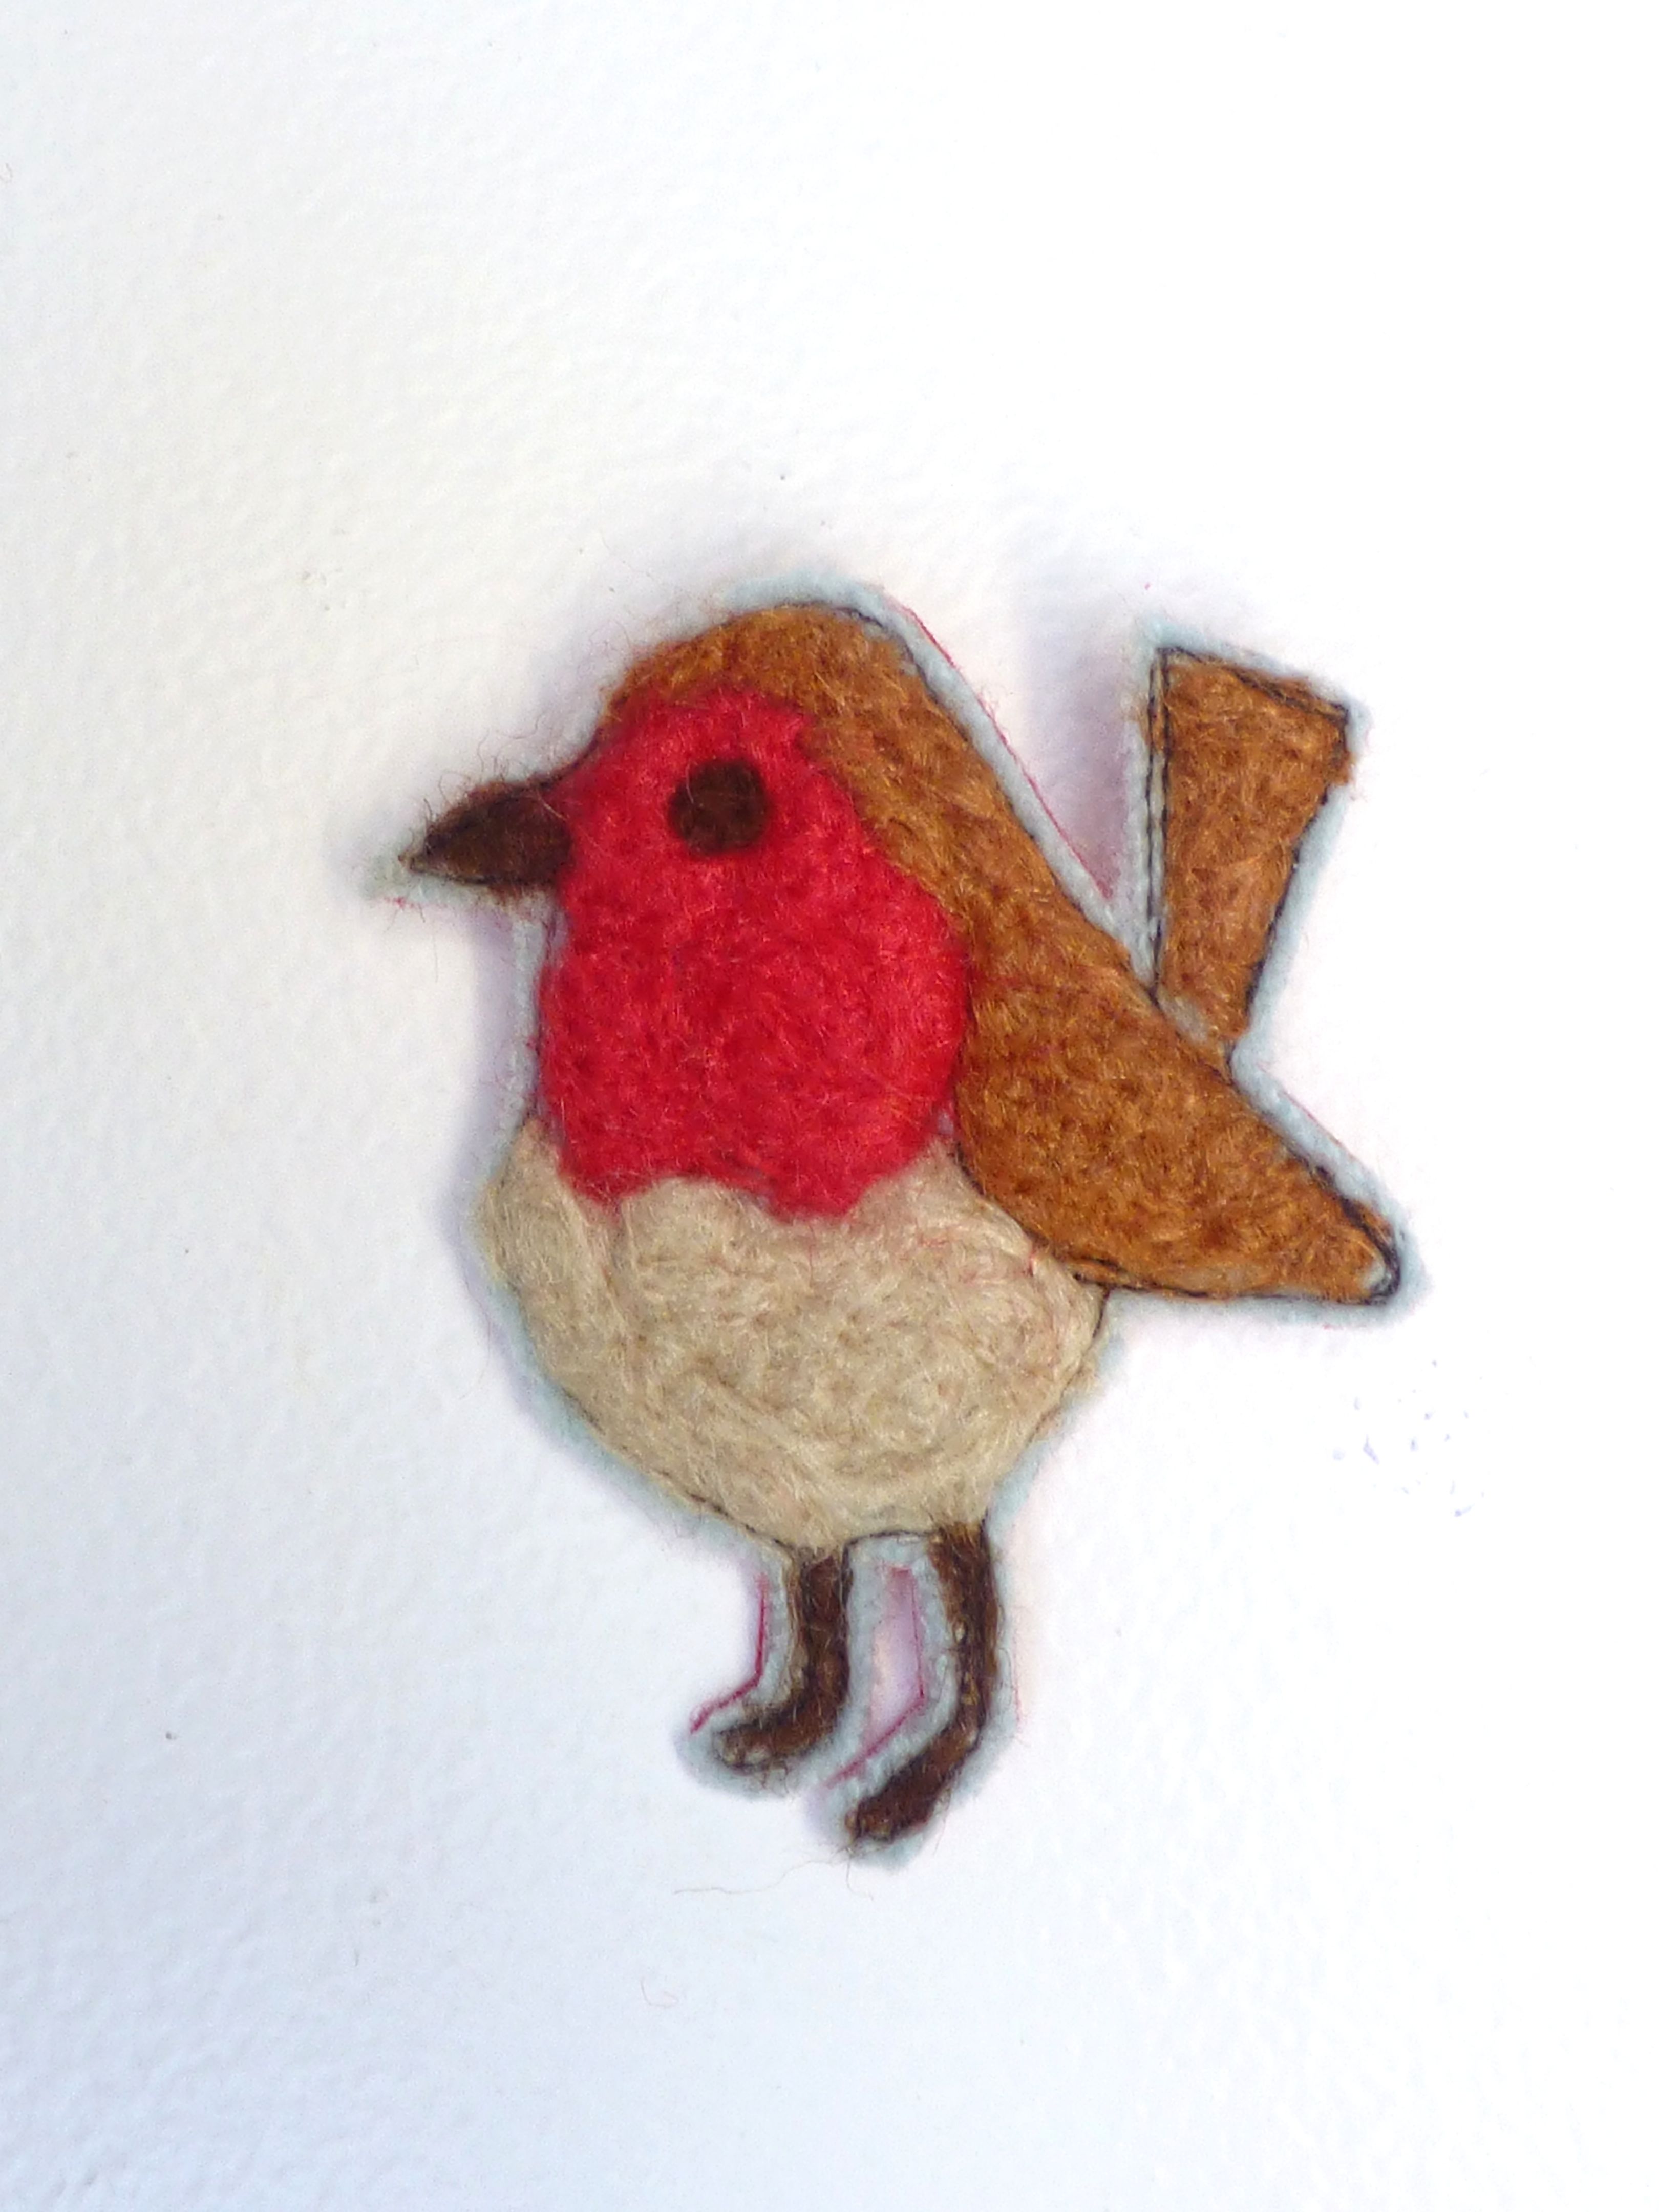
My very first attempt at needle felting – a tiny Robin brooch.
Shown briefly the other day, this pocket tissue cover was created from leftover fabric from a book bag project.

I had planned on including these pure lambswool fingerless gloves too, but they just sold on Folksy so I will have to make some more:)

There are more items to come because I’ve never had so much pleasure making random things just for the fun of it!
How’s your #sewingsanta parcel coming along?
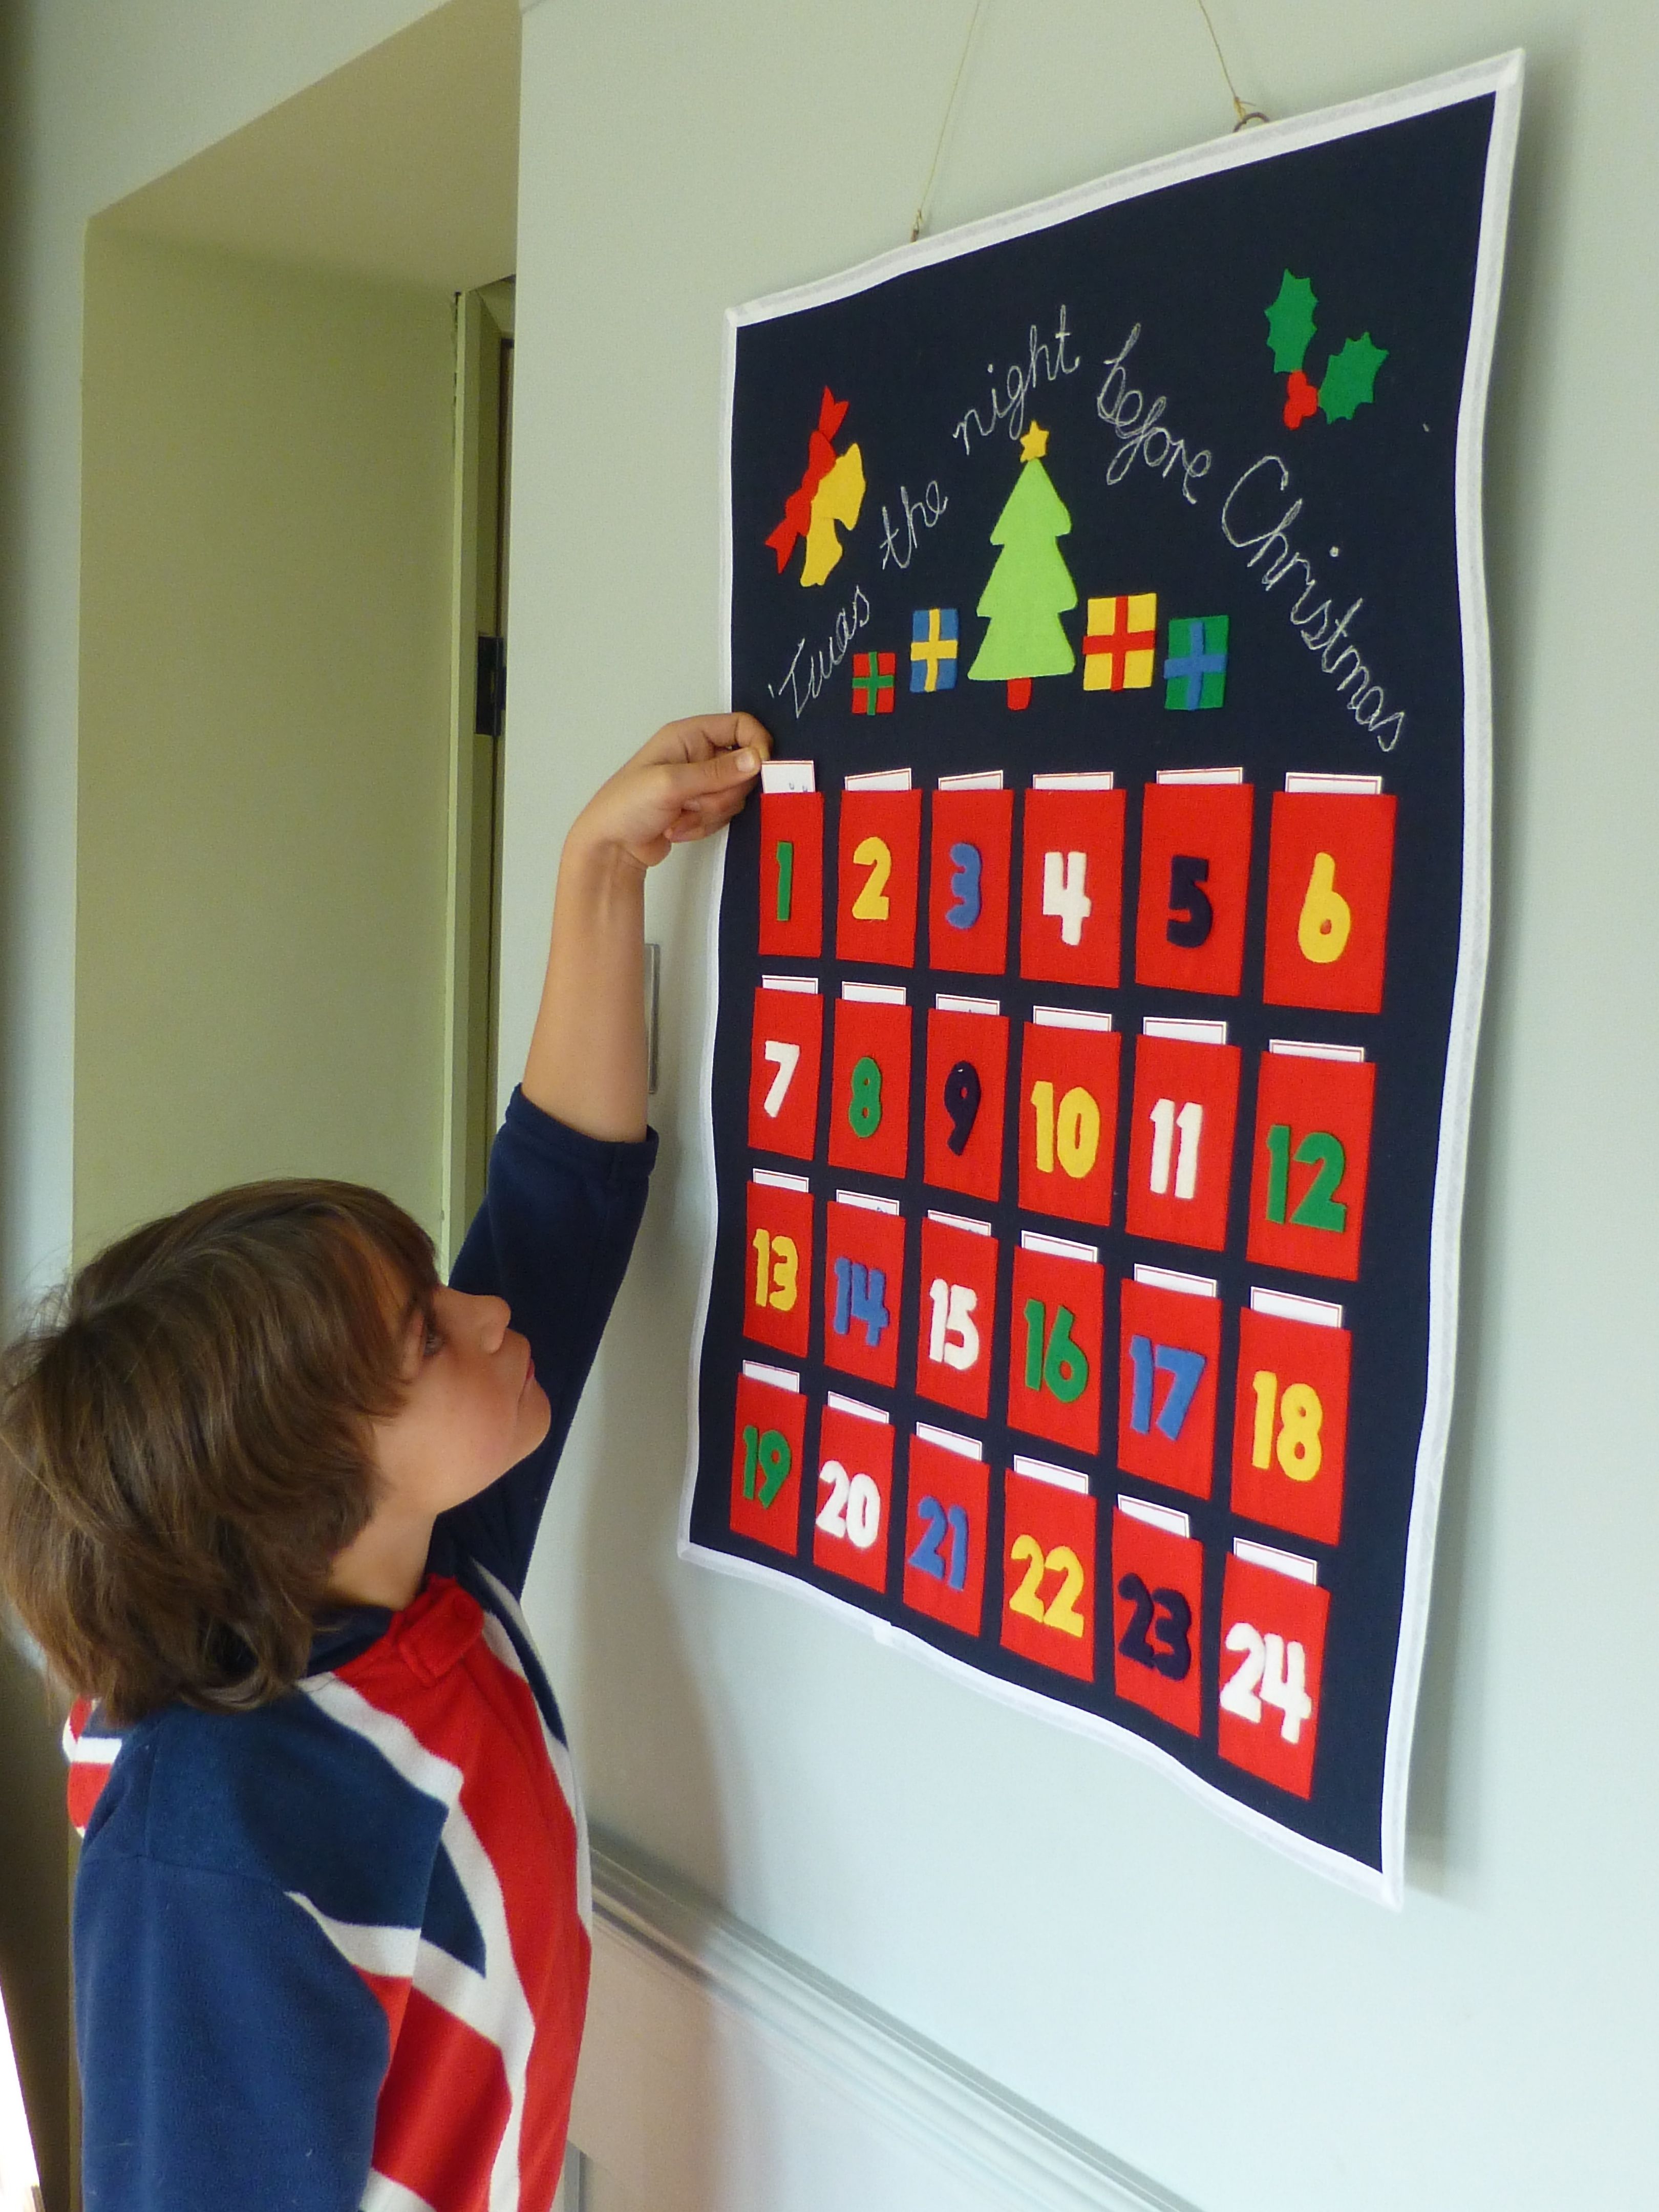
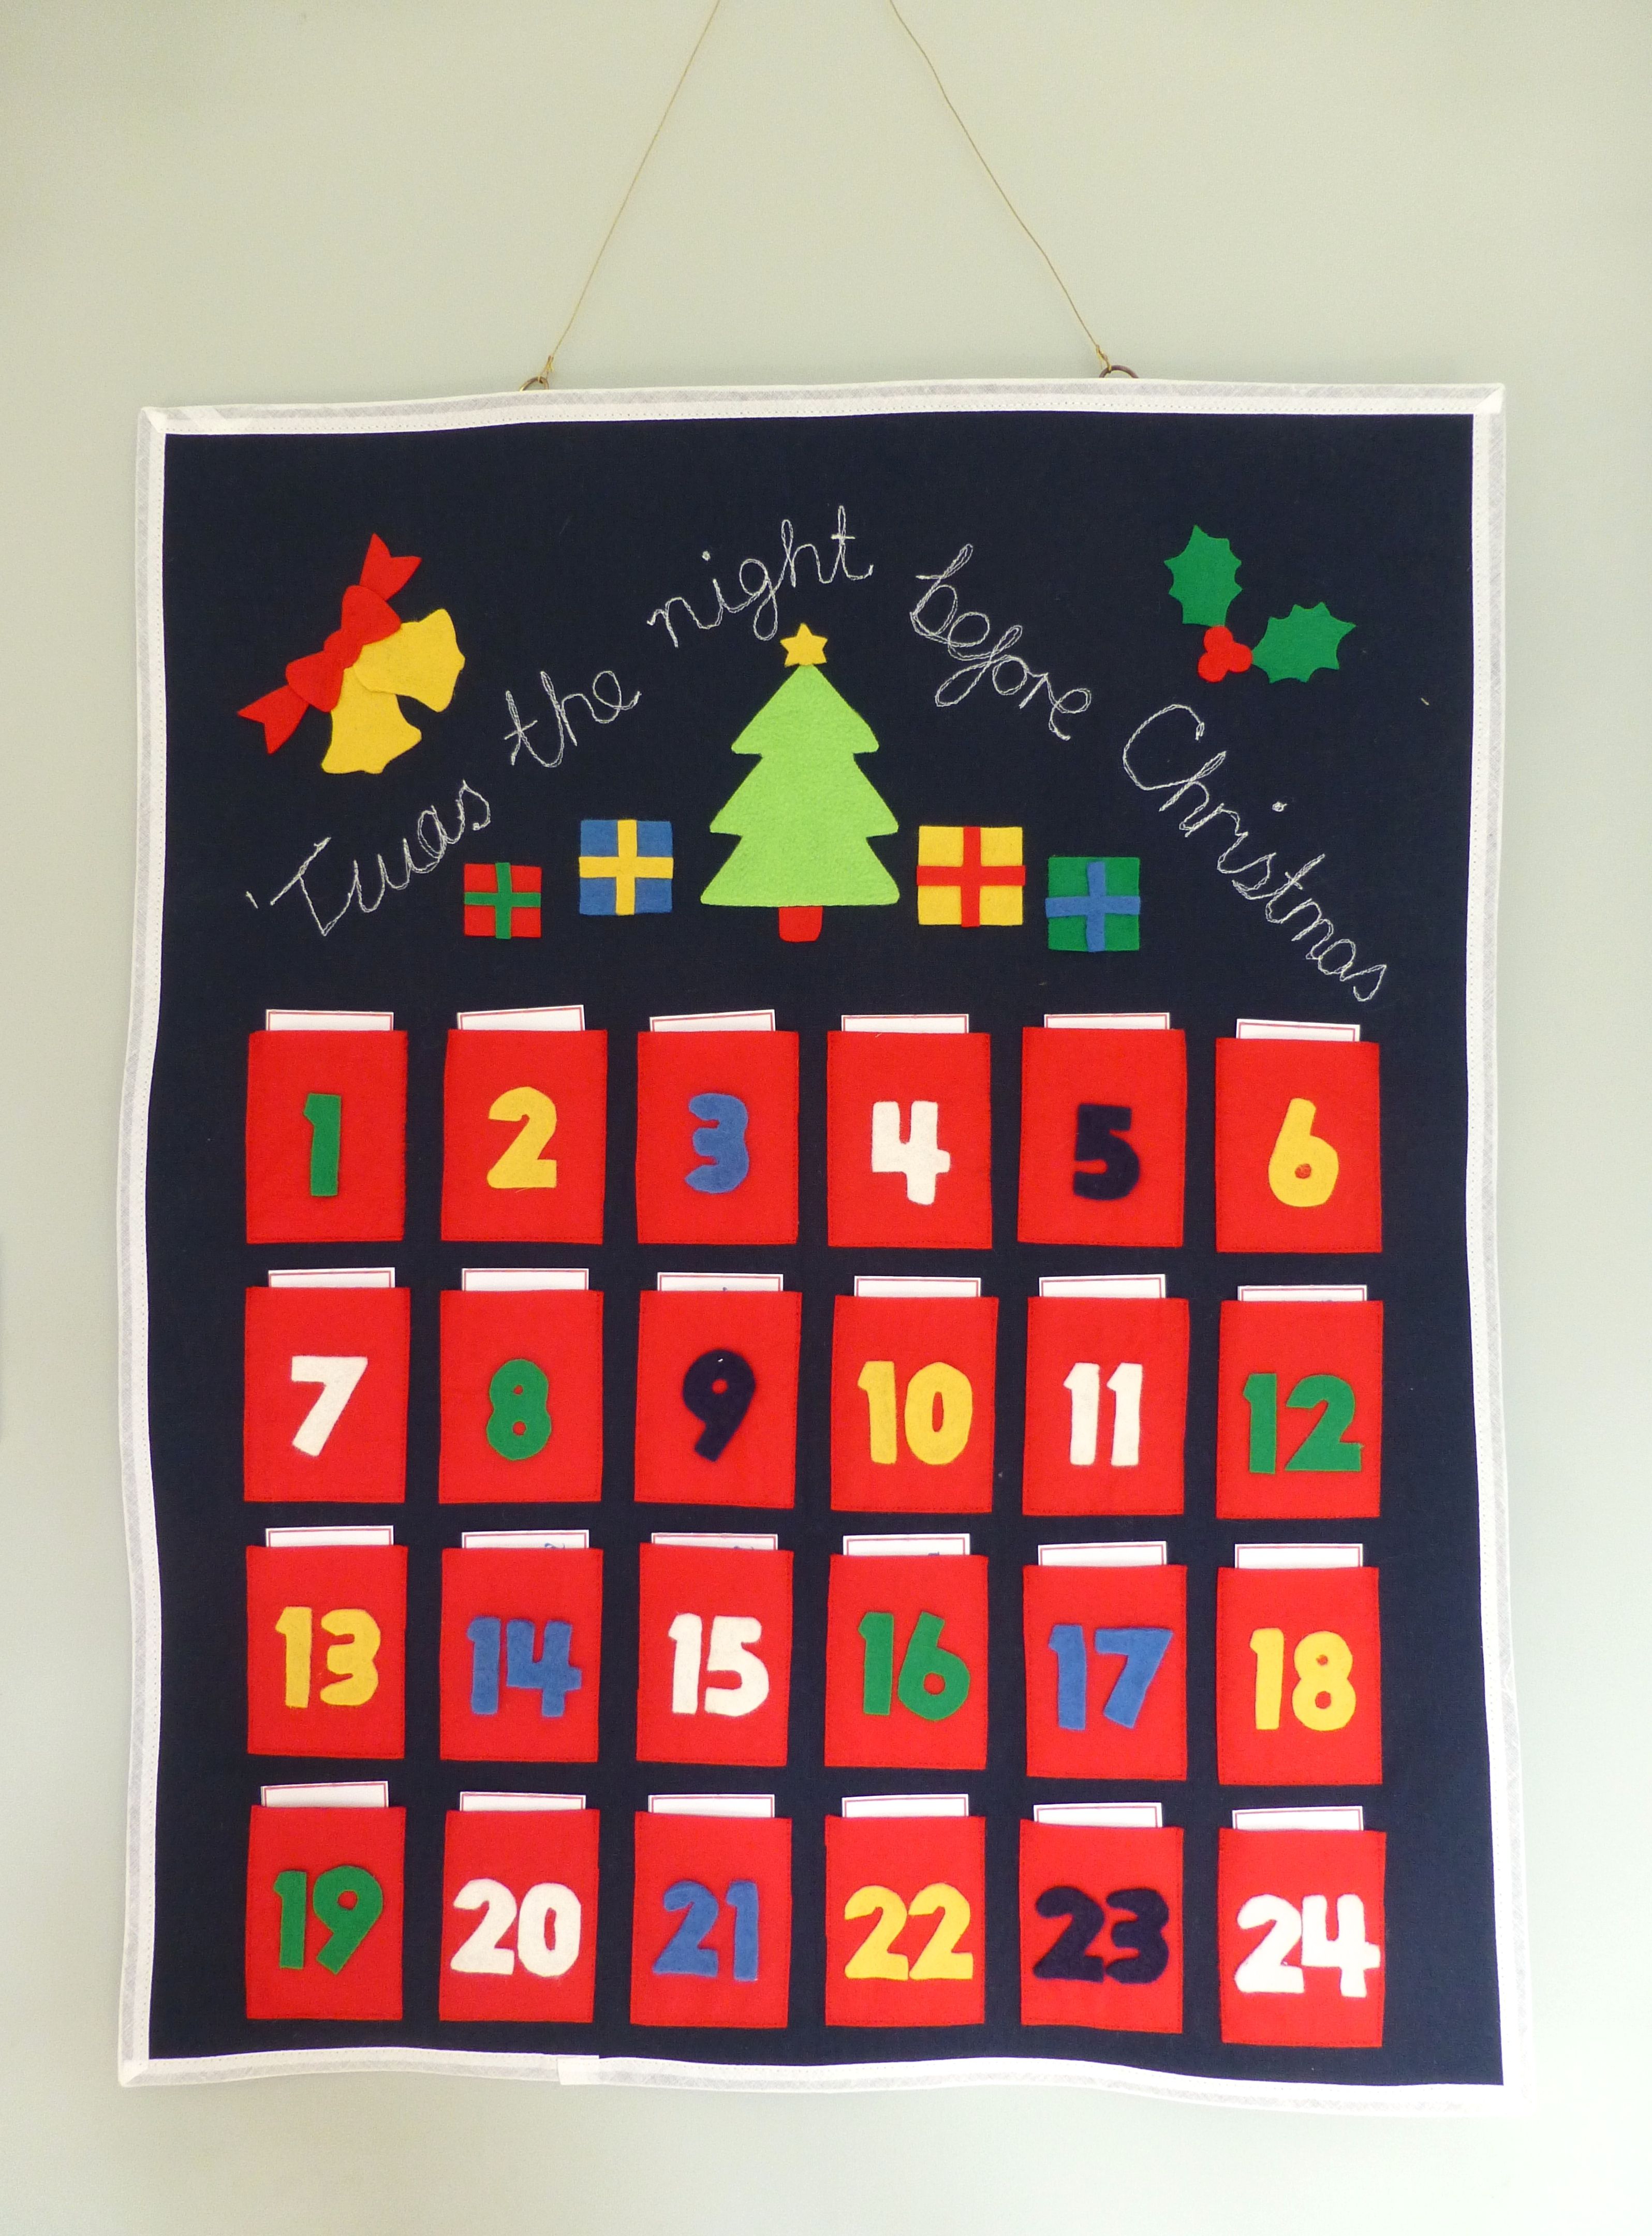
The first of December is eagerly awaited in our house by young and old(ish) alike. Yes indeedy, we all love the opening of the first window on the advent calendar.
Now, I’m one of those traditionalists who absolutely has to have one of the old fashioned, Dickensian-type calendars with lots of glitter and a romanticized scene from Victorian times hiding behind each tiny window. In fact I browse for hours in various different shops before making the most difficult decision of Christmas and coughing up the cash for four of the best. One each for Daughter (who lives with her boyfriend), No.1 Son (at Uni in Plymouth – boy, does he love it when the post arrives on the communal doormat) and No.2 and No.3 Sons.
There will be no chocolate-filled advent calendars in this house, thank you very much and, no, they are never disappointed because that’s all they’ve ever known. Anyway, I still remember the sense of anticipation and subsequent joy felt as a child when it was my turn to open a window – there were four of us and only one calendar so we got to open a door every four days. My lot are relatively spoilt as they get one each!!!!


Back to the item in question.
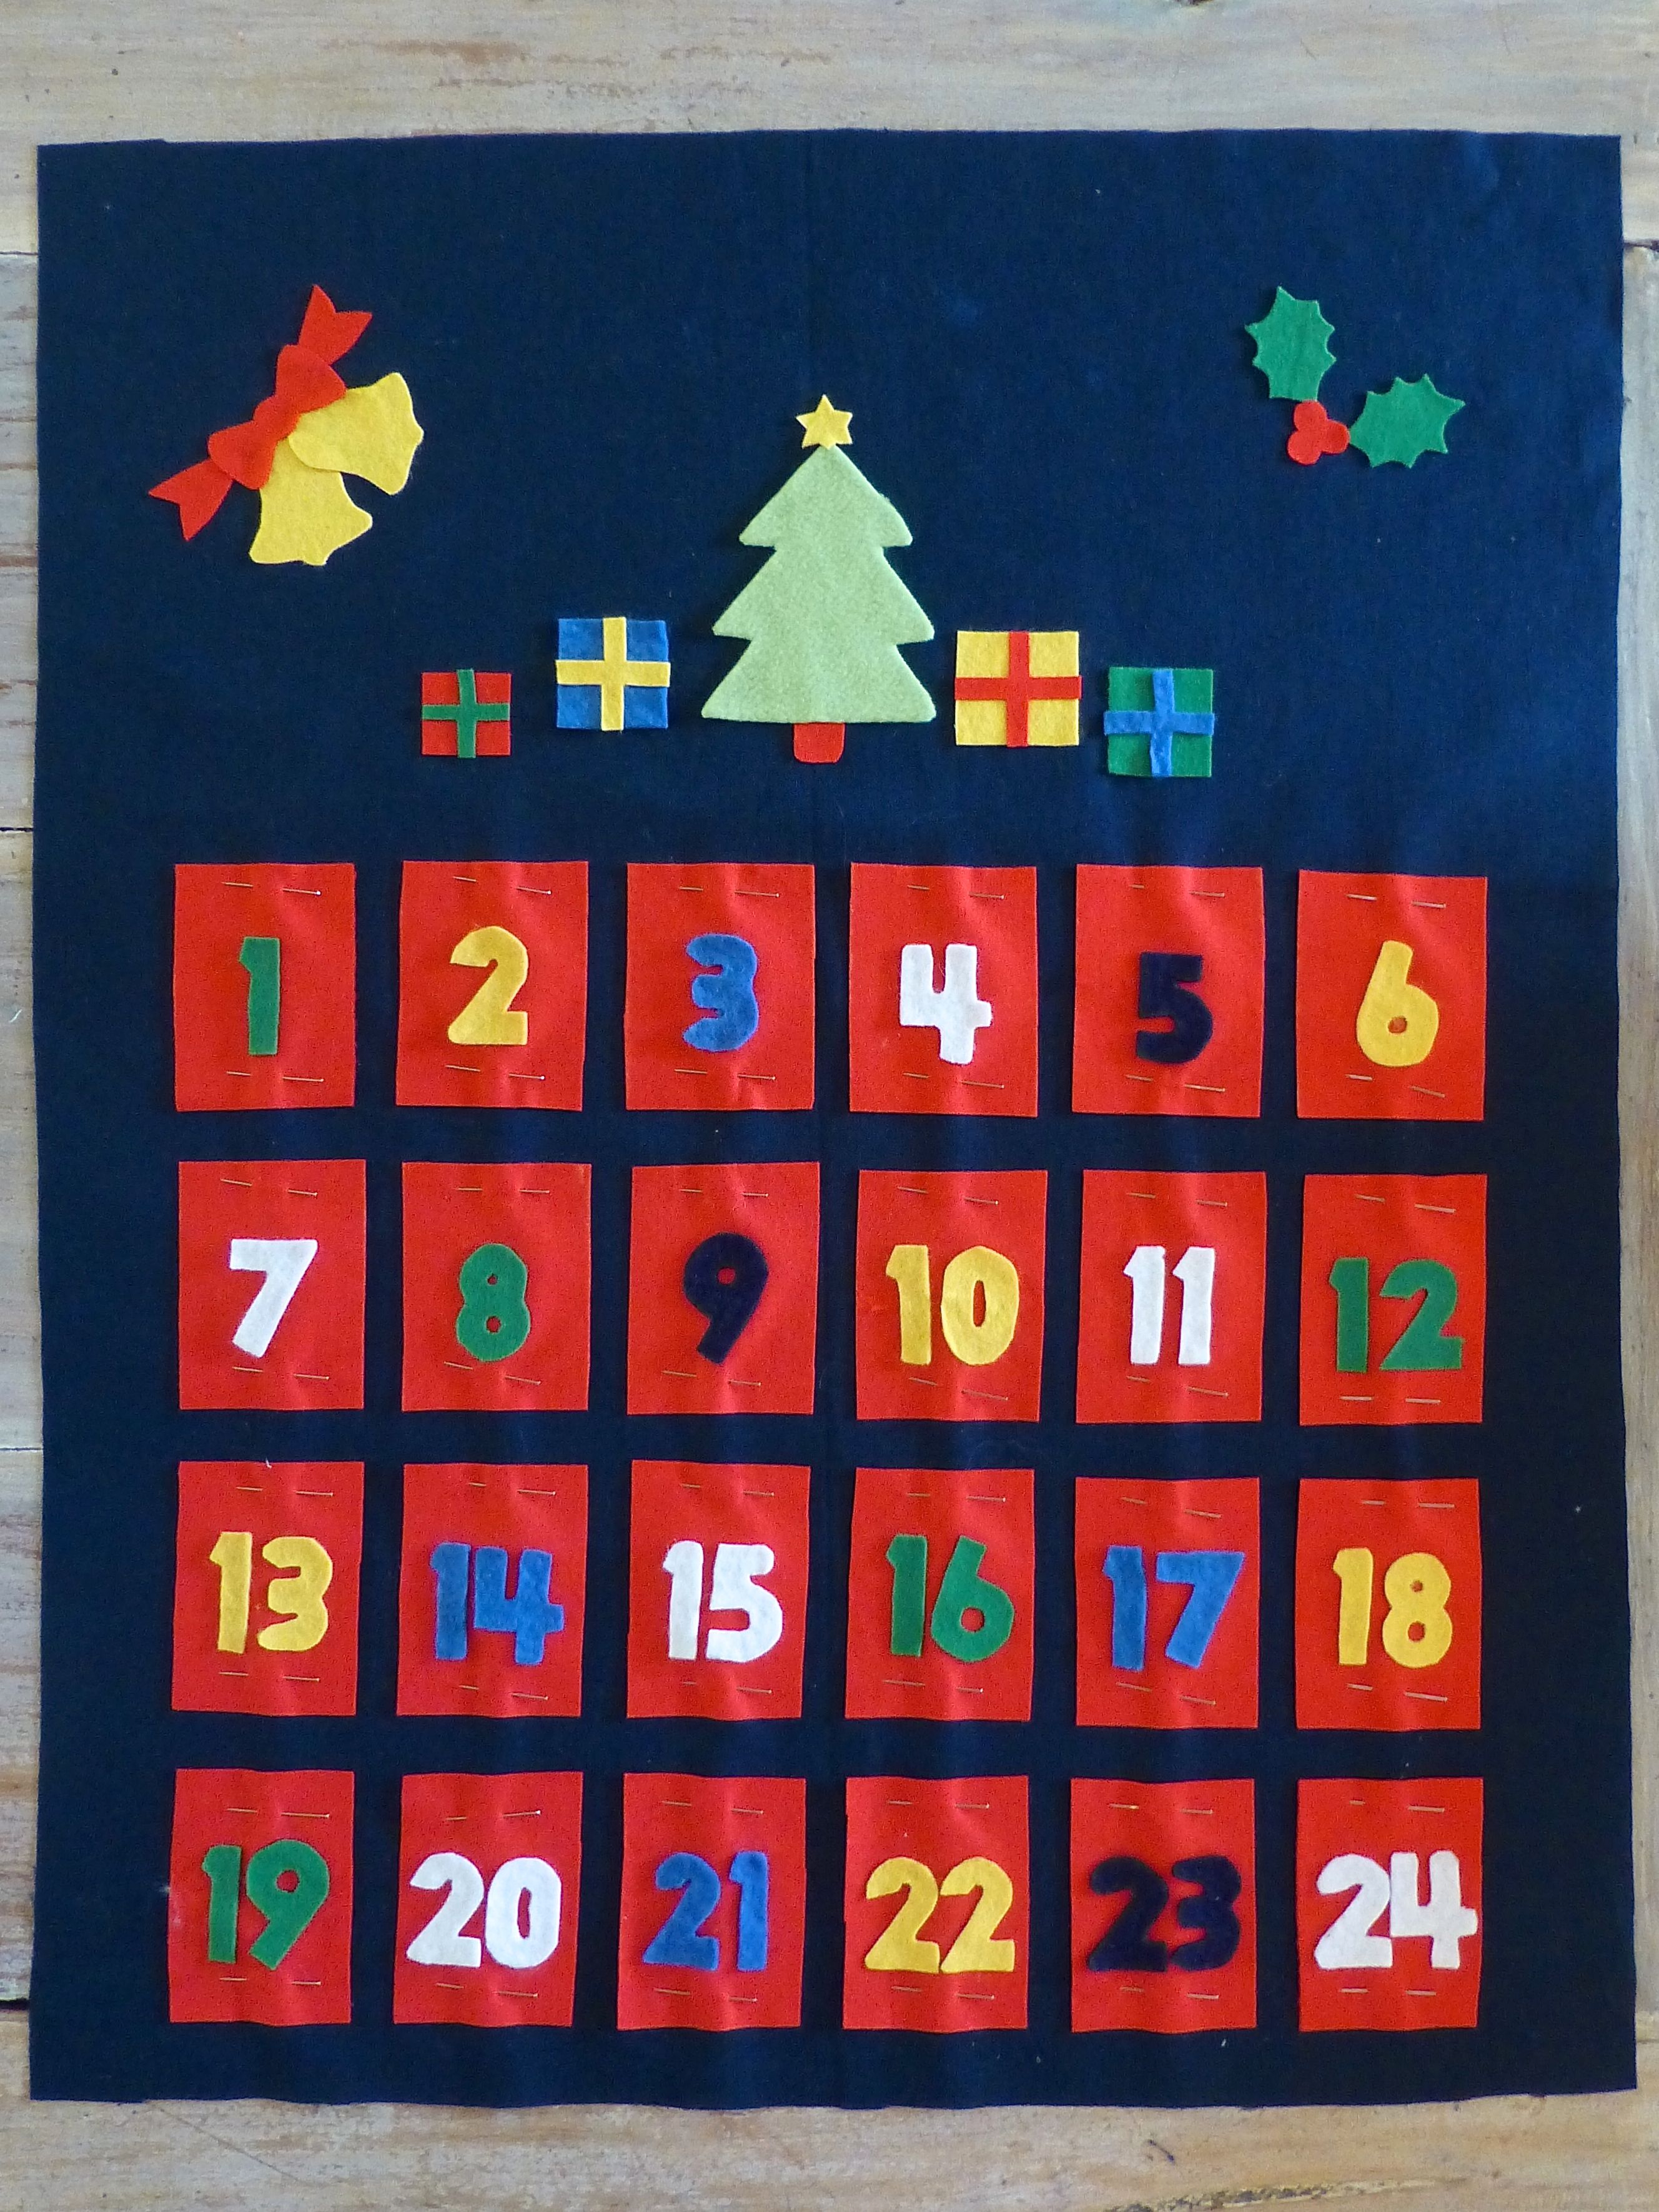
Yesterday’s post showed another advent calendar, one that I made both as a decoration and as a way to bring together the family throughout December.
First the tutorial, then onto what went into the pockets.
Now stop it, don’t be impatient and scroll down to the bottom like a petulant child – enjoy the journey and try to imagine and appreciate the hours of toil that went into constructing this masterpiece!
Right, off we go.
This project was free to make as I used what I had in my stash – you may have to substitute bits according to whether you also want to use up leftovers or are happy to go and buy the bits specially.
You will need two pieces of fabric each measuring 55cm wide x 67cm high. I used navy linen for the front and white cotton for the back.
For everything else I used felt as it doesn’t fray so there is no need to hem the edges. You could use cotton from your stash and hem all four sides before sewing onto the calendar, but make sure you choose a thin fabric to keep the bulk down to a minimum.
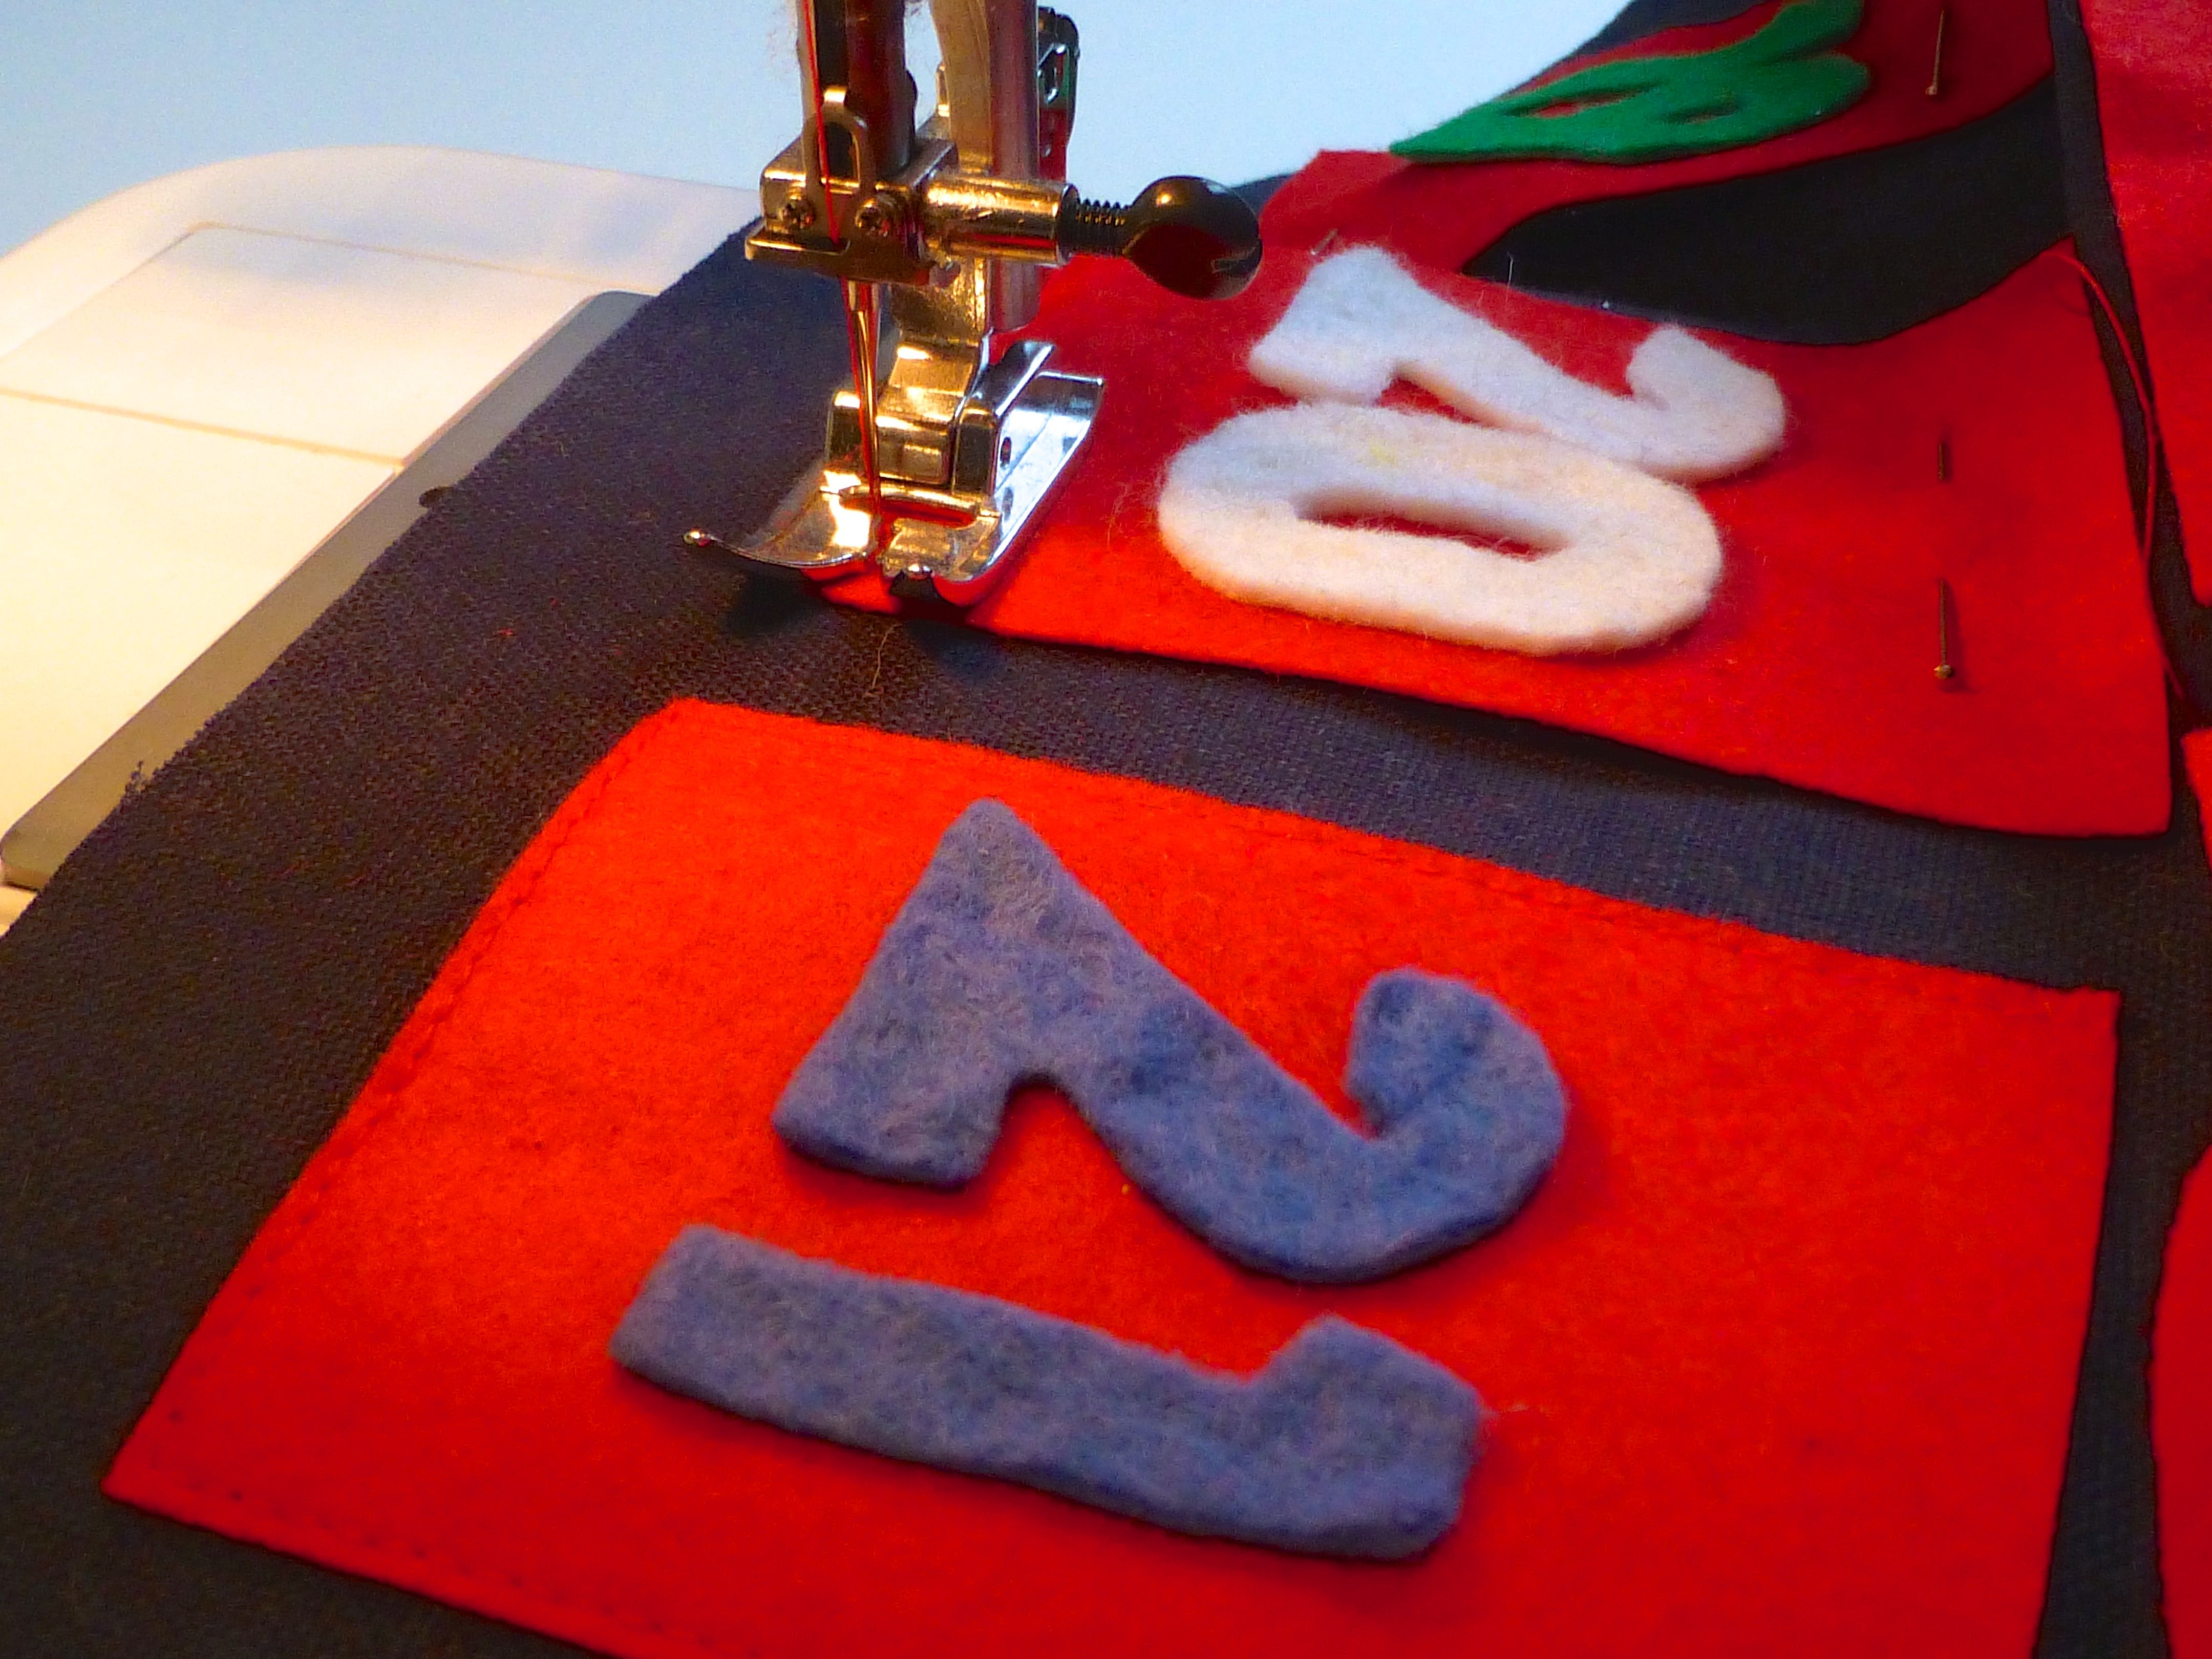
From red felt, cut twenty-four rectangles to form the pockets, each one 6cm x 8cm.
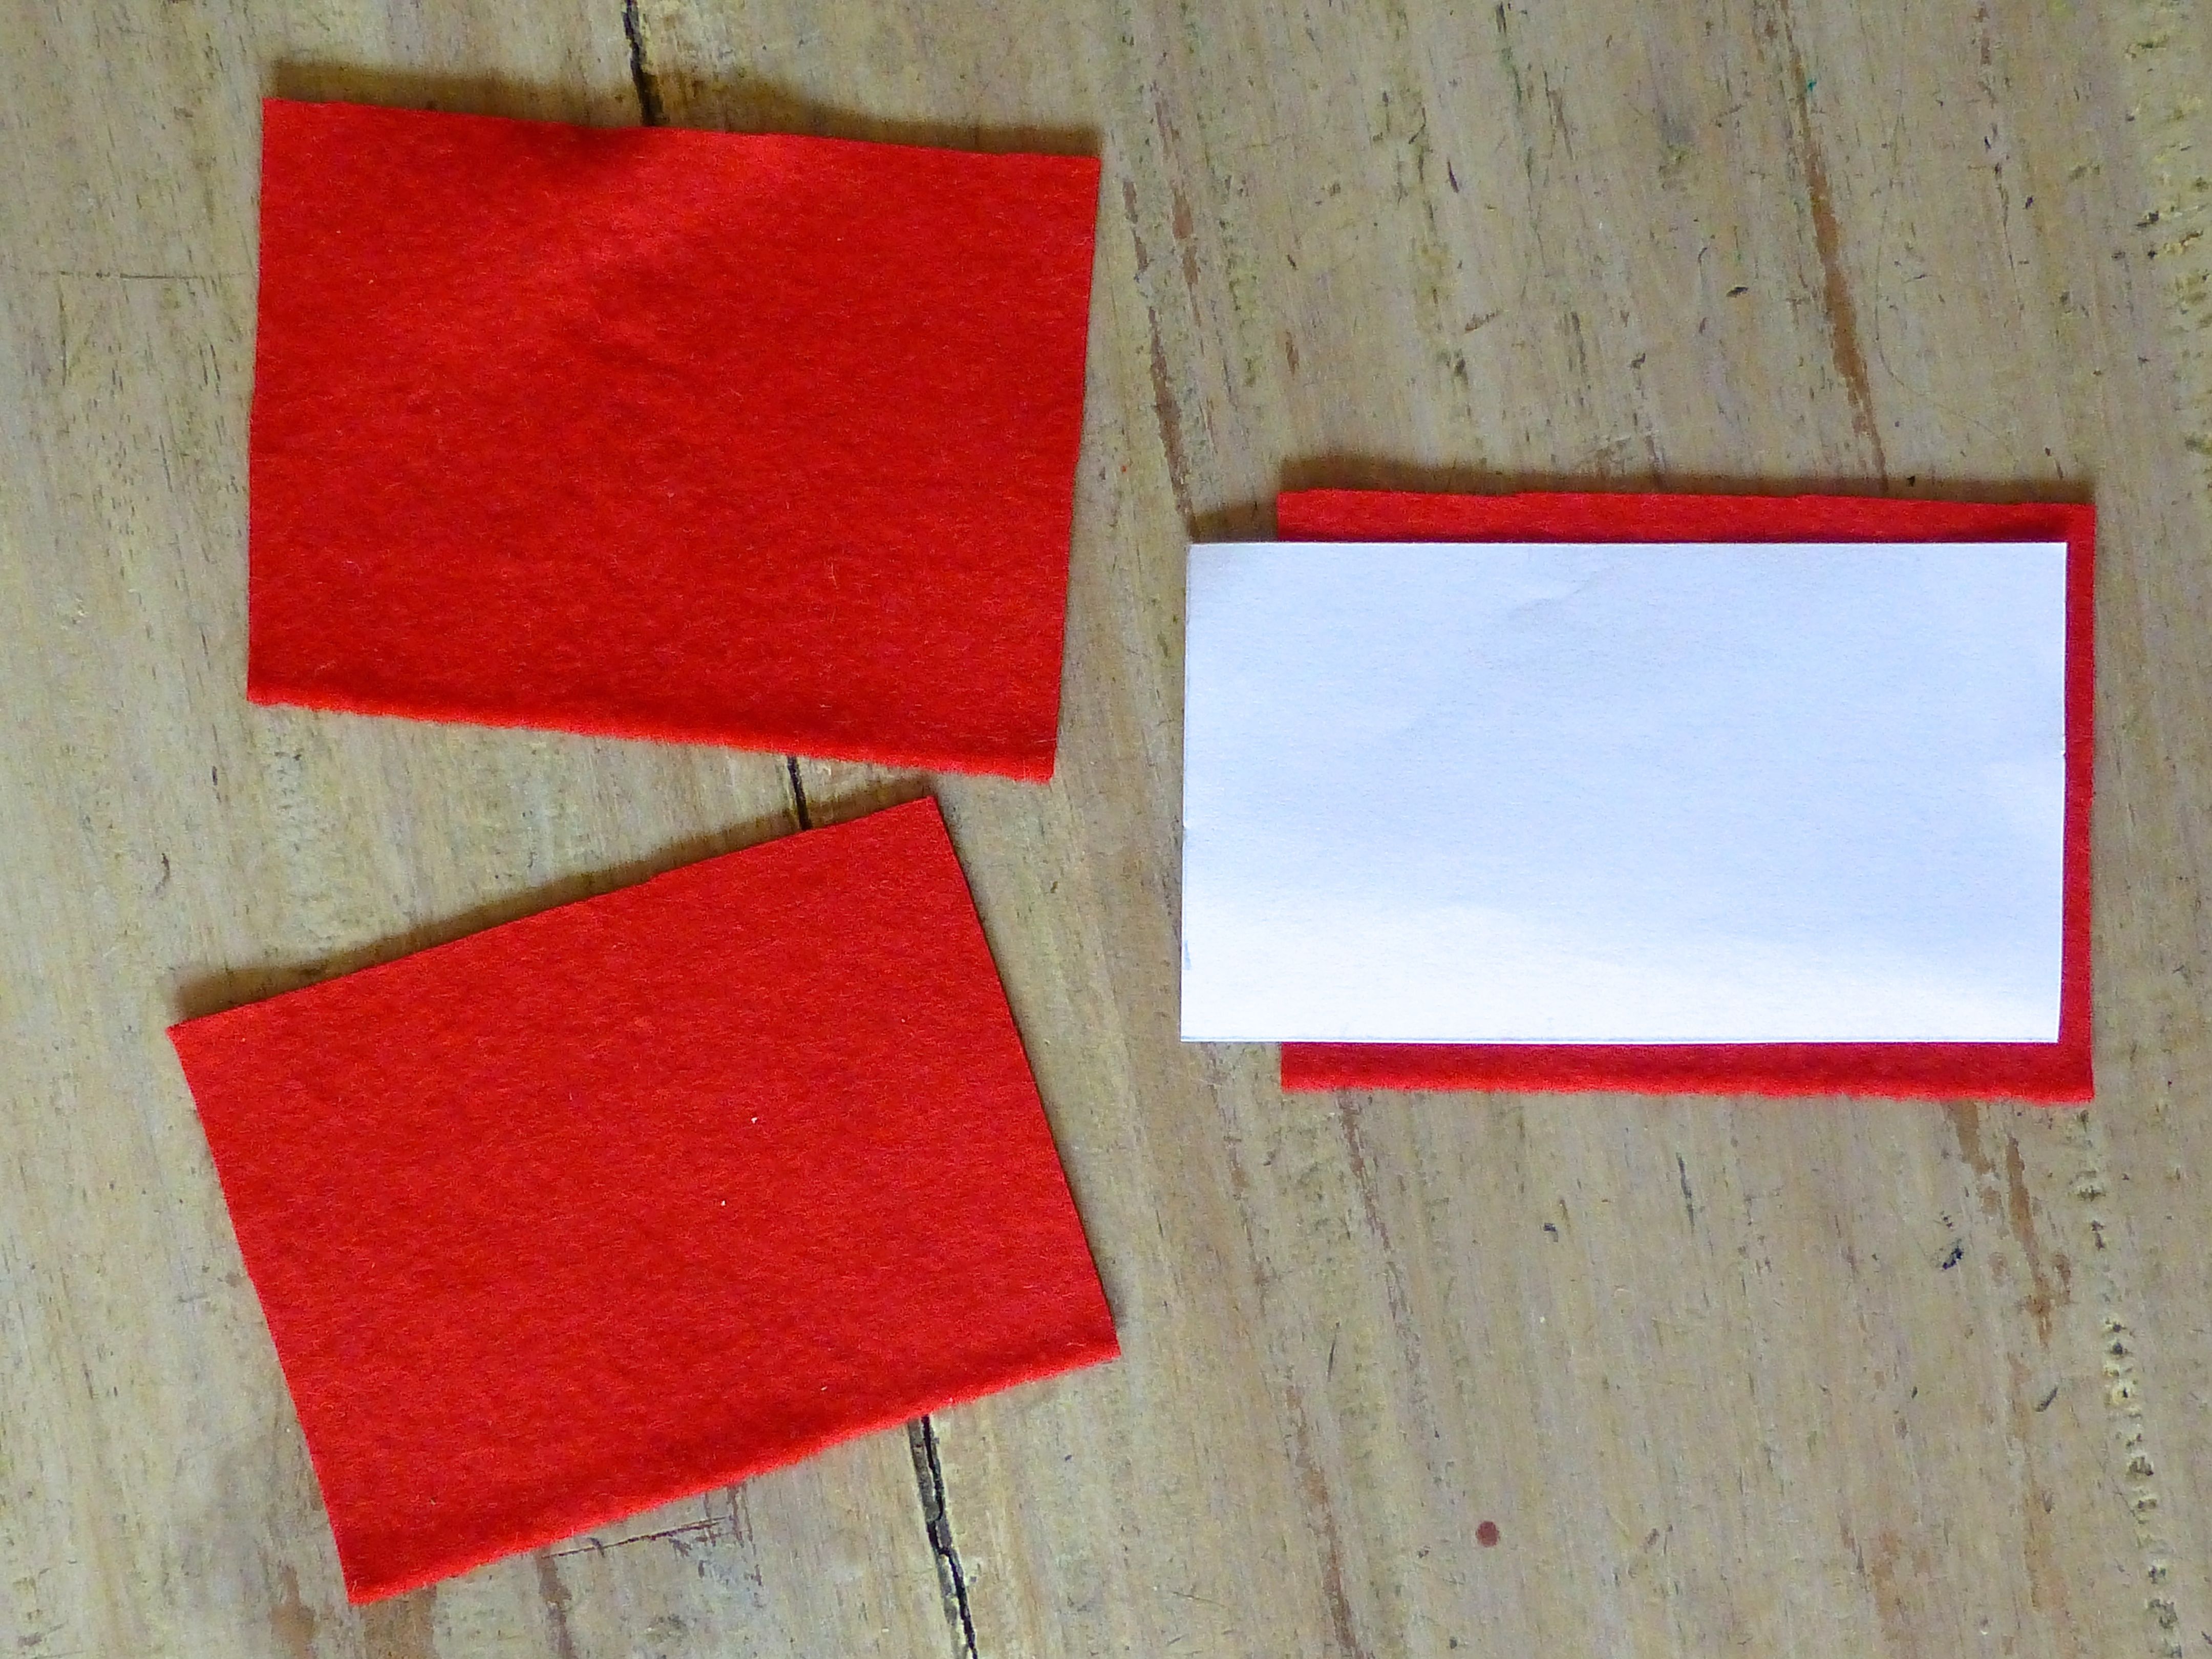
I used fridge magnets in the shape of numbers to trace around and cut numbers 1-24 out of different coloured felt. You could use stencils, download a suitable font off the internet or, if you’re particularly good at that sort of thing, draw them freehand.

Fabric glue or PVA is perfect for sticking the numerals onto each of the felt pockets.


Bright colours in a random order make this visually more appealing for children but you could use a more sophisticated colour scheme for adults.

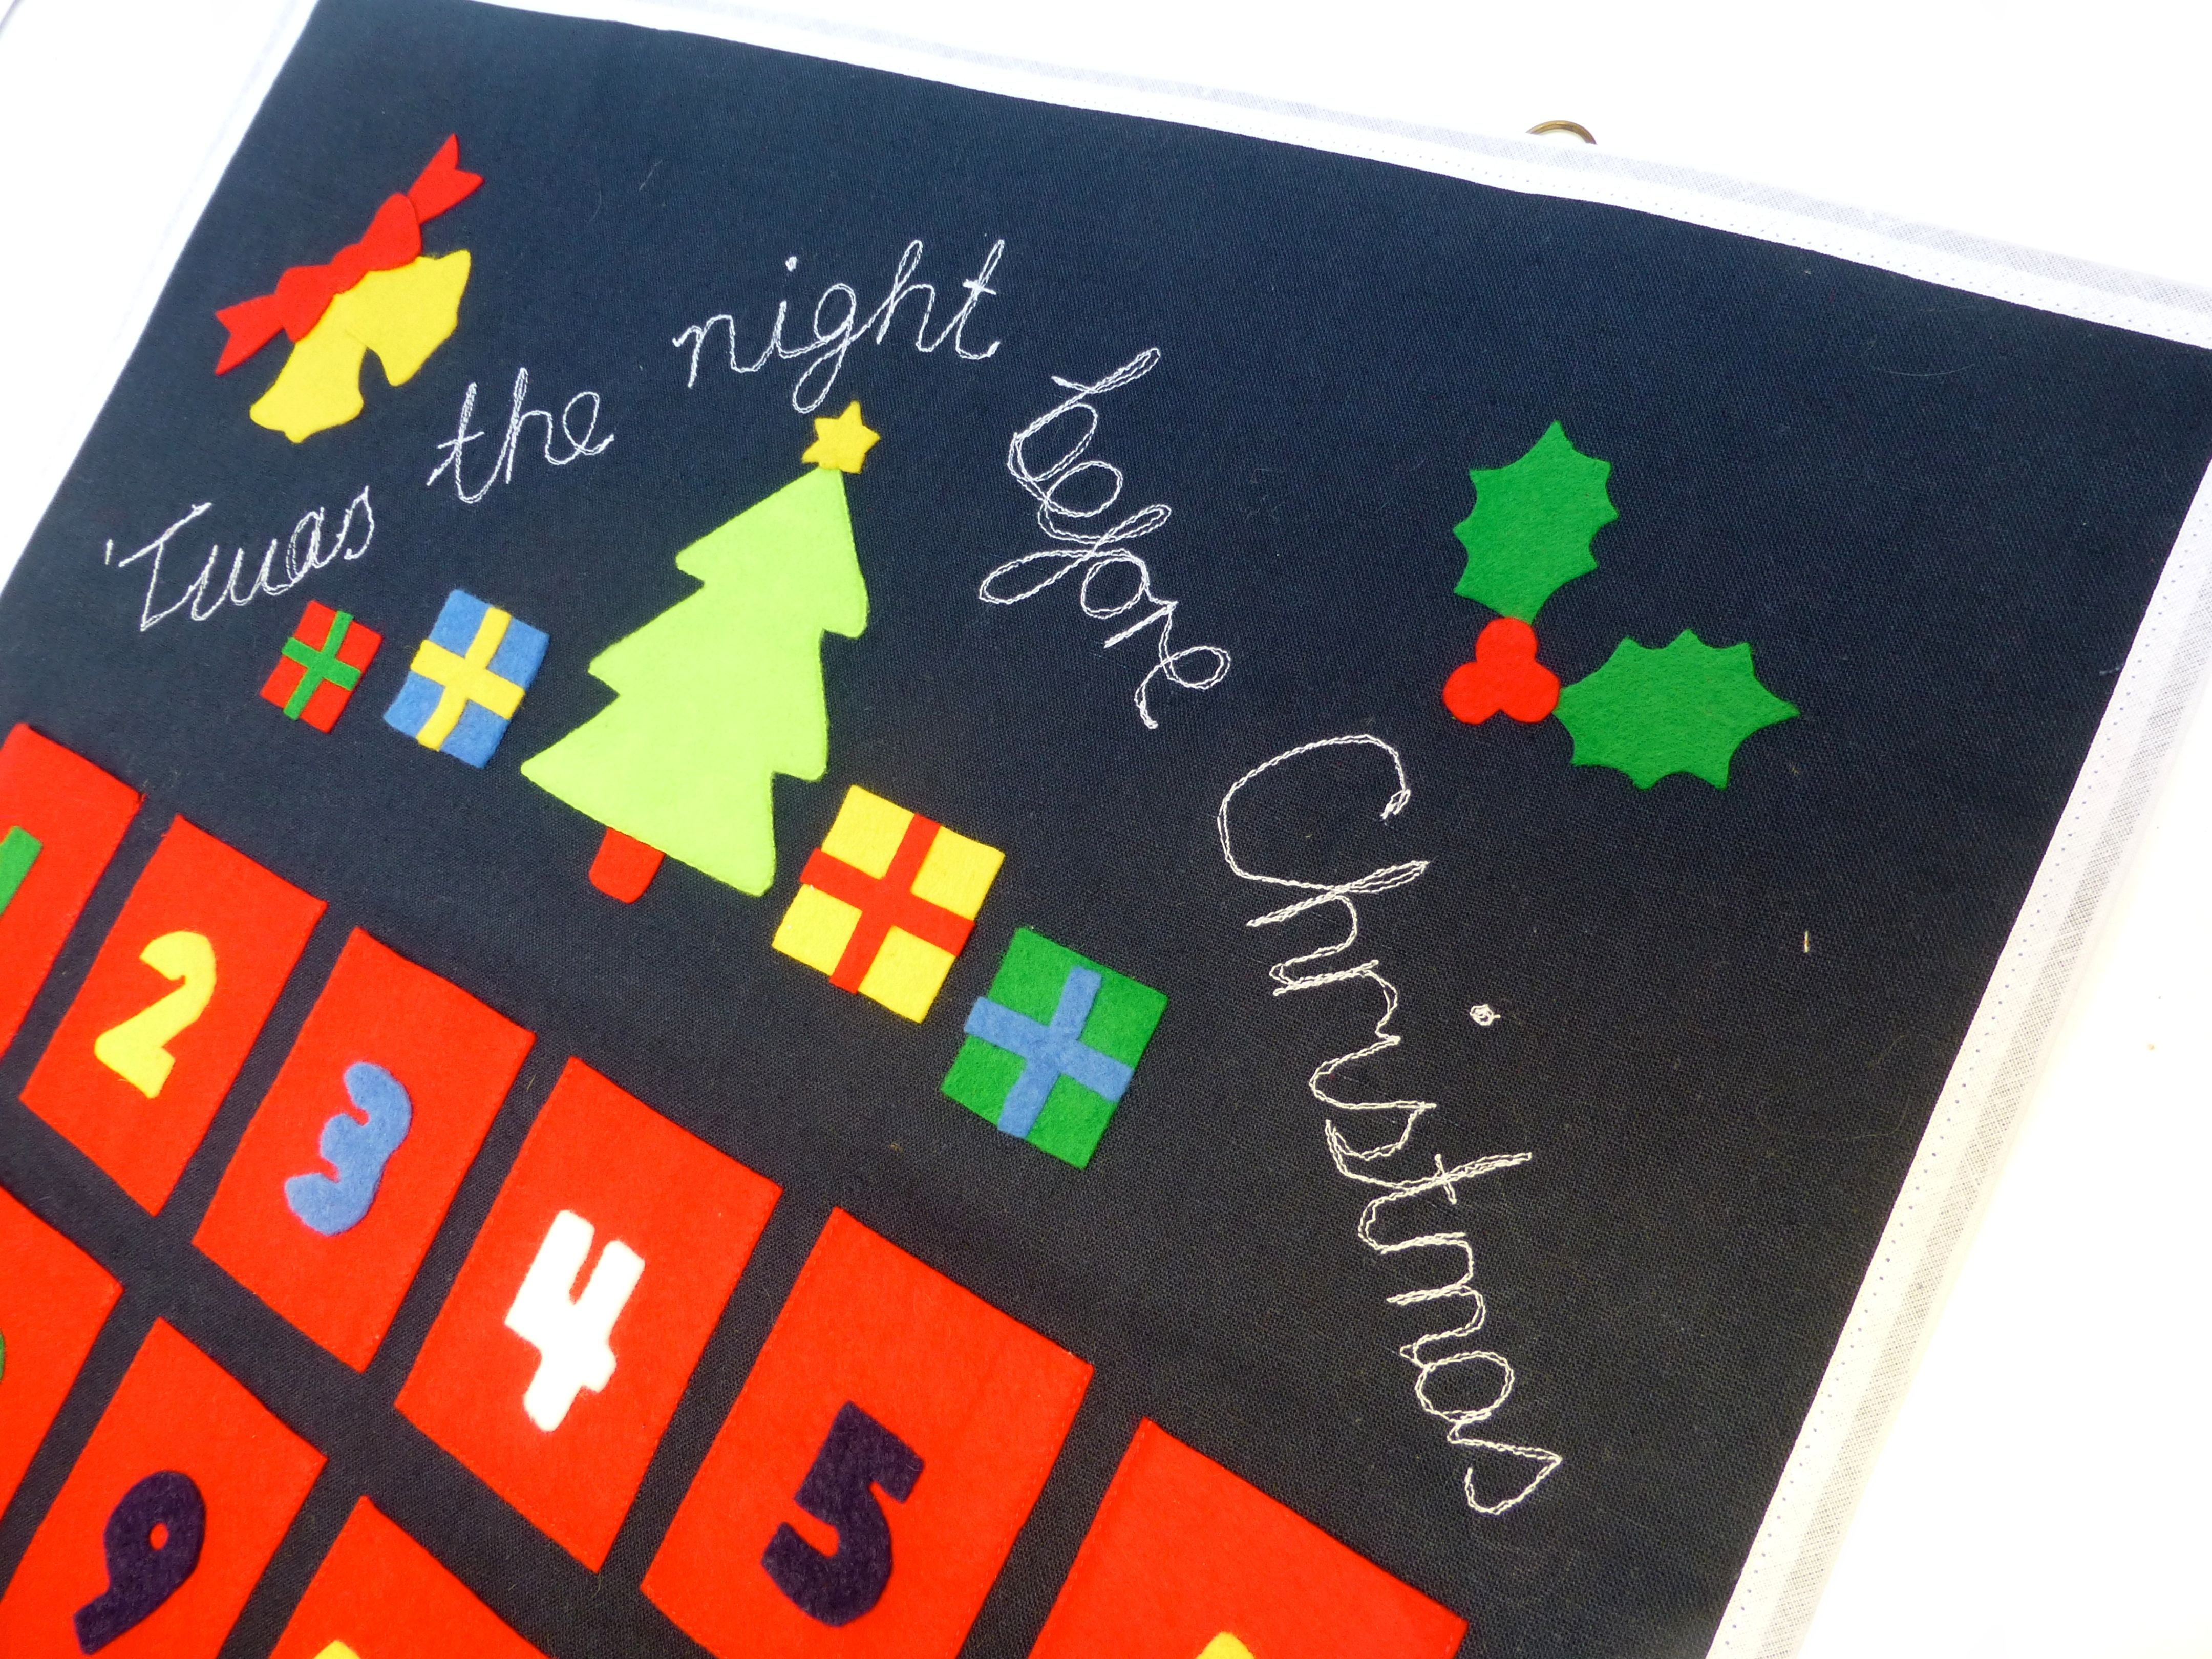
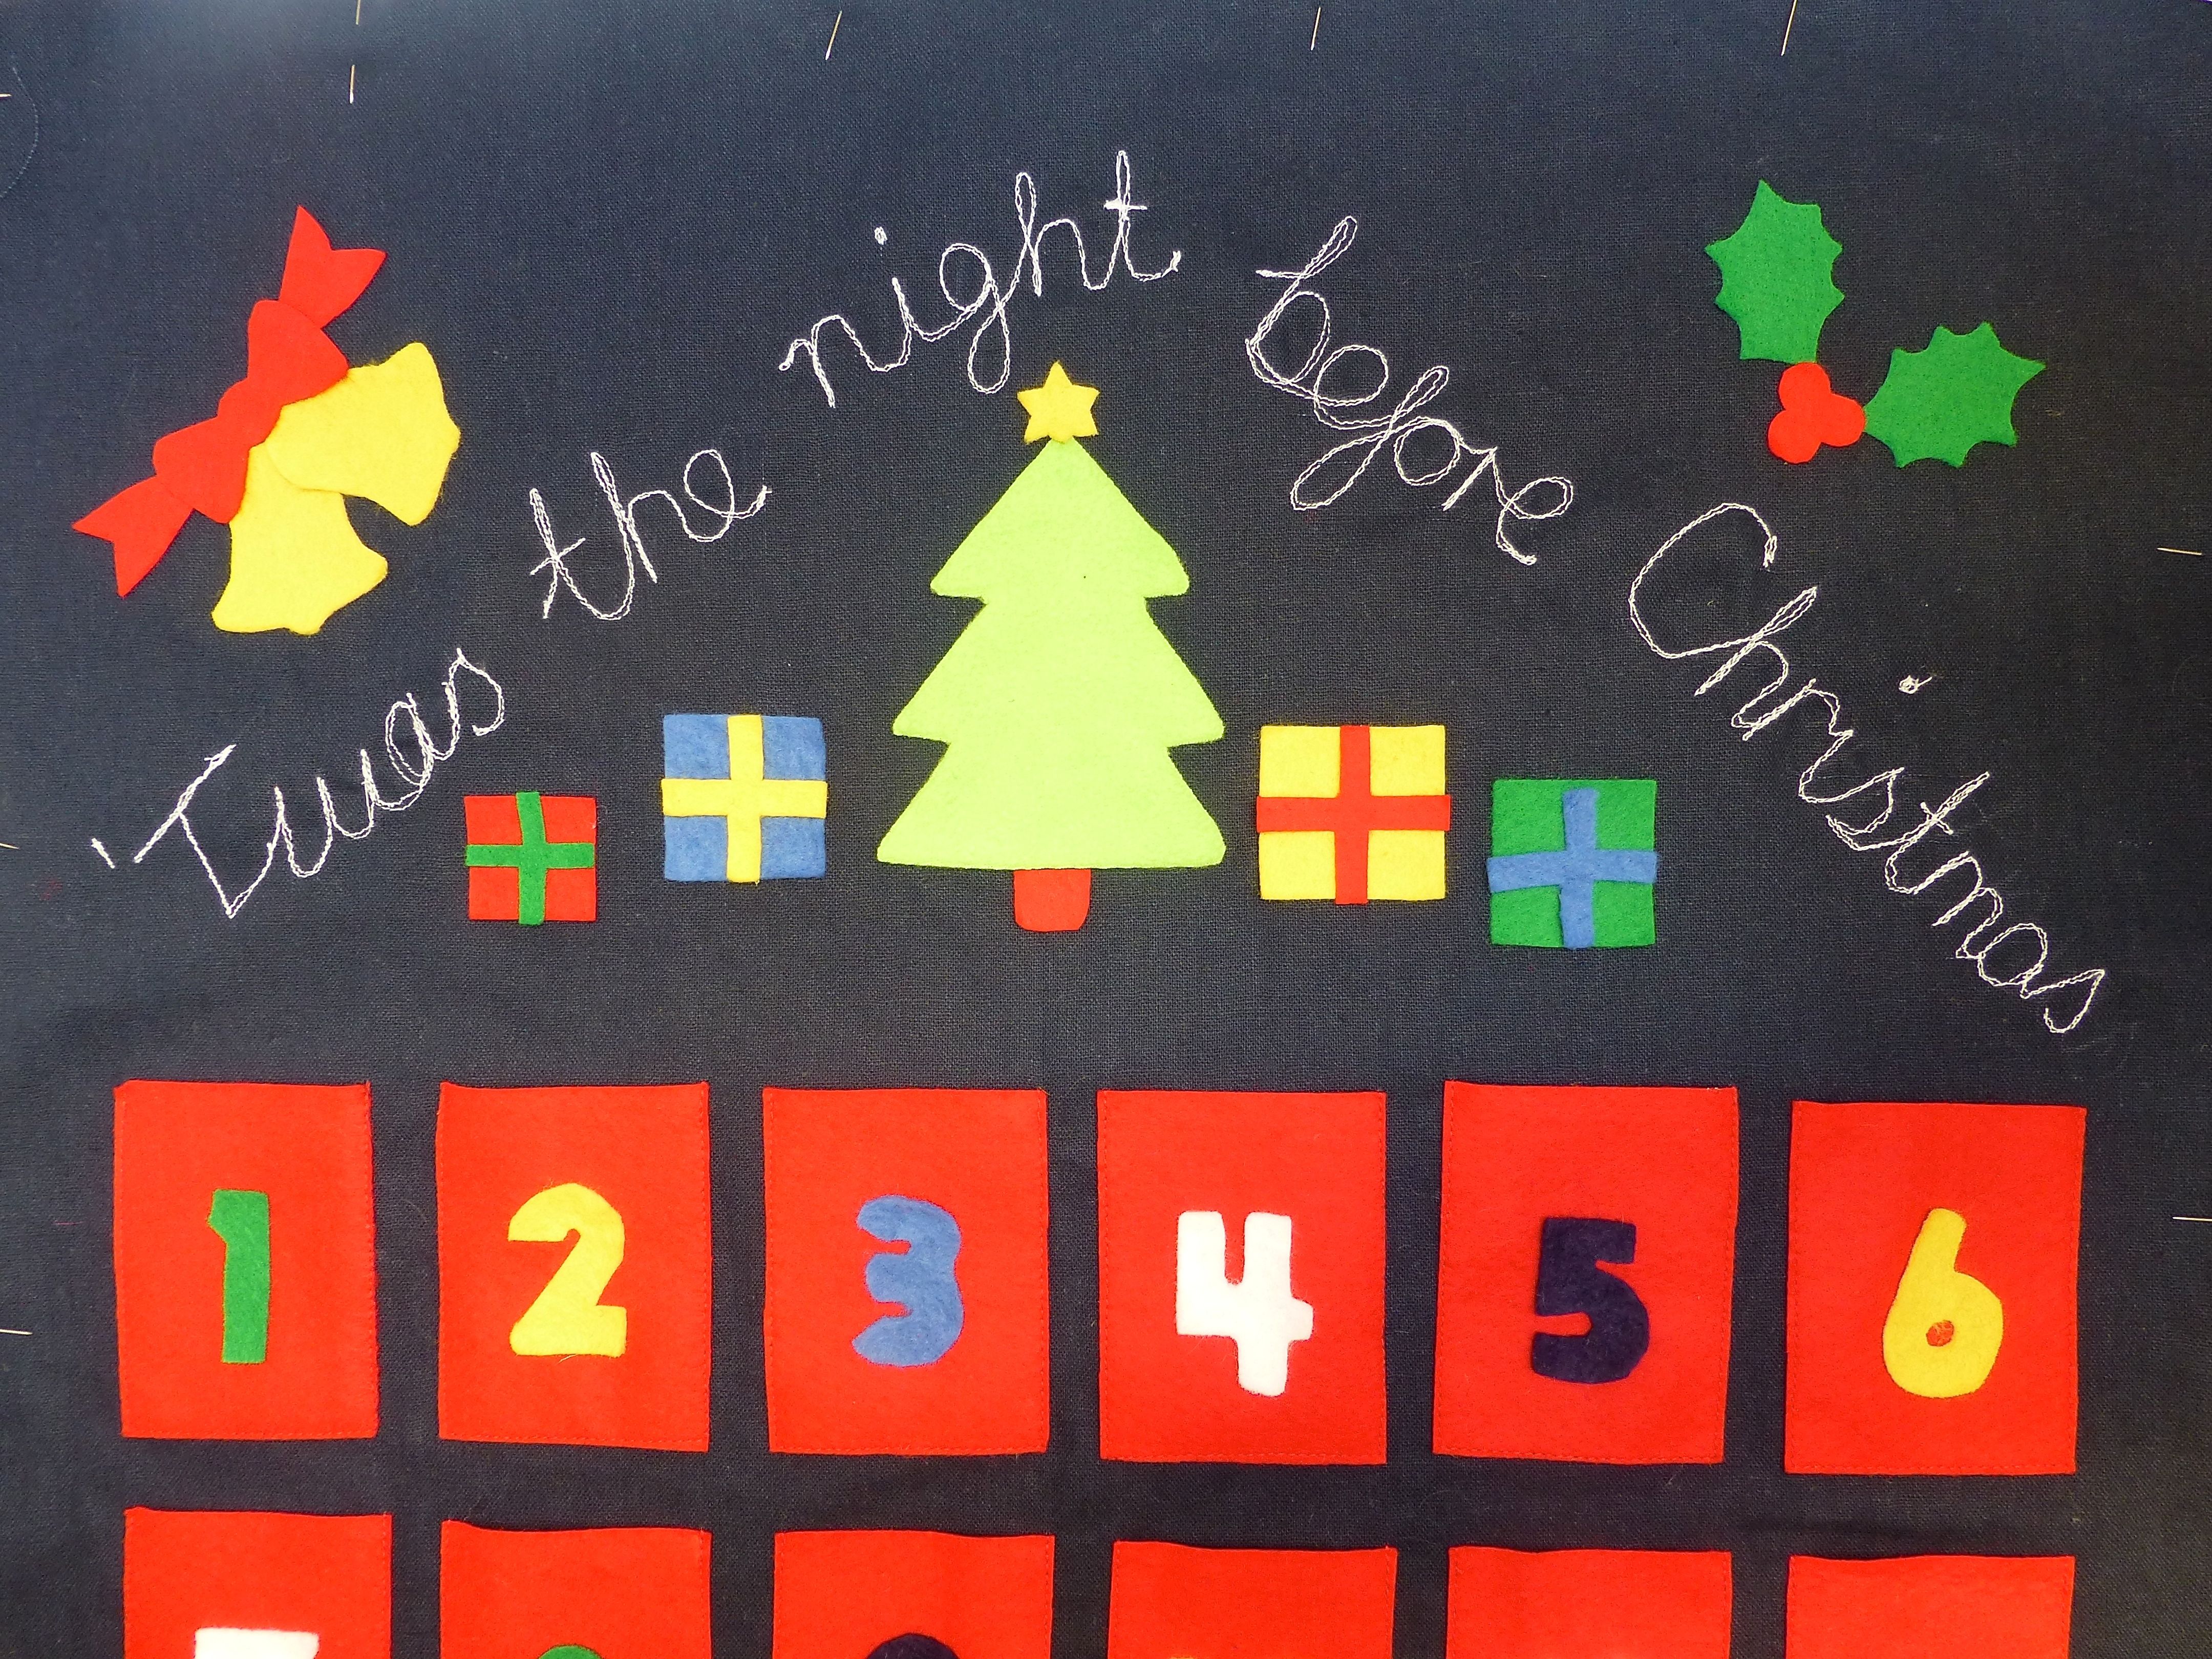
Time to decide what to put at the top of the calendar!
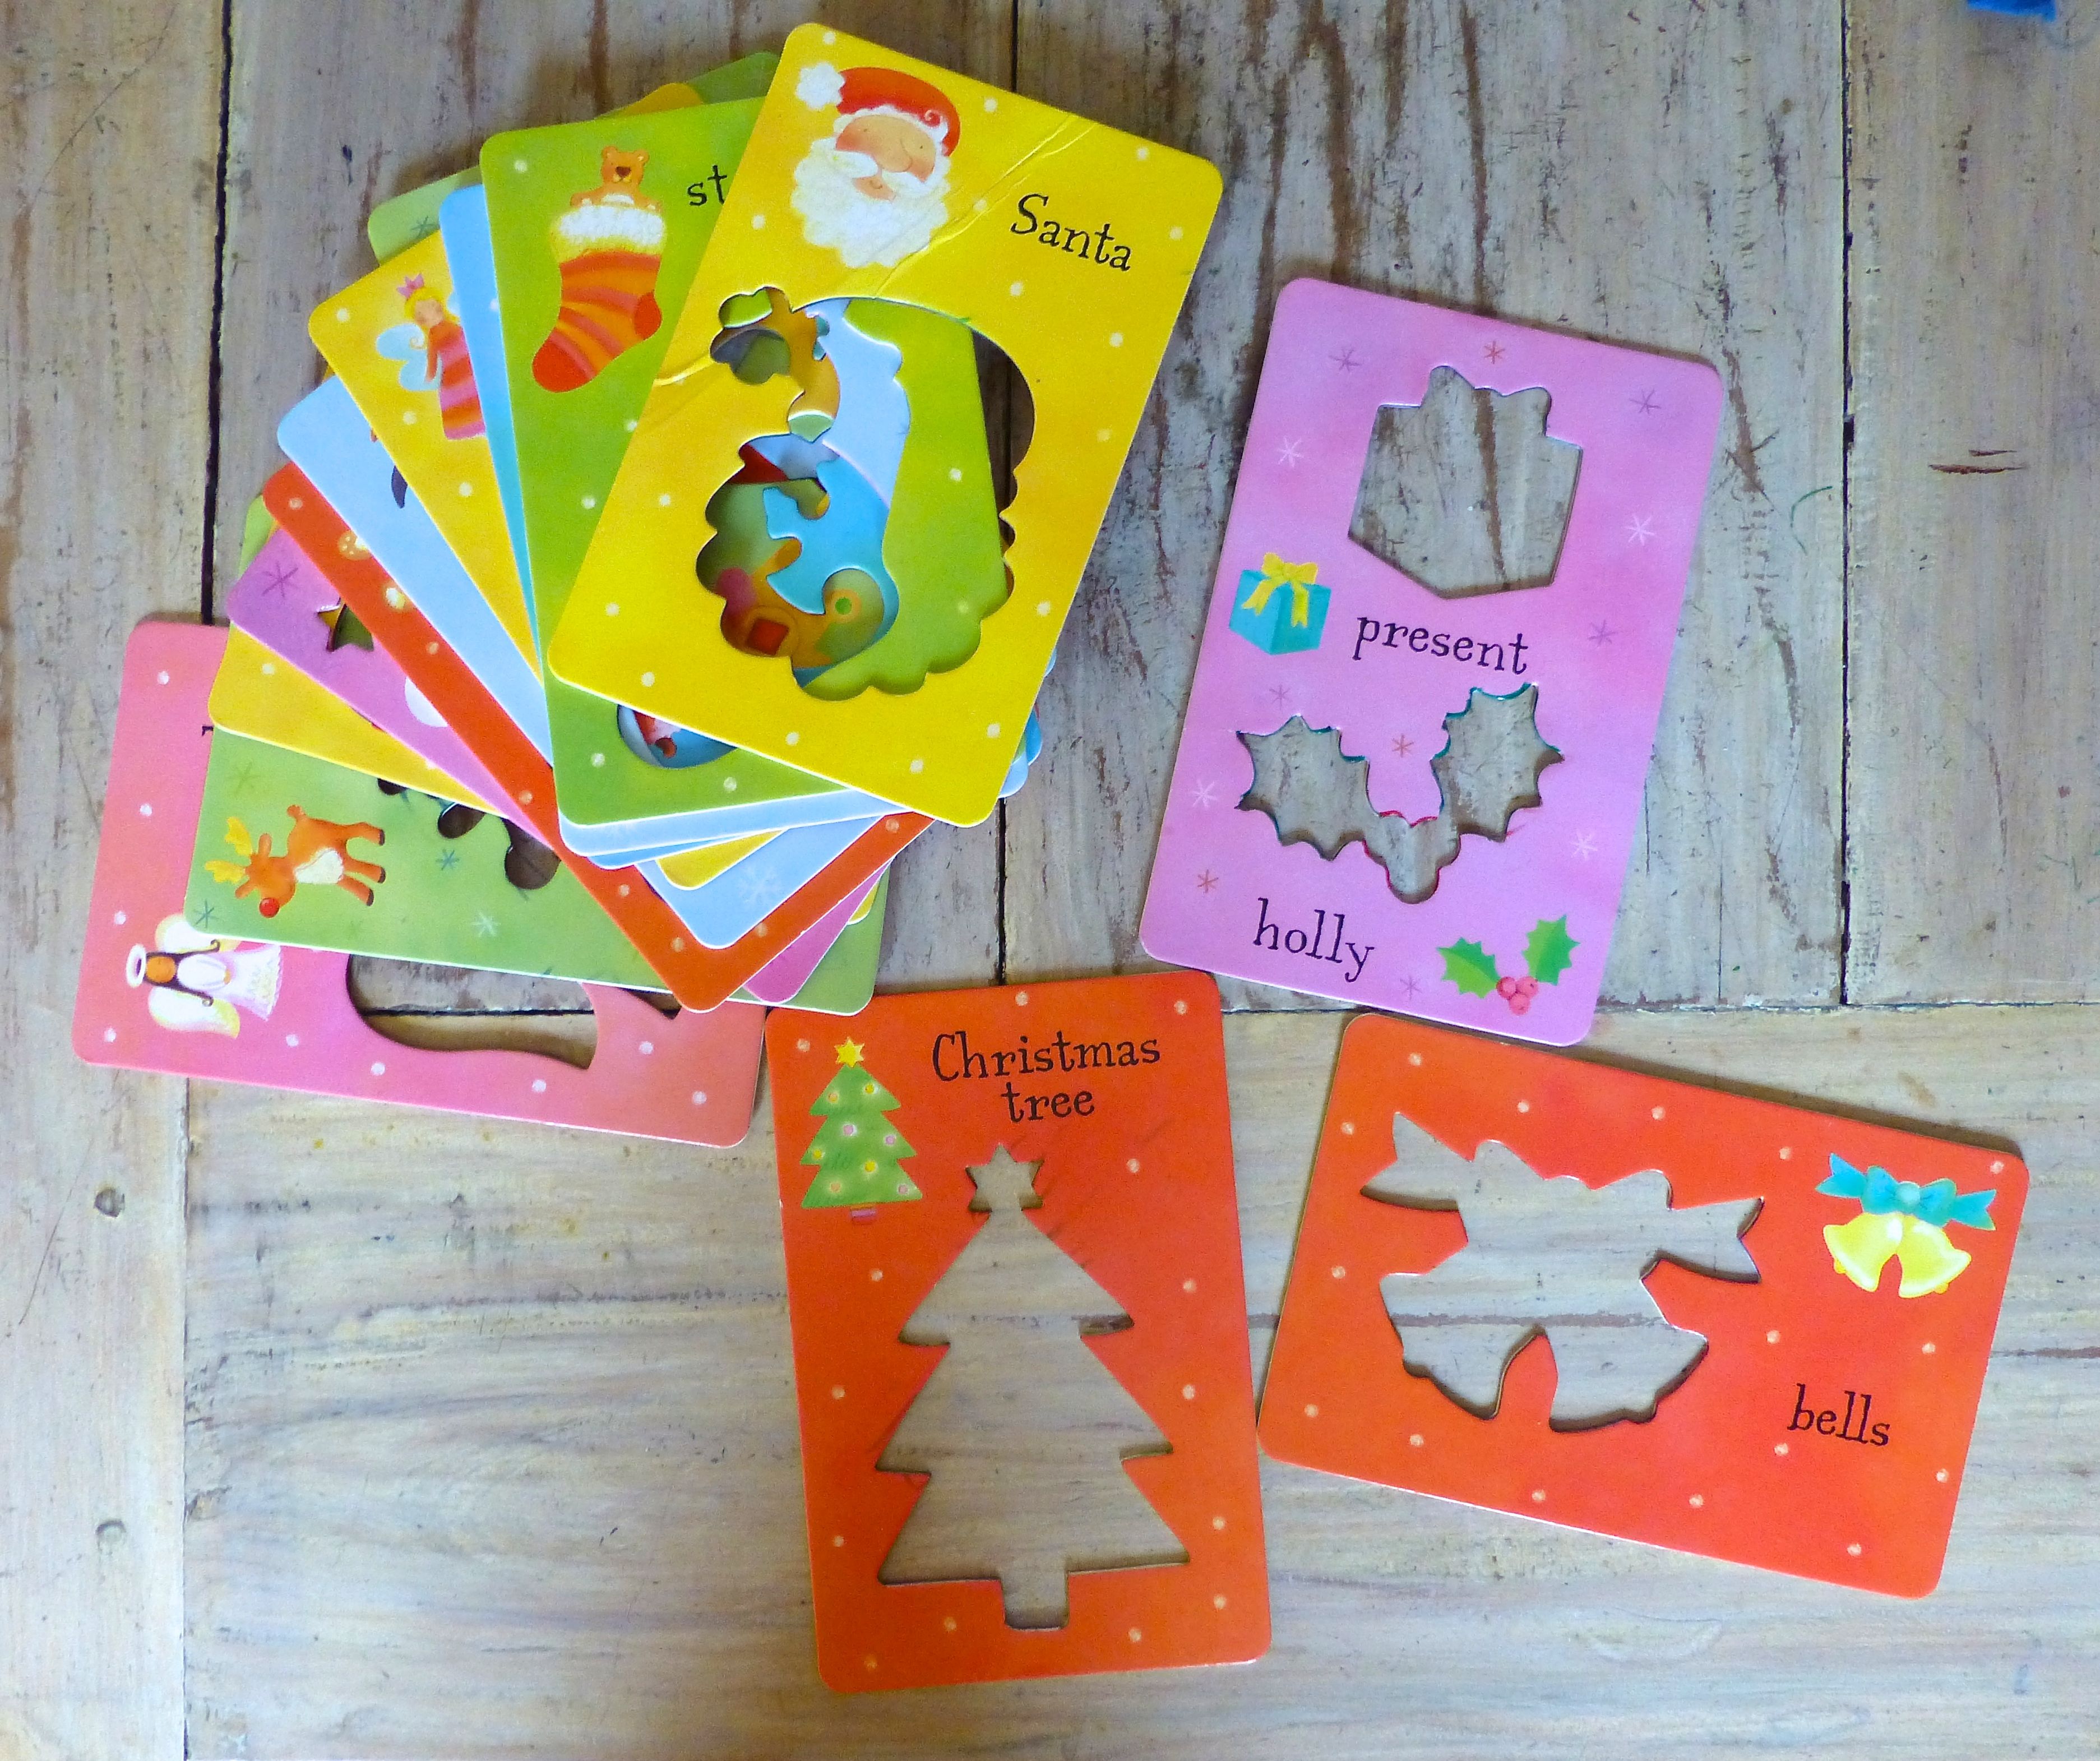
We have a box of Christmas stencils by Usborne available at Amazon for £5.99 or The Works for just £2.99!

They’ve been invaluable over the years for sooooo many different projects and this time I picked out the Holly, Bells and Christmas Tree to use at the top.
To make the presents I simply cut some squares out of felt and added a square shaped cross to represent the ribbon.

All were then glued in a pleasing arrangement leaving a gap about 5cm from all edges.

The next part was quite fiddly in that you have to place the felt pockets onto the front of the calendar making sure they are evenly spaced. When you’re happy that it looks right, pin each pocket in place and sew around three edges leaving the top edge open.

I thought it needed a little something extra so decided to add some free machine embroidery using that classic first line “‘Twas the night before Christmas….”
Because it was quite a long phrase to squeeze in, I used dressmakers chalk to pencil the words in as a guideline. I did NOT fancy unpicking all those stitches if I ran out of space before getting to the end of the fabric! The chalk is so soft it just rubs away with your fingers afterwards leaving no trace.
Pin the back to the front, wrong sides together and stitch all the way around.
If your fabric is on the flimsy side just use some wadding or interfacing in between to make it less floppy.
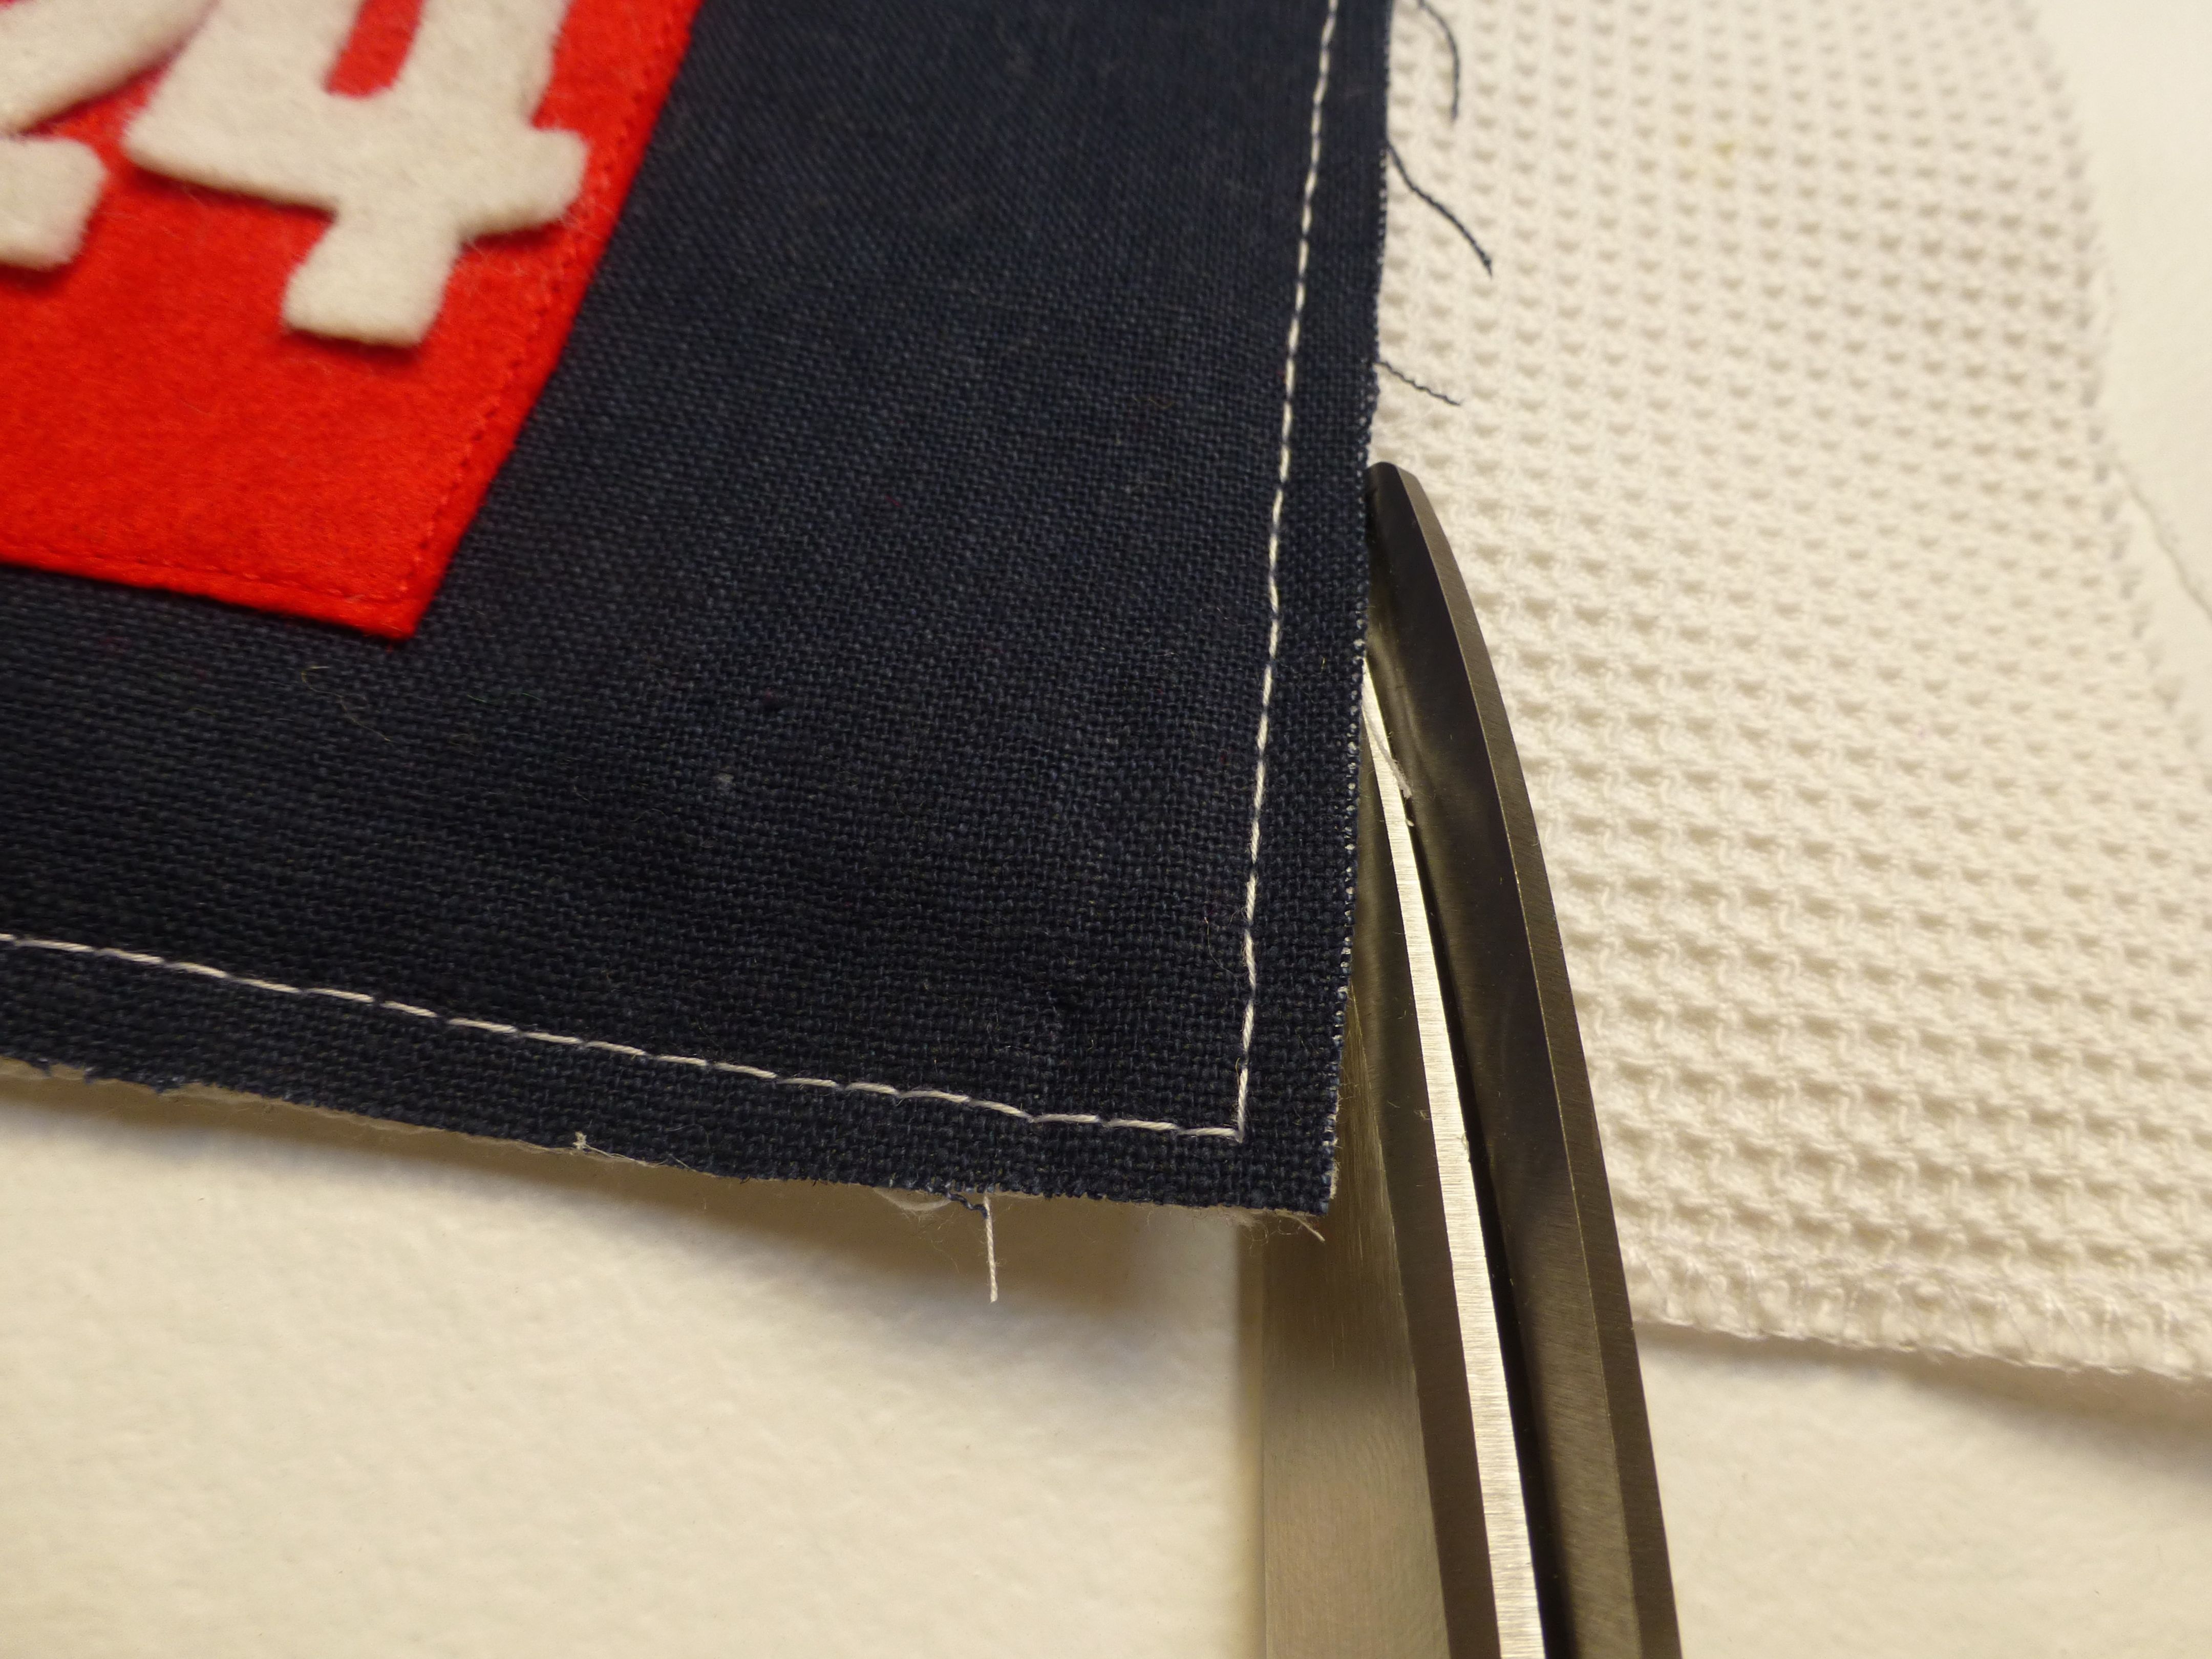
Trim the edges to an even width.
Fold about 3m of bias binding in half and iron the crease well. Encase the raw edges within and stitch close to the edge as shown below.

Attach two brass curtain rings to the back of the calendar, about 15cm in from each side.
I used picture hanging wire to hang from our picture rail.

If you find that it flops a bit, you could add a casing to the top on the reverse with a length of dowelling inserted.
Or you could cheat like I did and use double sided sticky tape to fix a plastic 12″ ruler to the back. Well, no one can see it, can they?
And here it is – TADAH!
OK, so what did I put inside each pocket as a treat if not chocolate?
I had a long, hard think about the whole concept of Christmas and what it means to us, religion aside and concluded that it’s about doing things together as a family. Our children would rather have the gift of our time than all the presents in the world, so this is what I did.
On each of thirty little white cards measuring 8.5cm x 5cm, I wrote a different ‘gift’. These ranged from “Look At Christmas Lights” on the front with more detail on the reverse – this particular one being “Put your pyjamas on, get in the car with a blanket and mug of hot chocolate, and drive round in the dark to look at all the Christmas lights”.
Another card reads “Camp Out Under The Christmas Tree” which needs no further explanation!
One of my favourites is “Tape Candy Canes To Cars” , the reverse explaining “Give the anonymous gift of a candy cane to complete strangers by taping one to the windscreen of their cars after dark for them to find in the morning”.

Simple pleasures are often the best, so “Toast Marshmallows Over The Fire”, “Sing Christmas Carols” and “Make Paper Snowflakes” are minimum effort solutions for those busy days.

The Boys open a window on their traditional calendar on waking each morning, but we save the reveal of the evening’s treat until after supper so they have something to look forward to all day, every day of Advent.

Although all the cards are inserted for the photos, I will actually engineer the day’s treat depending on our schedule – they can’t “Stay Up Late” on a school night, for example!
If you would like a copy of all thirty treats (I made extra in case some ideas couldn’t be followed through), just email me and I can send you the jpegs for you to print out yourself.
Wow, that was a long post – I hope you managed to stay awake until the end….or did you just skip straight to the important last bit about the cards?!!!
My week in pictures for this, the twelfth, #sundaysevens – pop over to Natalie at Threads & Bobbins to see what it’s all about:)
1. Advent Calendar finished in the nick of time! I have a tutorial to post later this week.
2. The Christmas DVDs are coming out! Watching “The Polar Express” with the boys.

3. They drew 0-0 but Freddy got “Man of the match” – check out that medal!

4. Fifi and Tess curled up as close as they can get – they definitely sense when you’re in pain.

5. Bedside book bag (tutorial here) made for a little girl’s Christmas present….

6. ….leftover fabric made a sweet little cover for pocket tissues to go in the box for my #sewingsanta giftee:)

7. It’s coming off tomorrow – my husband’s “Monkey’s Tail” for Movember.

I’ve had a busy week of making and haven’t had time to do much else really, so this week’s Sunday Sevens is a bit different. Instead of showing you things that I have made or done, I thought I’d showcase seven things I bought at a craft fair this week by other talented craftspeople. Hop over to Natalie at Threads and Bobbins to see what this link up is all about.
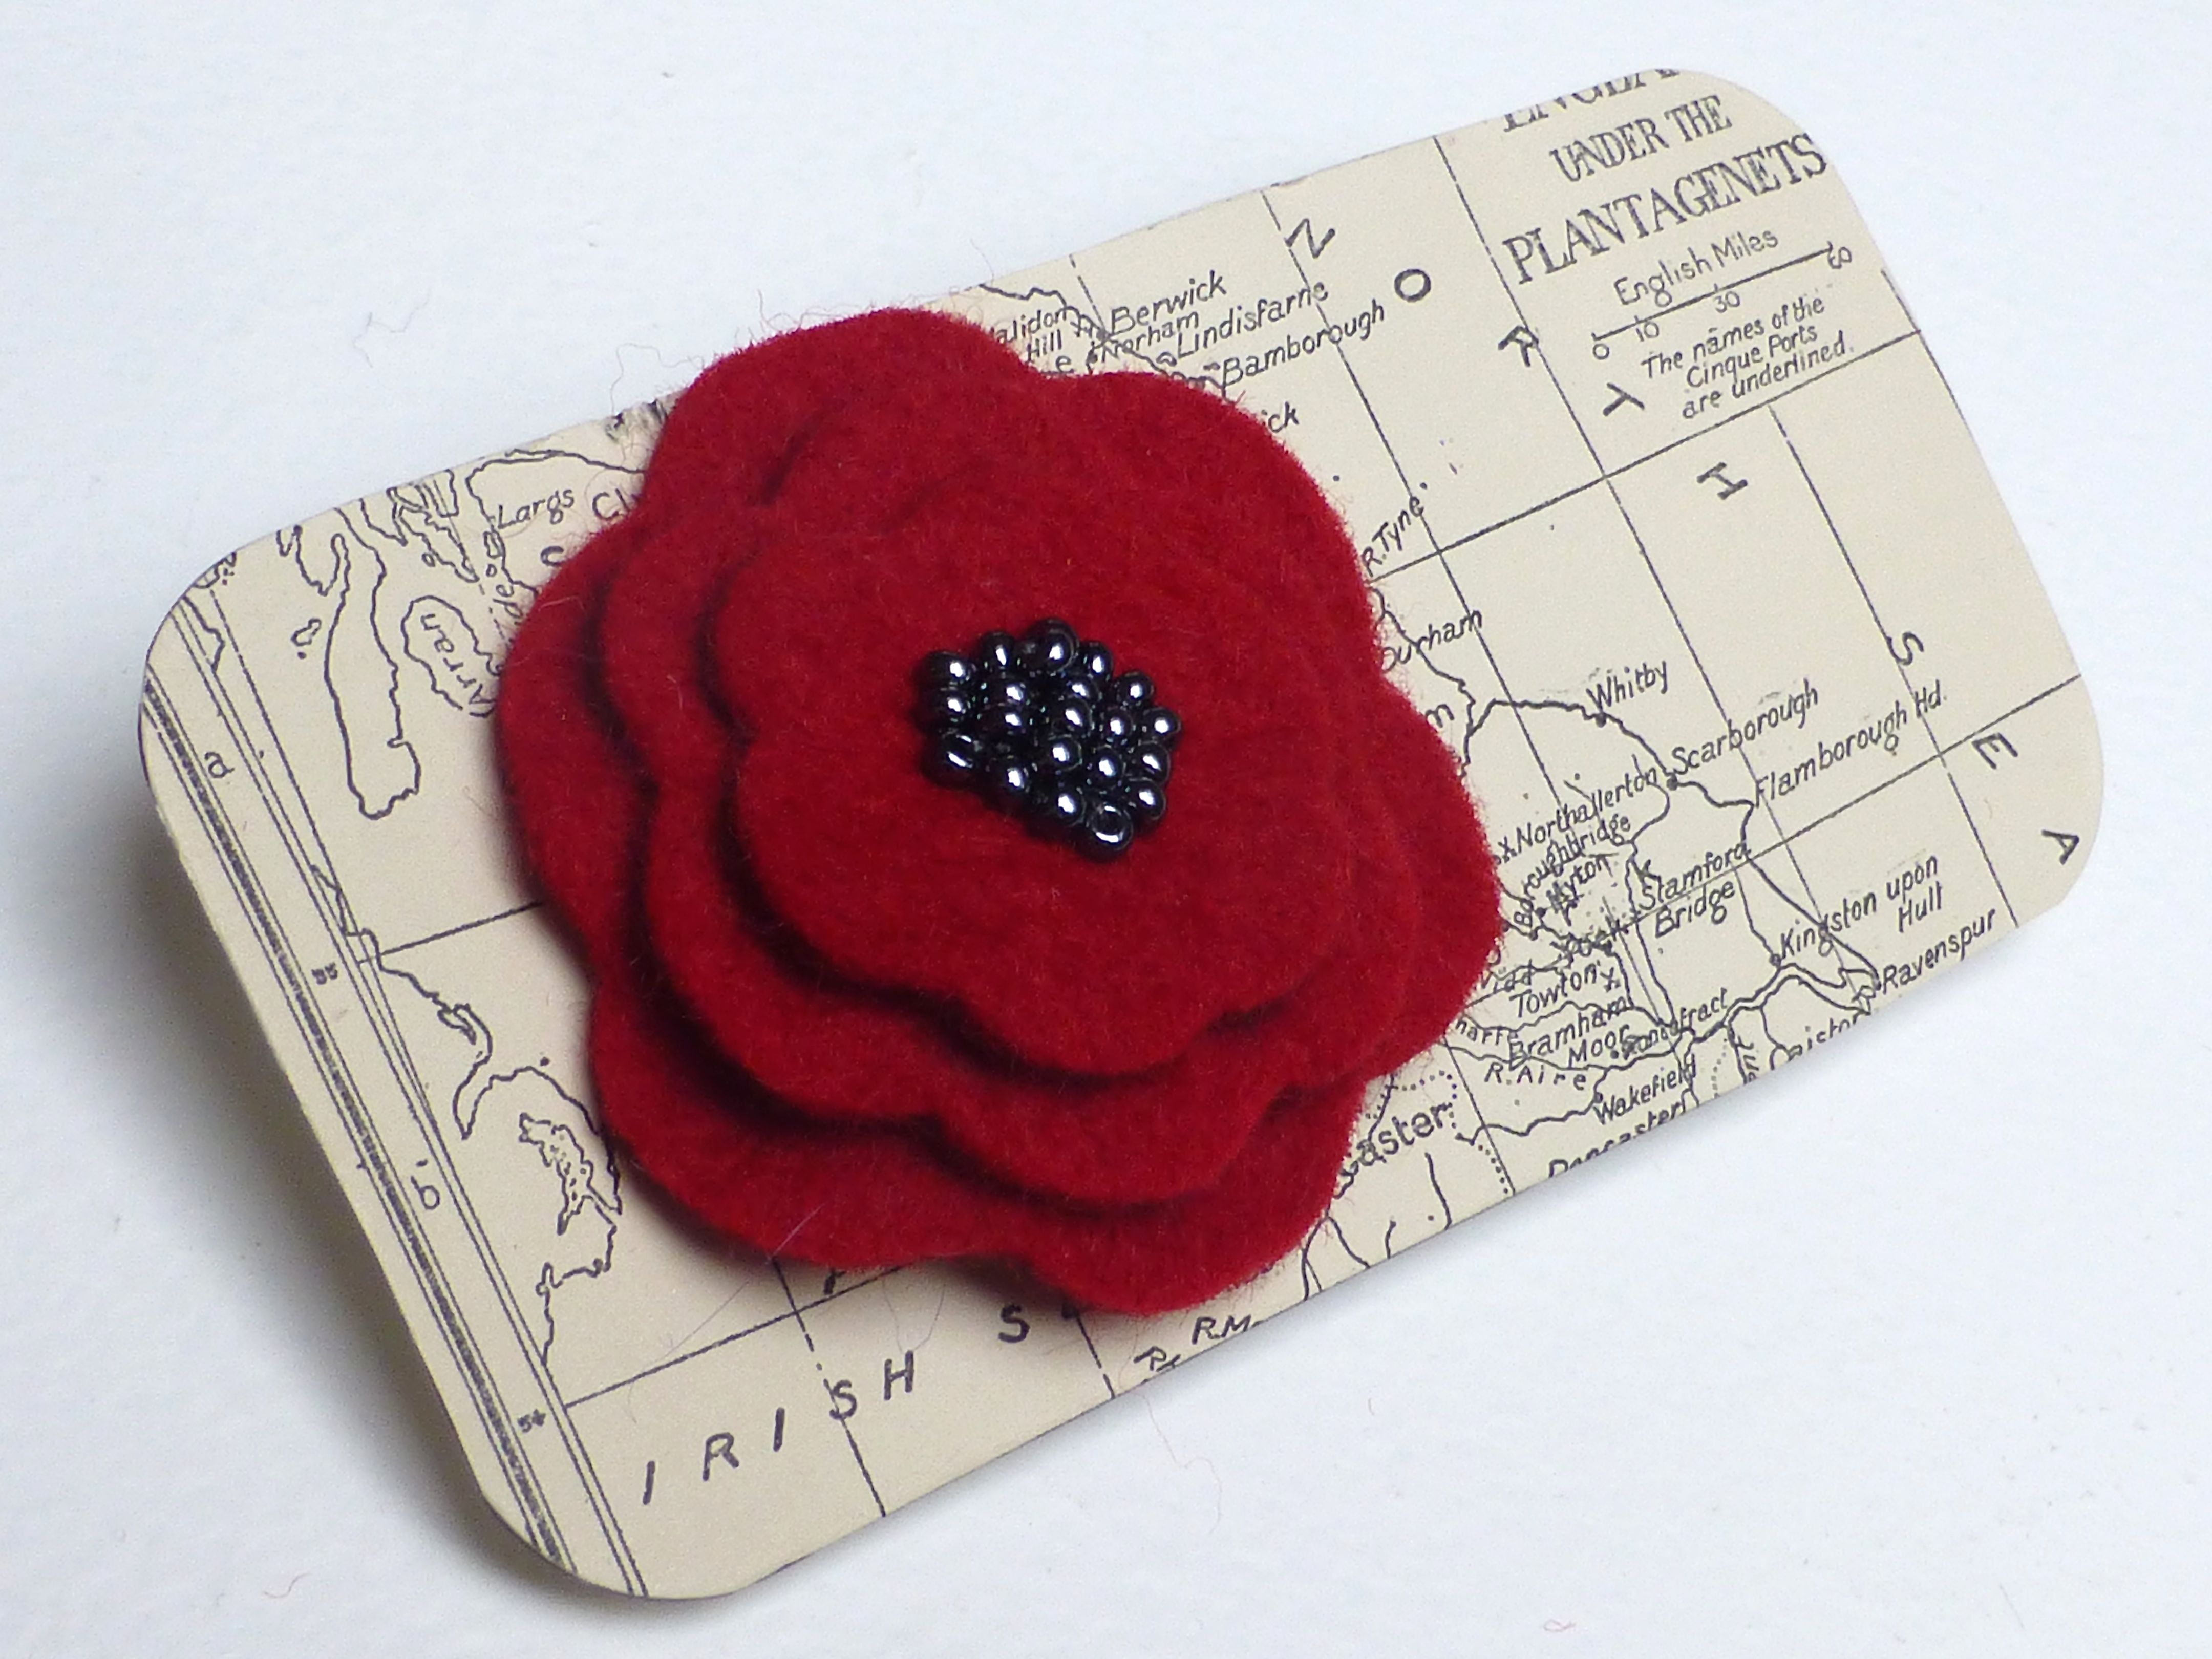
1. A beautiful felt poppy hairband which I am going convert to a brooch by removing the elastic and adding a pin. The beads in the centre really sparkle in the light and I love the inventive use of an old map as a means of presentation.
2. Simple wire hearts with a colourful bead by Helen Bagwell at Longfield Designs – these will look pretty on my Christmas tree.

3. Two painted, handcrafted wooden door wedges – so simple, but I love them.

4. A cute pair of wristwarmers in wonderfully soft yarn.

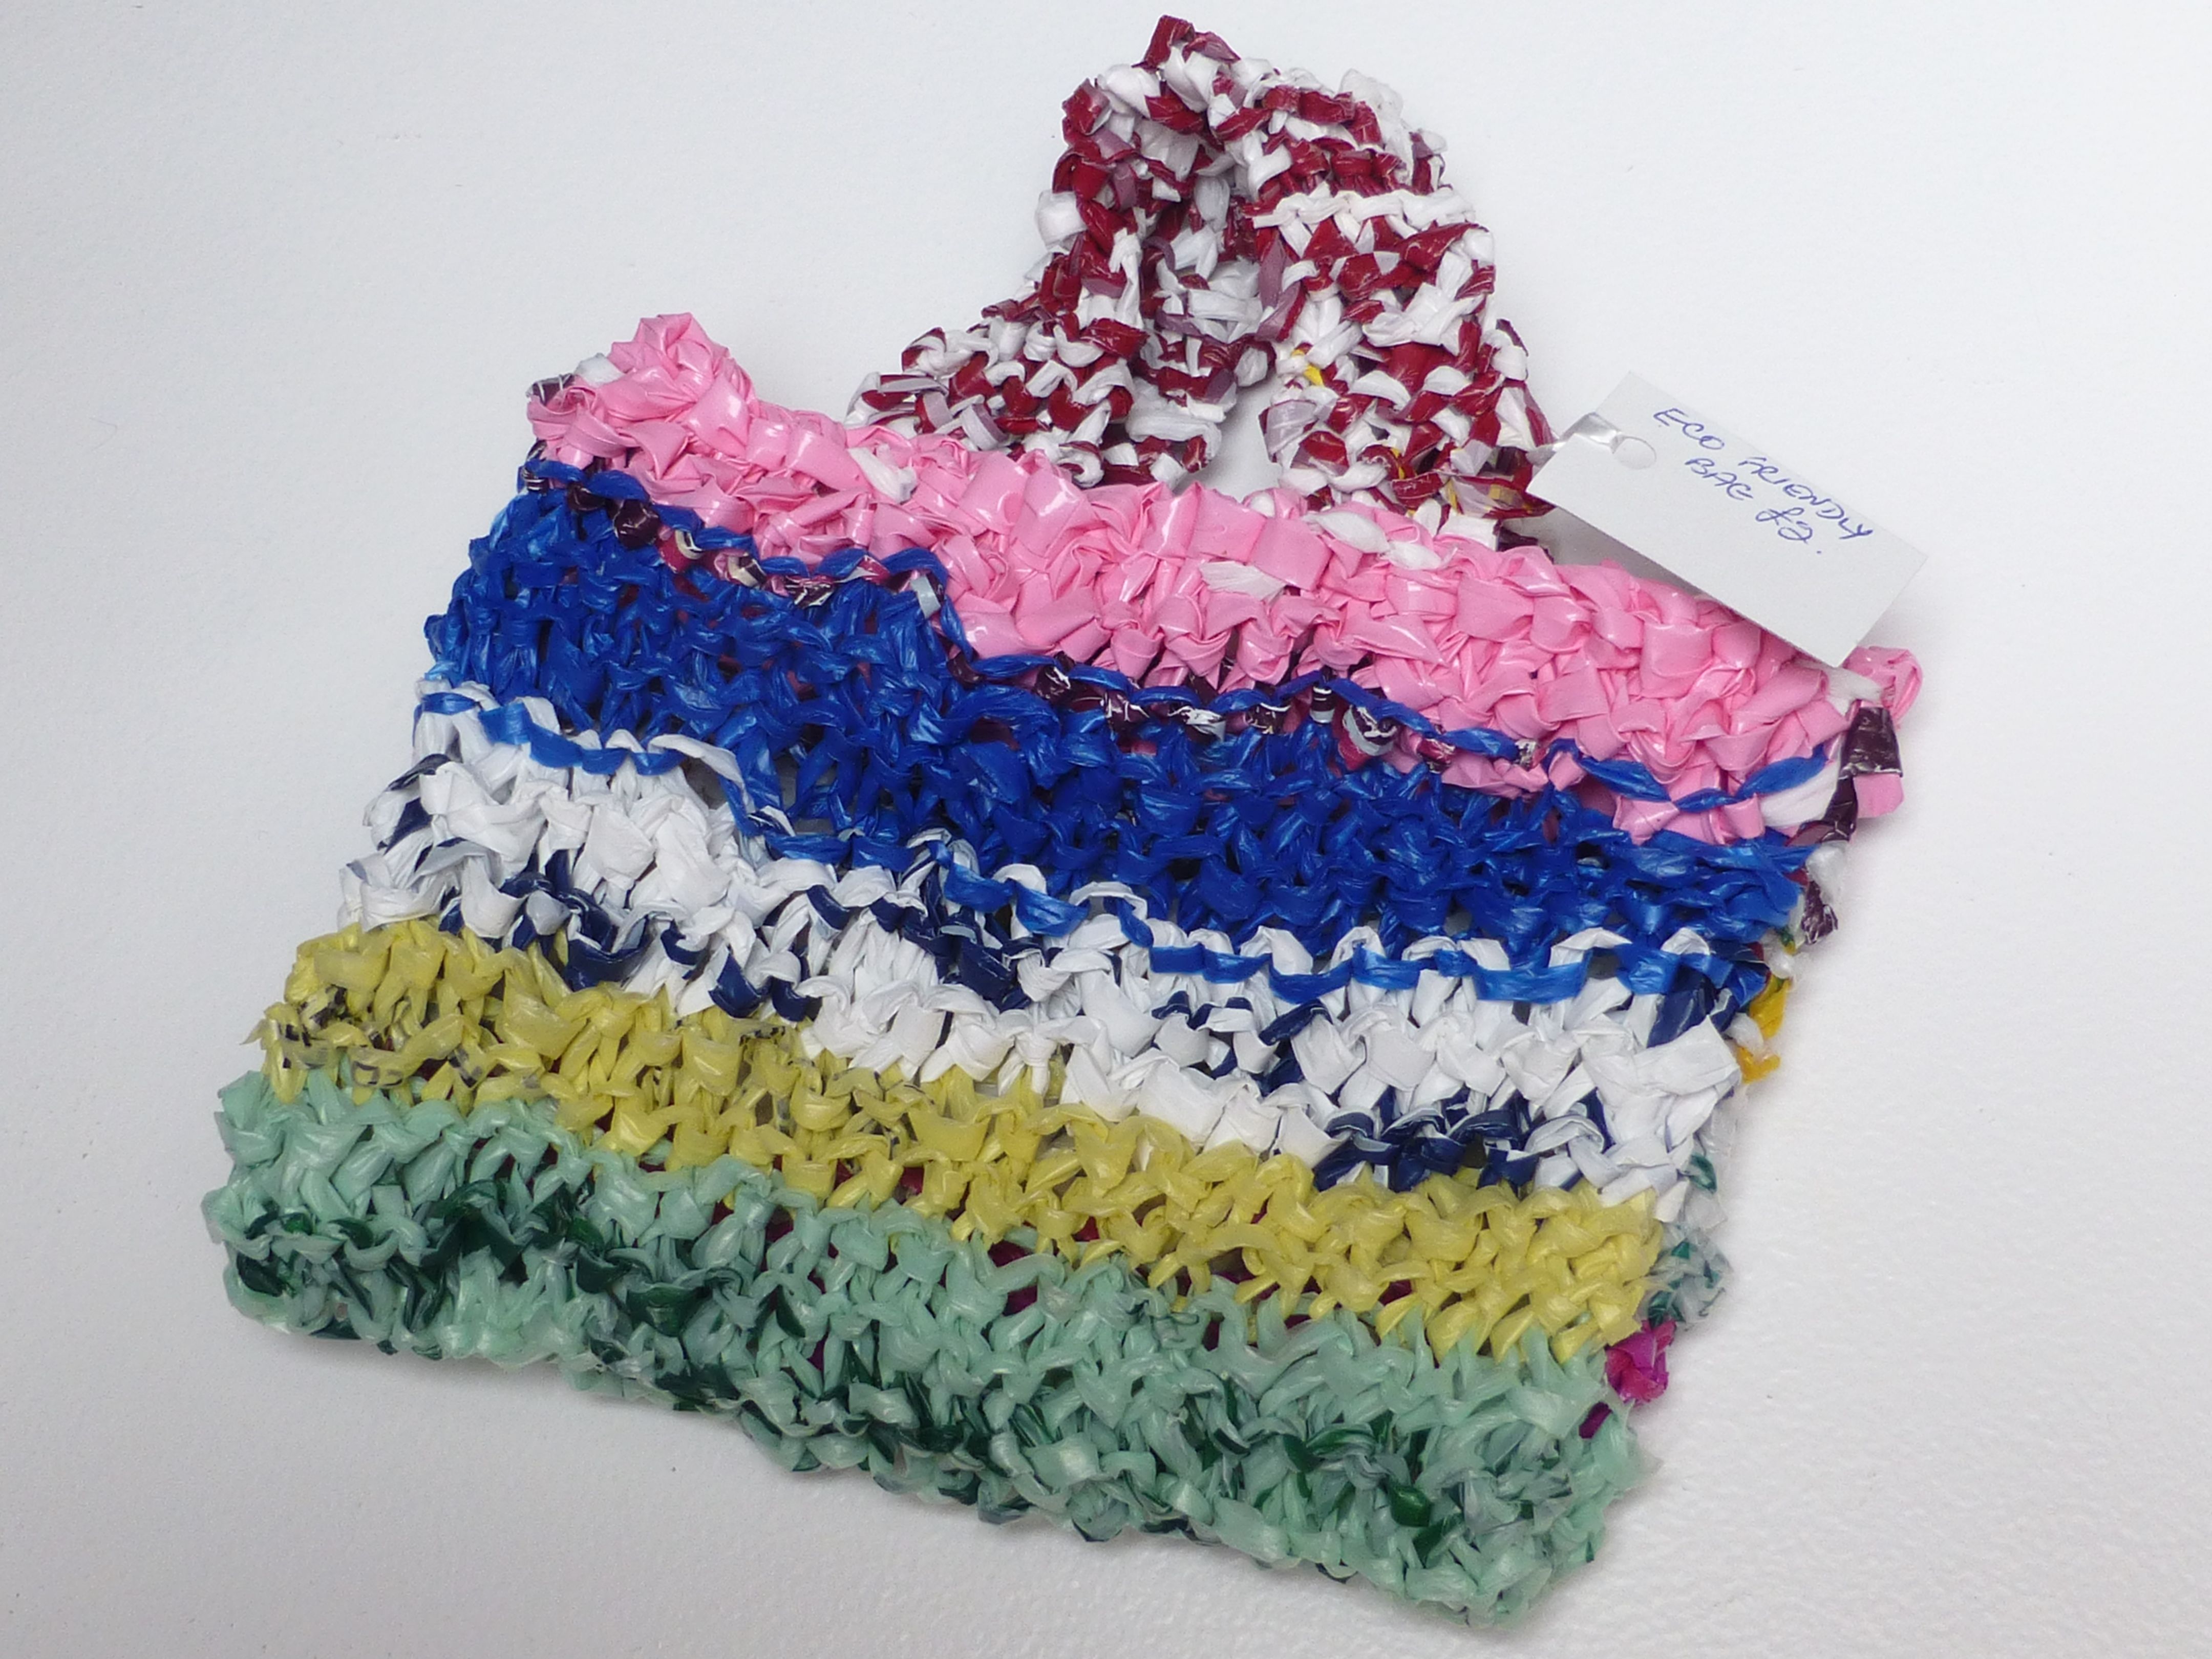
5. A brilliant reinvention of used carrier bags – knitted eco bags! These were being made and sold for charity so I just had to buy one.
6. Admittedly I had intended to make something similar for No.3 son, but it’s such a fabulous set and entirely handmade for just £6.00 that I saved myself a task!
7. Anyone who has ever “owned” a cat will understand.
I’m chuffed with my purchases and pleased to support local crafters in a small way, although everything was totally underpriced for the hours that had gone into creating such unique items. I paid the grand sum of £23.50 for everything!
Have you bought anything from other crafters recently?
Now I don’t know about you, but I’m one of those people who hates (and I don’t use that word lightly) to give money or vouchers as a gift – I would much rather make a present if possible, or choose something personally if a bought gift is more appropriate.
However there are occasions when cold hard cash is the only option (or a cheque/voucher) especially when trying to please a teenager or, more frequently nowadays, as the preferred wedding gift for a bride and groom.
But what are you supposed to put the money in?
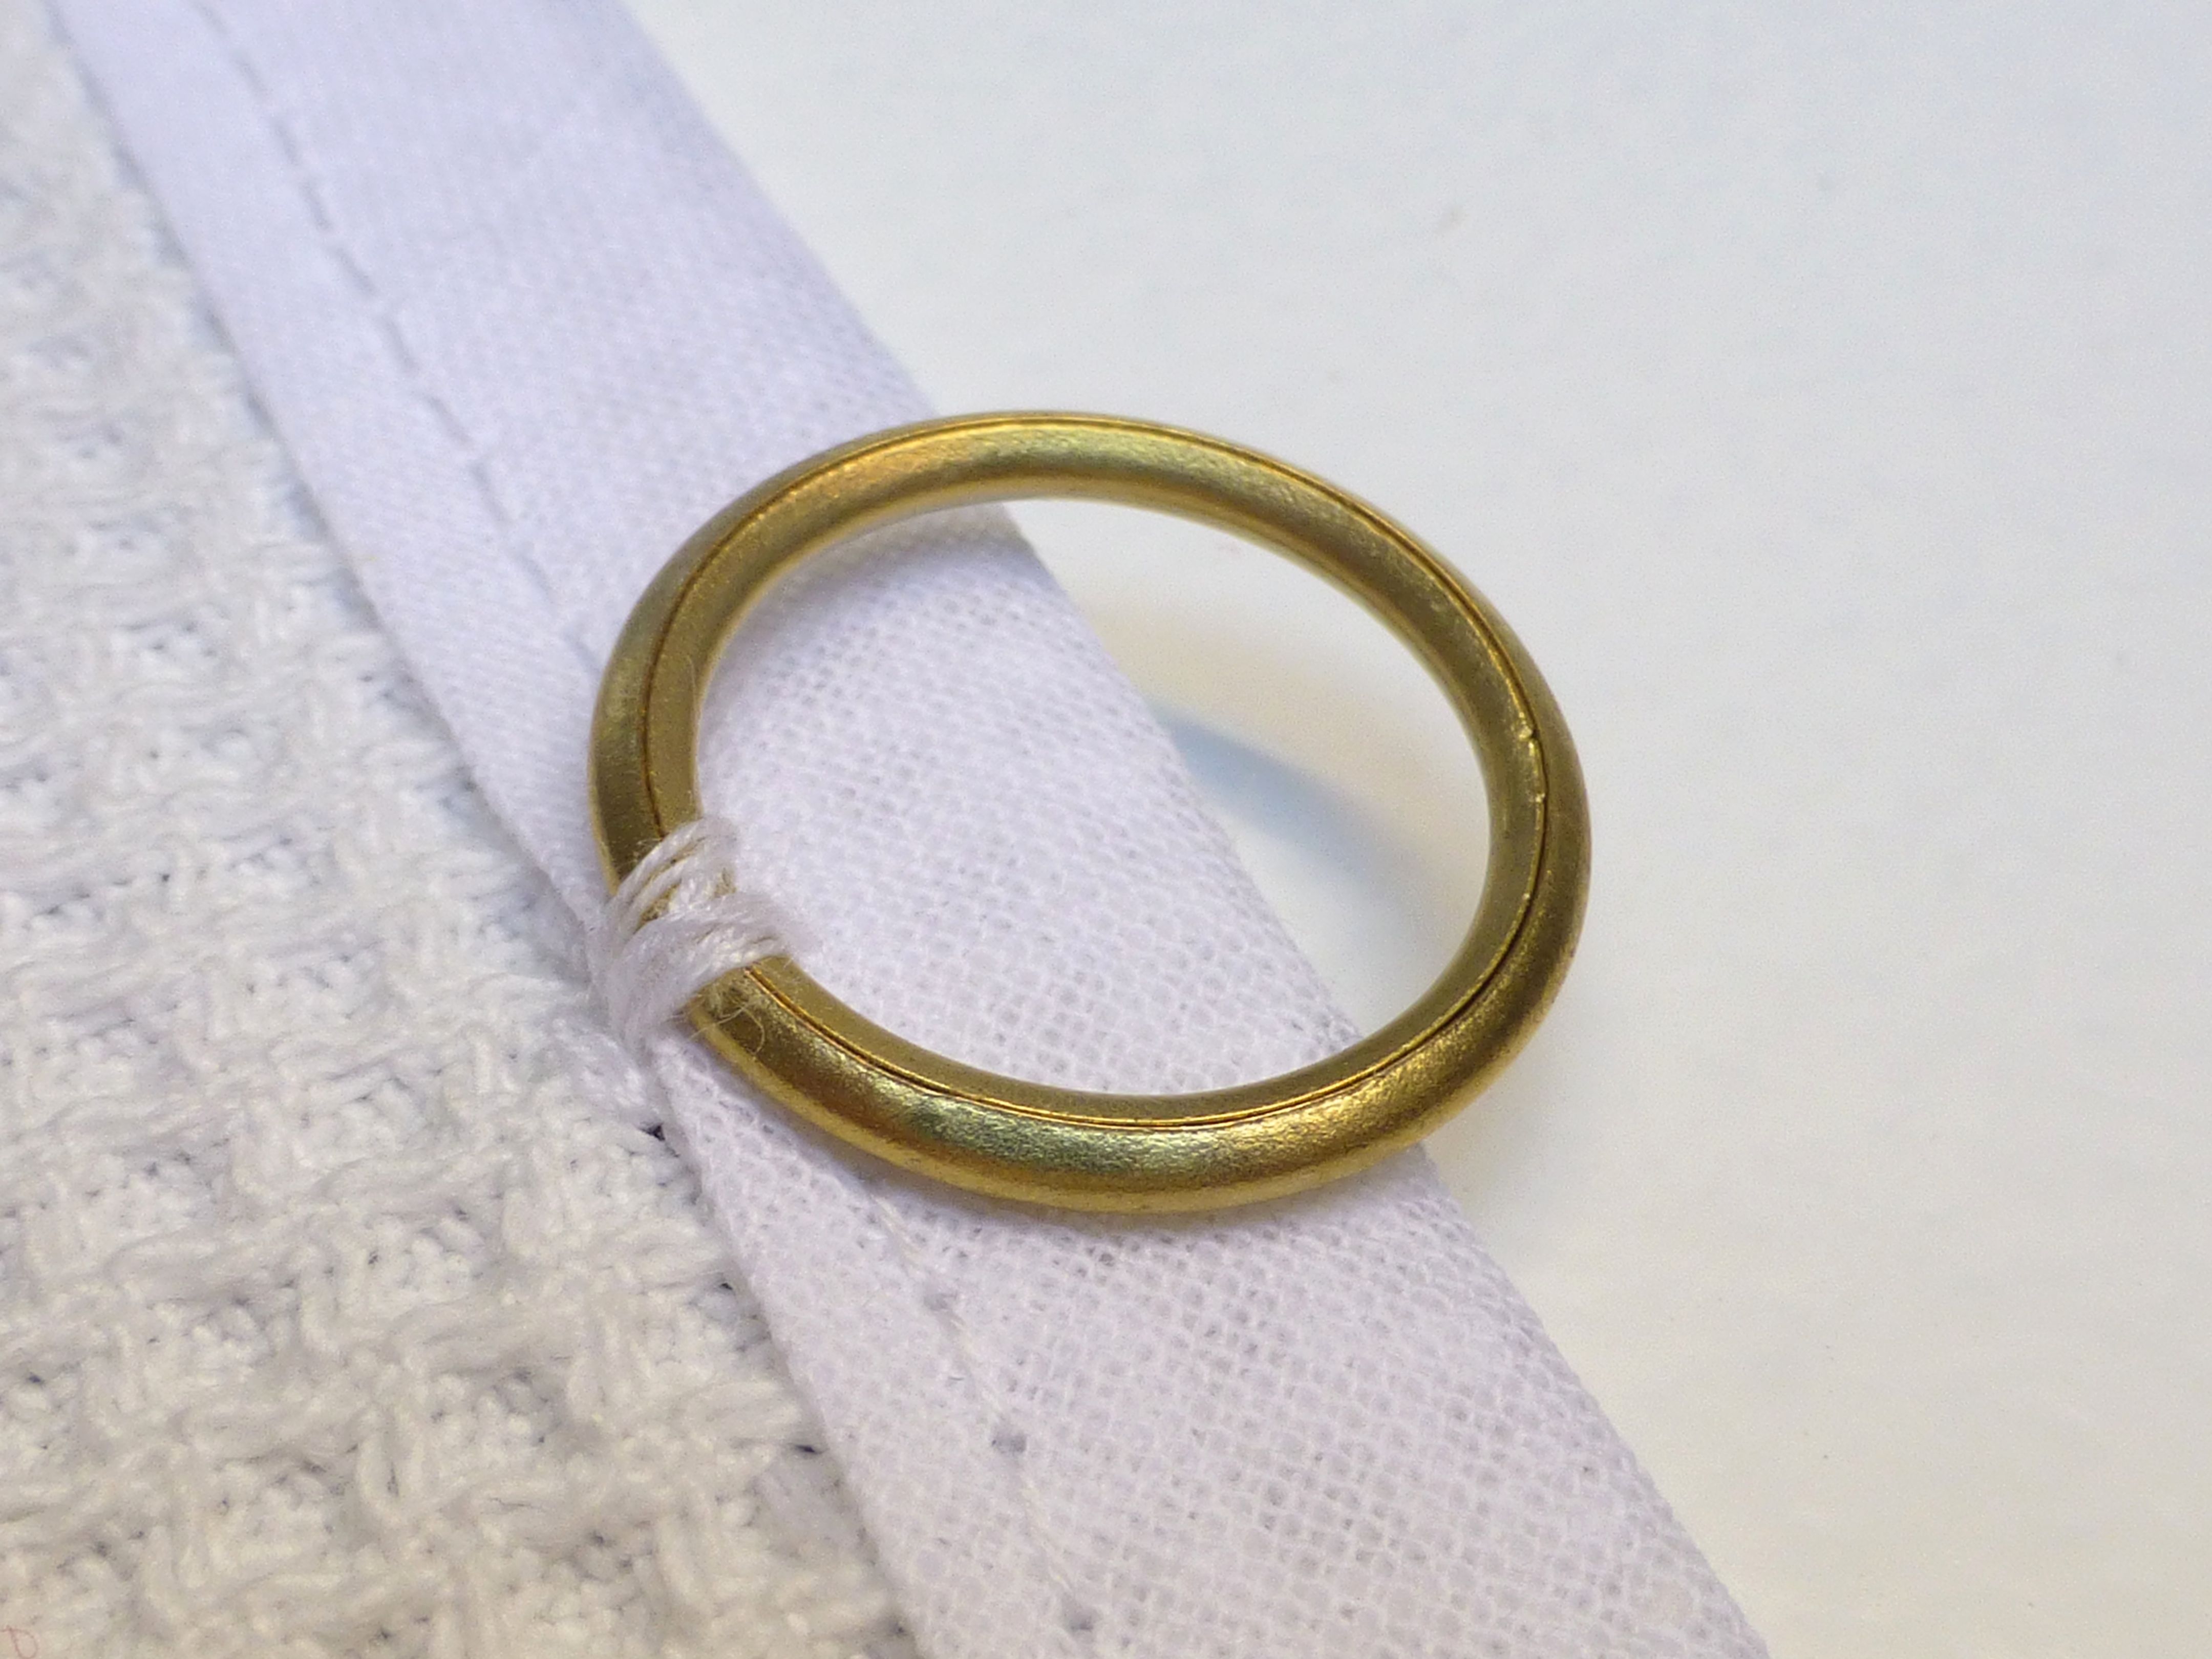
Slipping some notes into a card is the usual thing to do, or you could attempt to make it look as if more thought has gone into your gift by popping cash into a card money wallet specifically designed for the purpose.
Hmmmm. Therein lies the problem. How to give an expensive gift to make it look less thoughtless.
I found myself in this unenviable position this week as my Aunt has mentioned that she would love an iPad for her 75th birthday. As there are lots of options in terms of specification, the family have decided to give cash and leave the decision up to her as to which model to buy.
Luckily I was reading Bec’s blog about Snail Mail and she inspired me to create a card along the same lines and….
….Tadah!

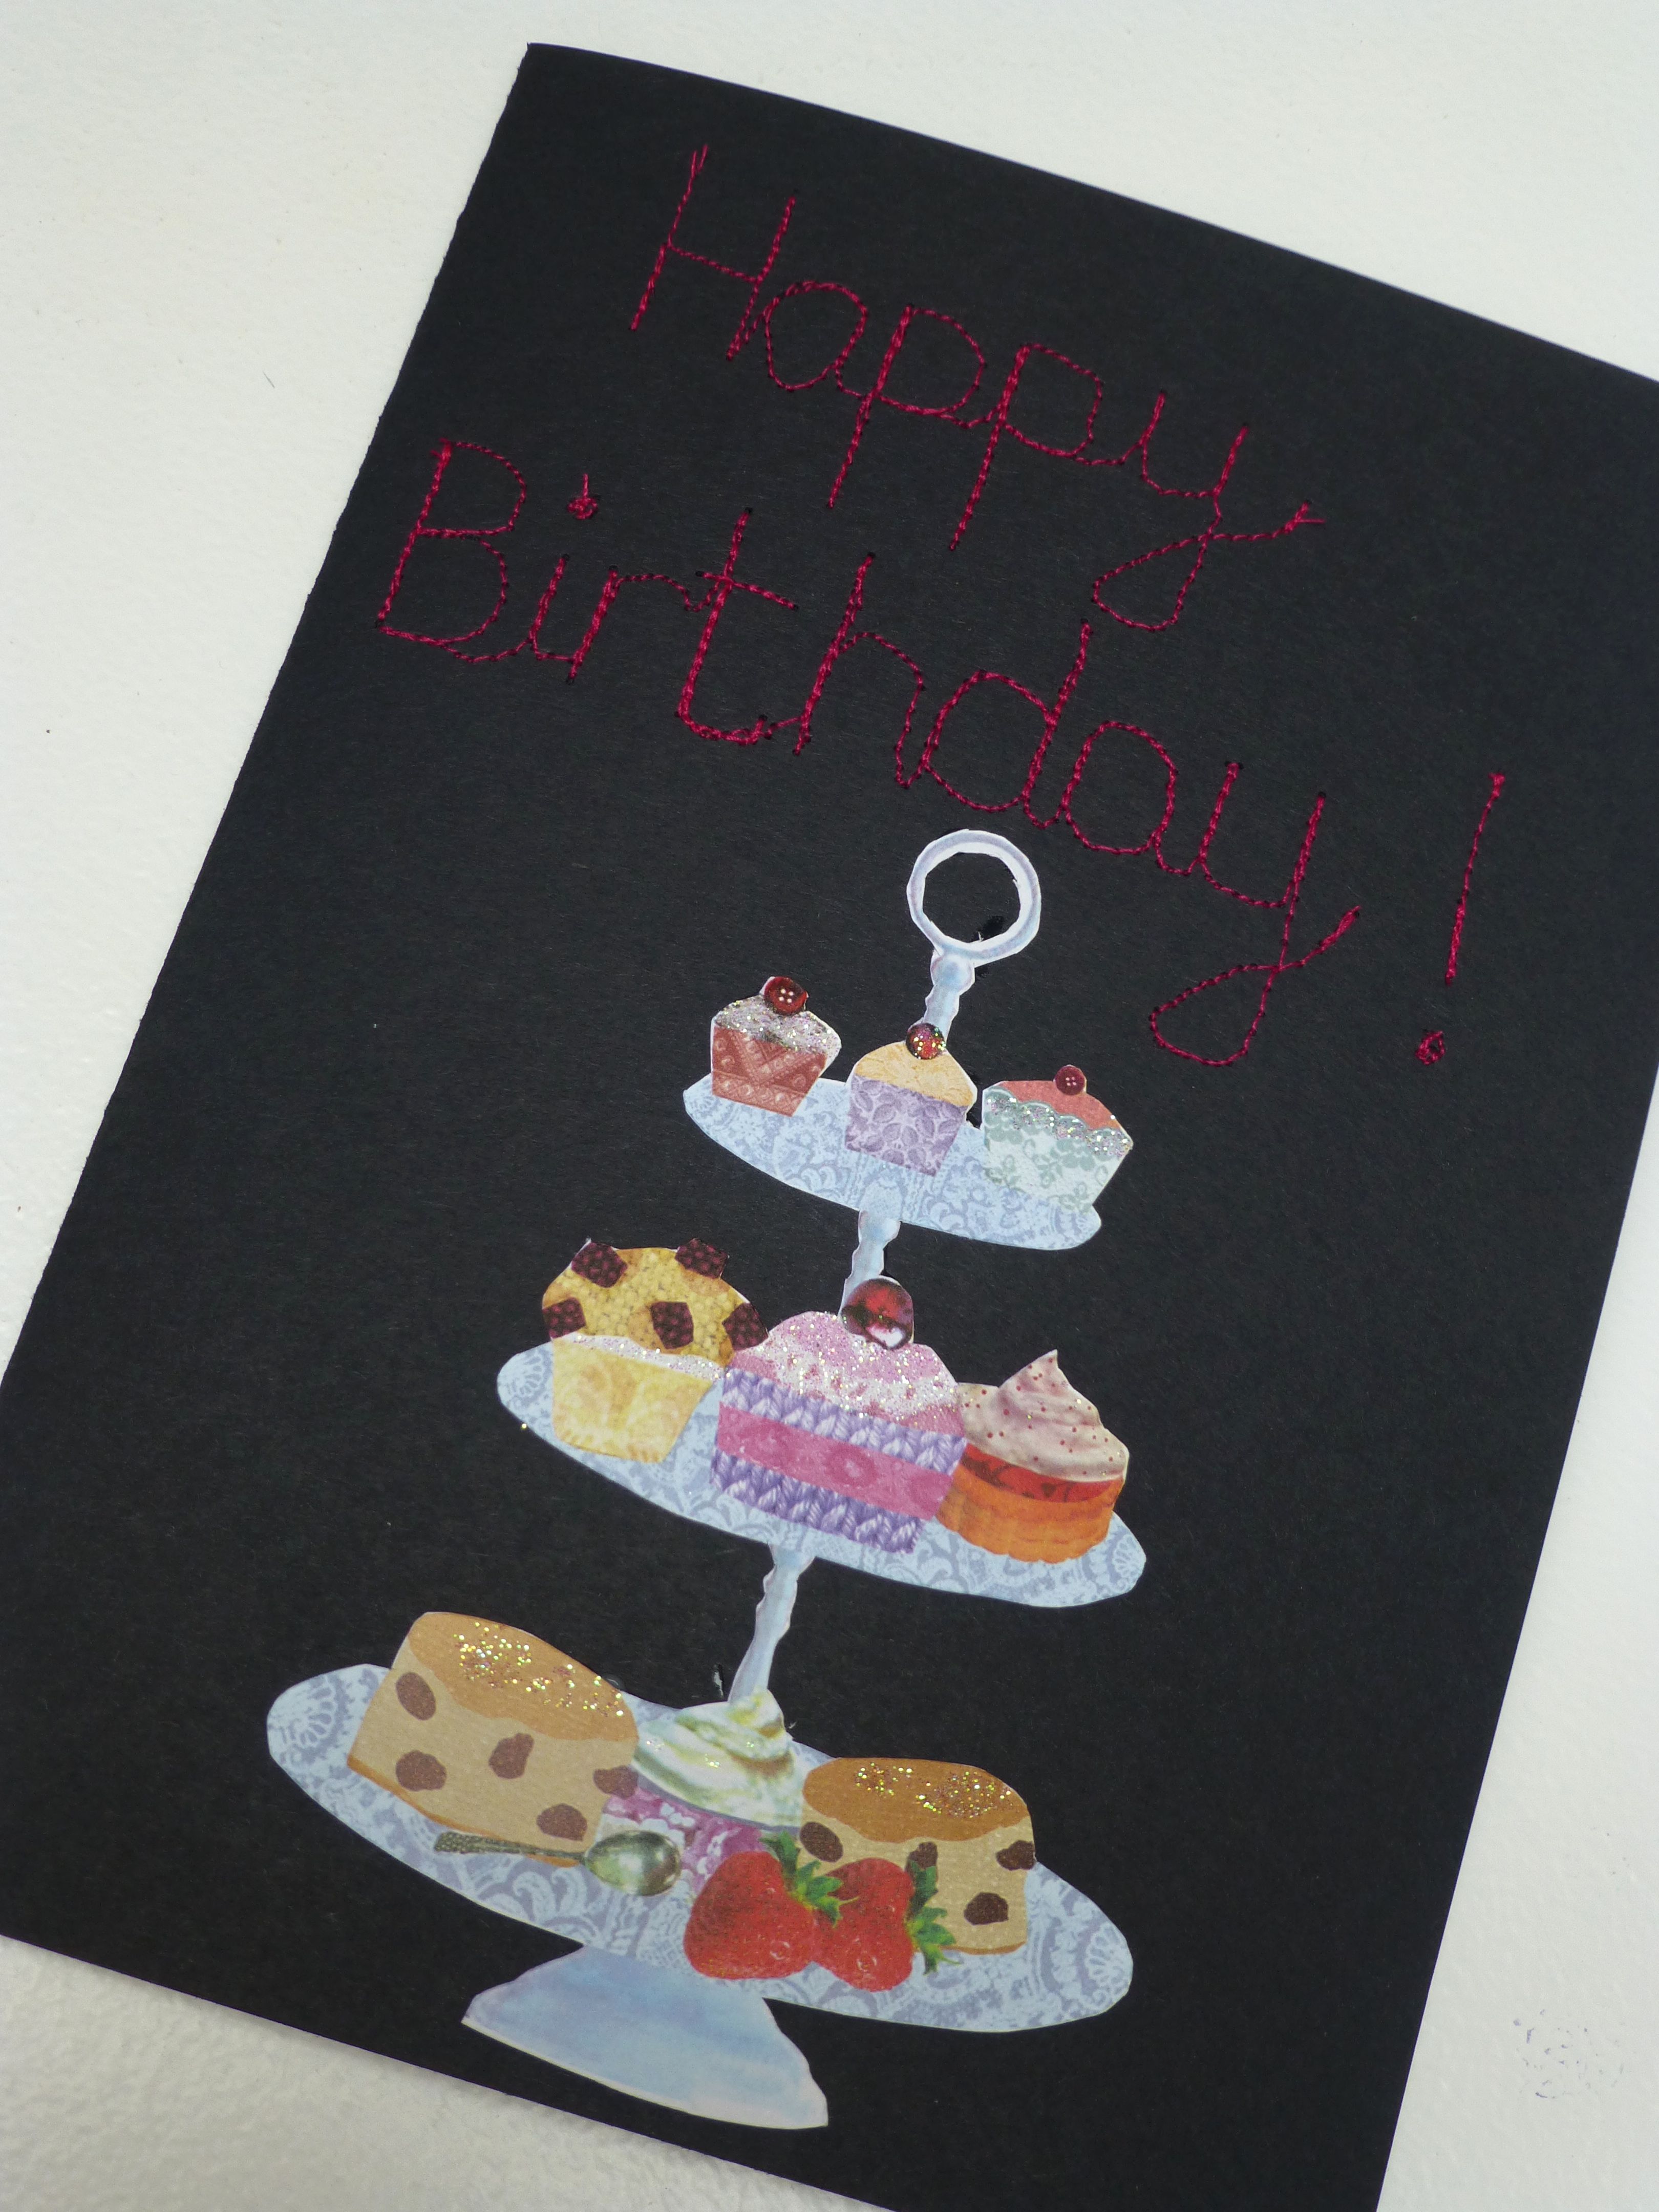
This is the inside of course and, basically, by creating an interactive card I have satisfied my urge to give a present that can be opened properly.
I started by machine sewing ‘Happy Birthday’ onto the front of a folded sheet of A4 black card.

Then, using a craft knife, I cut out some images from a sheet of wrapping paper…
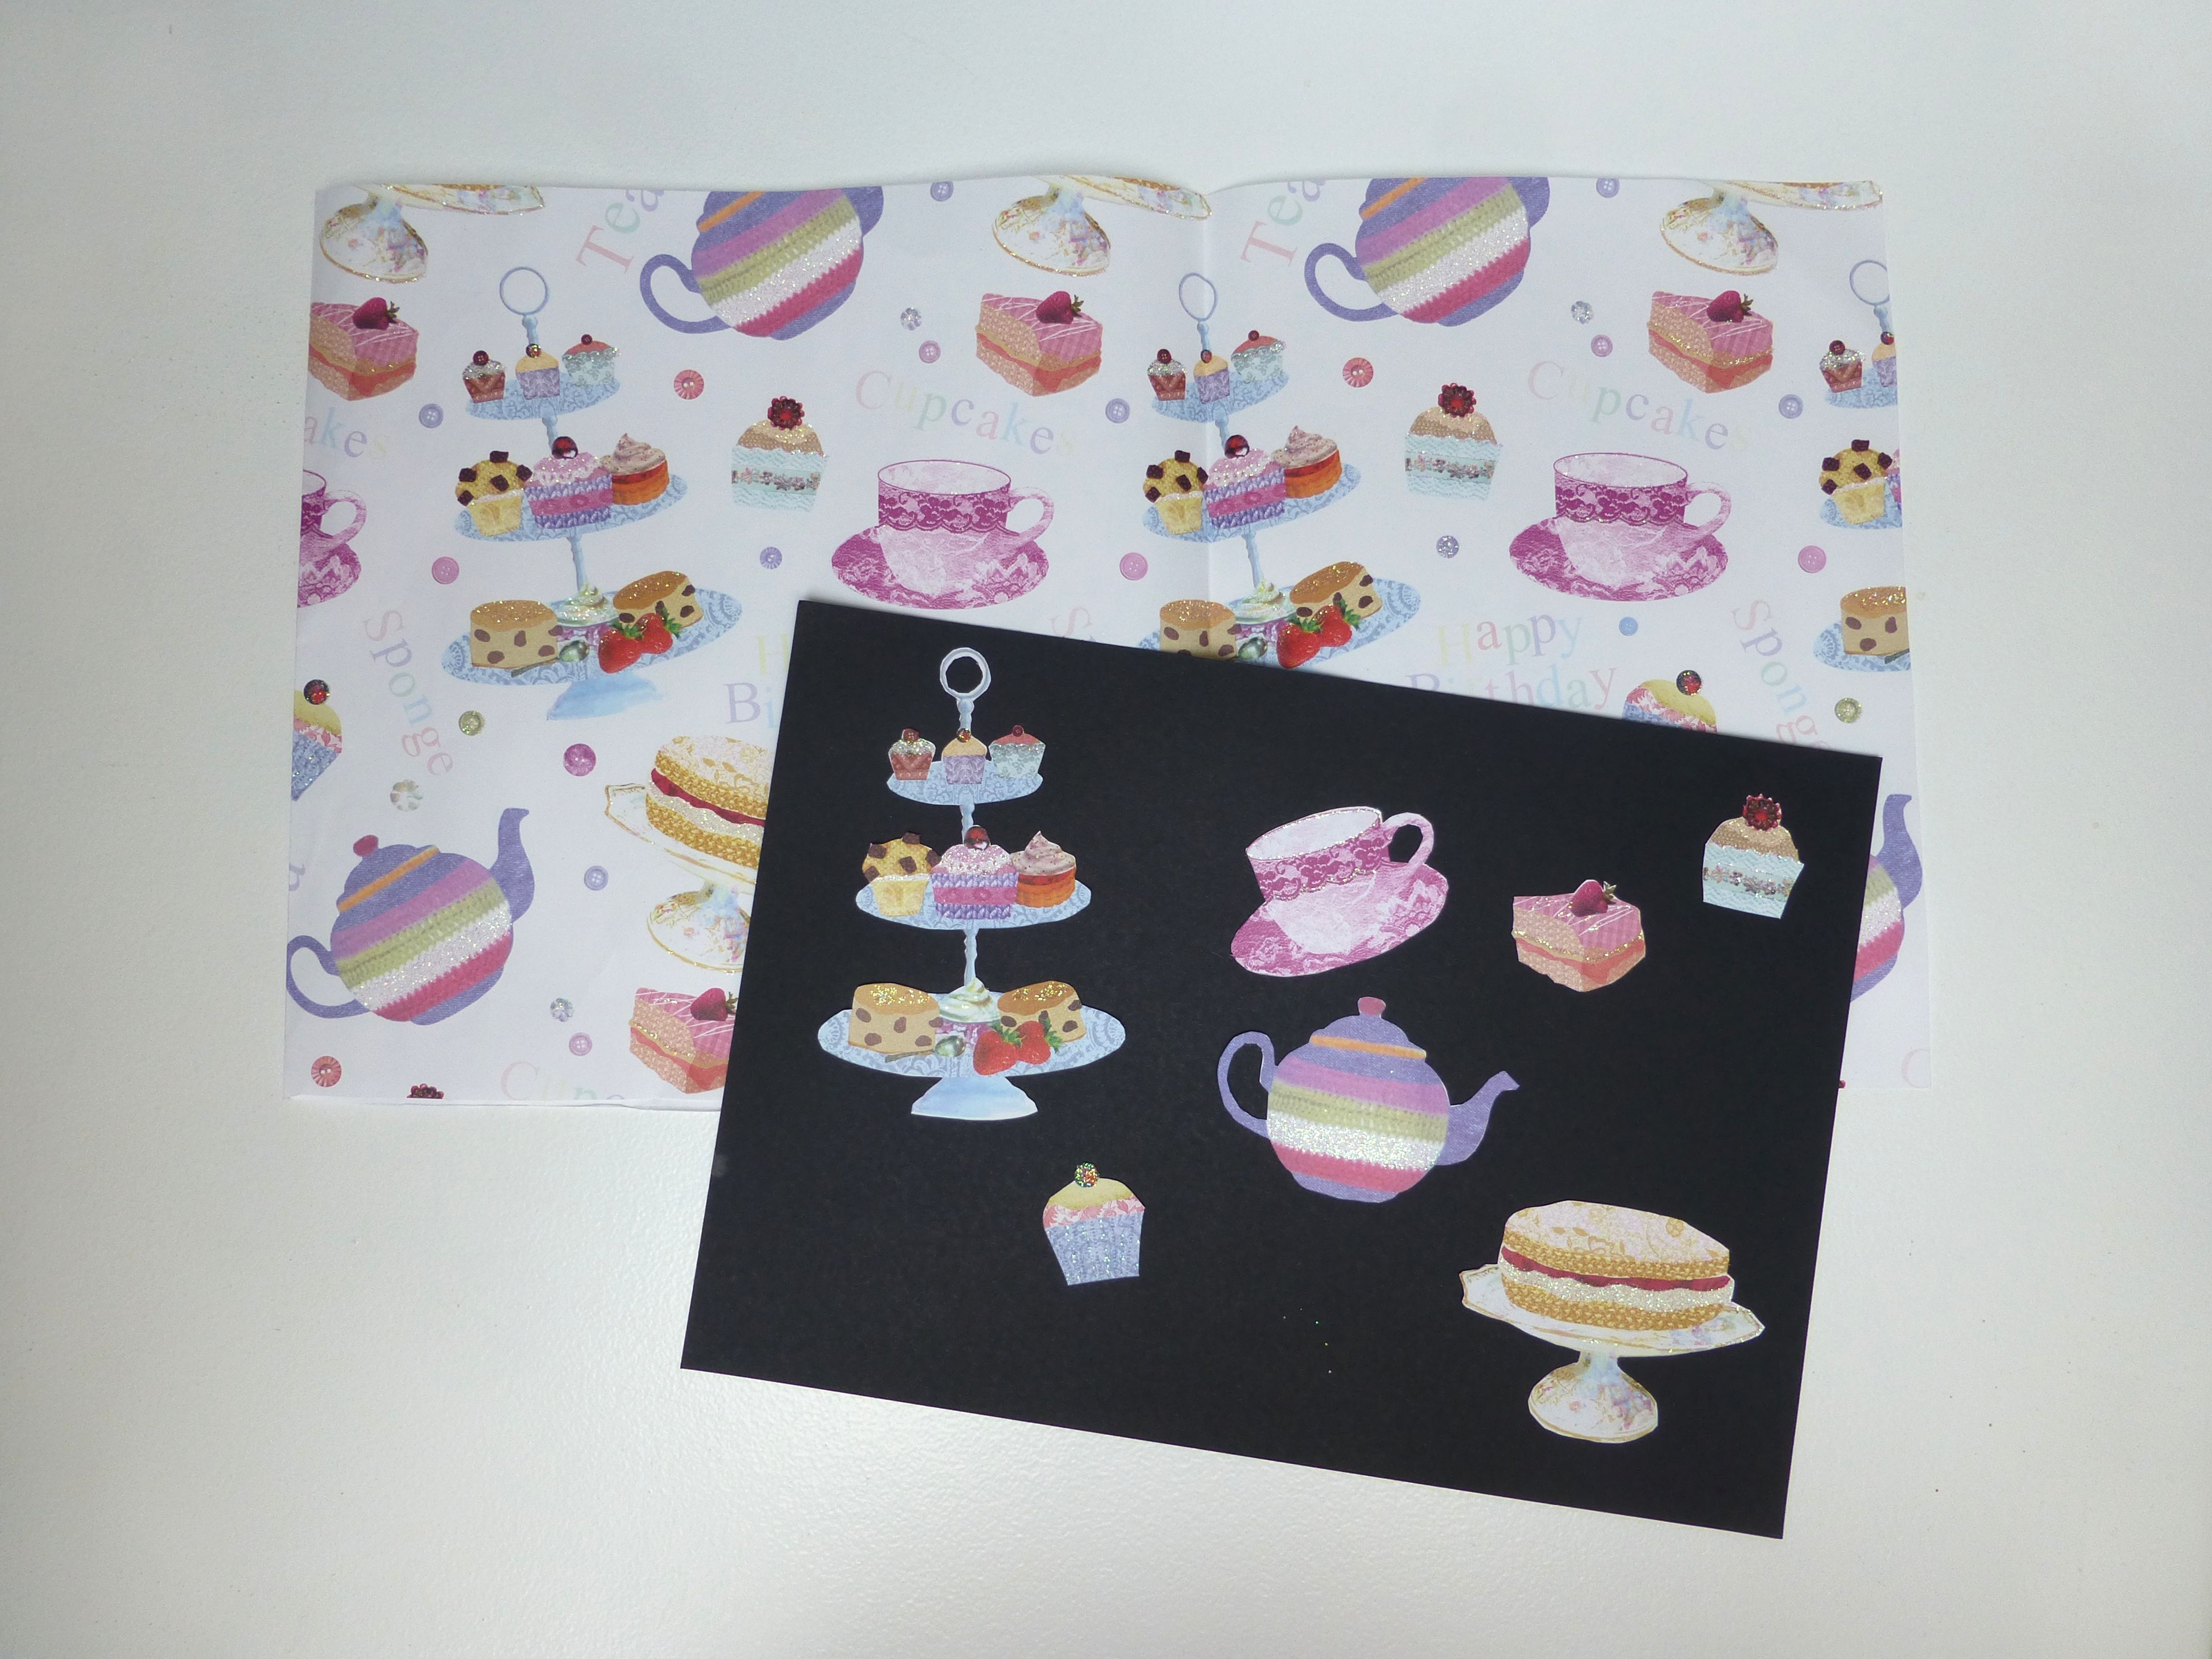
….and carefully glued them on with PVA.
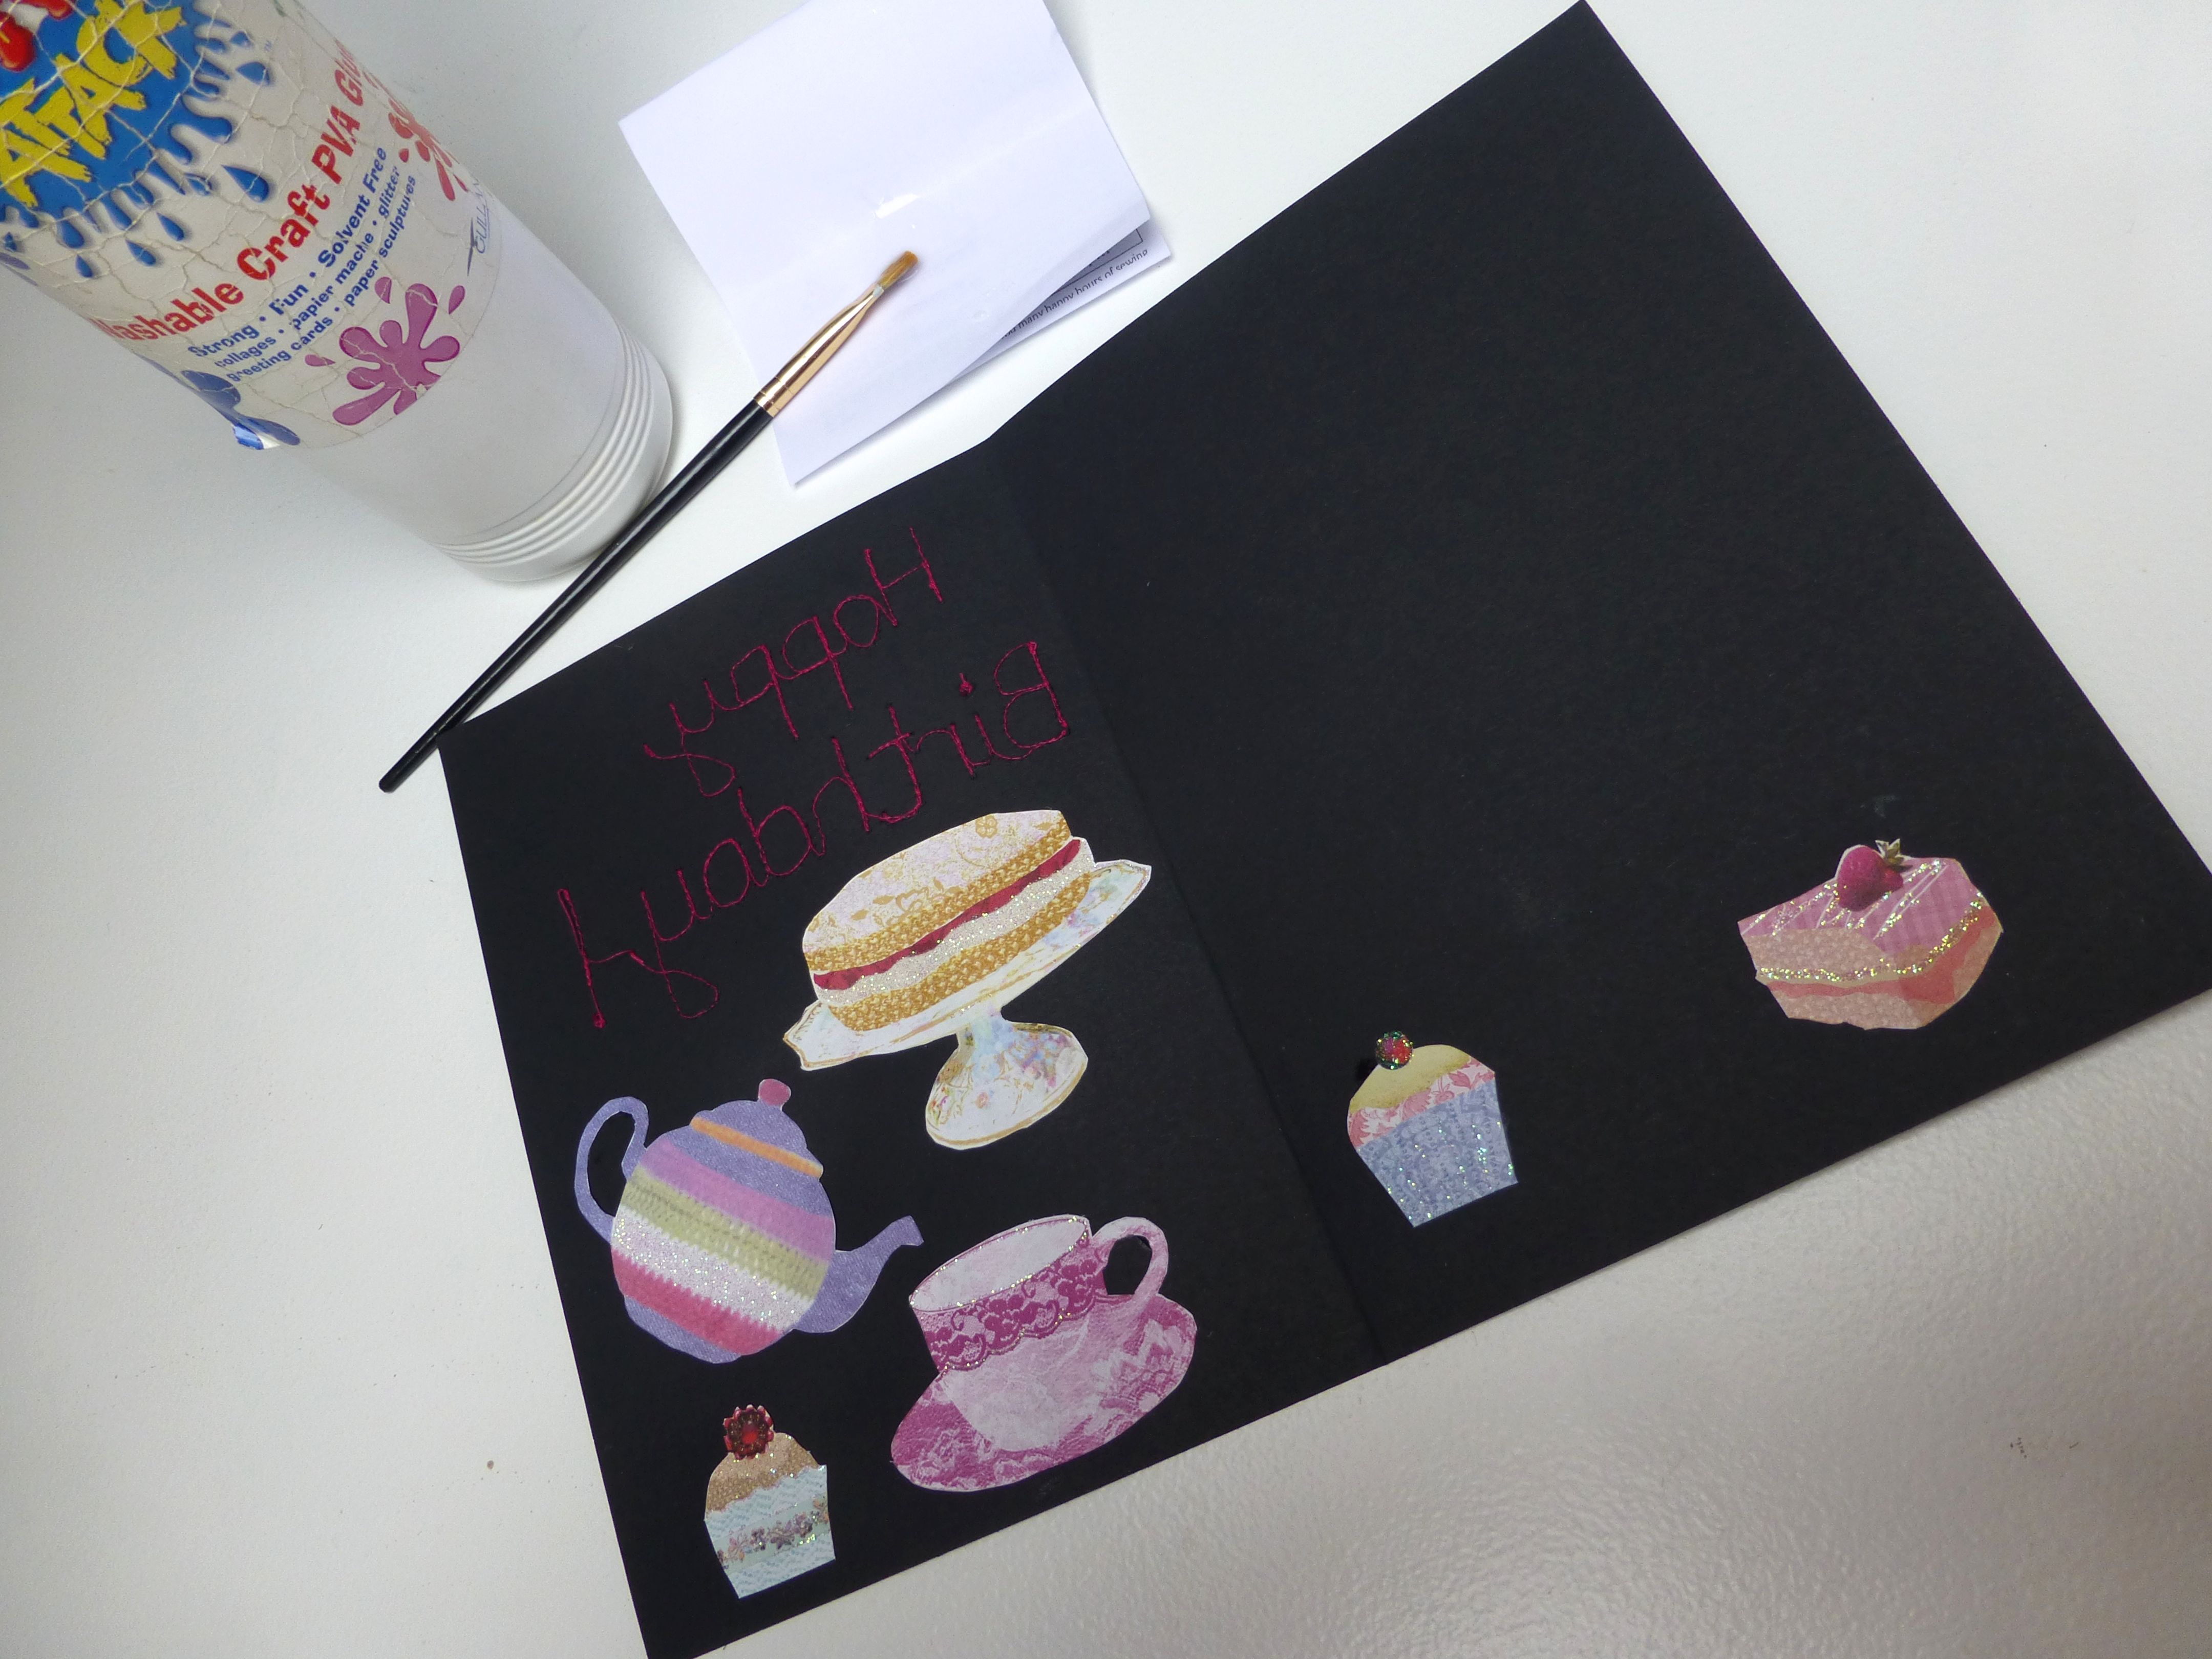
A small square of white card serves as the money wallet, simply glued on three sides making sure the top edge is left open.

Using a gift bag (I always recycle any that I’ve received presents in) I cut out a square about an inch larger all round than the white one and then cut it down the middle.

A six inch length of ribbon was glued to the underside of the cut edges.

To make a flap to glue to the card, score a line about a quarter of an inch in and fold as below;
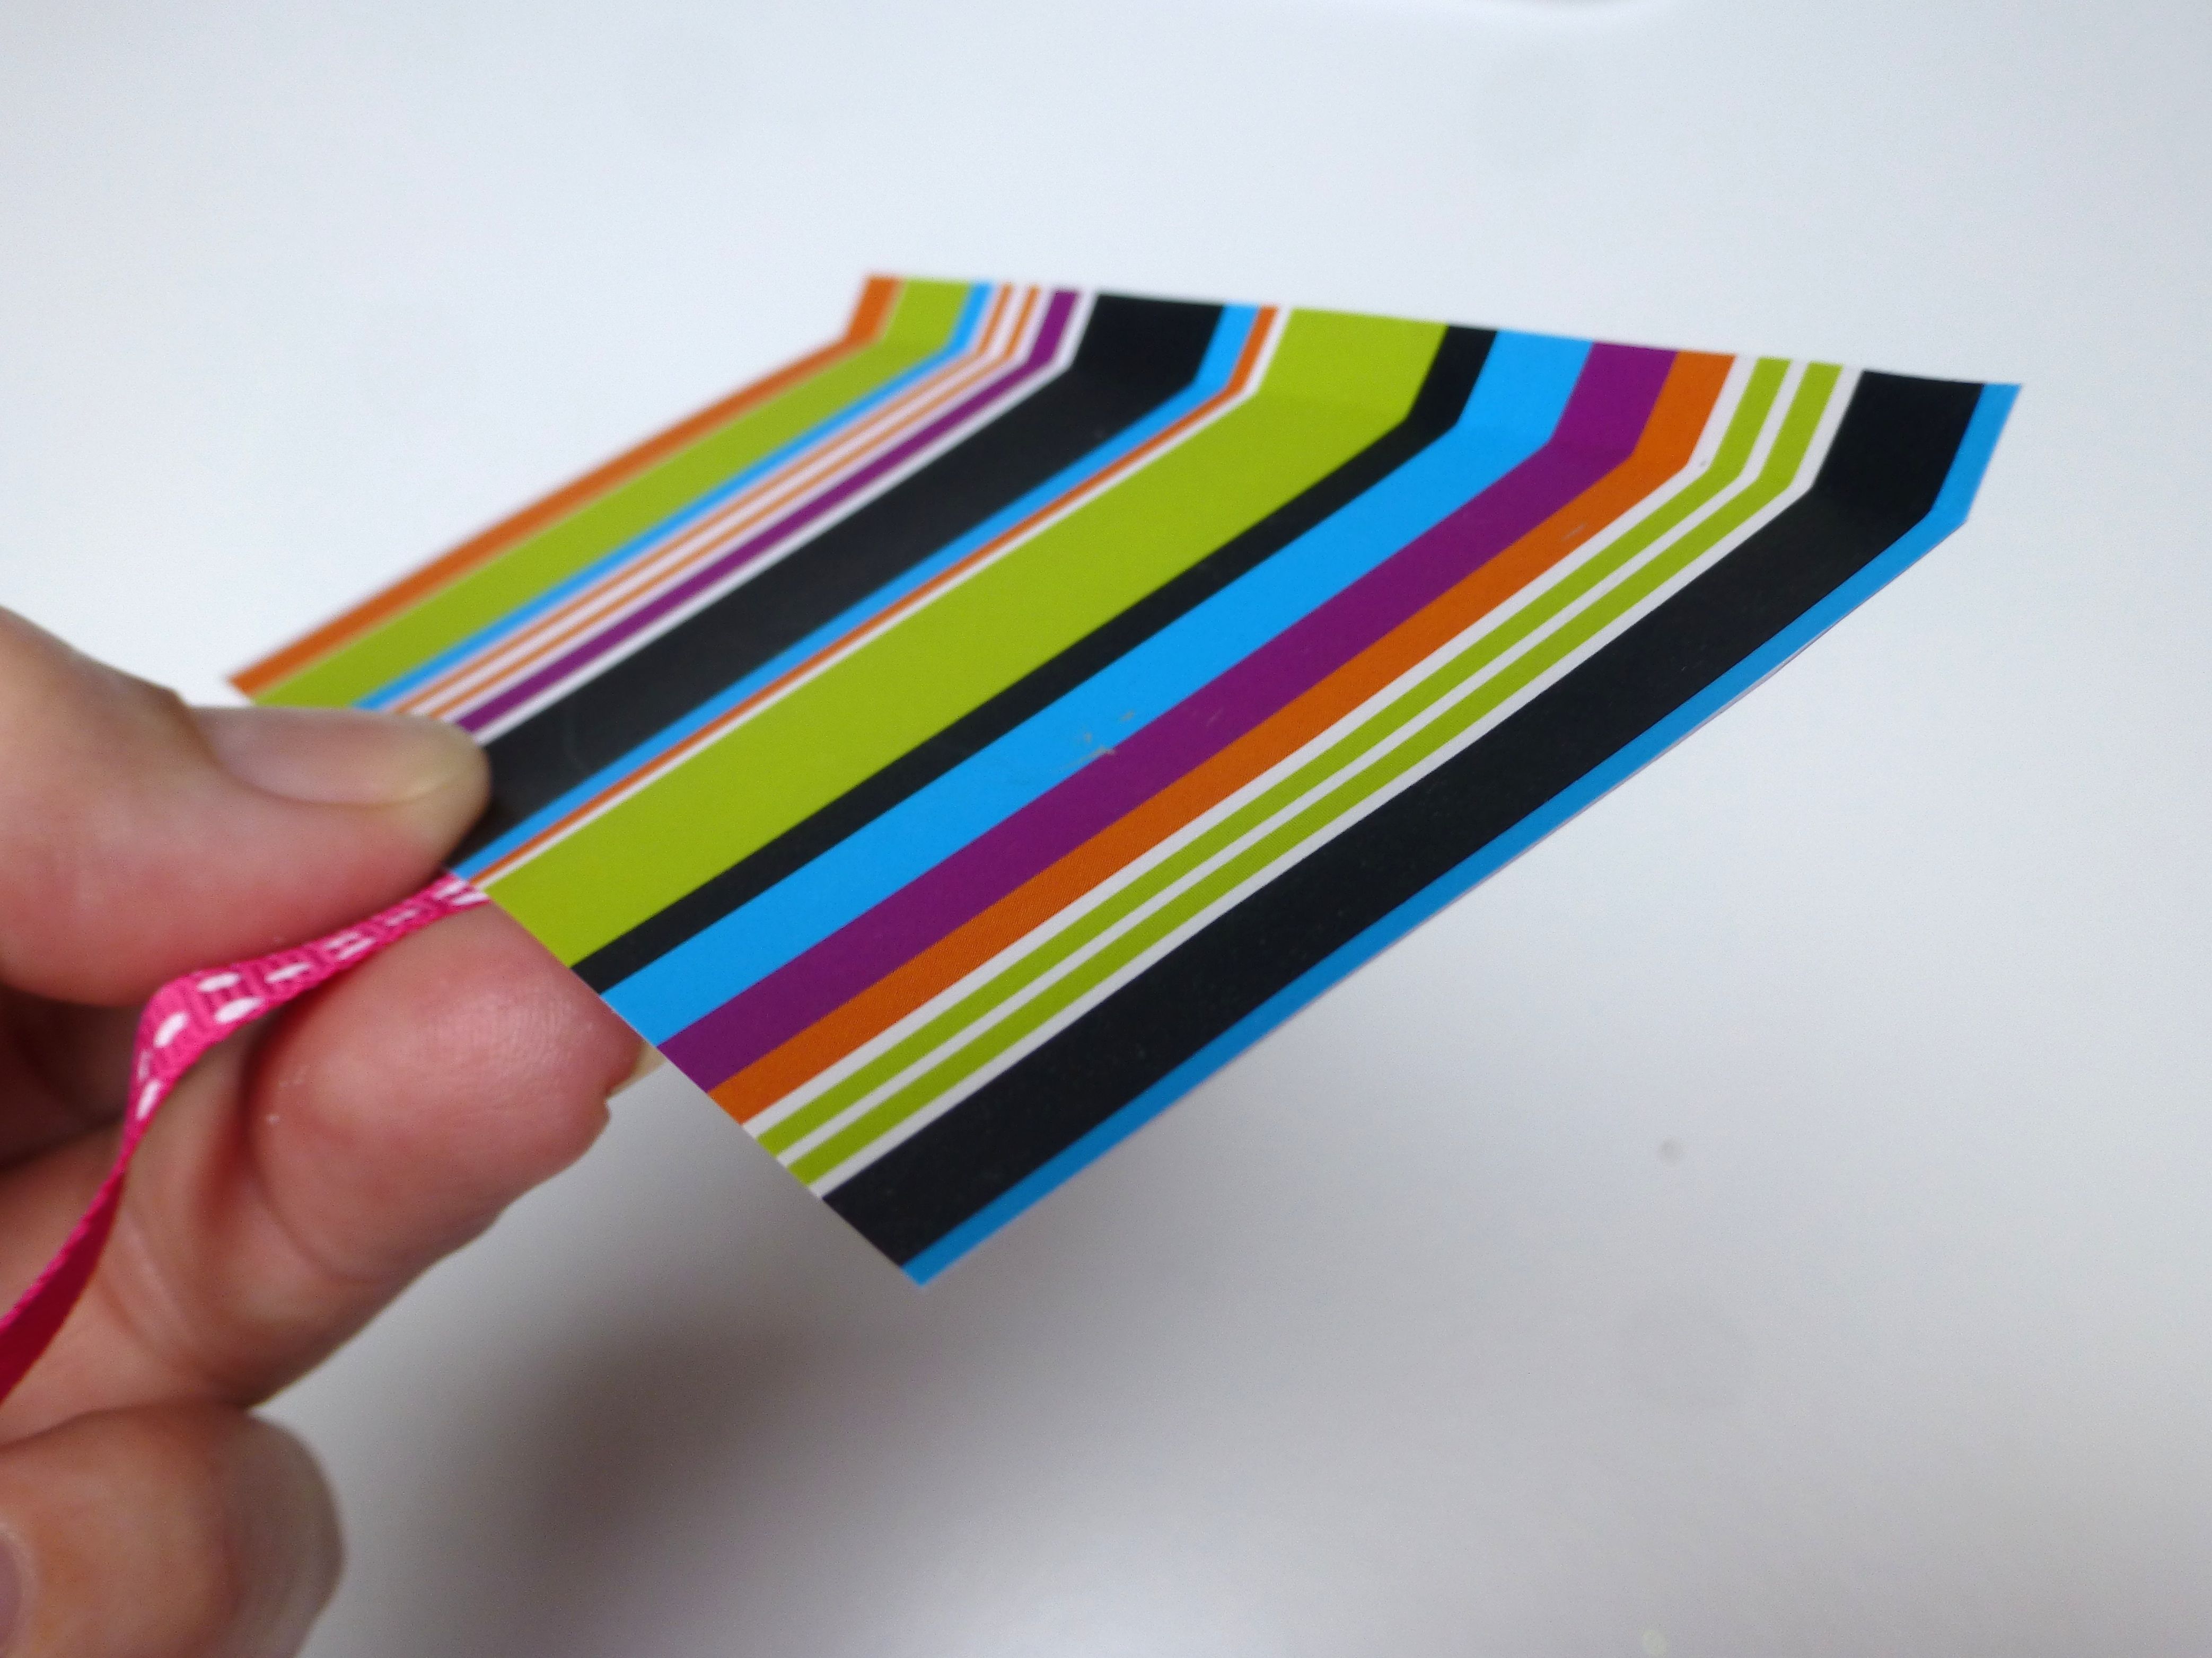
Glue these flaps to the card over the white square.

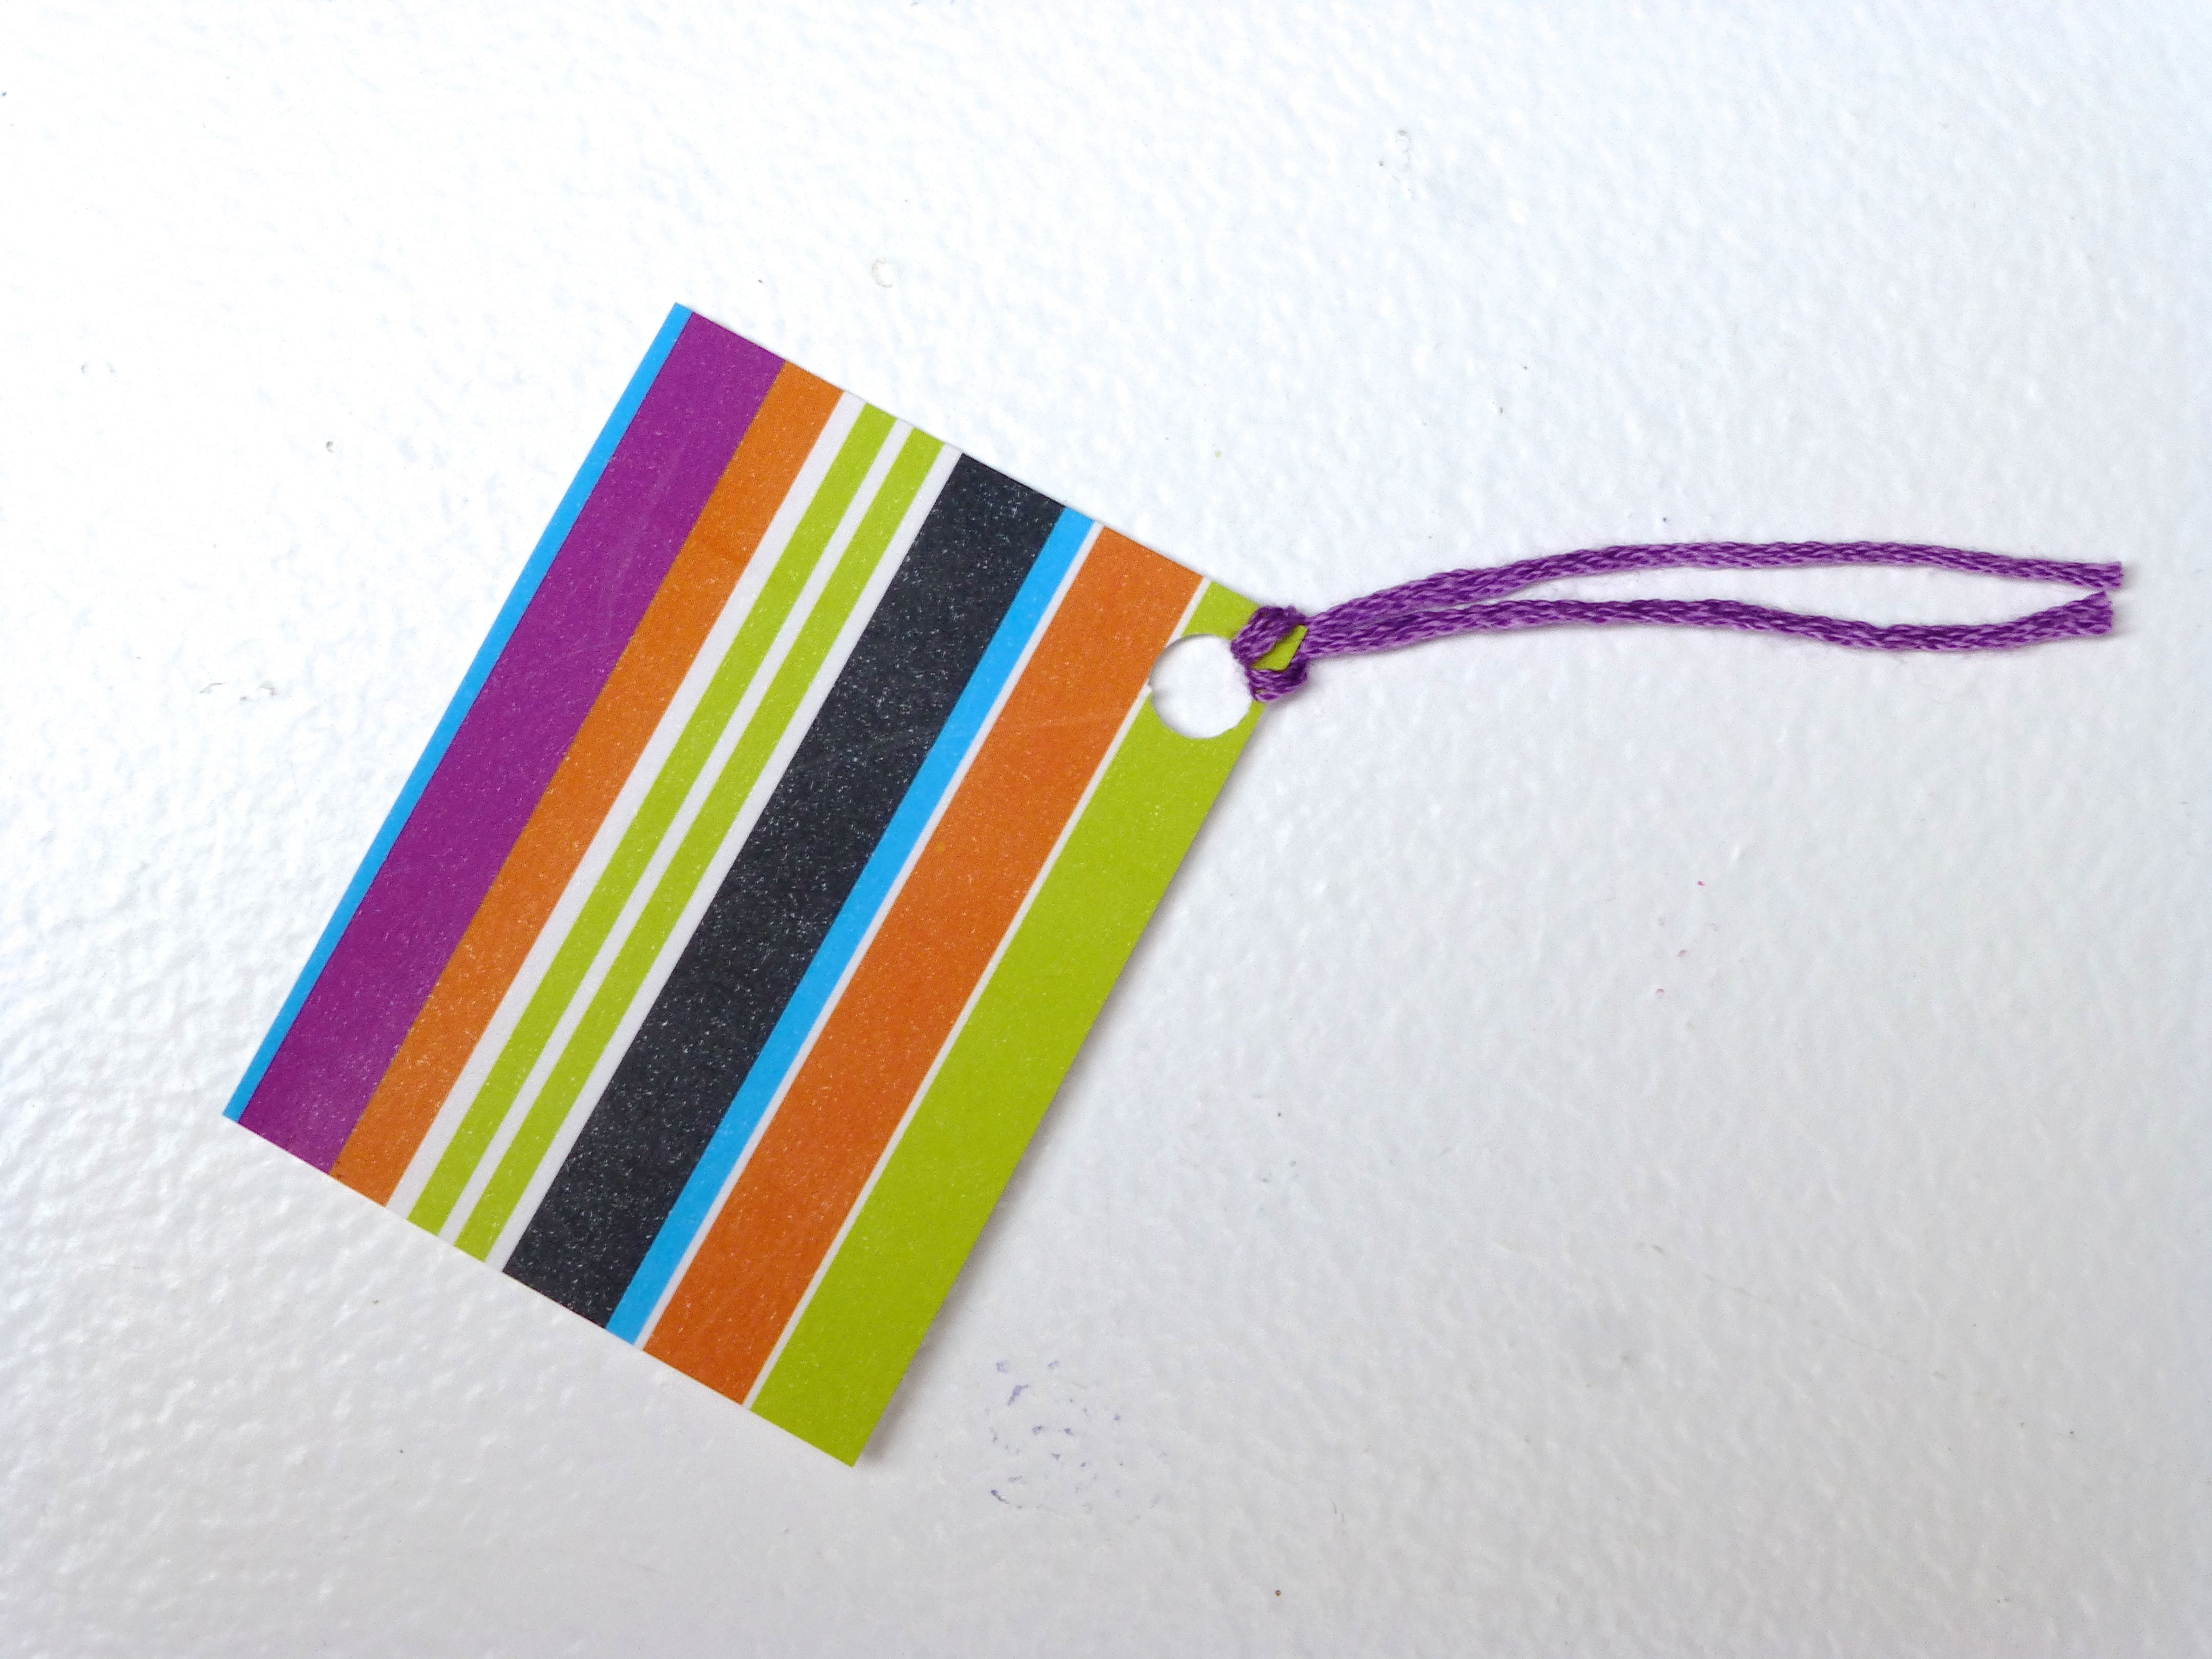
I drew a cartoon-style iPad as a reference to what the money is for.

A miniature tag was cut out of the same card and attached with a short length of embroidery floss.
A bow tied in the middle finishes it off and gives the feeling of having unwrapped a real present.


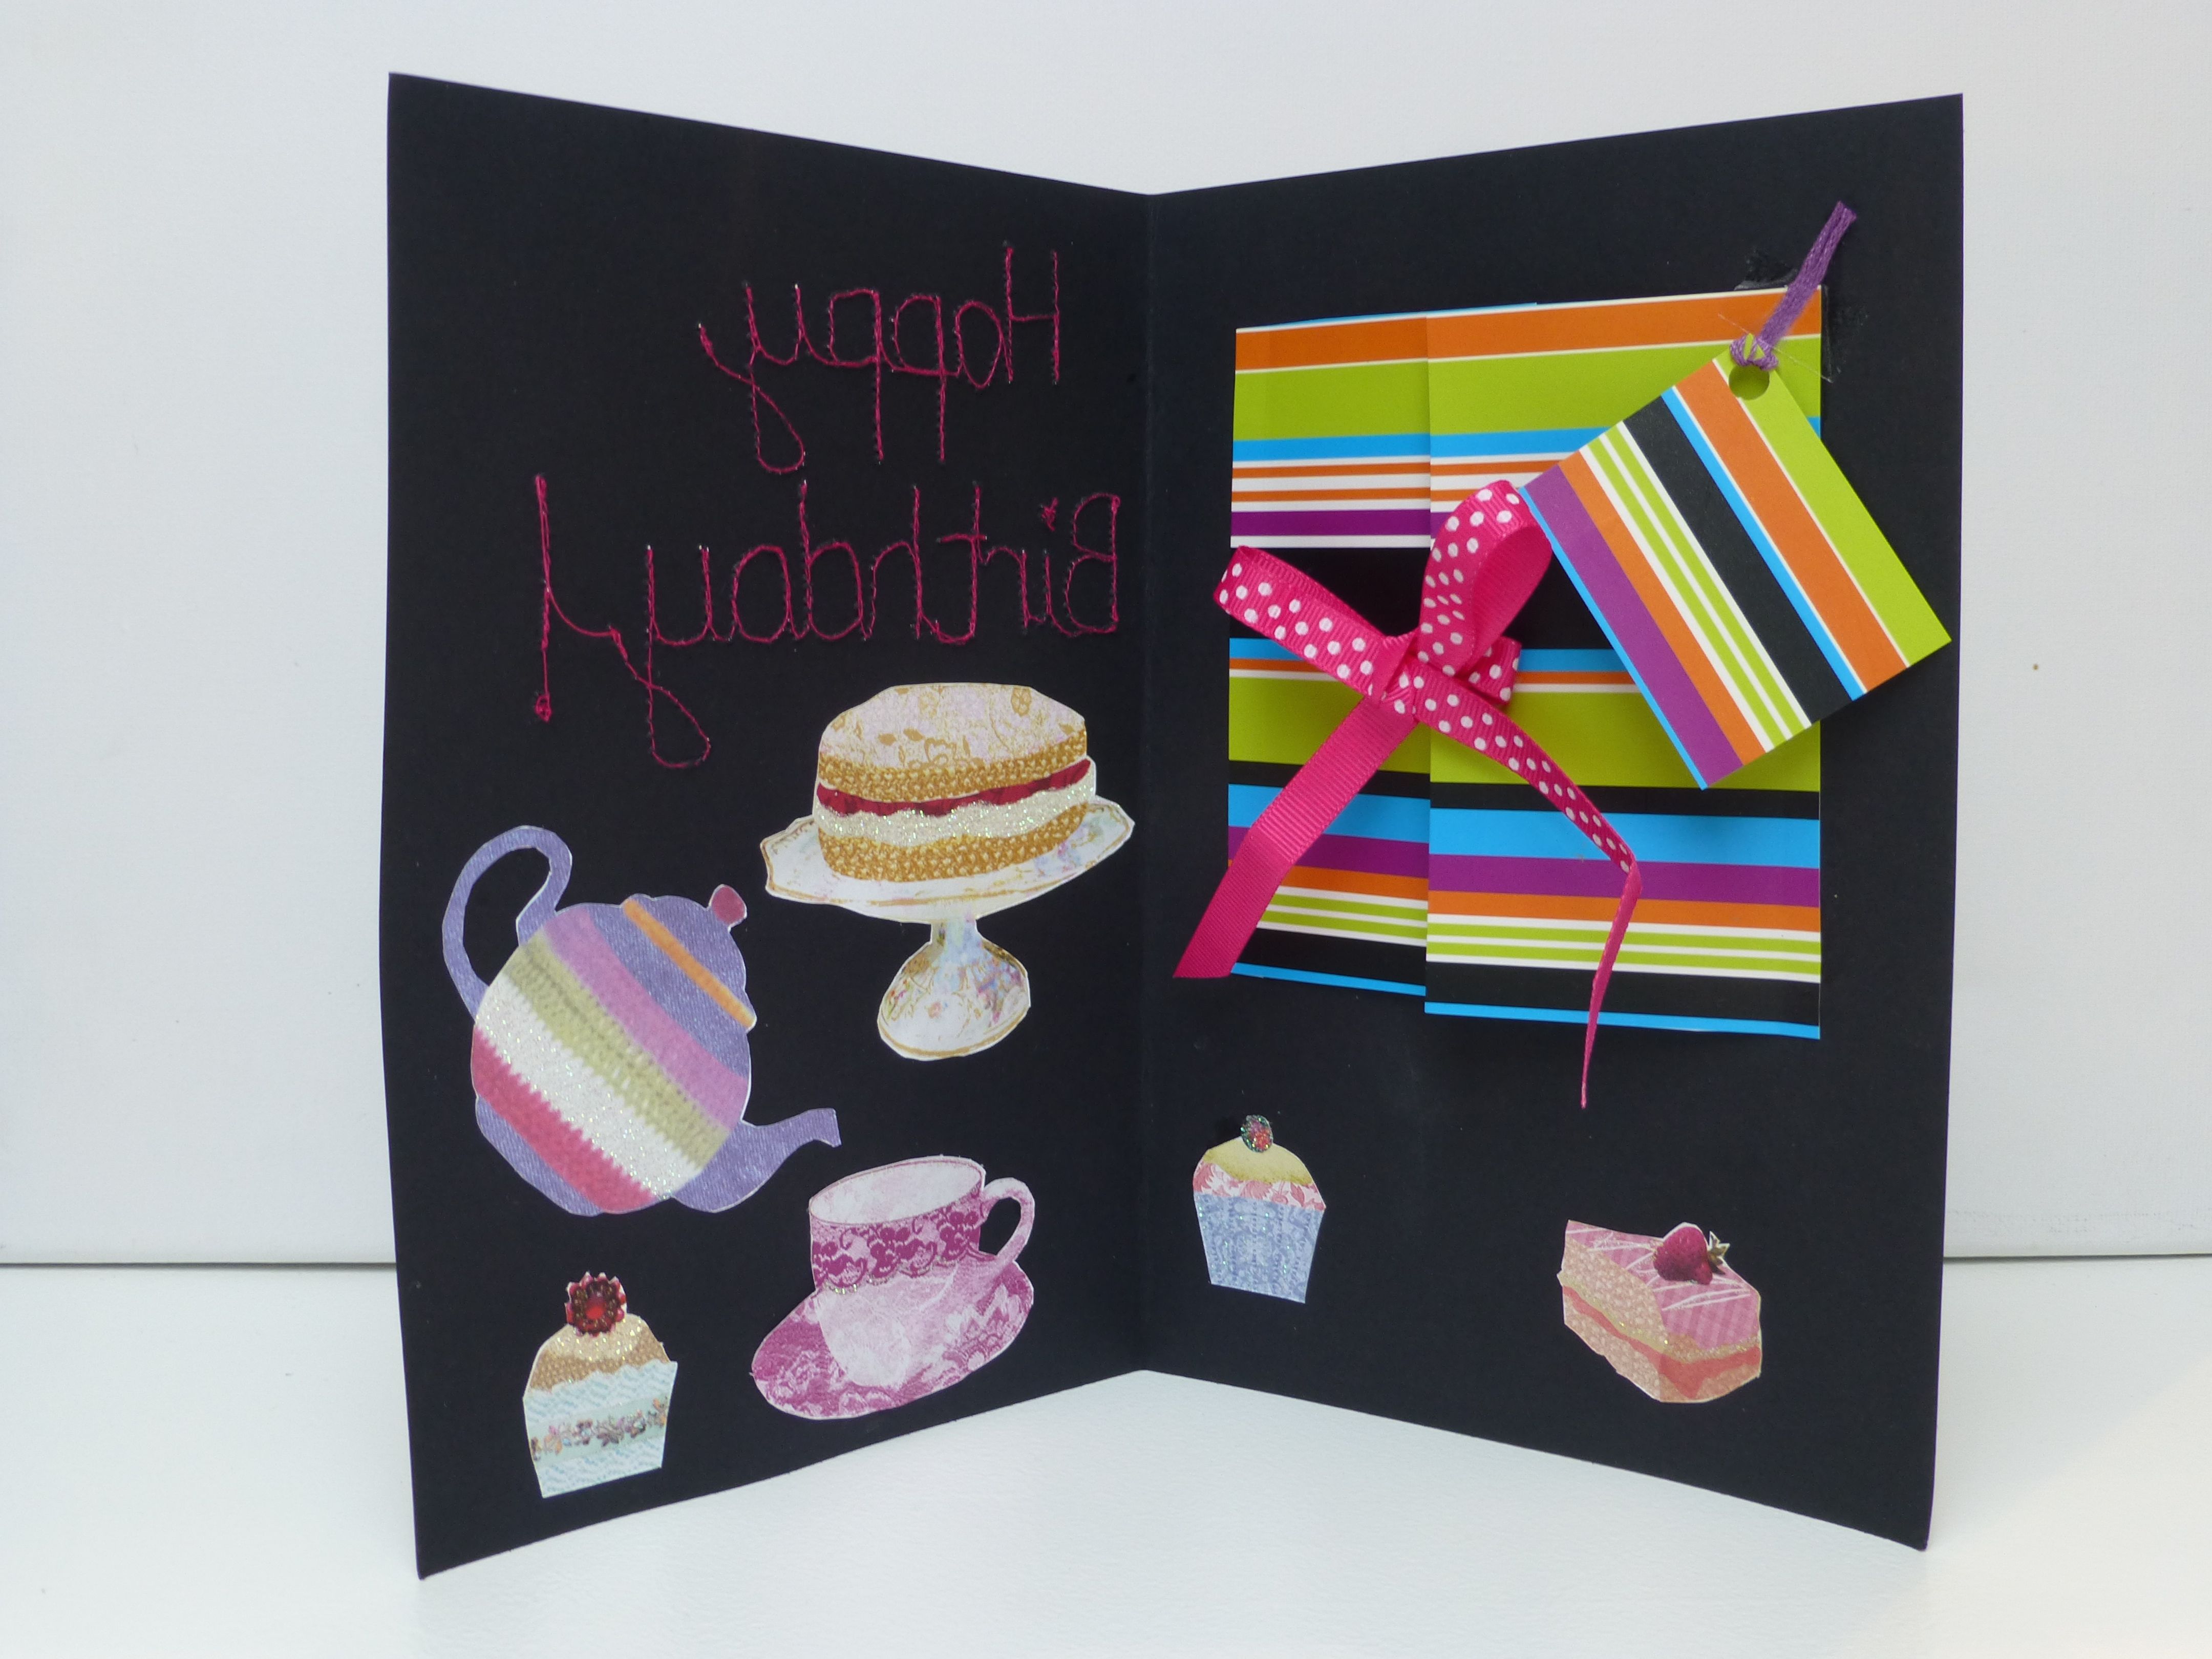
I am actually quite happy to give money in this card as I feel lots of thought has gone into it and after all, it is the thought that counts.
Artist and tutor
a creative life on the spectrum
Everyday craft inspirations
Movin' On Up
Because We're All a Work in Progress
Previously Boys and Chickens, I have created a new blog to share my sewing adventure as 2018 is they year I plan to teach myself to sew! There will also be bits of crochet and cooking too.
Sewing, crochet, crafts, accessories, baking, tutorials,
small steps to a kinder world
Sew What... Sewing, Embroidery and handmade
"She is too fond of books and it has addled her brain." (Louisa May Alcott)
A life of books . . .
Official crafty blog for my Quiet Water Craft Etsy shop
Sewing, crochet, crafts, accessories, baking, tutorials,
my year of trying to be more creative in different ways
Sewing, crochet, crafts, accessories, baking, tutorials,
The latest news on WordPress.com and the WordPress community.
Adventures in dressmaking from an improving sewist!
Knitting, Sewing, Crafting
Sewing, crochet, crafts, accessories, baking, tutorials,
Sewing, crochet, crafts, accessories, baking, tutorials,
Sewing, crochet, crafts, accessories, baking, tutorials,
Sewing up a self-made wardrobe
Sewing, crochet, crafts, accessories, baking, tutorials,
Sewing, crochet, crafts, accessories, baking, tutorials,
My art work and other musings
Fabric, life, and all that
Sewing, crochet, crafts, accessories, baking, tutorials,
Sewing, crochet, crafts, accessories, baking, tutorials,
Making and creating
From Scraps to Quilts
here’s what I’m sewing...
Lesley blogging about her sewing projects
lathaminteriors.co.uk
Sewing, crochet, crafts, accessories, baking, tutorials,
What's happening in North Cheriton
Returning sewist, crafter and runner
My quest to sew a wardrobe of clothes which actually fit me
a blog about making things
the joy of creativity
My challenge: One year - I will not buy clothes - I will upcycle to make what I need - everything from underwear to evening wear! Join me for tips, exclusive BrawHem makes, and inevitably some hilarious disasters...
Go Sew Something
