This month’s blog post for Minerva Crafts is two-for-the-price-of-one.
I had just enough left over from making a sleeping bag to make a hoodie for one of The Boys as well.
Click on the link to read all about both makes: – Sleeping Bag & Hoodie


This month’s blog post for Minerva Crafts is two-for-the-price-of-one.
I had just enough left over from making a sleeping bag to make a hoodie for one of The Boys as well.
Click on the link to read all about both makes: – Sleeping Bag & Hoodie
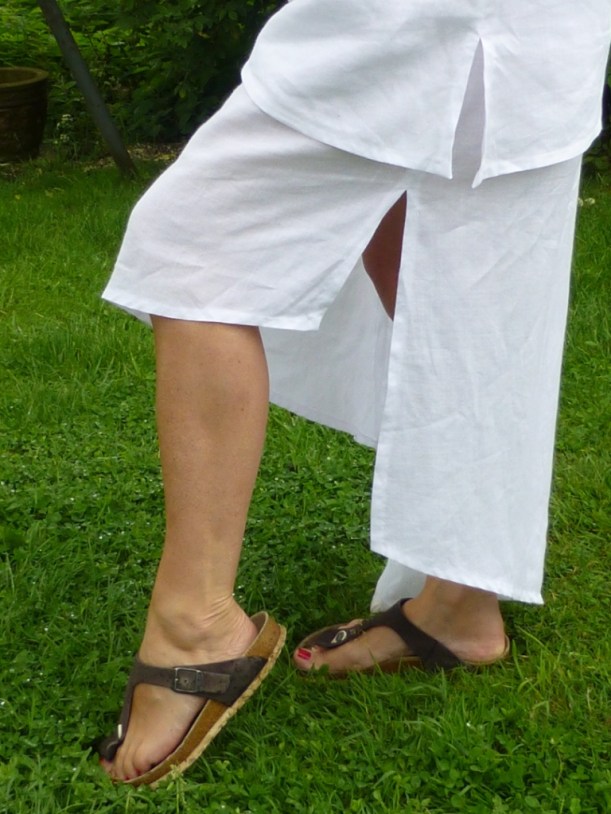
This month’s make for the Minerva Crafts Blogger’s Network is an interesting one. I started off with a commercial pattern but had to drastically alter it after I realised that the white fabric revealed my underwear!
Click on the link below to read all about it: –
They’re finished!
Bright red, tailored shorts with so many exquisite little details that make them a joy to look at!
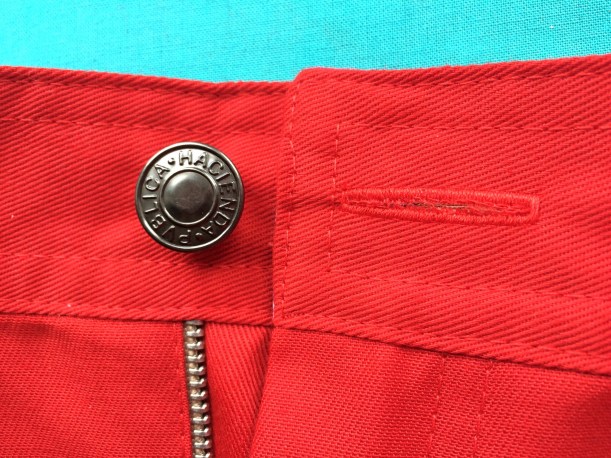
Just one look at the smile on his face tells you how much Mr H-L likes them.

To see the full blog post over on the Minerva Crafts Blogger Network, just click on the following link: Red Shorts With Camper Van Lining
In other news, I am delighted to say that the winner of the fabric giveaway is……

Congratulations Lulu! Please email your full name and address to info@sewchet.com so that I can get your prize in the post to you as soon as possible.

It’s finally finished – my caravan sewing machine cover!
To see more, just head on over to the post on the Minerva Crafts Bloggers Network. Here’s the link: Caravan Sewing Machine Cover
Hope it inspires you to make one of your own as everyone should have one!
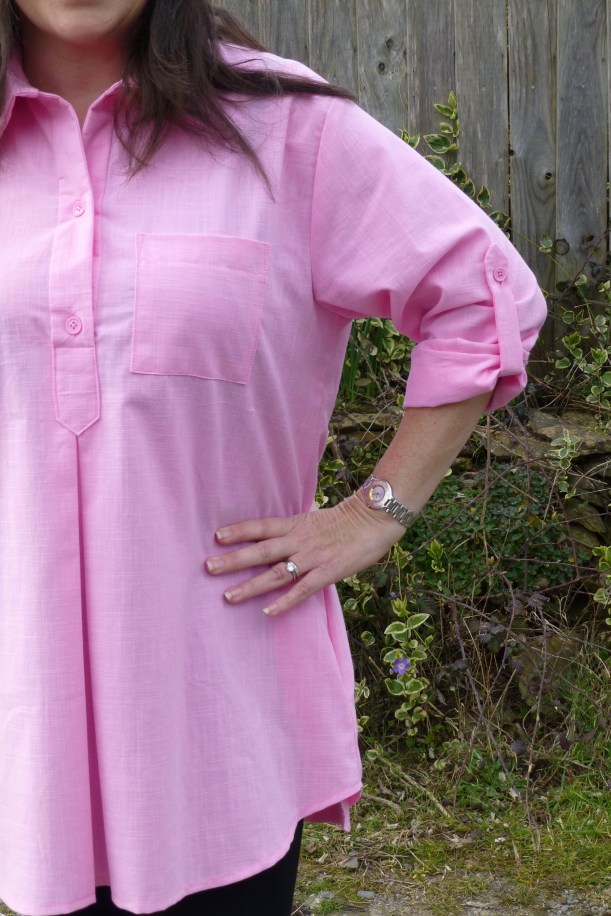
This month’s Minerva Crafts blog post is finished!
Just click on the link to see all about the Linen Look Cotton Tunic.

My Minerva Crafts sponsored make for February is this luxurious faux fur gilet. If you want to read the full article, things have changed slightly and you need to click on the link below which will take you directly to it on the Bloggers Network: –
https://www.minervacrafts.com/blogger-network/post/faux-fur-gilet
Let me know if it works and don’t forget to come back here and tell me what you think of it:)
(By the way – WordPress has just informed me that this is my 200th post!)
In case you hadn’t noticed, Christmas is just around the corner – nine days, to be precise and I’ve got a great last-minute make for you; a personalised Christmas sack for that special little person in your life.

I’m not joking when I say last-minute as I made TWO personalised sacks yesterday afternoon, each one taking about two and a half hours from start to finish. They’d make great gifts, too, with a little something popped inside and they only cost £12.94 each to make so won’t break the bank.
This is the parcel that arrived from Minerva Crafts: –
 For each sack you will need:
Trim your gingham fabric to the same size as the hessian – 39″ x 56″.
Put the offcuts to one side as you will use these for the tie and the fabric letters.
Draw a reindeer on a sheet of paper and cut out the individual elements separately.

Cut these out of the felt squares using the picture below as a guide.

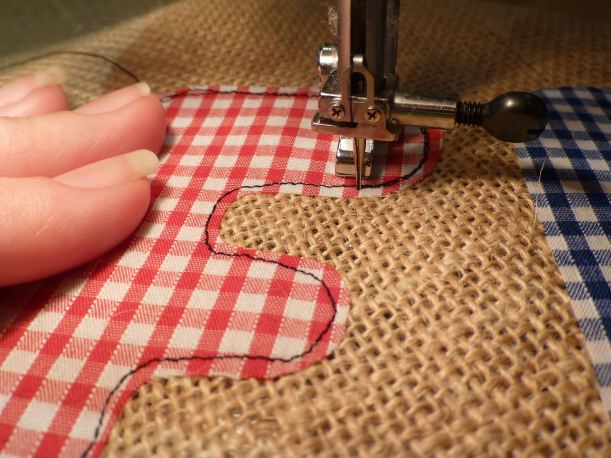
Stitch the nose and eyes onto the felt face – I used free machine embroidery throughout to achieve a ‘scribble’ effect which works well on children’s gifts.

Fold your hessian in half and arrange the felt pieces in the centre as shown.

Hessian has an open weave which tends to move quite a lot, so either tack your appliqués on first or use LOTS of pins to keep them in place while you sew them on.
I loathe tacking so I opted for pin overkill instead.

With the reindeer face stitched securely in place, it’s time to move on to personalising your sack.
You can download a suitable font or just freehand it like I did onto thin card. As I was making two sacks I had both blue and red gingham offcuts to cut the letters from. I also decided to use some paper backed fusible web to secure the letters to the hessian before stitching them.

Arrange the letters evenly in a curve around the bottom of the reindeer, remove the paper backing and iron in place.
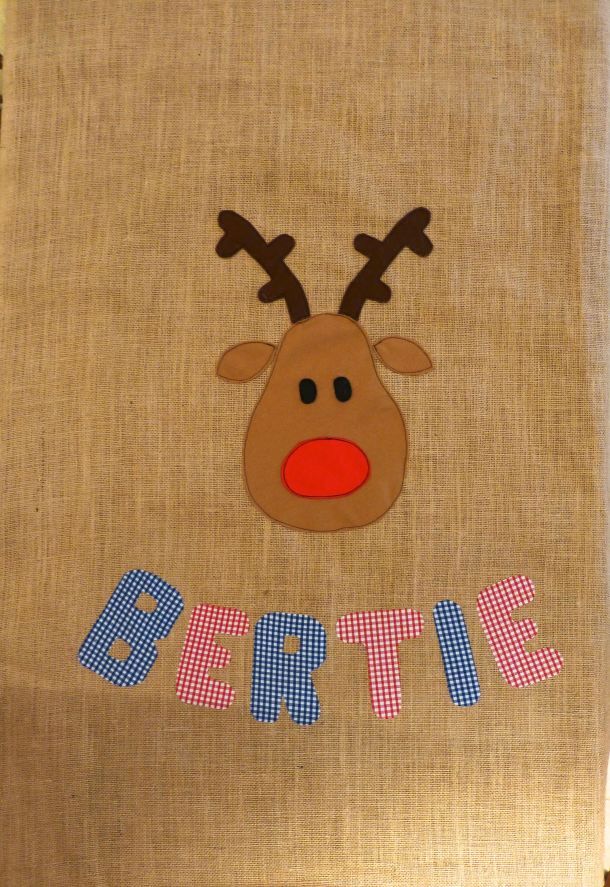
Two rounds of stitching on each letter gives a good effect.

When all your stitching is done, sew the top edge of the sack to the top edge of the lining with right sides together (sorry, no photo). Press the seam flat to create a crisp edge.
Then, lay your fabric out on a large table or on the floor and fold in half lengthwise, right sides together to create a ‘tube’.
Pin all the way around, leaving a gap in the lining where shown through which to turn. (I forgot to photograph this step on the first sack so the lining is shown in red).

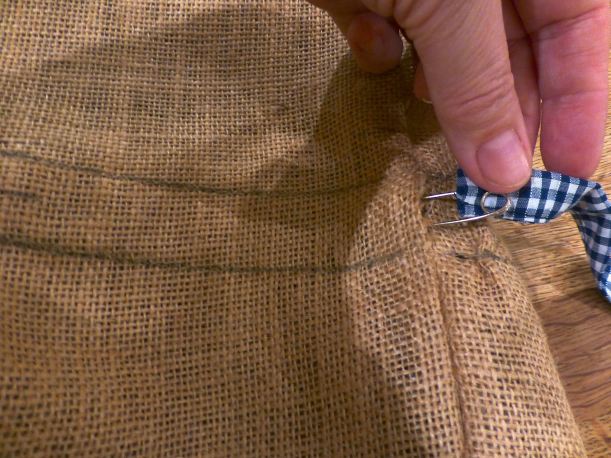
Put pins at 8″ from the top edge and 9″ from the top edge – this will be a break in the stitching to provide a channel for the tie.


Sew all the way around the three sides with breaks in the stitching as described above.
Trim the corners and turn the sack through to the right side. Sew the lining closed at the gap through which it was turned. Press.

With a soft pencil or tailor’s chalk, mark two parallel lines all the way around at 8″ and 9″ from the top edge of the sack. Pin through both layers of fabric. Stitch along the lines.

For the tie, use your remaining offcuts of gingham to assemble a length that measures about 70″ x 2″.
Fold in and press 1/4″ at each short end.
Fold in and press 1/4″ along each long edge.

Bring the folded long edges together enclosing the raw edges.

Stitch close to the edge to finish your tie.

Use a safety pin to thread the tie through the channel in the gap left for this purpose.
And that’s it – finished!

A beautiful sack which any child would be delighted to have on Christmas Day to pop all their opened presents into.

They’re huge, too, I would have added The Boys to the photo for scale except that the sacks are a surprise for them.
You’ve still got time, so who fancies whipping up a Christmas Sack for their little boy or girl?
Just in case you hadn’t noticed, Christmas is fast approaching which, in my case, means any handmade gifts I have planned need to be either made by now or, at the very least, be quick and easy projects to be squeezed in on the odd evening.
This is a quick and easy project.
And cheap – which is a bonus at this time of year!
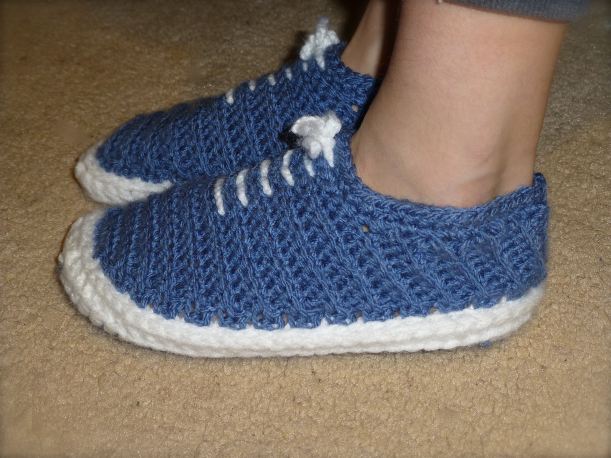
May I present to you the Van’s Style Crocheted Slippers by Shush Lander for Craftsy.
 I reckon these are as cool as it gets for the inherently un-cool footwear that is a slipper, so I thought I’d make a couple of pairs for The Boys for Christmas.
The digital pattern can be bought on Craftsy for the extremely reasonable price of £2.97 but it gets better – the three balls of yarn I bought from Minerva makes two pairs of slippers (with loads left over) at a cost of £1.79 per ball. Add it all together and divide by two (c’mon, keep up!) and it works out at a VERY cheap £4.08 per pair, a bargain by anyone’s standards, I would say!
This is the bundle that arrived from Minerva Crafts – three balls of Stylecraft acrylic yarn and a packet of round hat elastic.
 So, how did they work up?
Well, the pattern is extensive and pretty easy to follow, so no problems there, and the Stylecraft Special DK promises to wash like a dream as it’s good, hardwearing yarn, perfect for slippers.
There are instructions for eight different sizes from toddler through to adult. Hmmm, I wonder if all the difficult-to-buy-for males in the family would like a pair? Except my sixteen year old nephew – he asked his mother to tell me never to crochet anything for him again after the Bob Marley Rasta hat I made for him last Christmas!
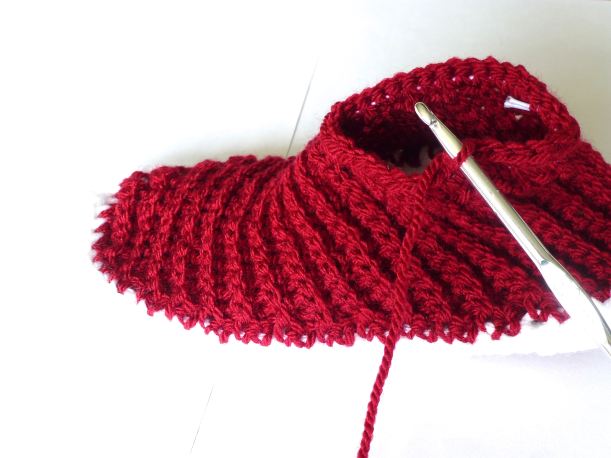
The soles are worked with two strands of yarn at a time to make a sturdy, cushioned base for the slipper.
 The body of the slipper is crocheted with just one strand of yarn into the back of each stitch which results in a rather lovely ribbed pattern.
 You crochet over a circle of hat elastic at the ankle edge to give a more snug and secure fit.
 You can just see the elastic if I stretch the top edge open wide.
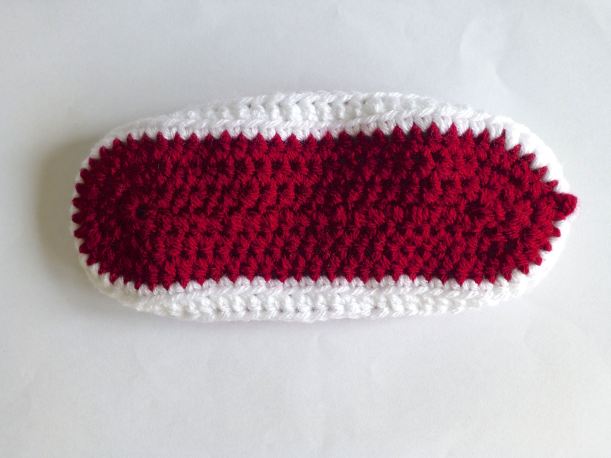
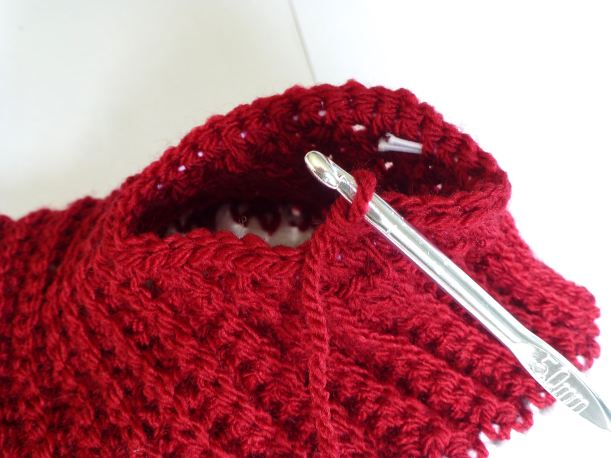
 Bottom edge before: –
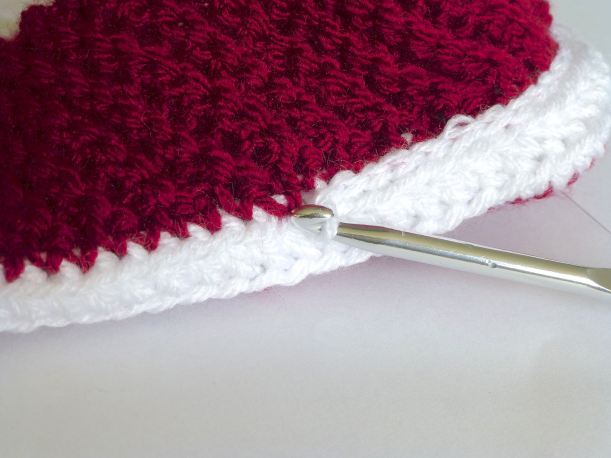
 Bottom edge after: –
 A row of slip stitches cleverly cover up the change of yarn colour as demonstrated in this photo: –
 Next are the laces which are just for show – two very long rows of simple chain stitches.
 I made 150 chains instead of the stated 110 as I didn’t feel they were long enough.
 The ‘laces’ are just threaded through with a darning needle and tied in a bow to give the trainer look.
 And there you are – a pair of Van’s style slippers whipped up in an evening!
 The following evening I made a second pair in blue.
They look a bit like babies’ booties lined up like this!
 Size wise, I found that they crocheted up small so would suggest going up a size, but they are stretchy so will still be fine for The Boys.


 I ended up giving these to The Boys after they were finished because the photos look better while they are being worn and a little bit odd without a foot inside.
 No.3 Son in particular is chuffed with them, but No.2 Son says they’re a bit tight…..guess what I’ll be making out of the leftover yarn tonight?
This reveal has to be one of the most fun projects I have EVER undertaken, certainly the most enjoyable crochet project I have ever had the pleasure to immerse myself in – even more than a blanket!
Anyone who crochets will know how deeply satisfying the process of blanket-making is, especially during the Winter months. Long, dark nights curled up on the sofa watching TV, all the while plodding steadfastly through the labour of love that is a crocheted blanket. Whilst always ecstatic to finally finish such an epic task, there’s invariably a sense of “What do I do now?”.
Summer is different. Less time spent indoors, more holidays, car journeys, time in the garden, means a large, cumbersome WIP is out of the question. A small, portable piece is what’s needed, something you can pop in your handbag and get on with anytime, anywhere.
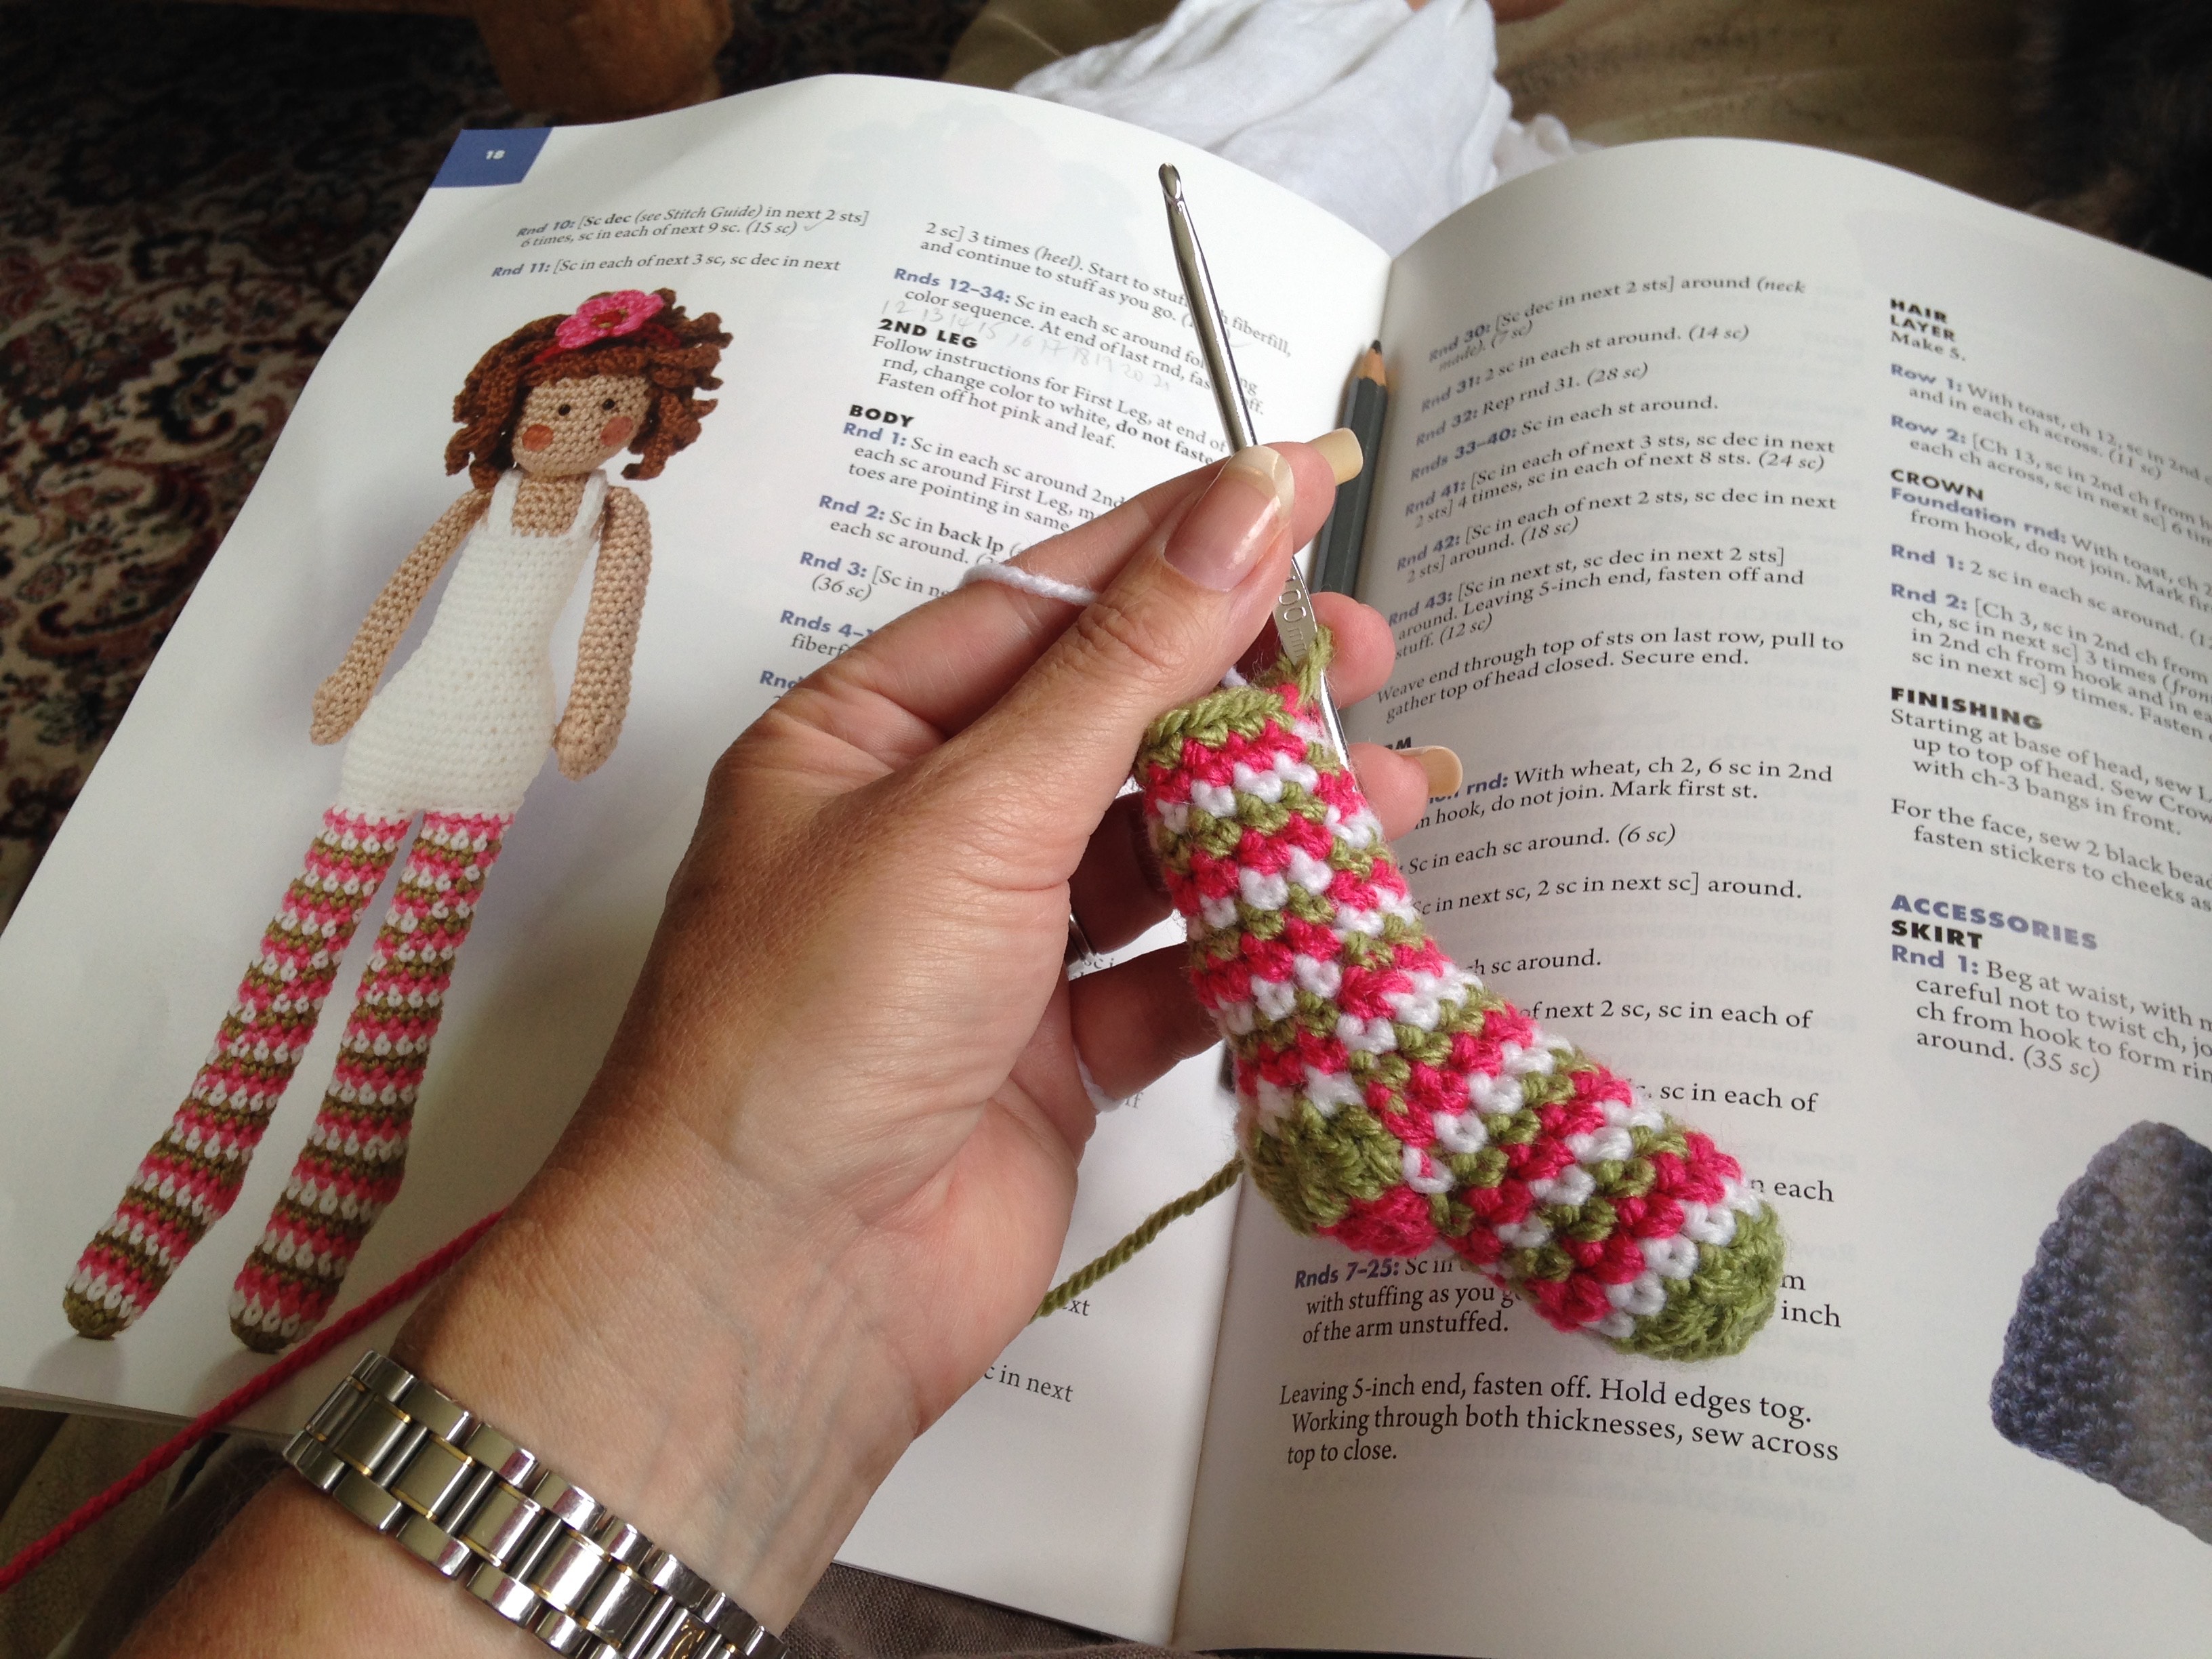
When I came across the book “Crochet Your Own Dolls And Accessories” published by Annie’s Attic, I let out a silent squeal of delight. Here was such a project and, not only that, it could double up as being both my Minerva Crafts Blogger Network post for October and the perfect Christmas present for a little girl!

I don’t know about you, but my idea of crochet dolls has always been, well….

Link omitted so as not to hurt anyone’s feelings:)
With images like this deeply ingrained in my subconscious, I was surprised and thrilled to find a thoroughly modern version which any twenty-first century youngster would find hard to resist falling in love with.

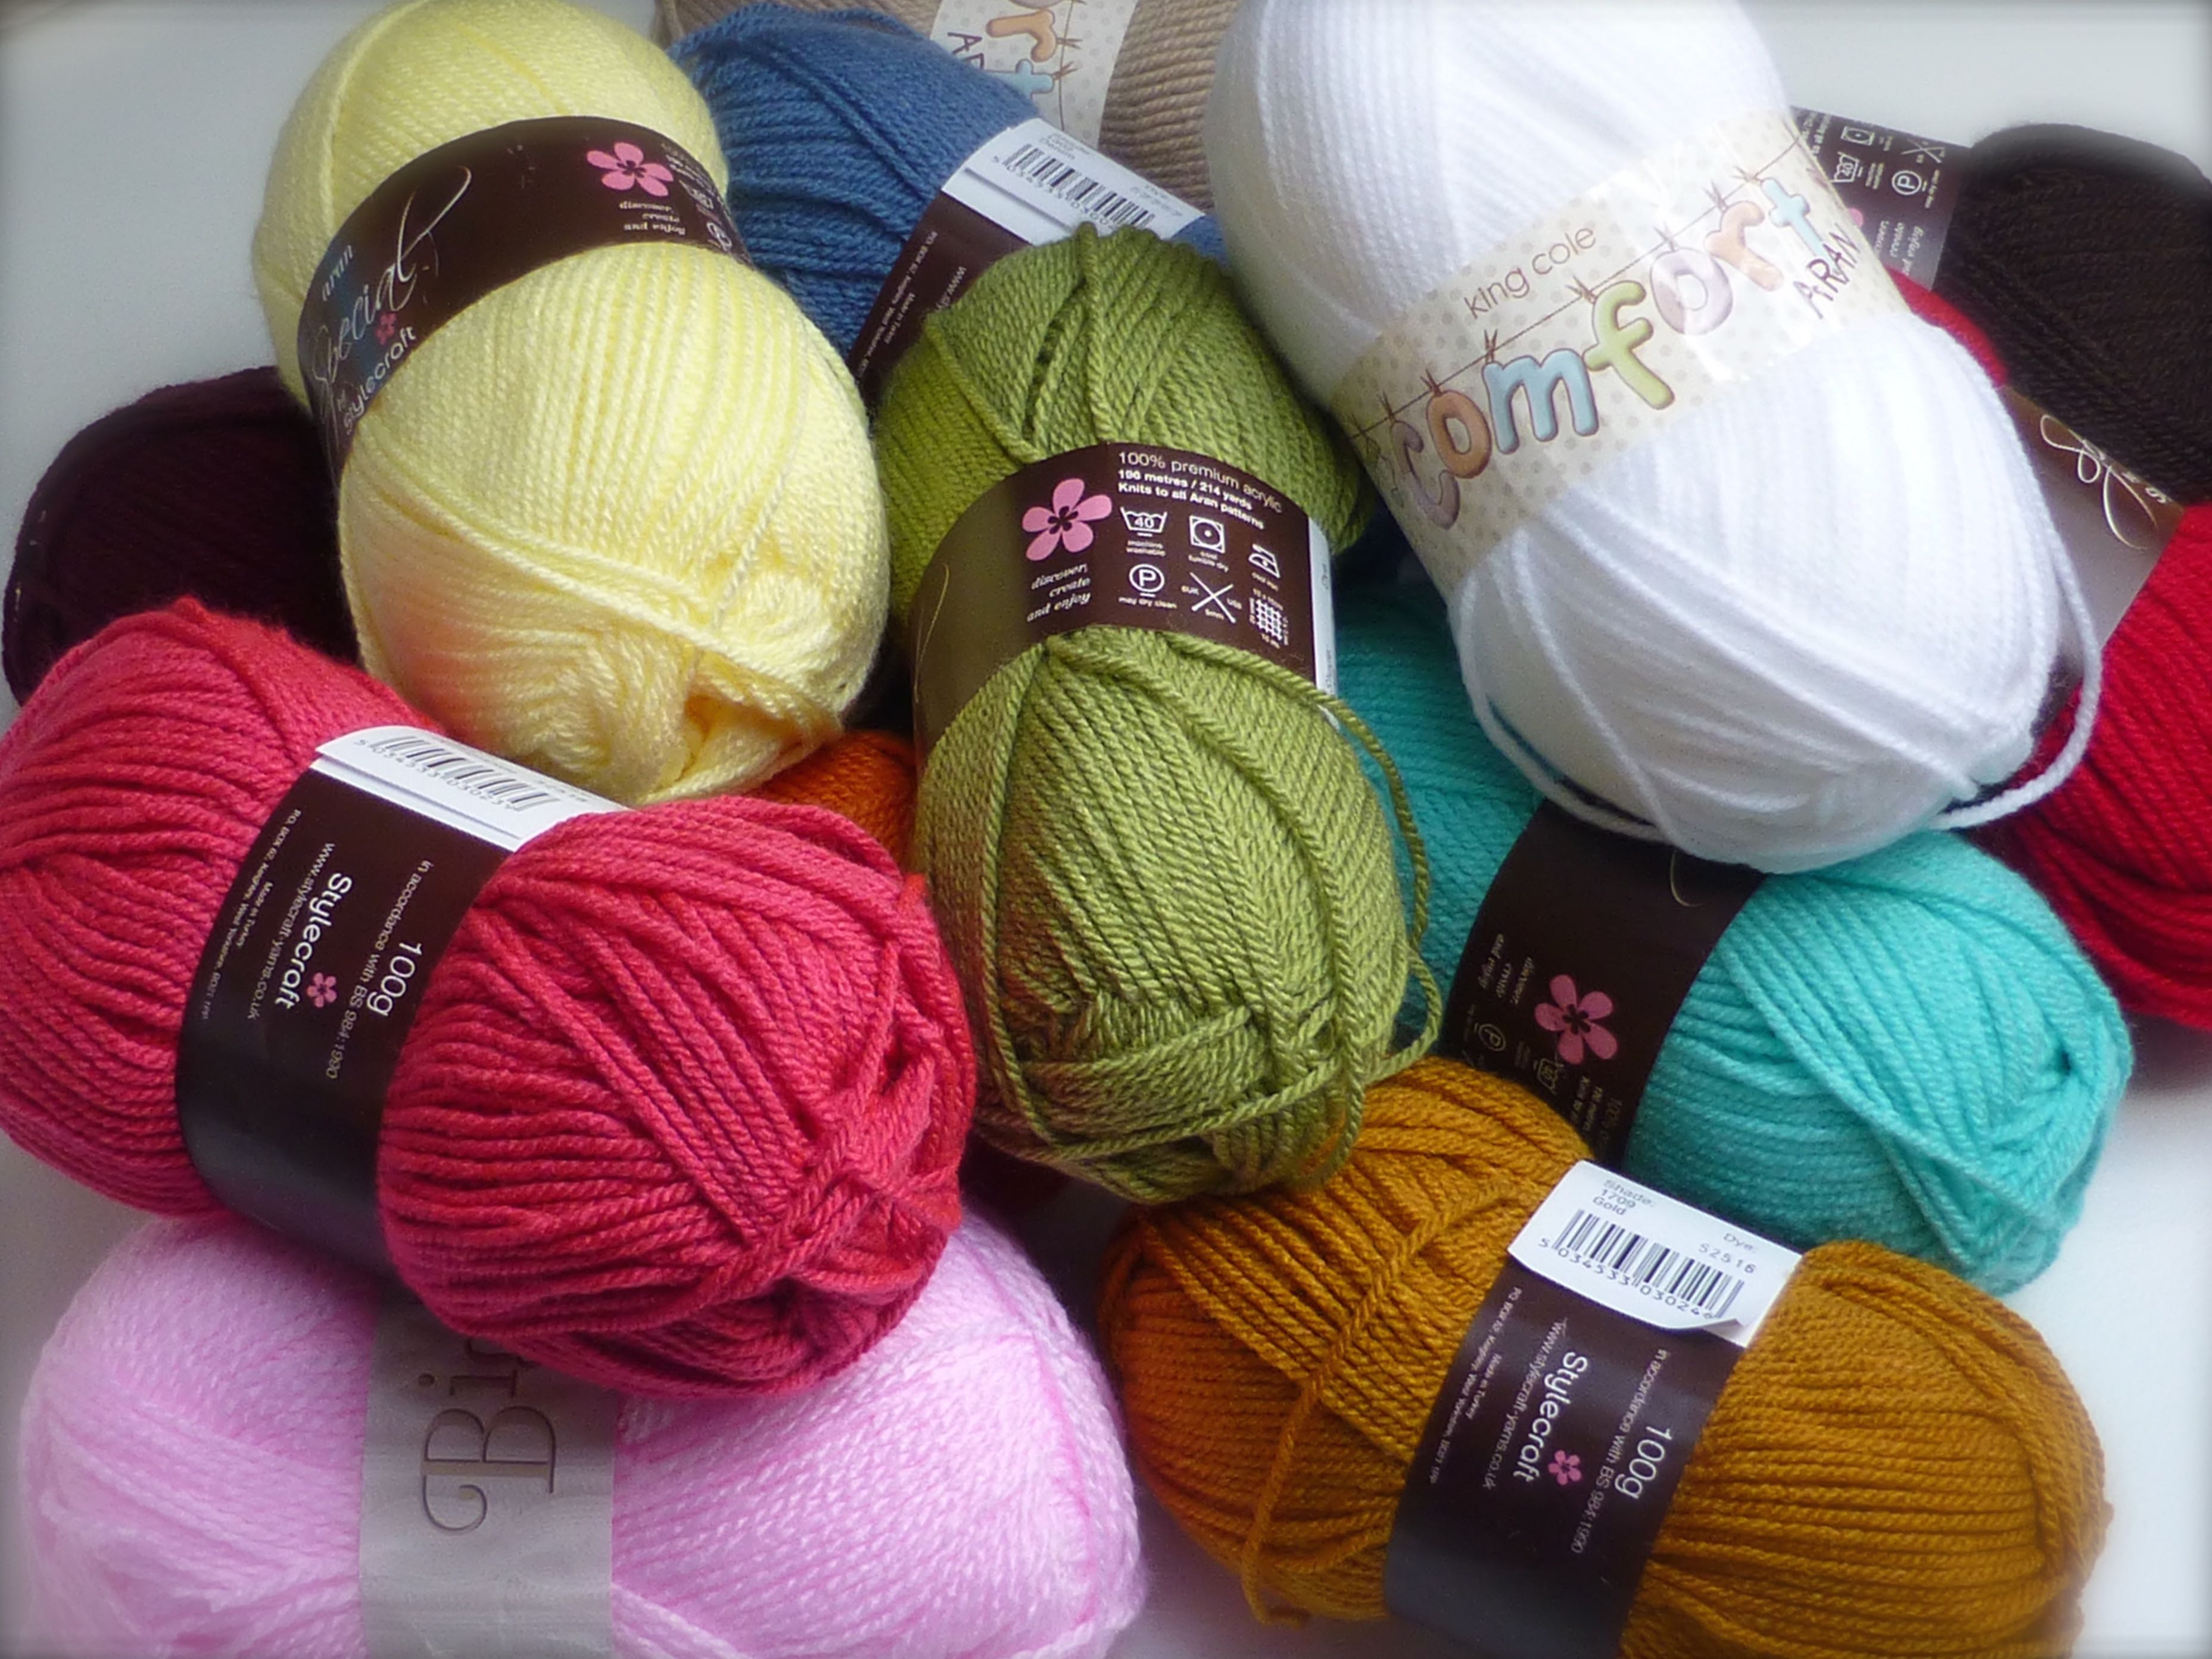
This huge sack of double knitting yarn arrived from Minerva Crafts way back in July with a tight, three-month deadline of October in mind.
Oh, I forget to tell you – my plan was to make every single thing in the entire book!
With such a lot to do, I got cracking immediately, starting on page one with “Bella Ann”.

The bodies of all four dolls are constructed the same way – in one piece from the feet up to the head, then attaching the separately crocheted arms at the end.

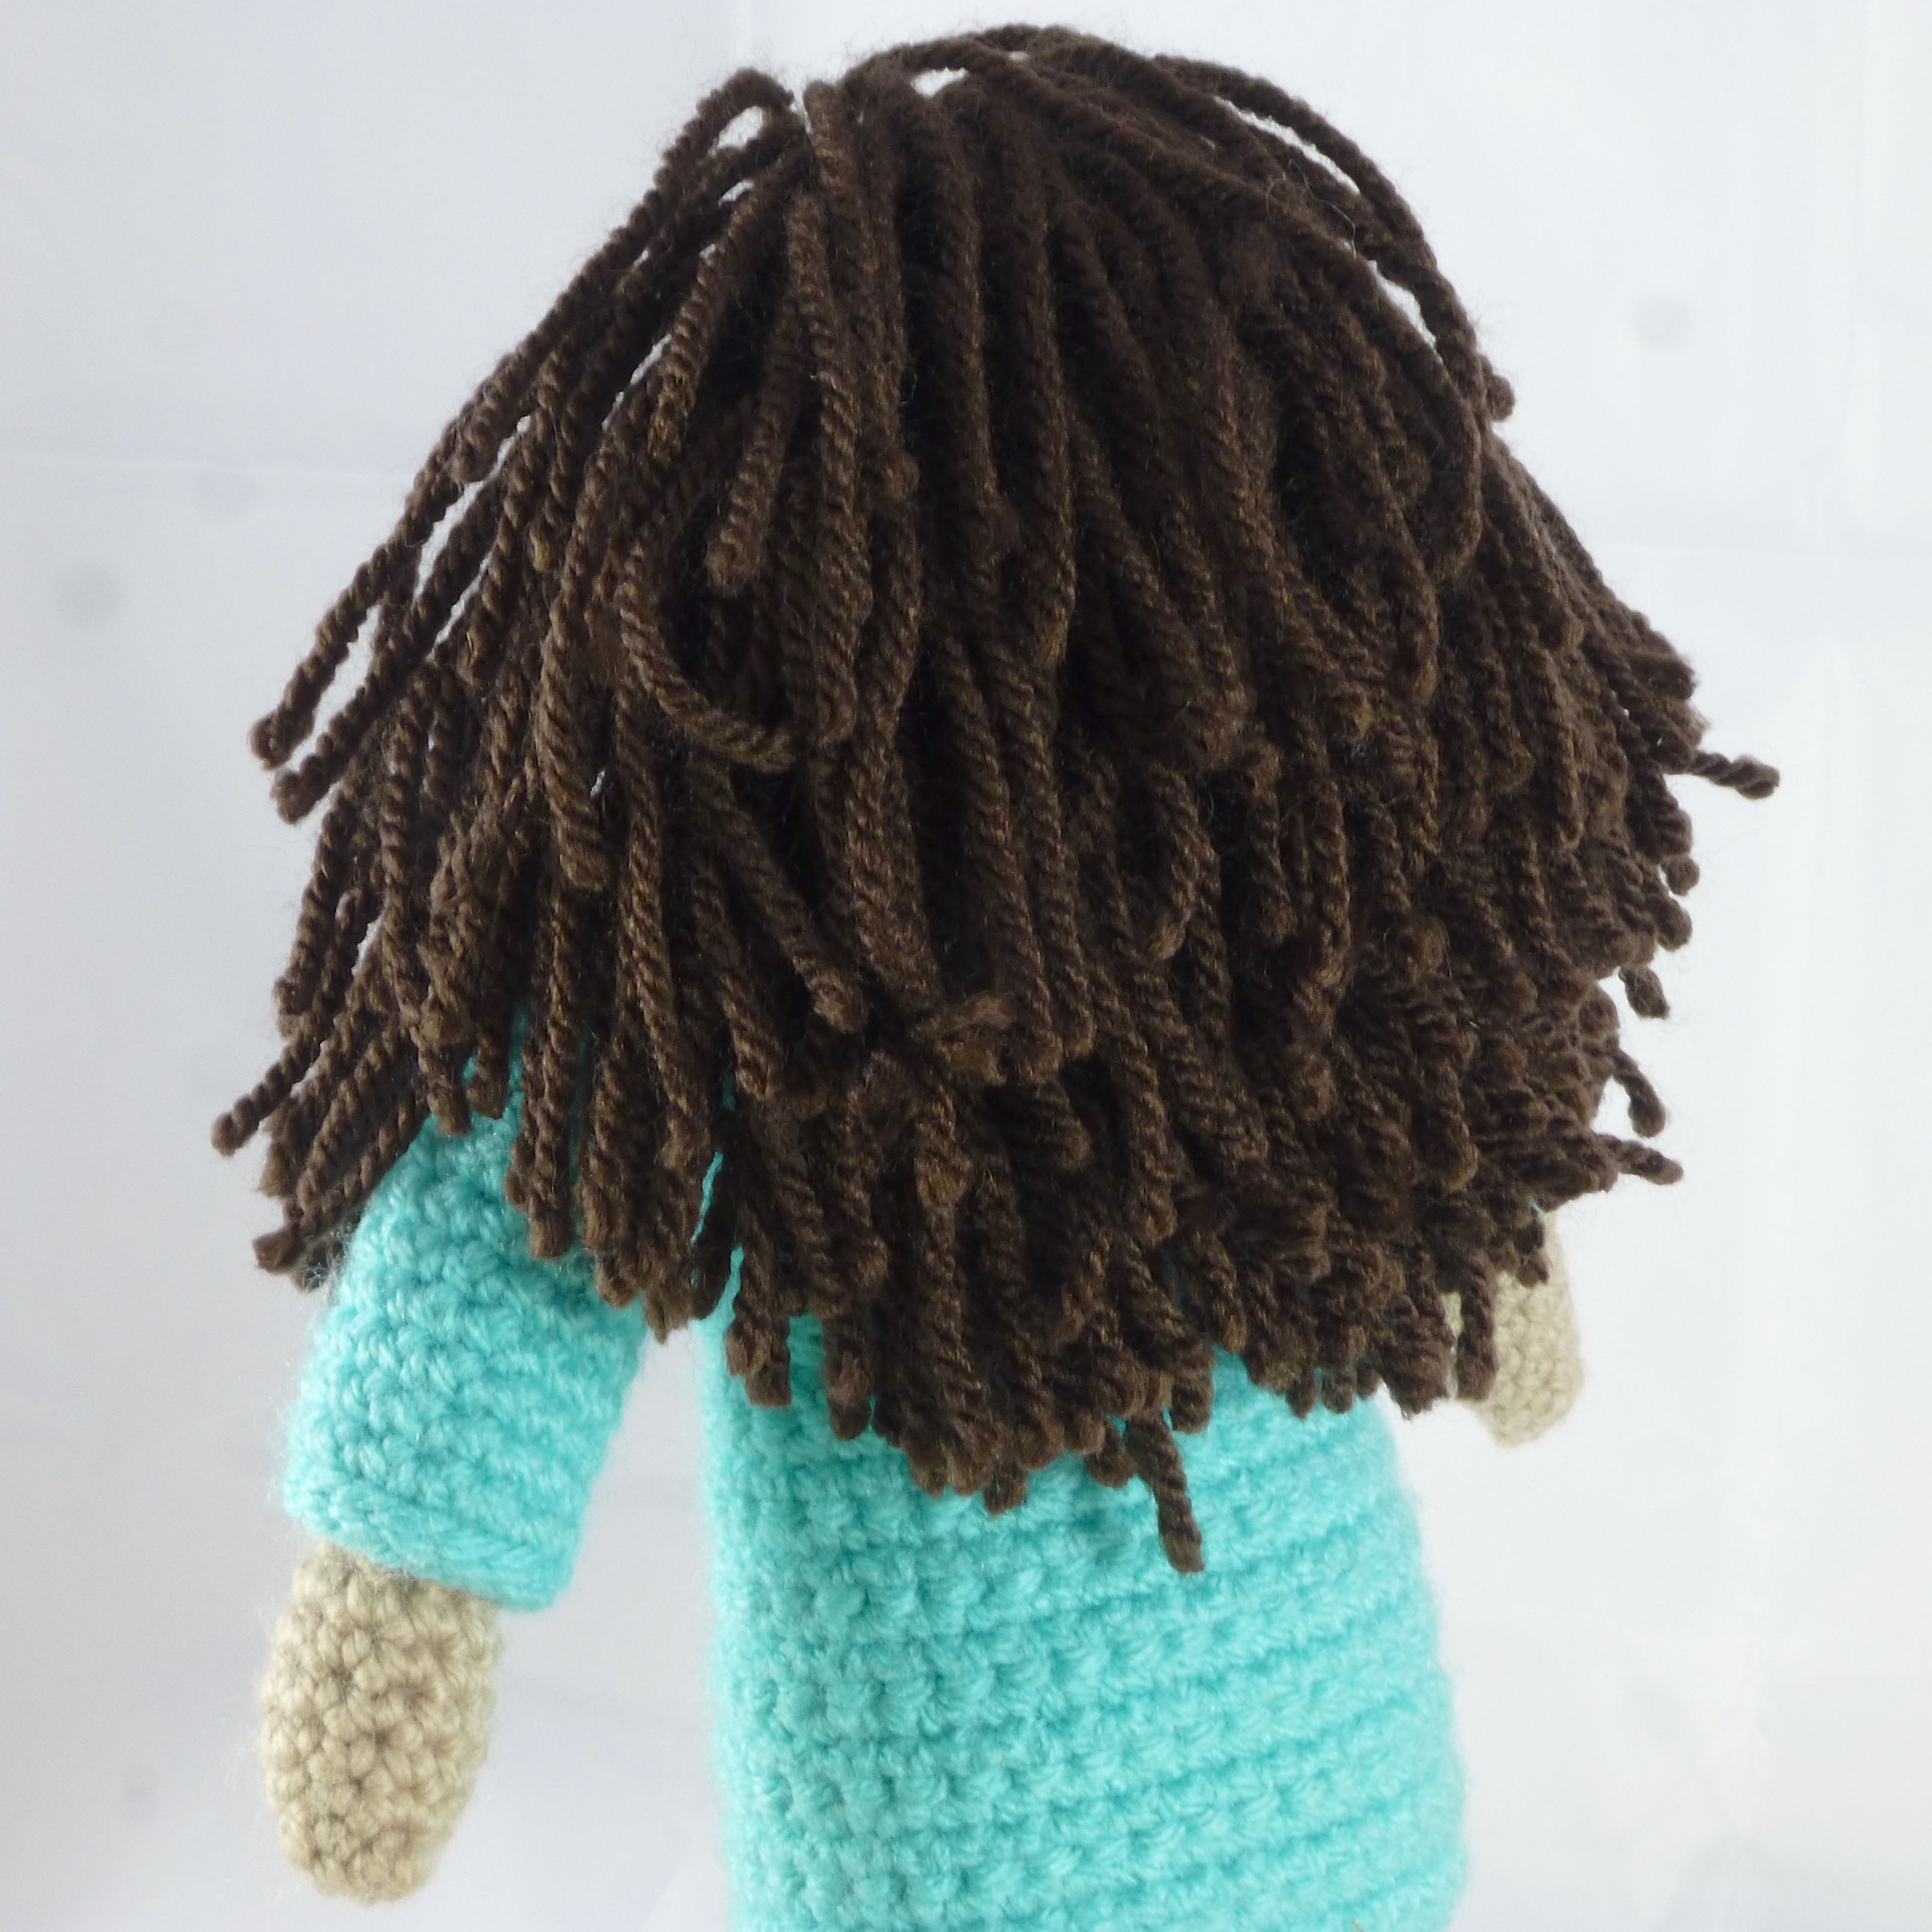
The hair is created using a darning needle and 135 strands of yarn, each one individually knotted onto a single stitch on the head!
The facial features are basic – two French knots for the eyes and a dab of blusher for the cheeks.
Simple, but effective, just enough to resemble a face.

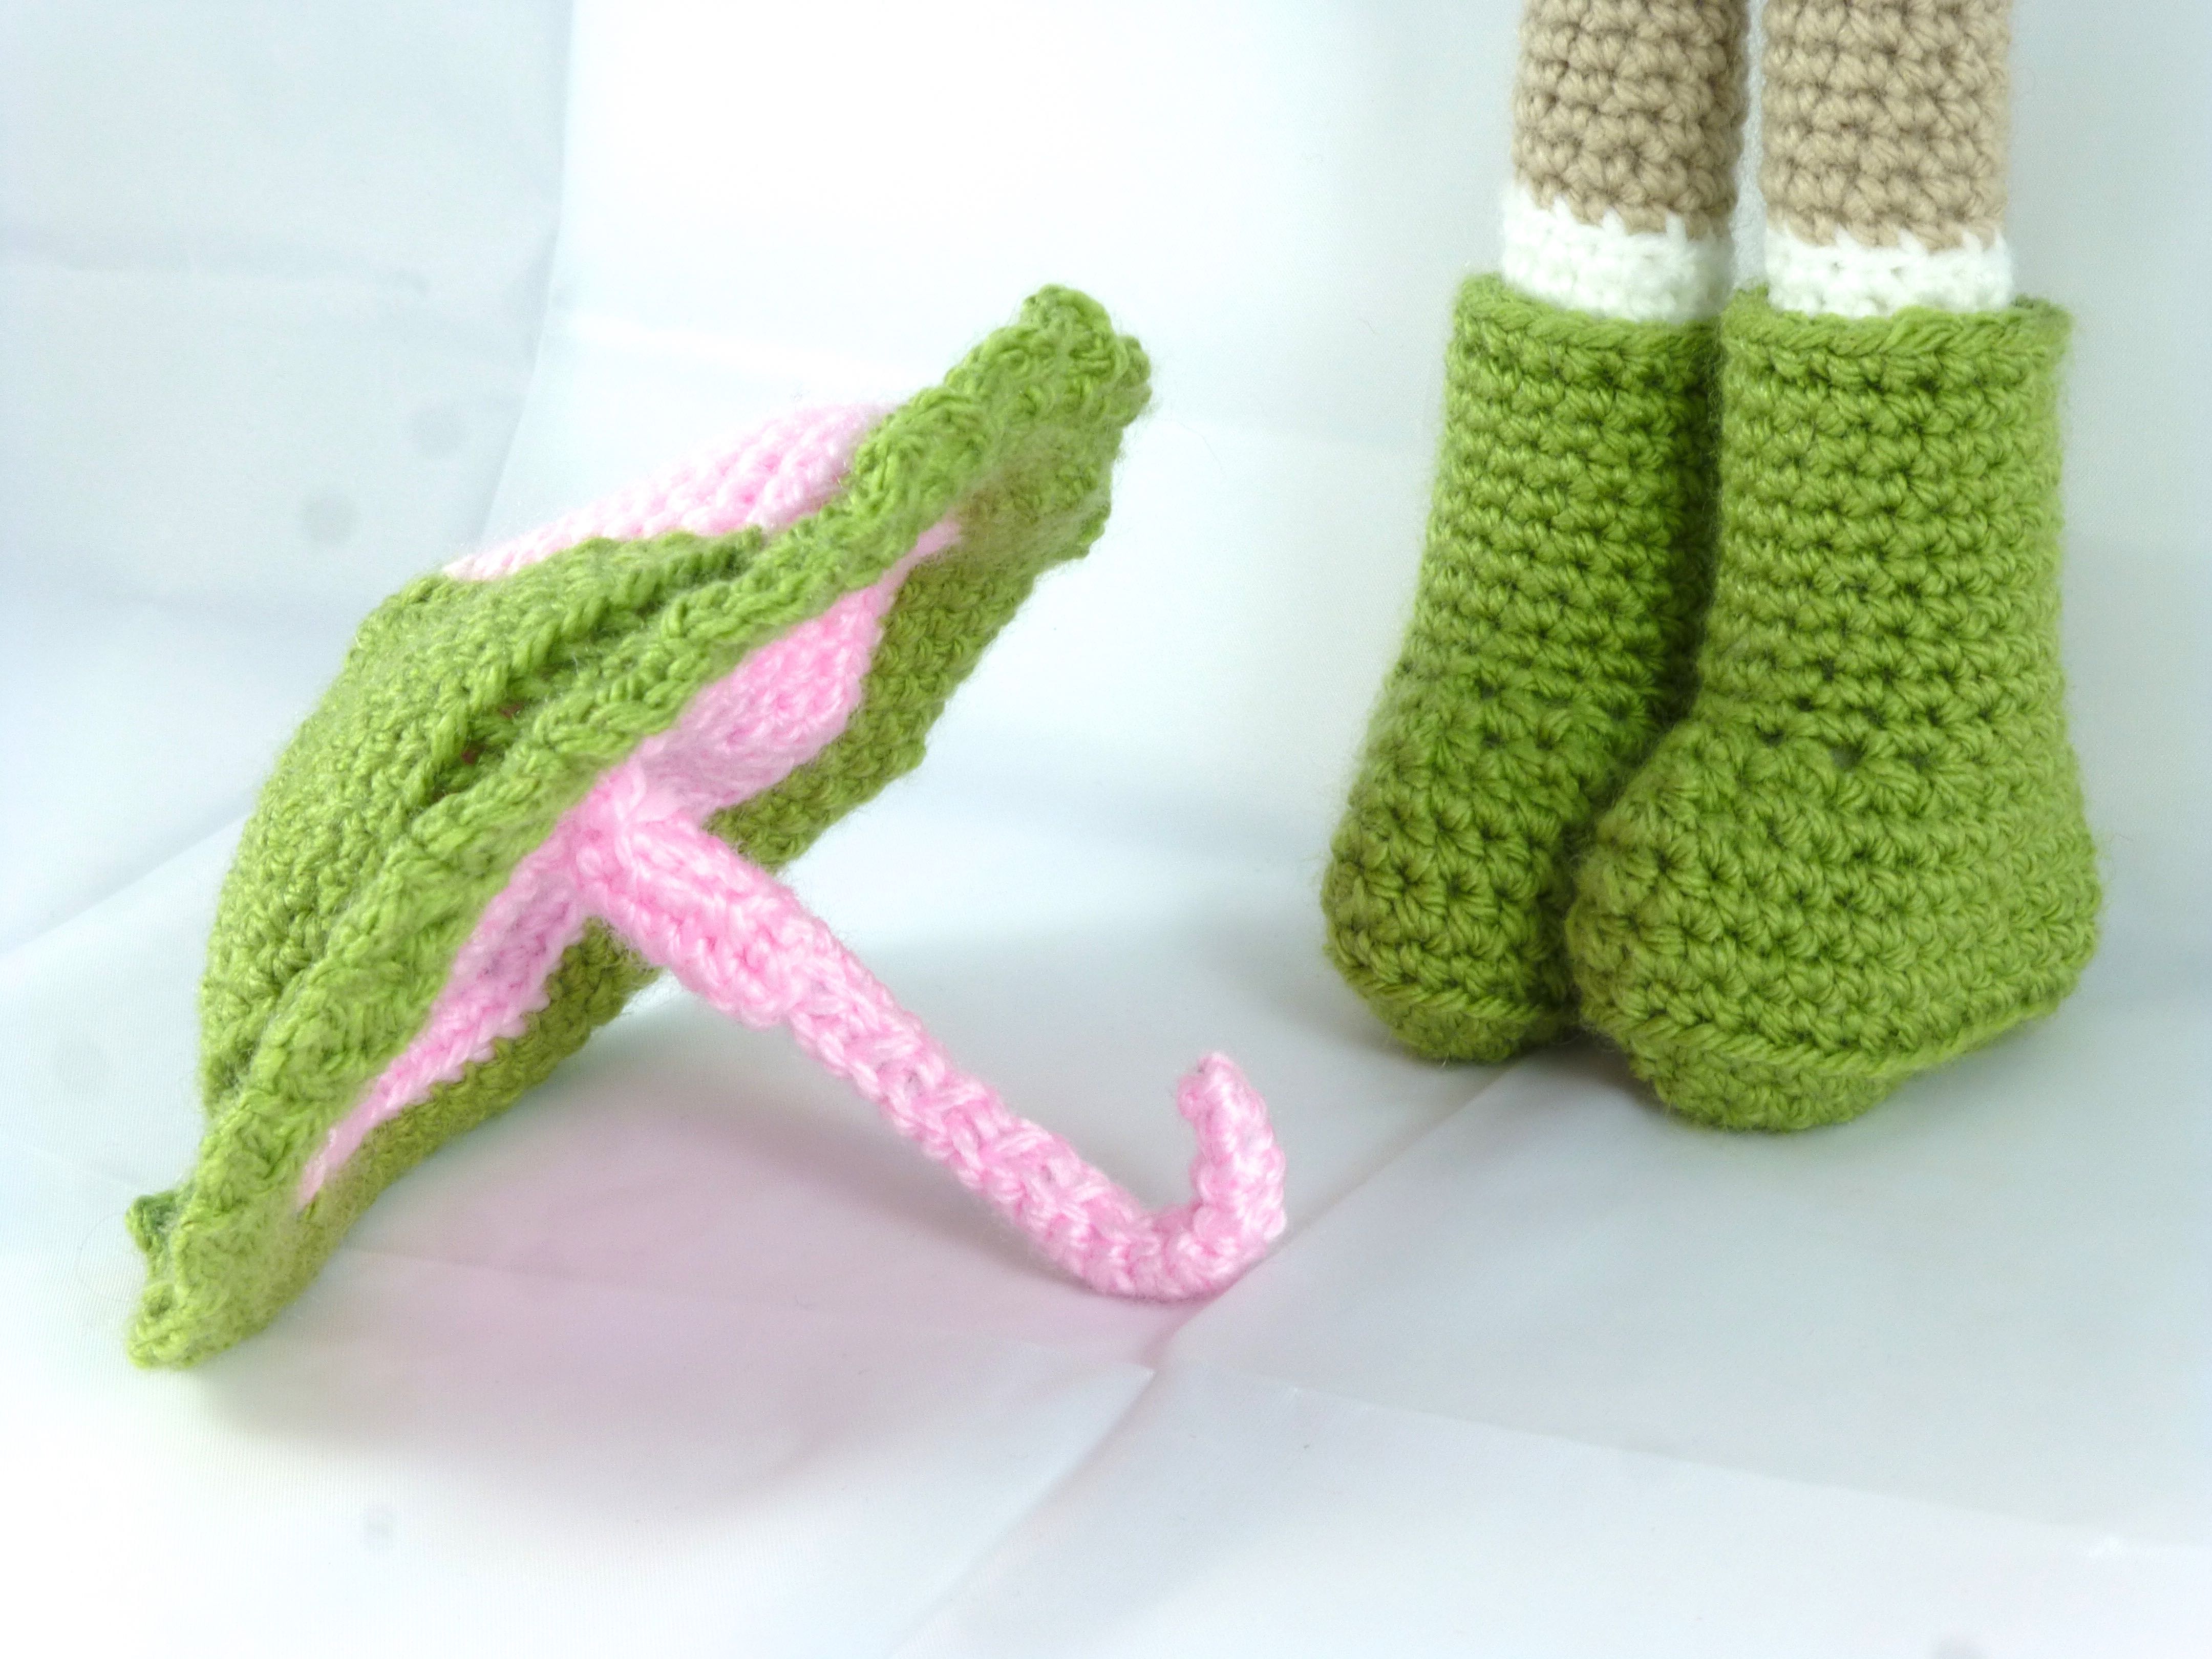
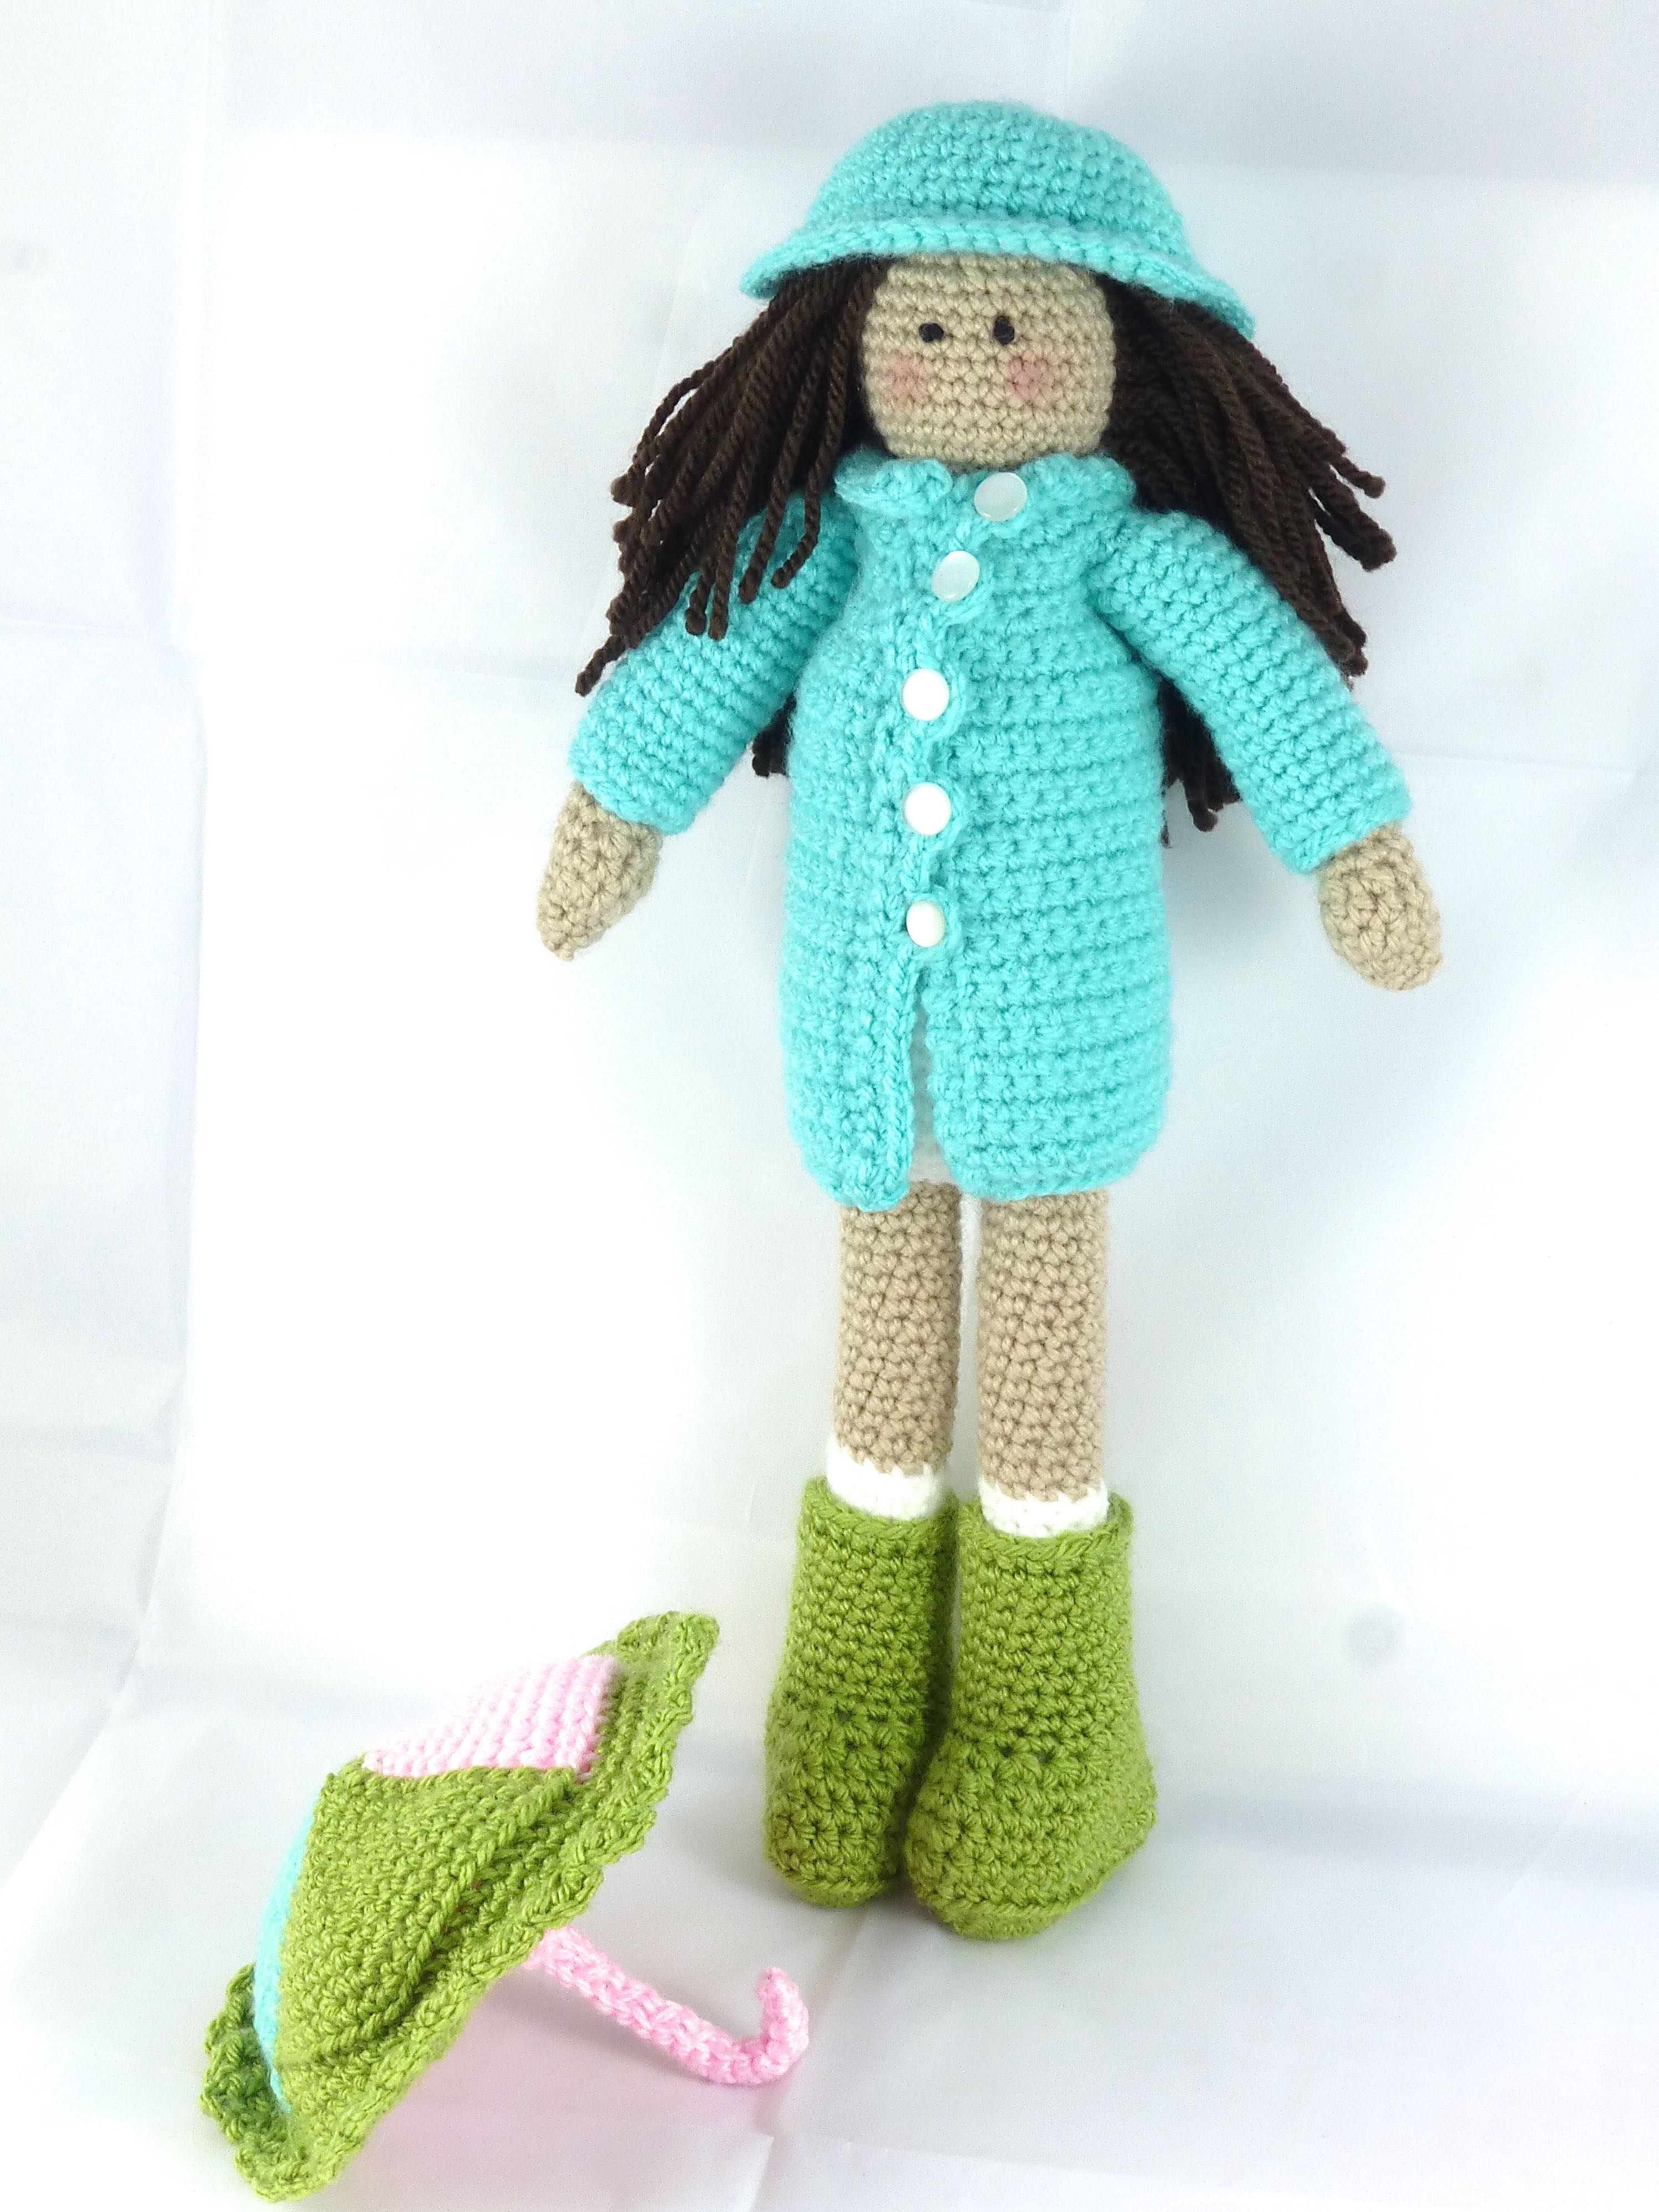
“Bella Ann” is an outdoorsy type who loves to get dressed up in a macintosh with matching hat.
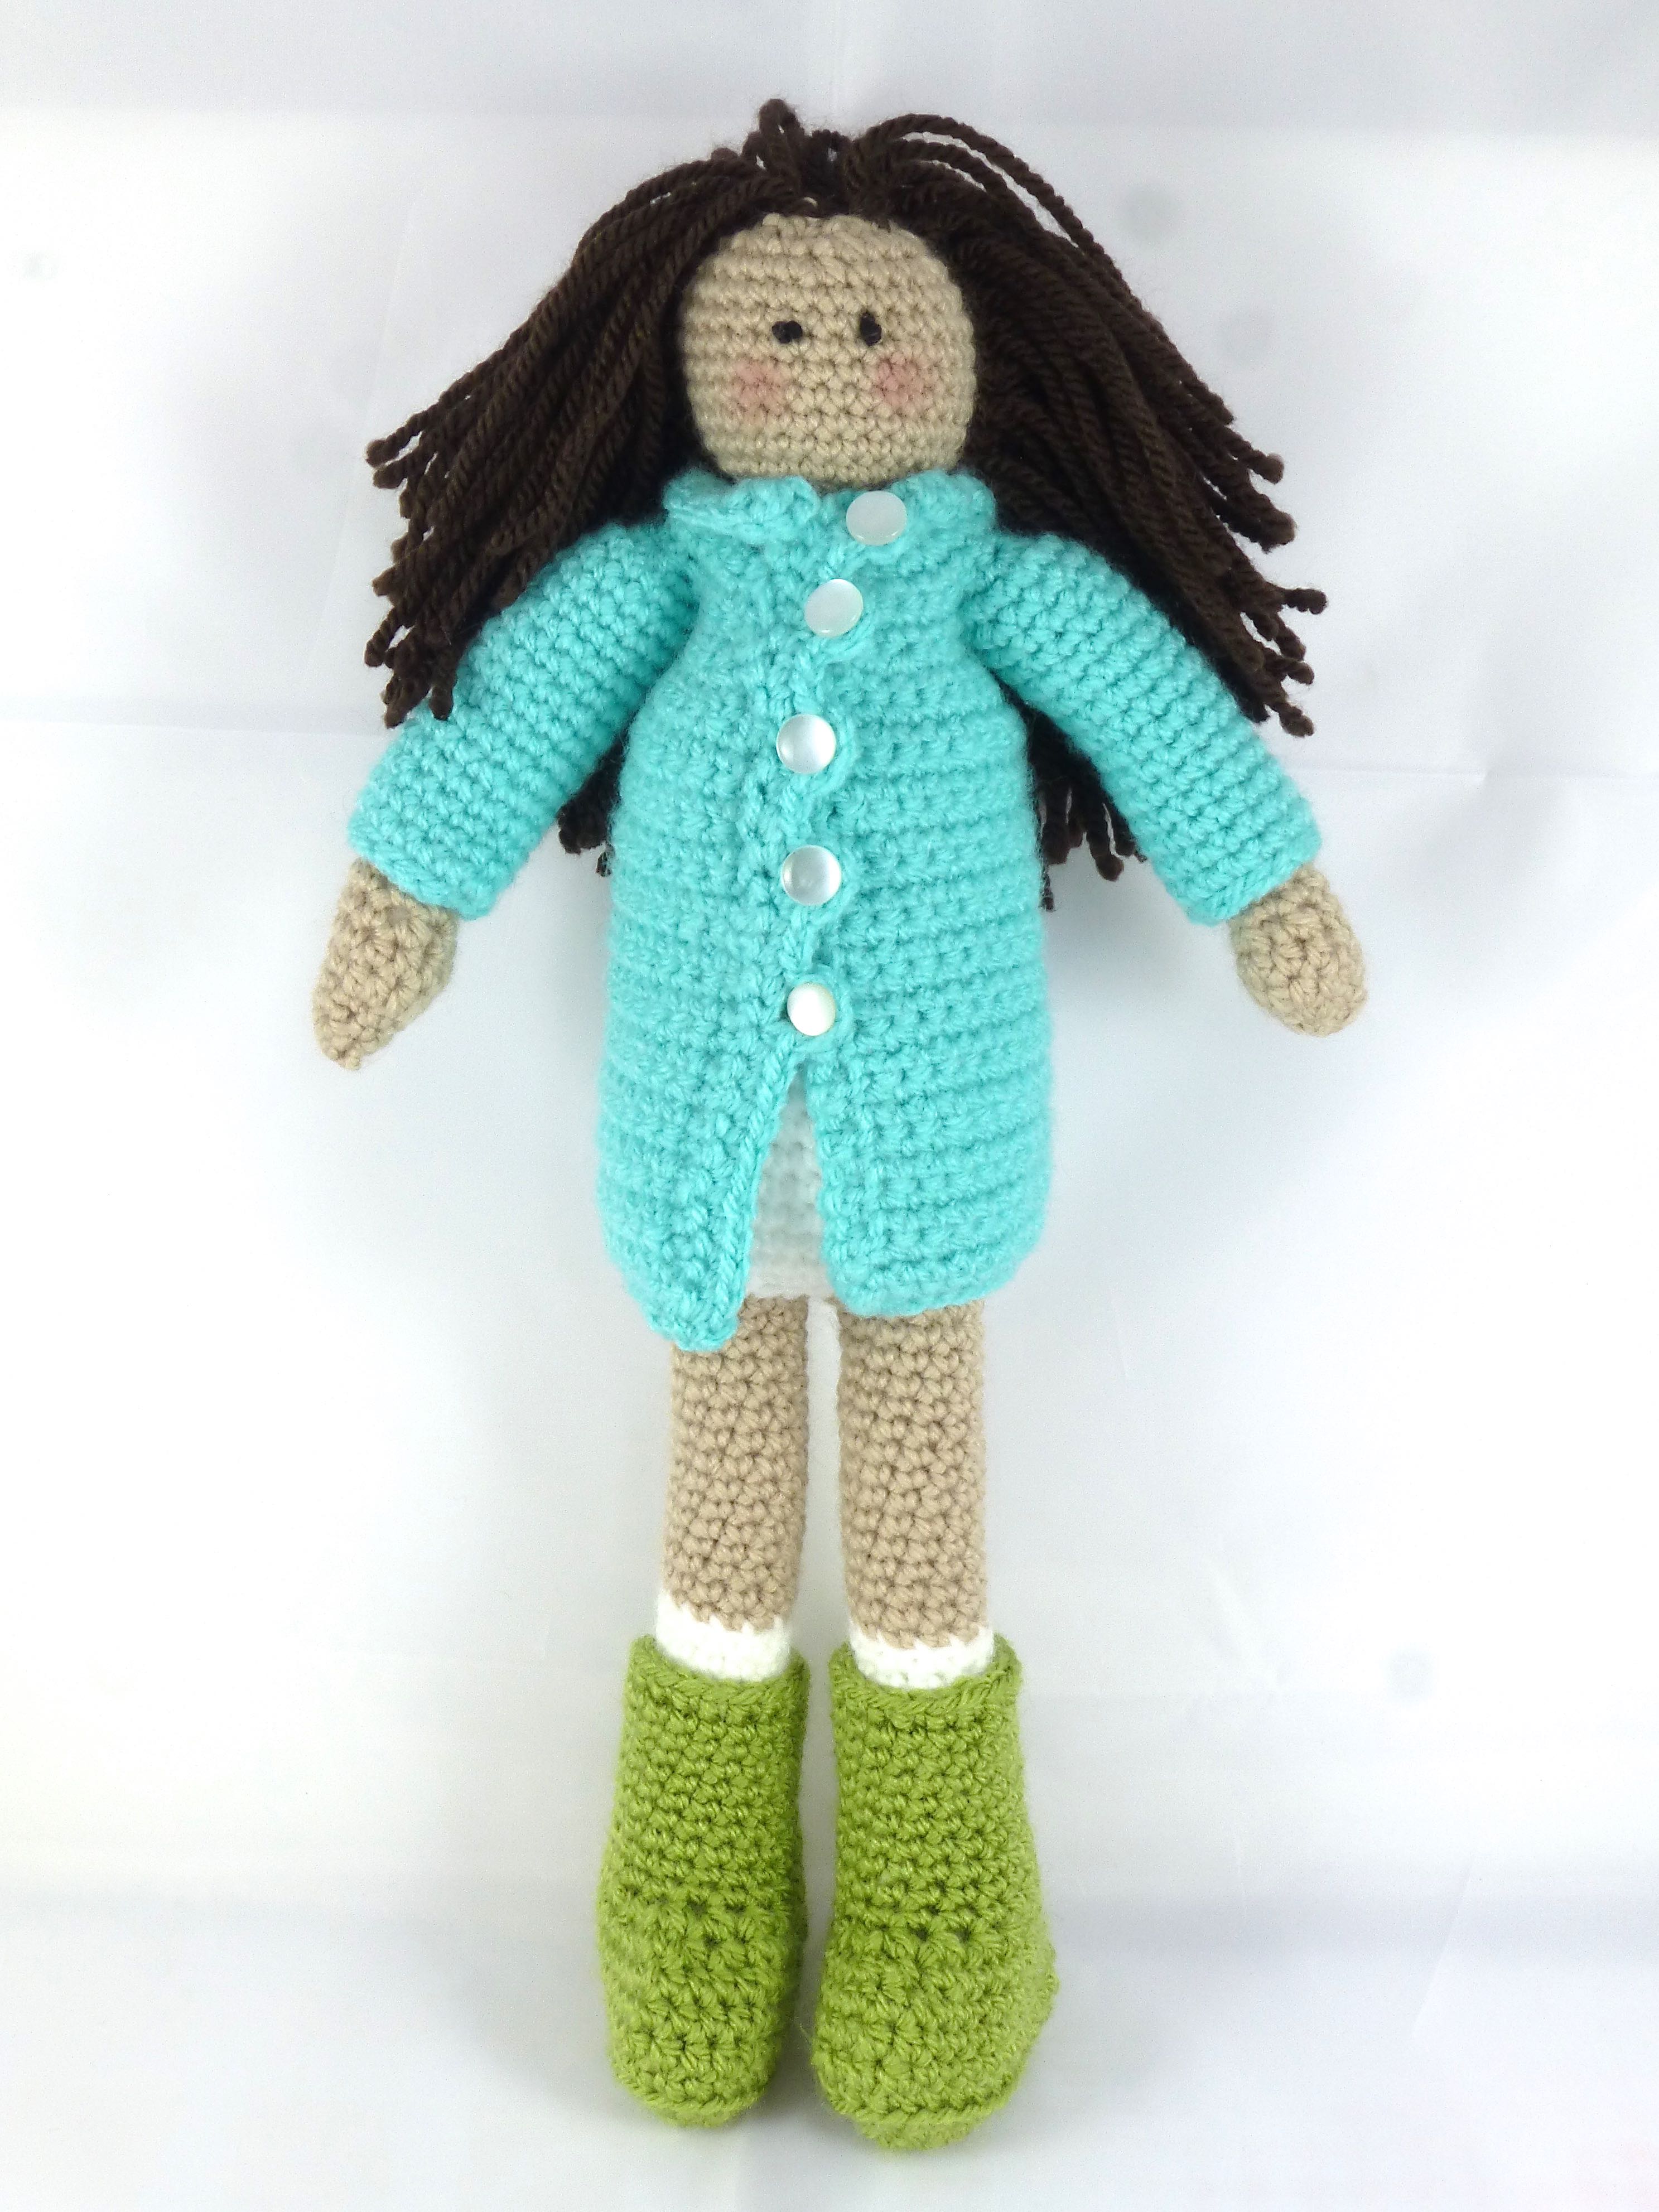
She even has wellies and her own umbrella!
So here’s my “Bella Ann” – TADAH!
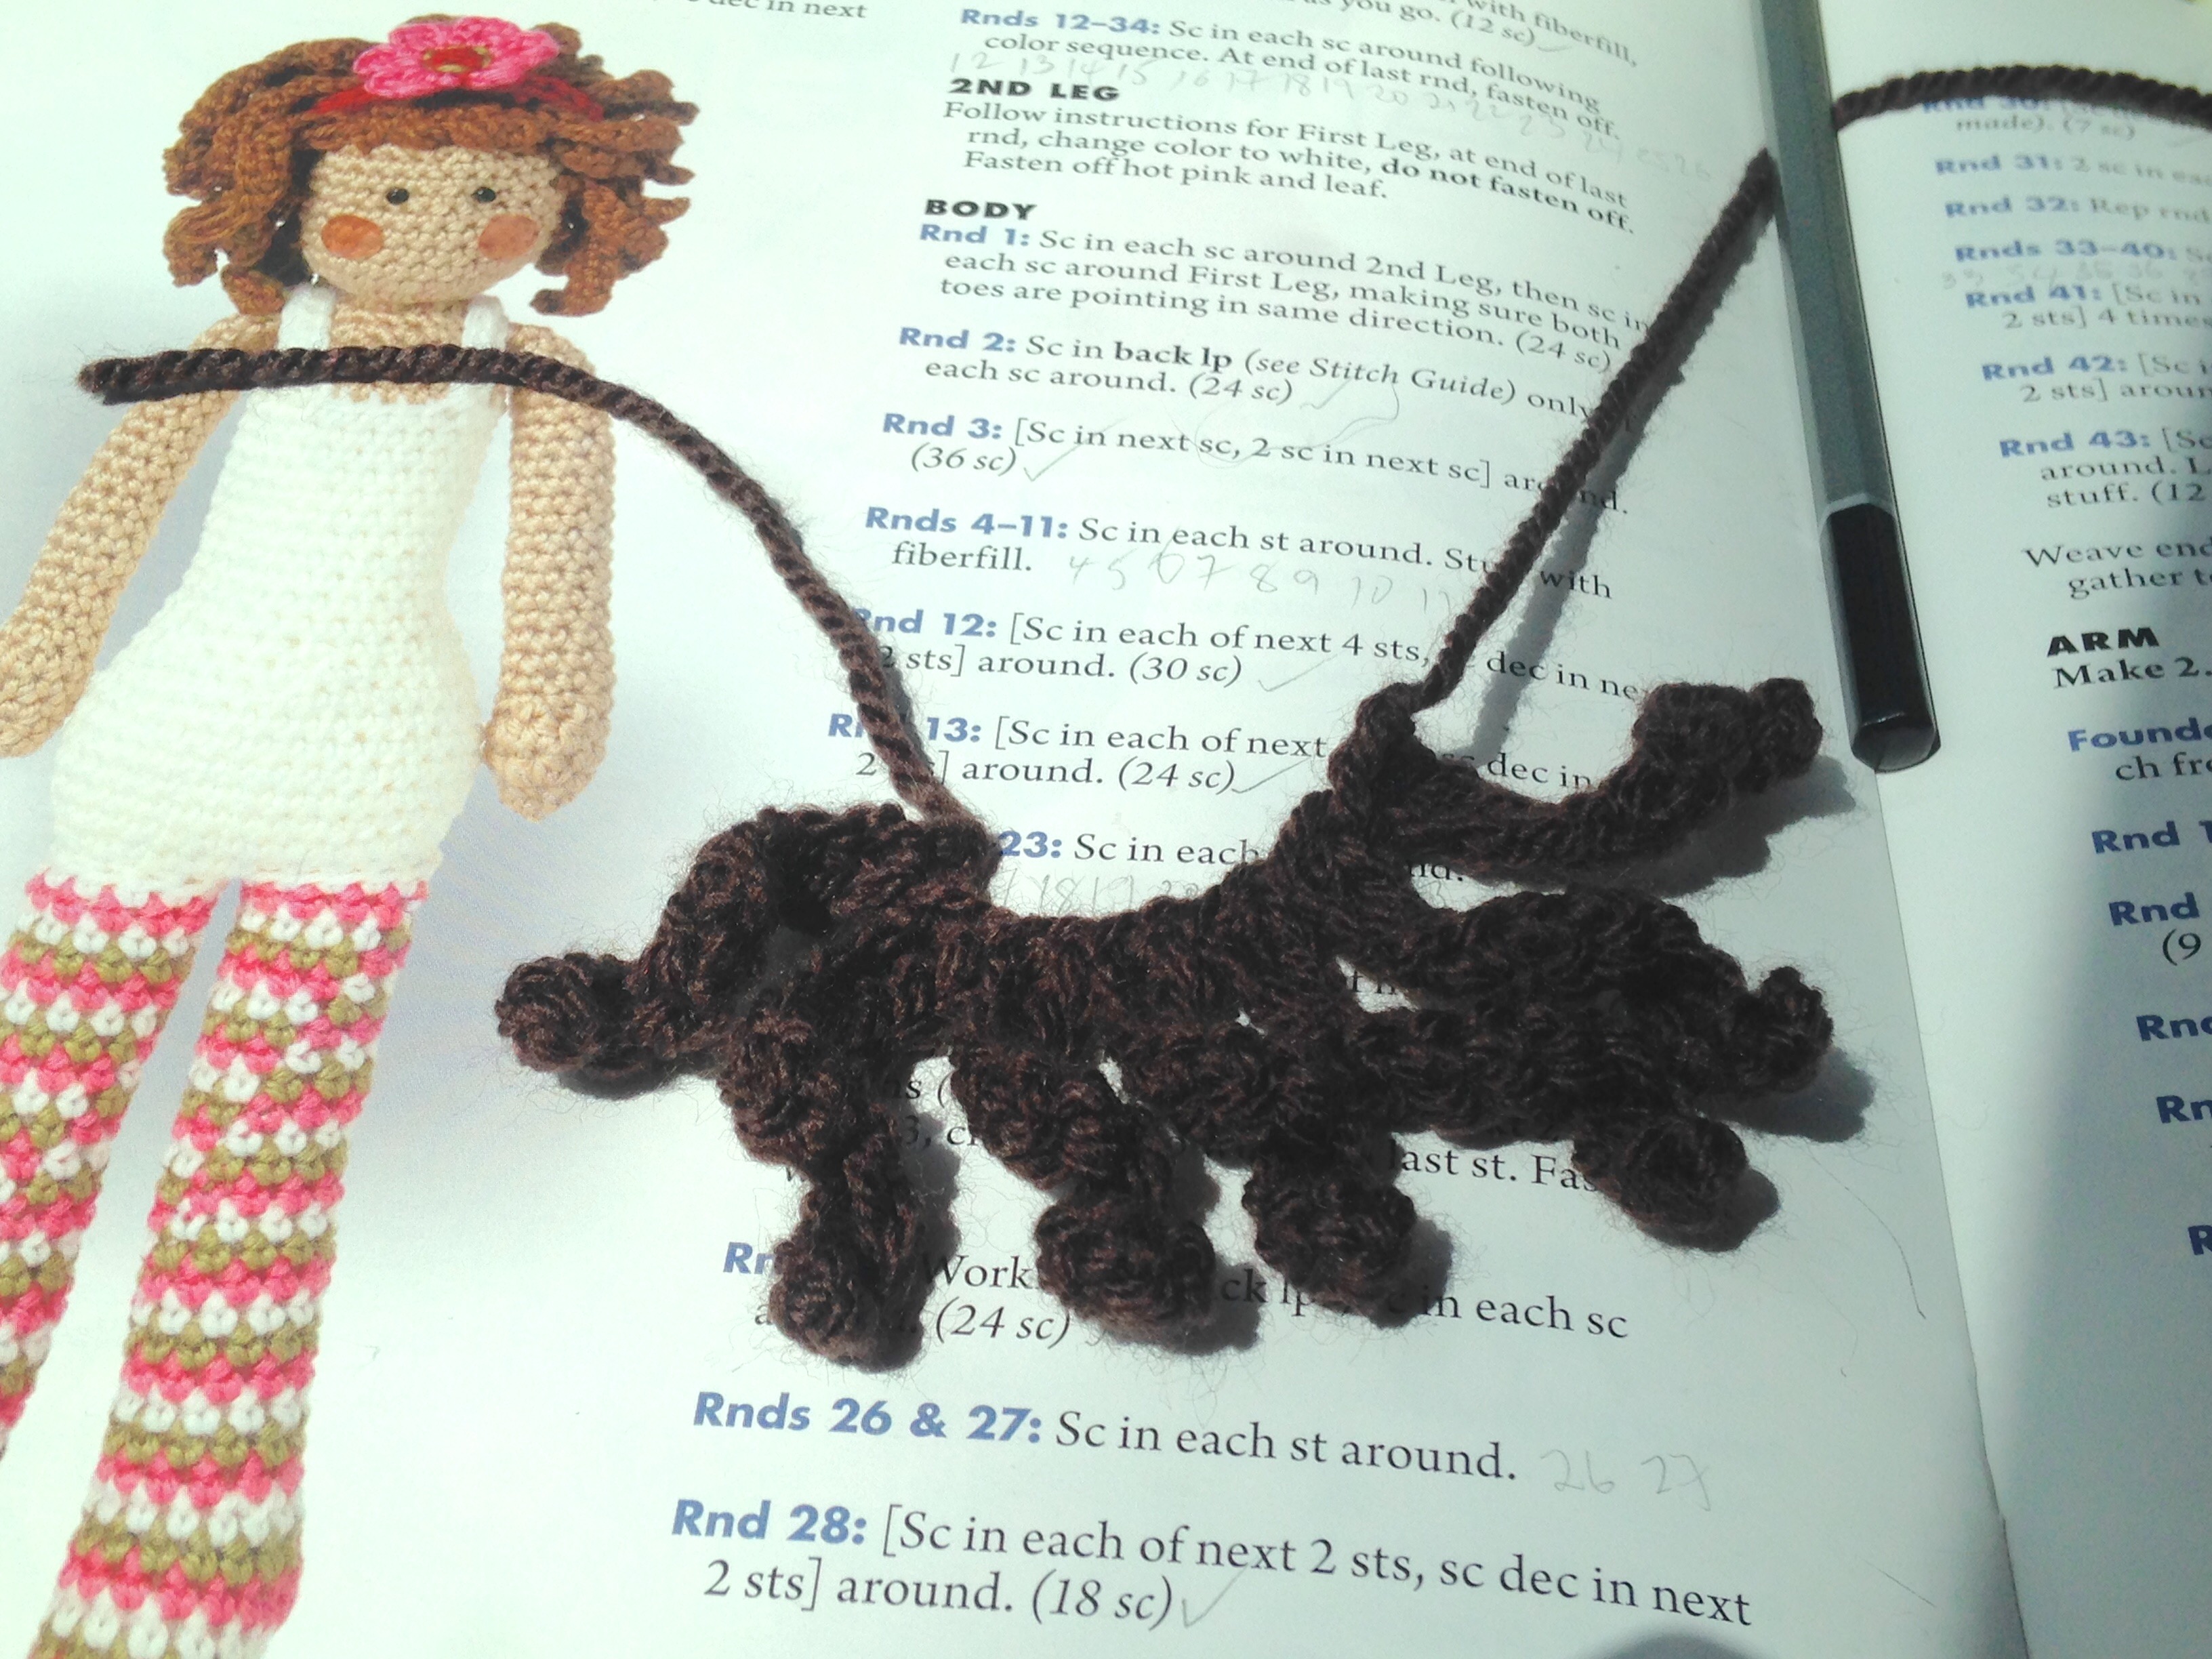
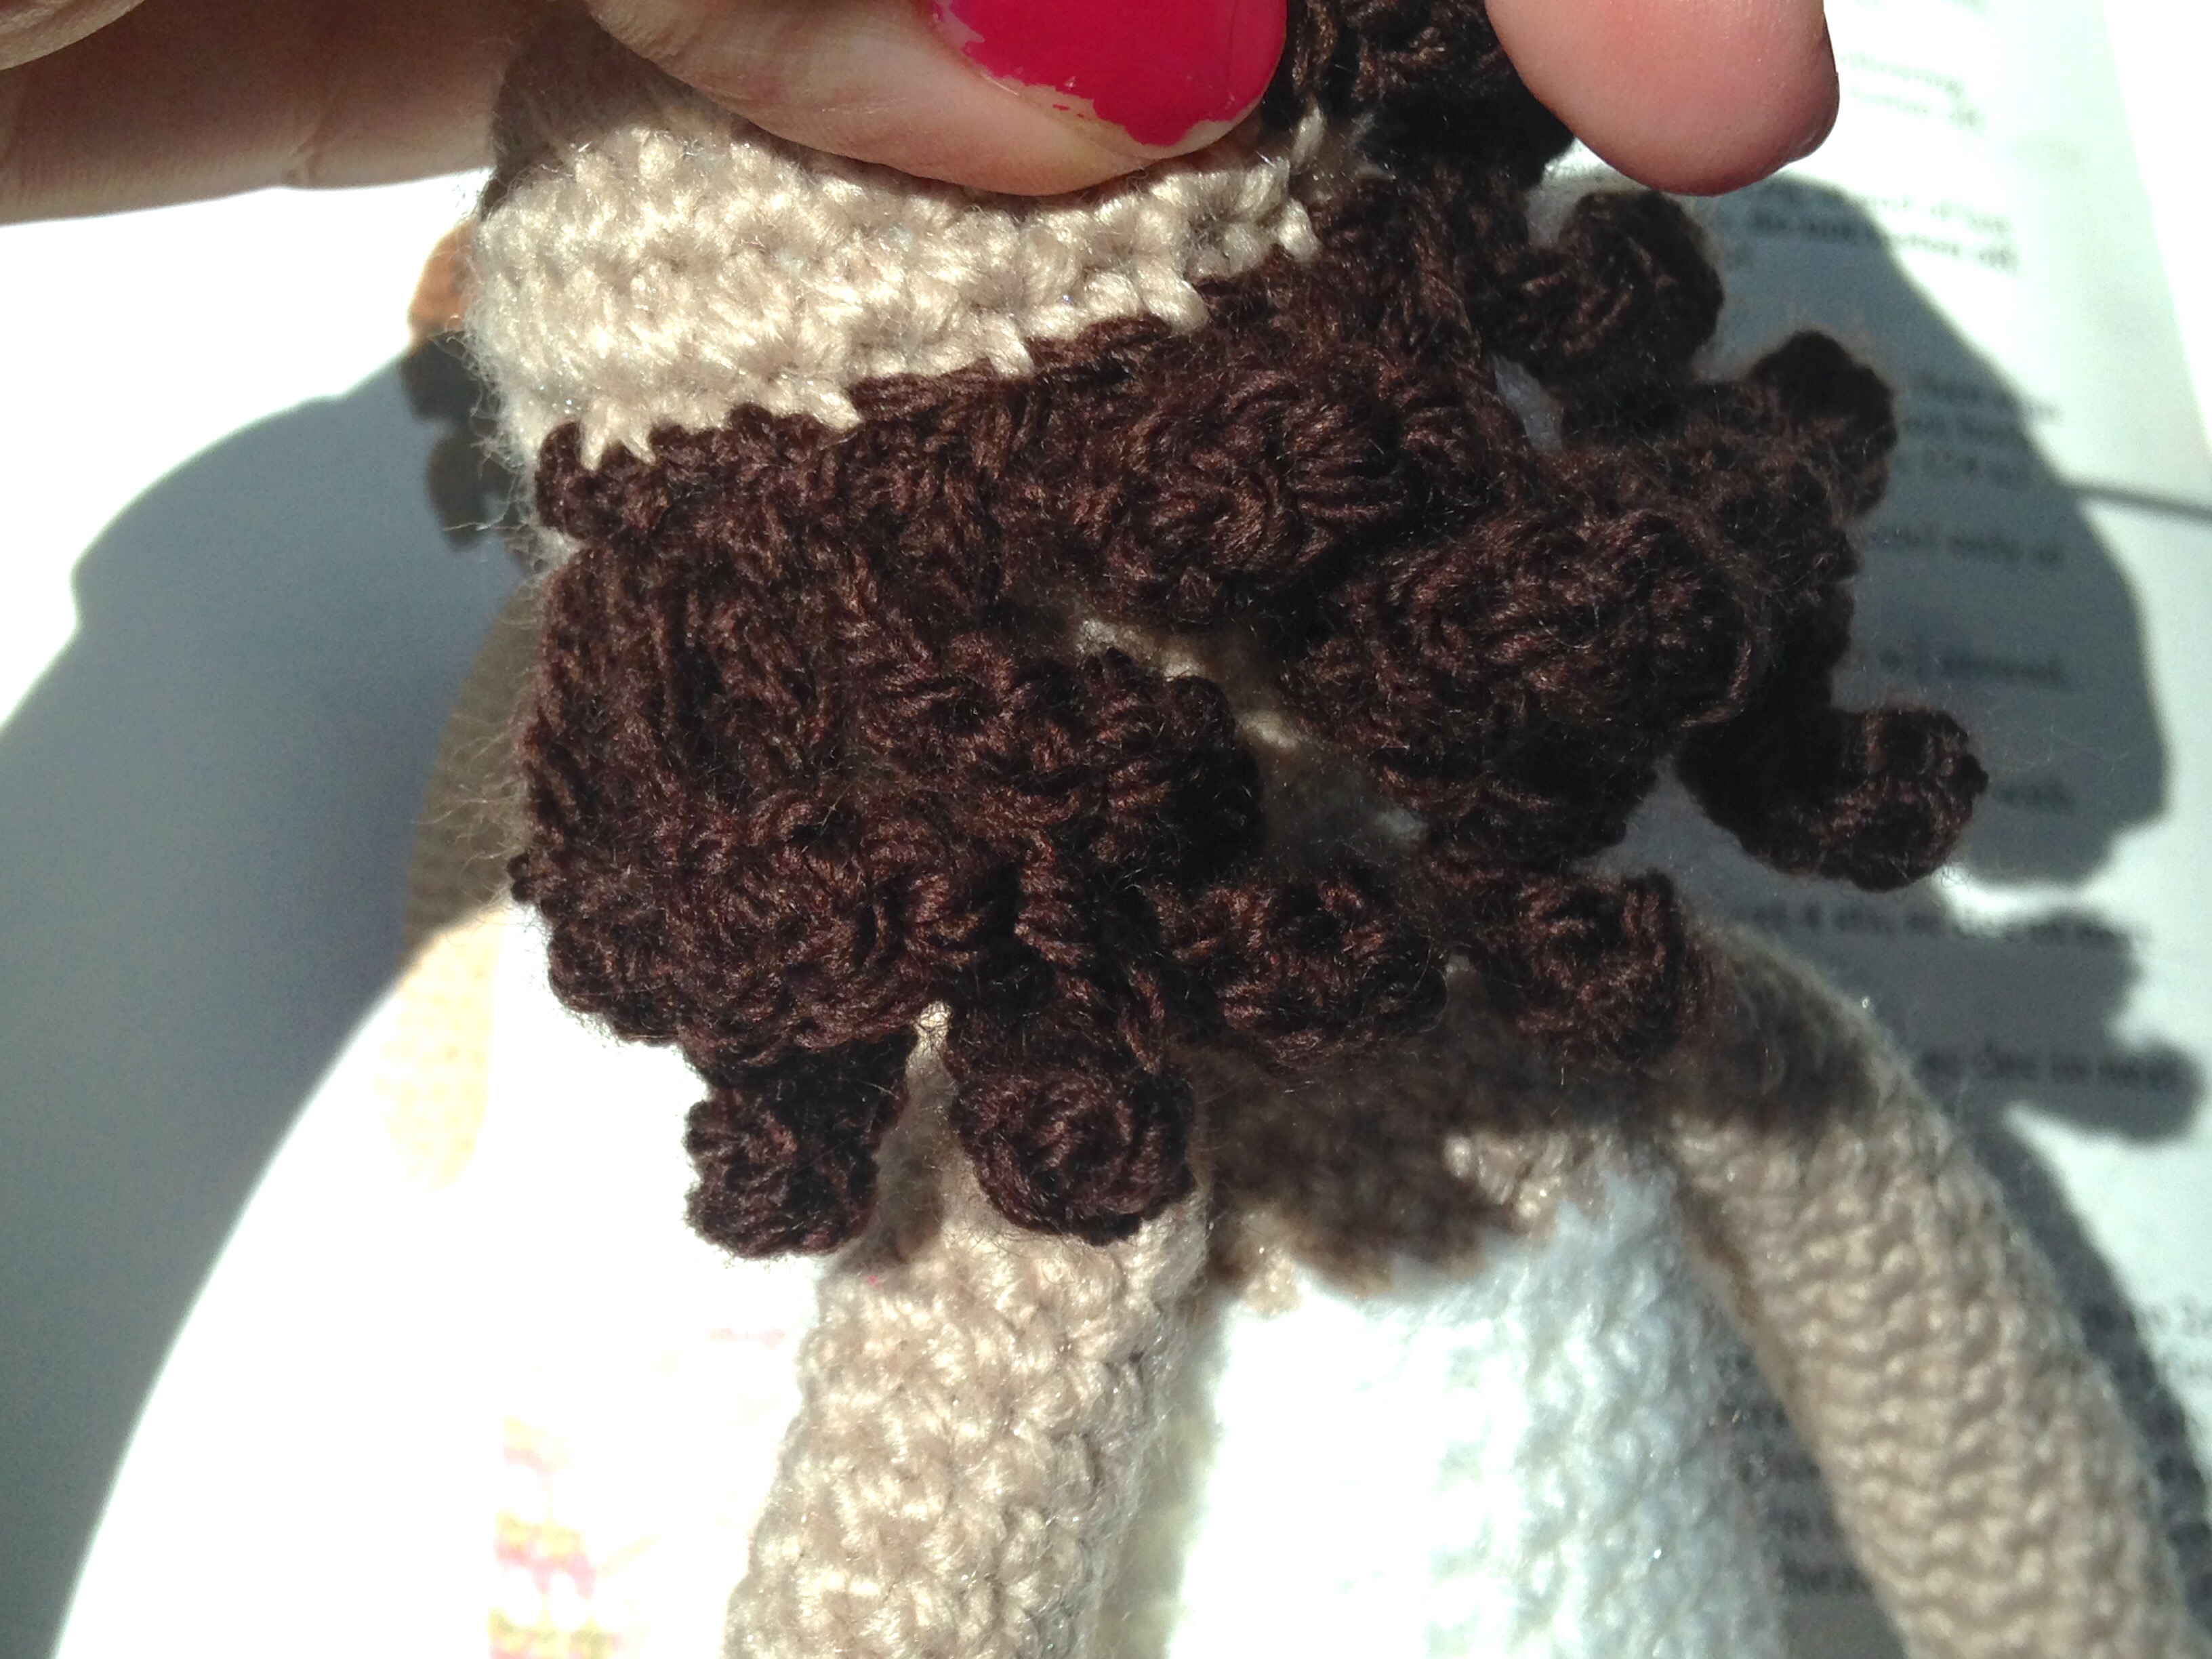
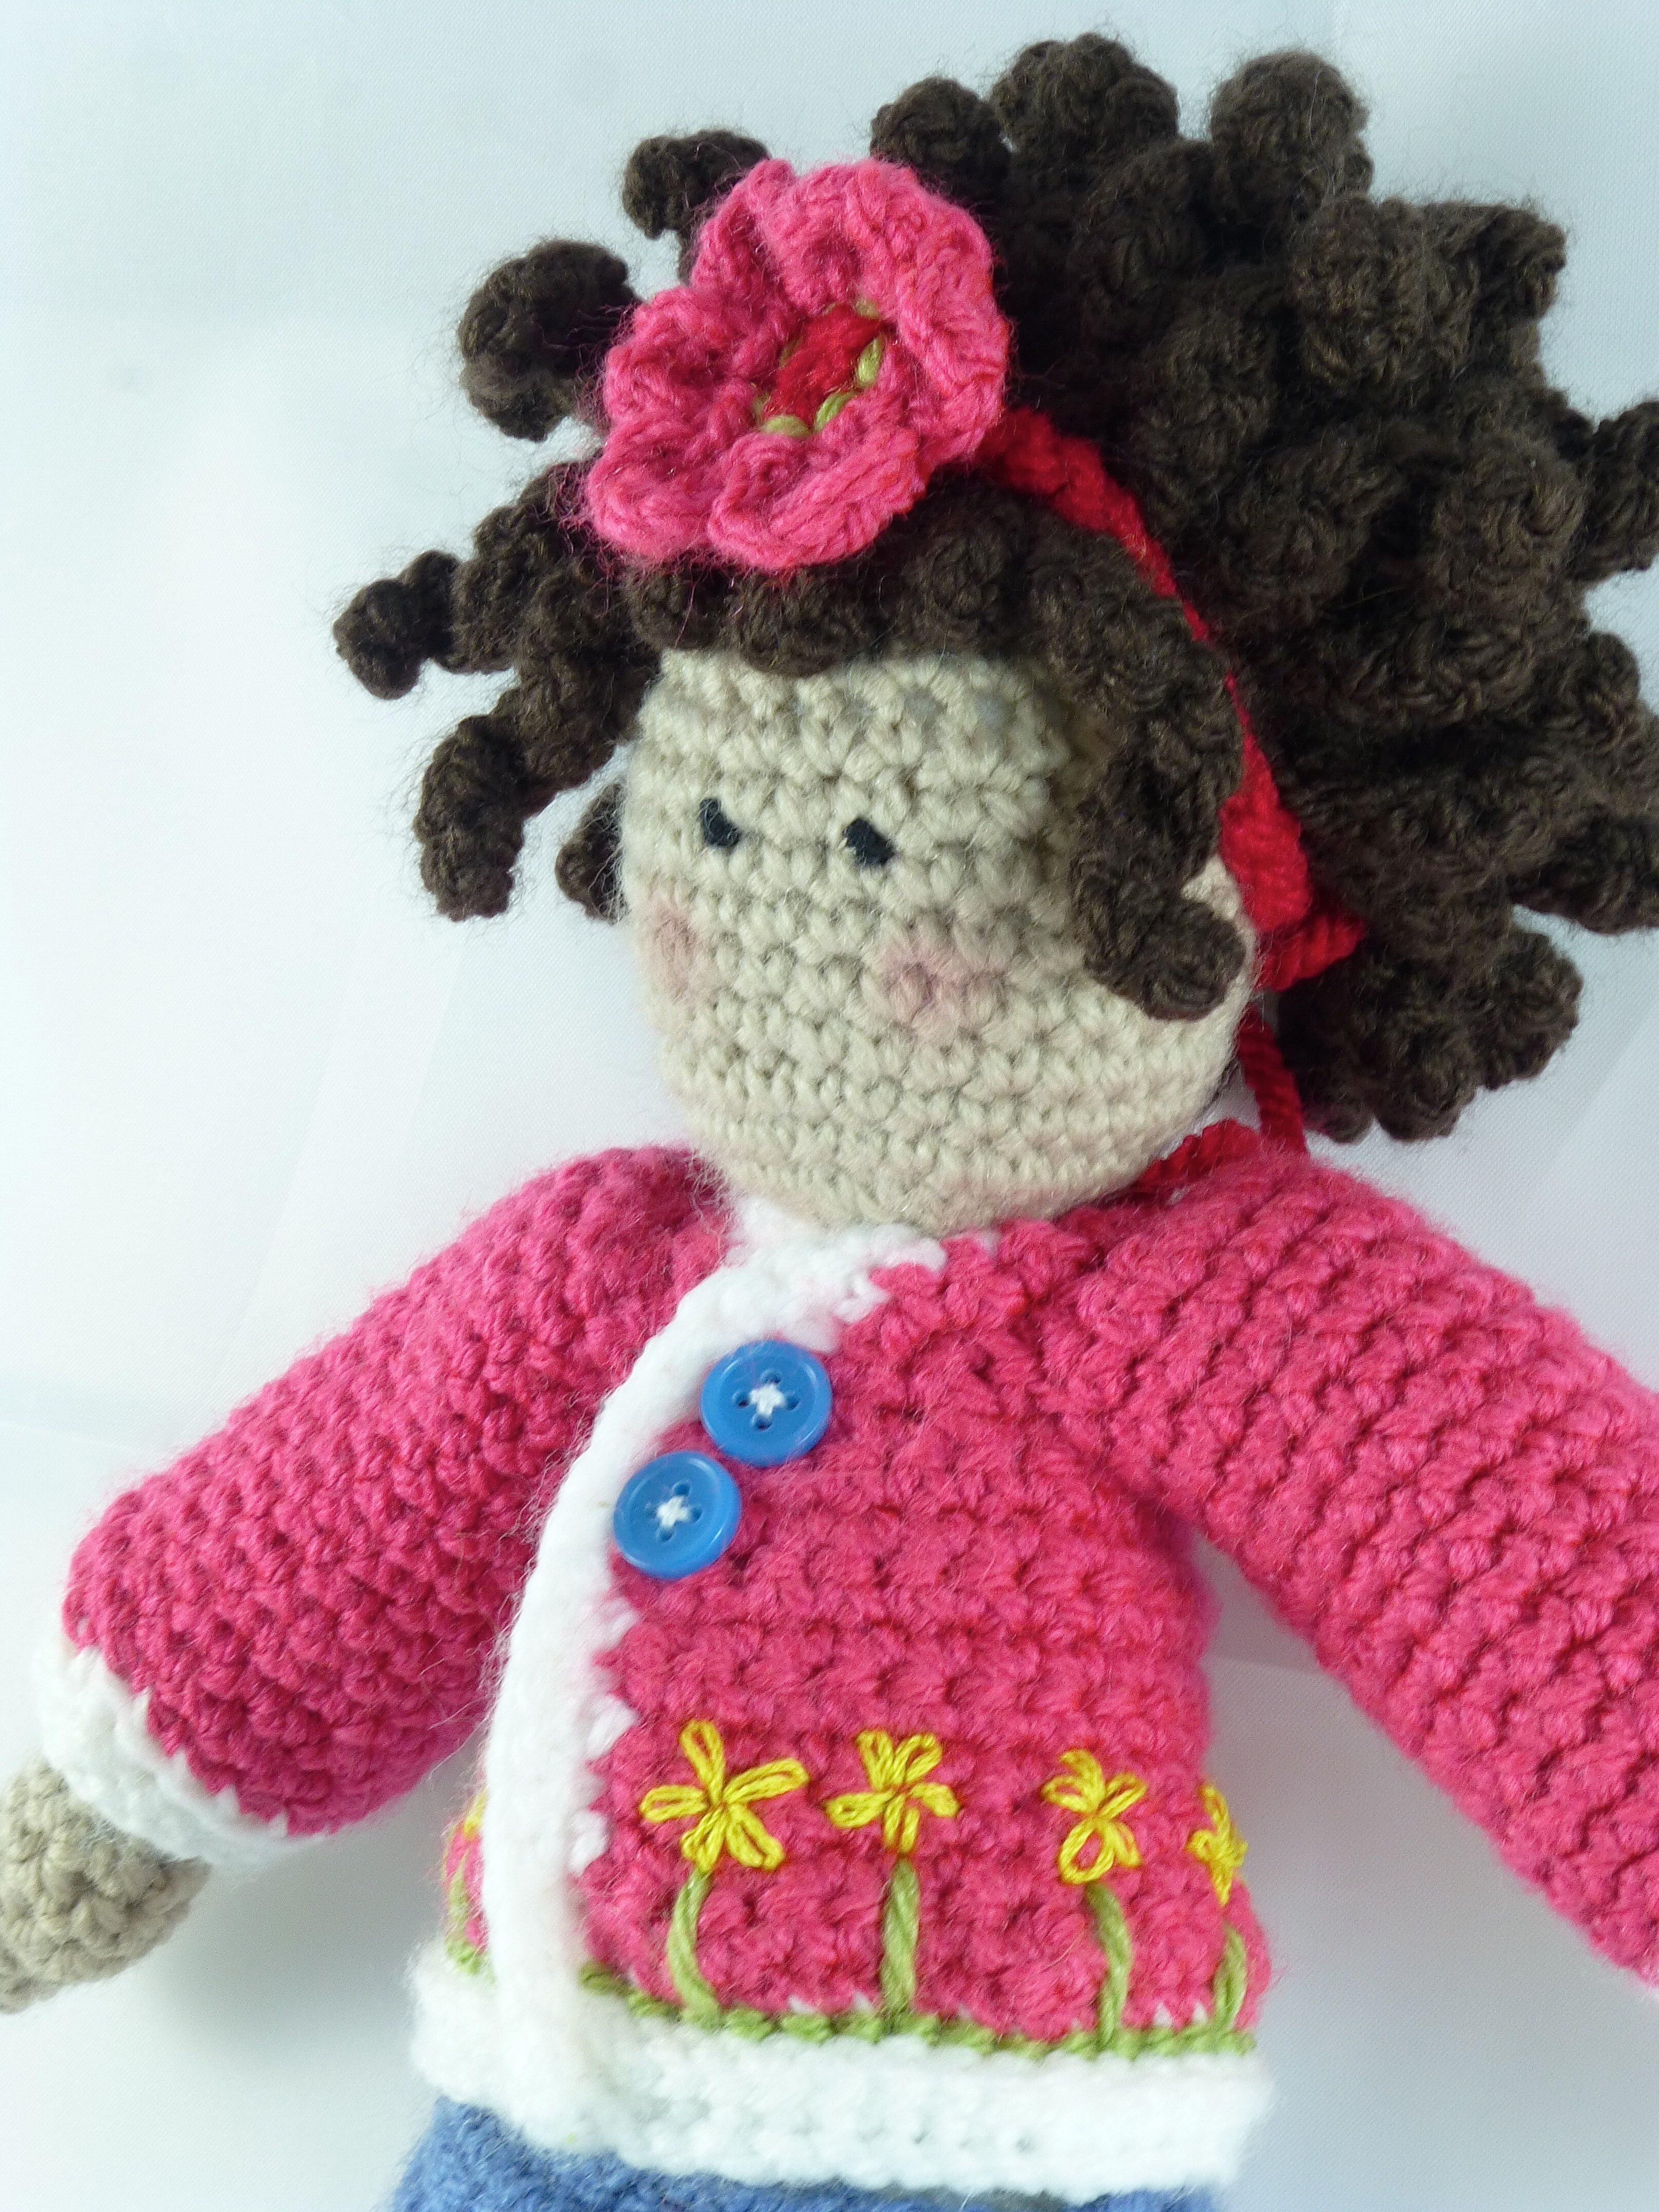
Next up was “Ginger Blue”, a college girl wearing trendy tights and a denim mini-skirt.
Remember I said you could chuck them in your handbag and crochet almost anywhere? This is Ginger’s skirt in process whilst sat in the car in a field for five hours while The Boys played in a football tournament on the way to Cornwall…..

My favourite part of the whole process was definitely making the hair. Each doll had a different method which were all very imaginative and extremely effective.
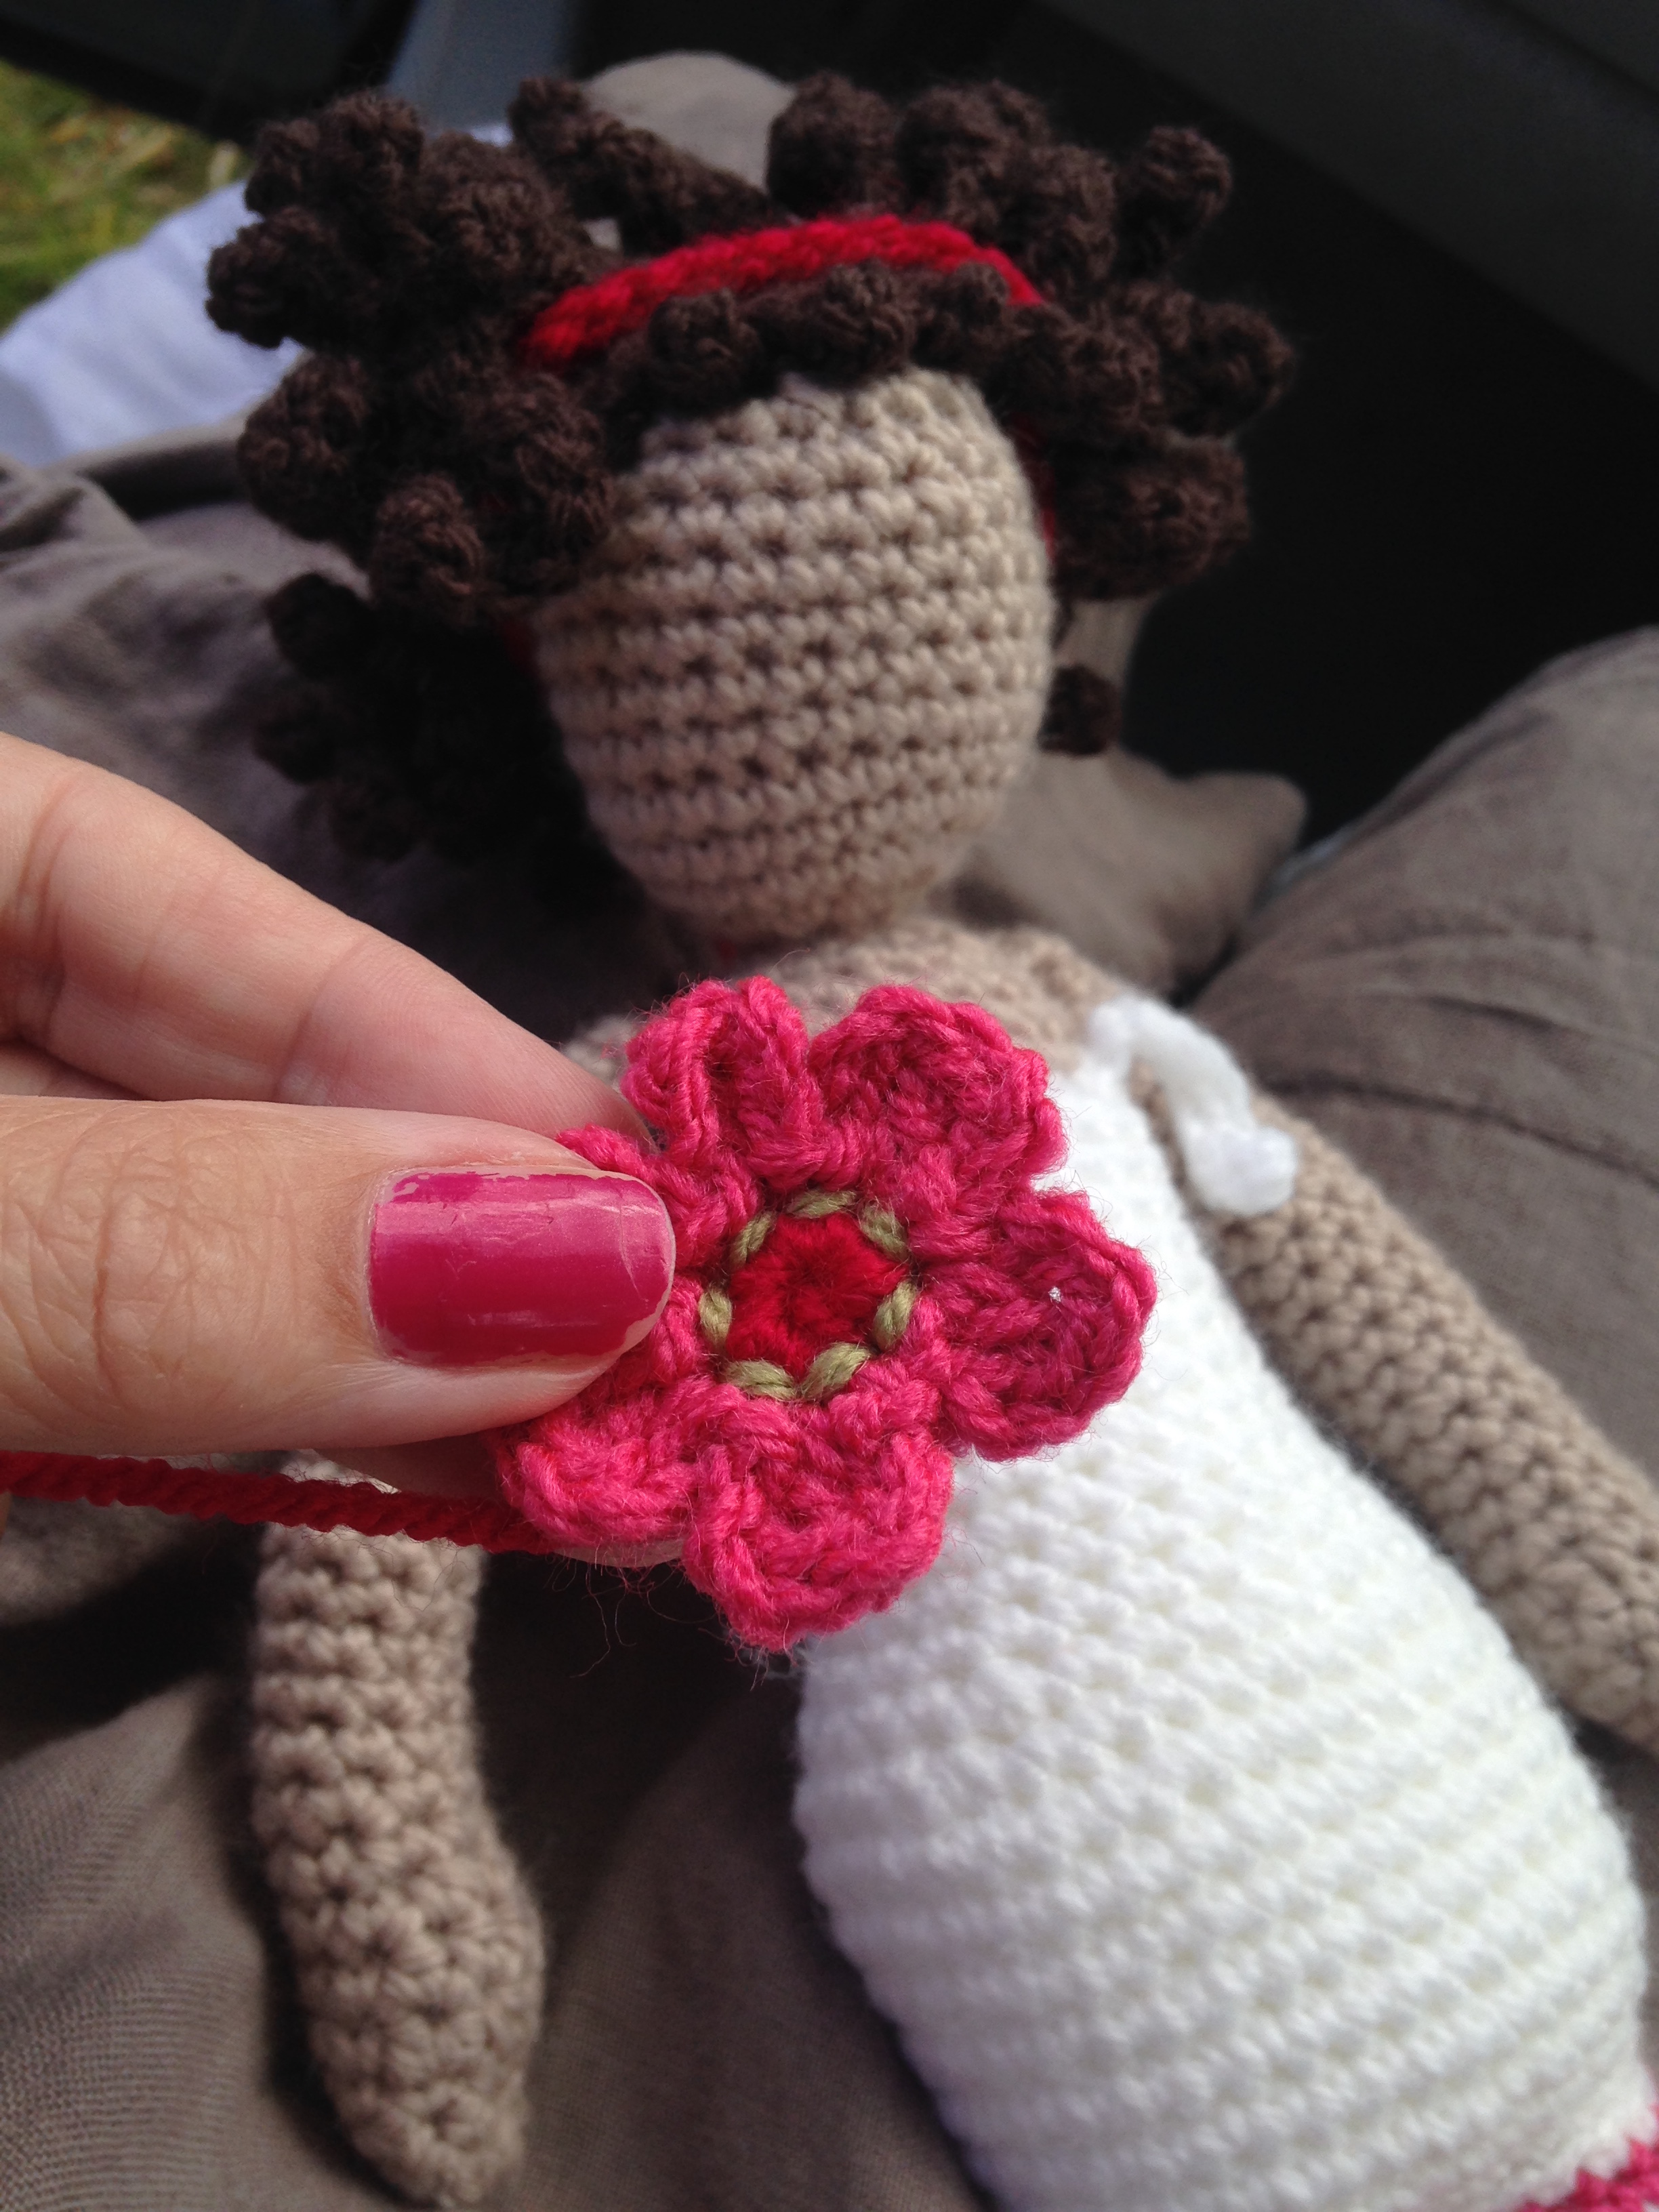
Ginger’s seemed to be based on an Afro and was worked in five curly layers plus a crown.
The finished layers were sewn horizontally upwards from the base of the head.
The whole was topped off with a cute little flower headband.
The cardigan pattern called for tiny buttons to be used for the flower heads, but I embroidered a series of chain stitches instead to form a Lazy Daisy.
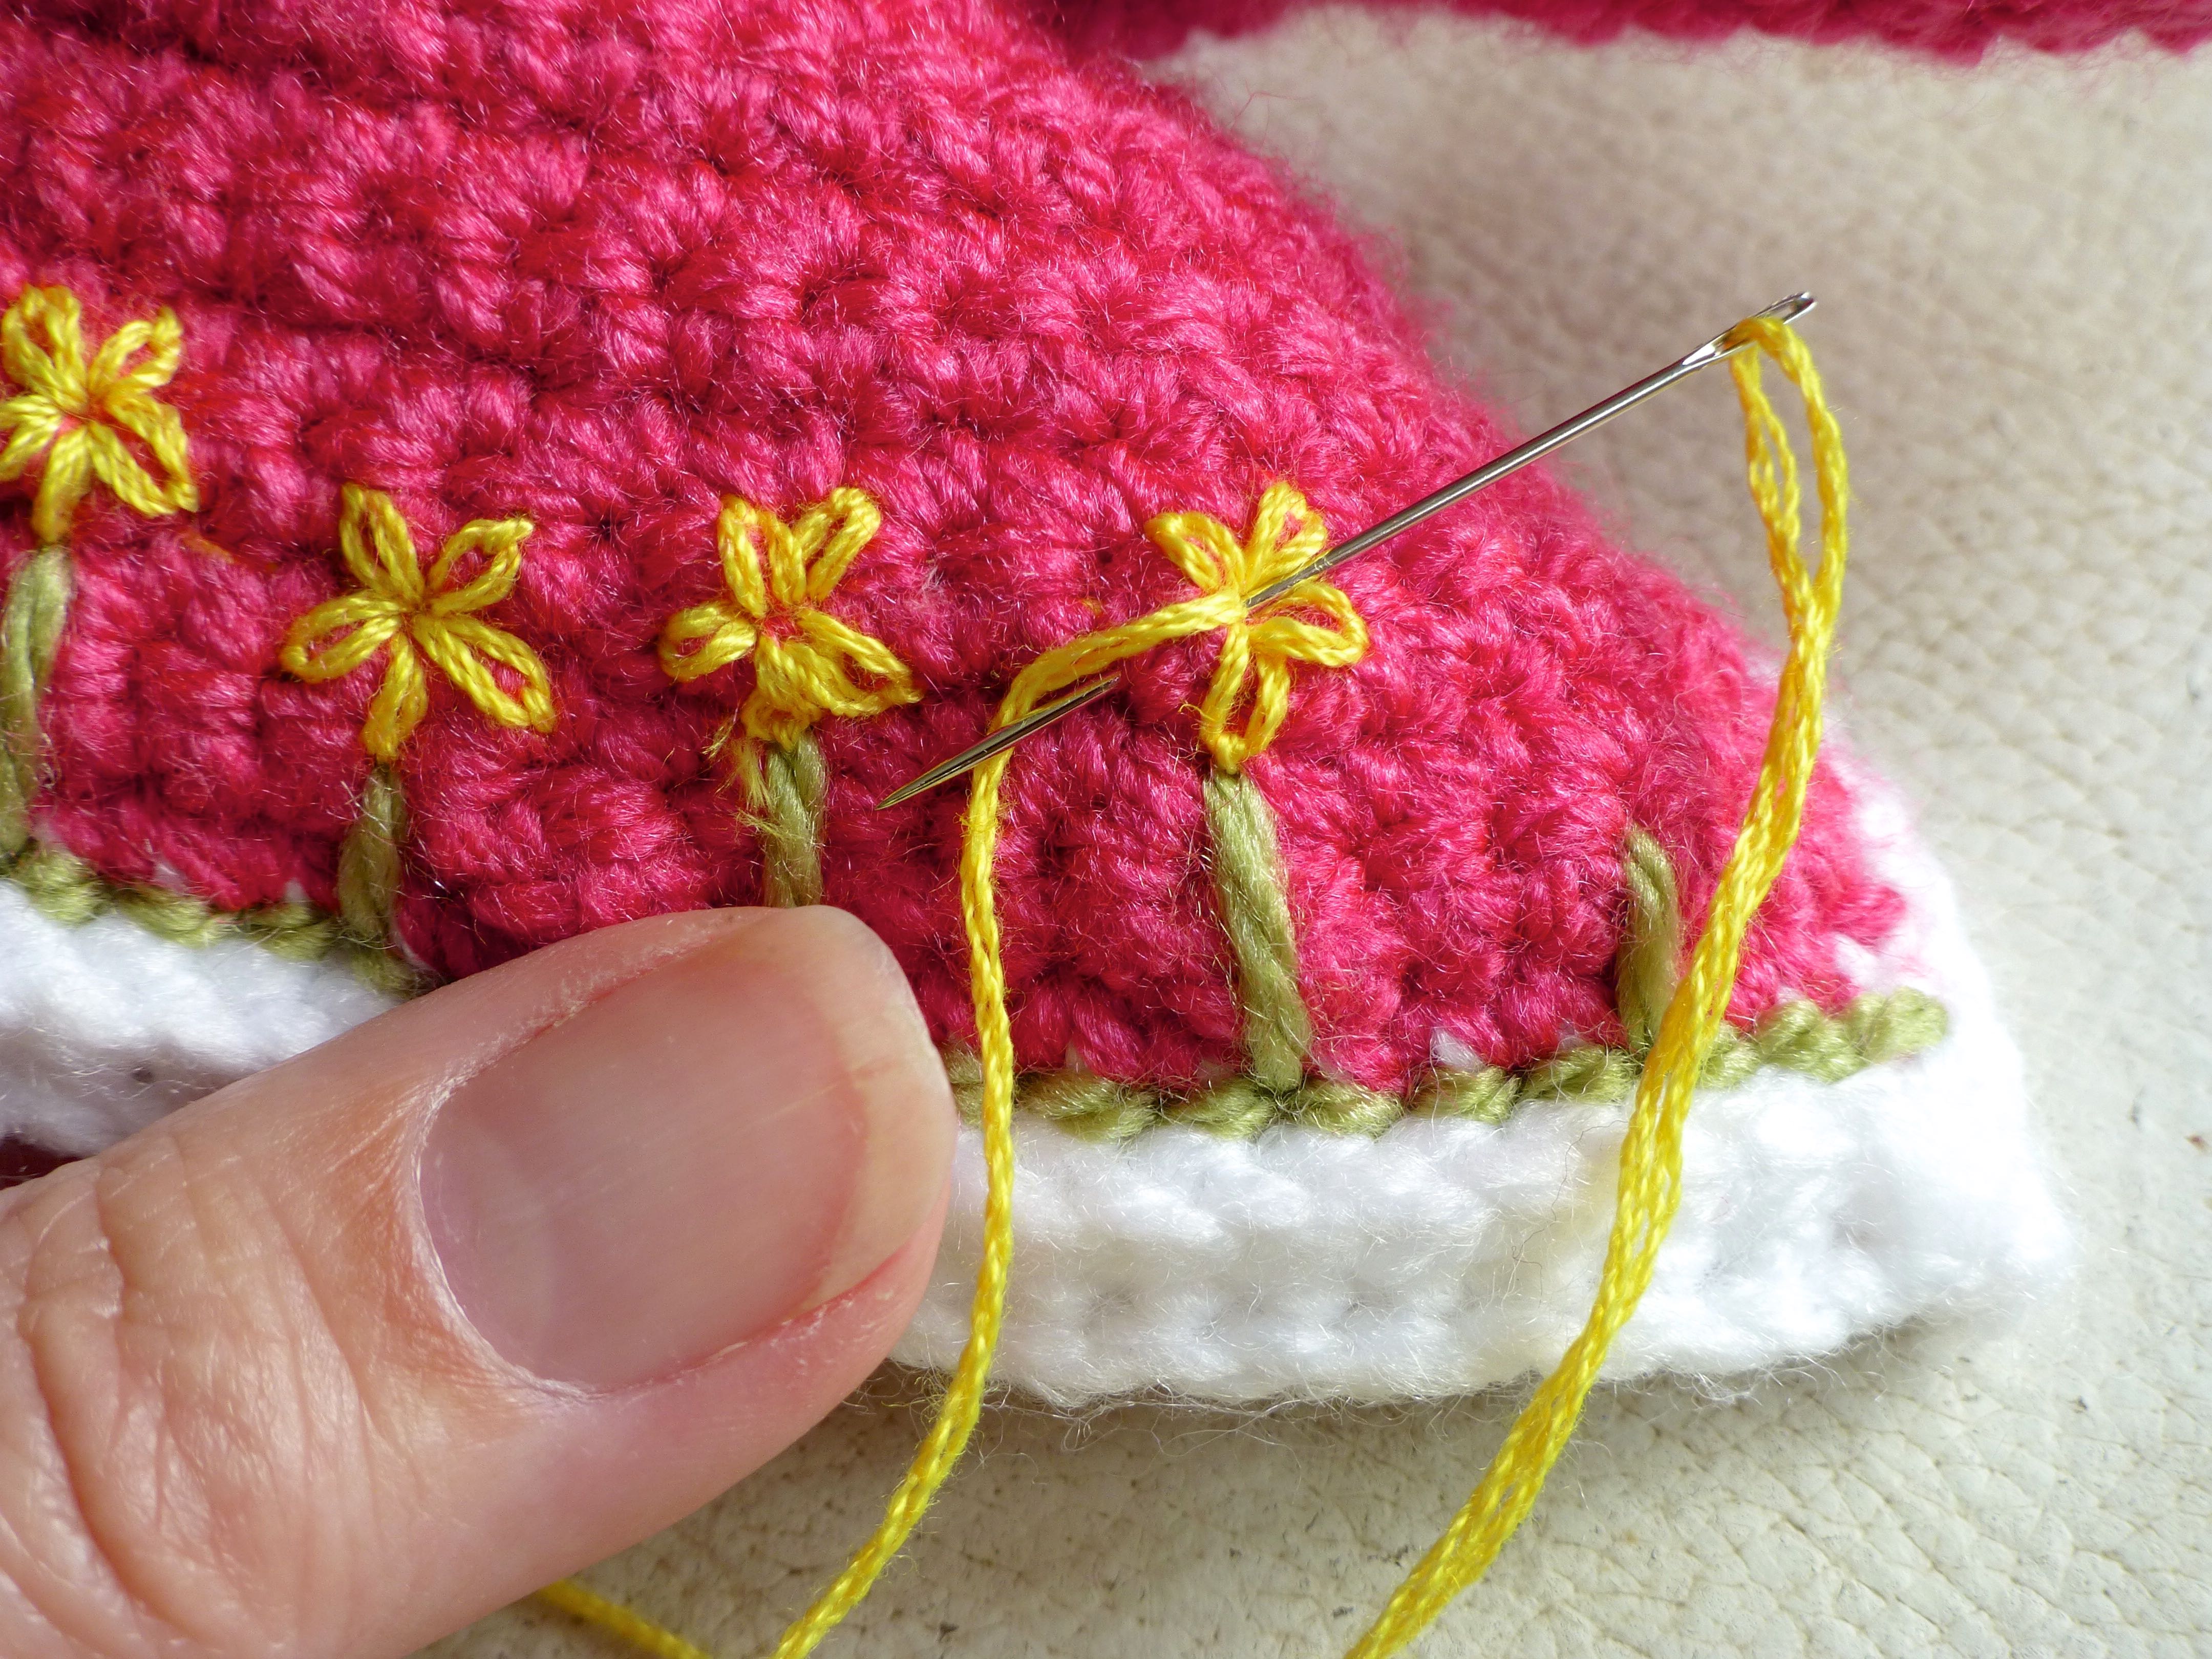
Two tiny blue shirt buttons reclaimed from the Child’s Play Tent are a brightly coloured addition.
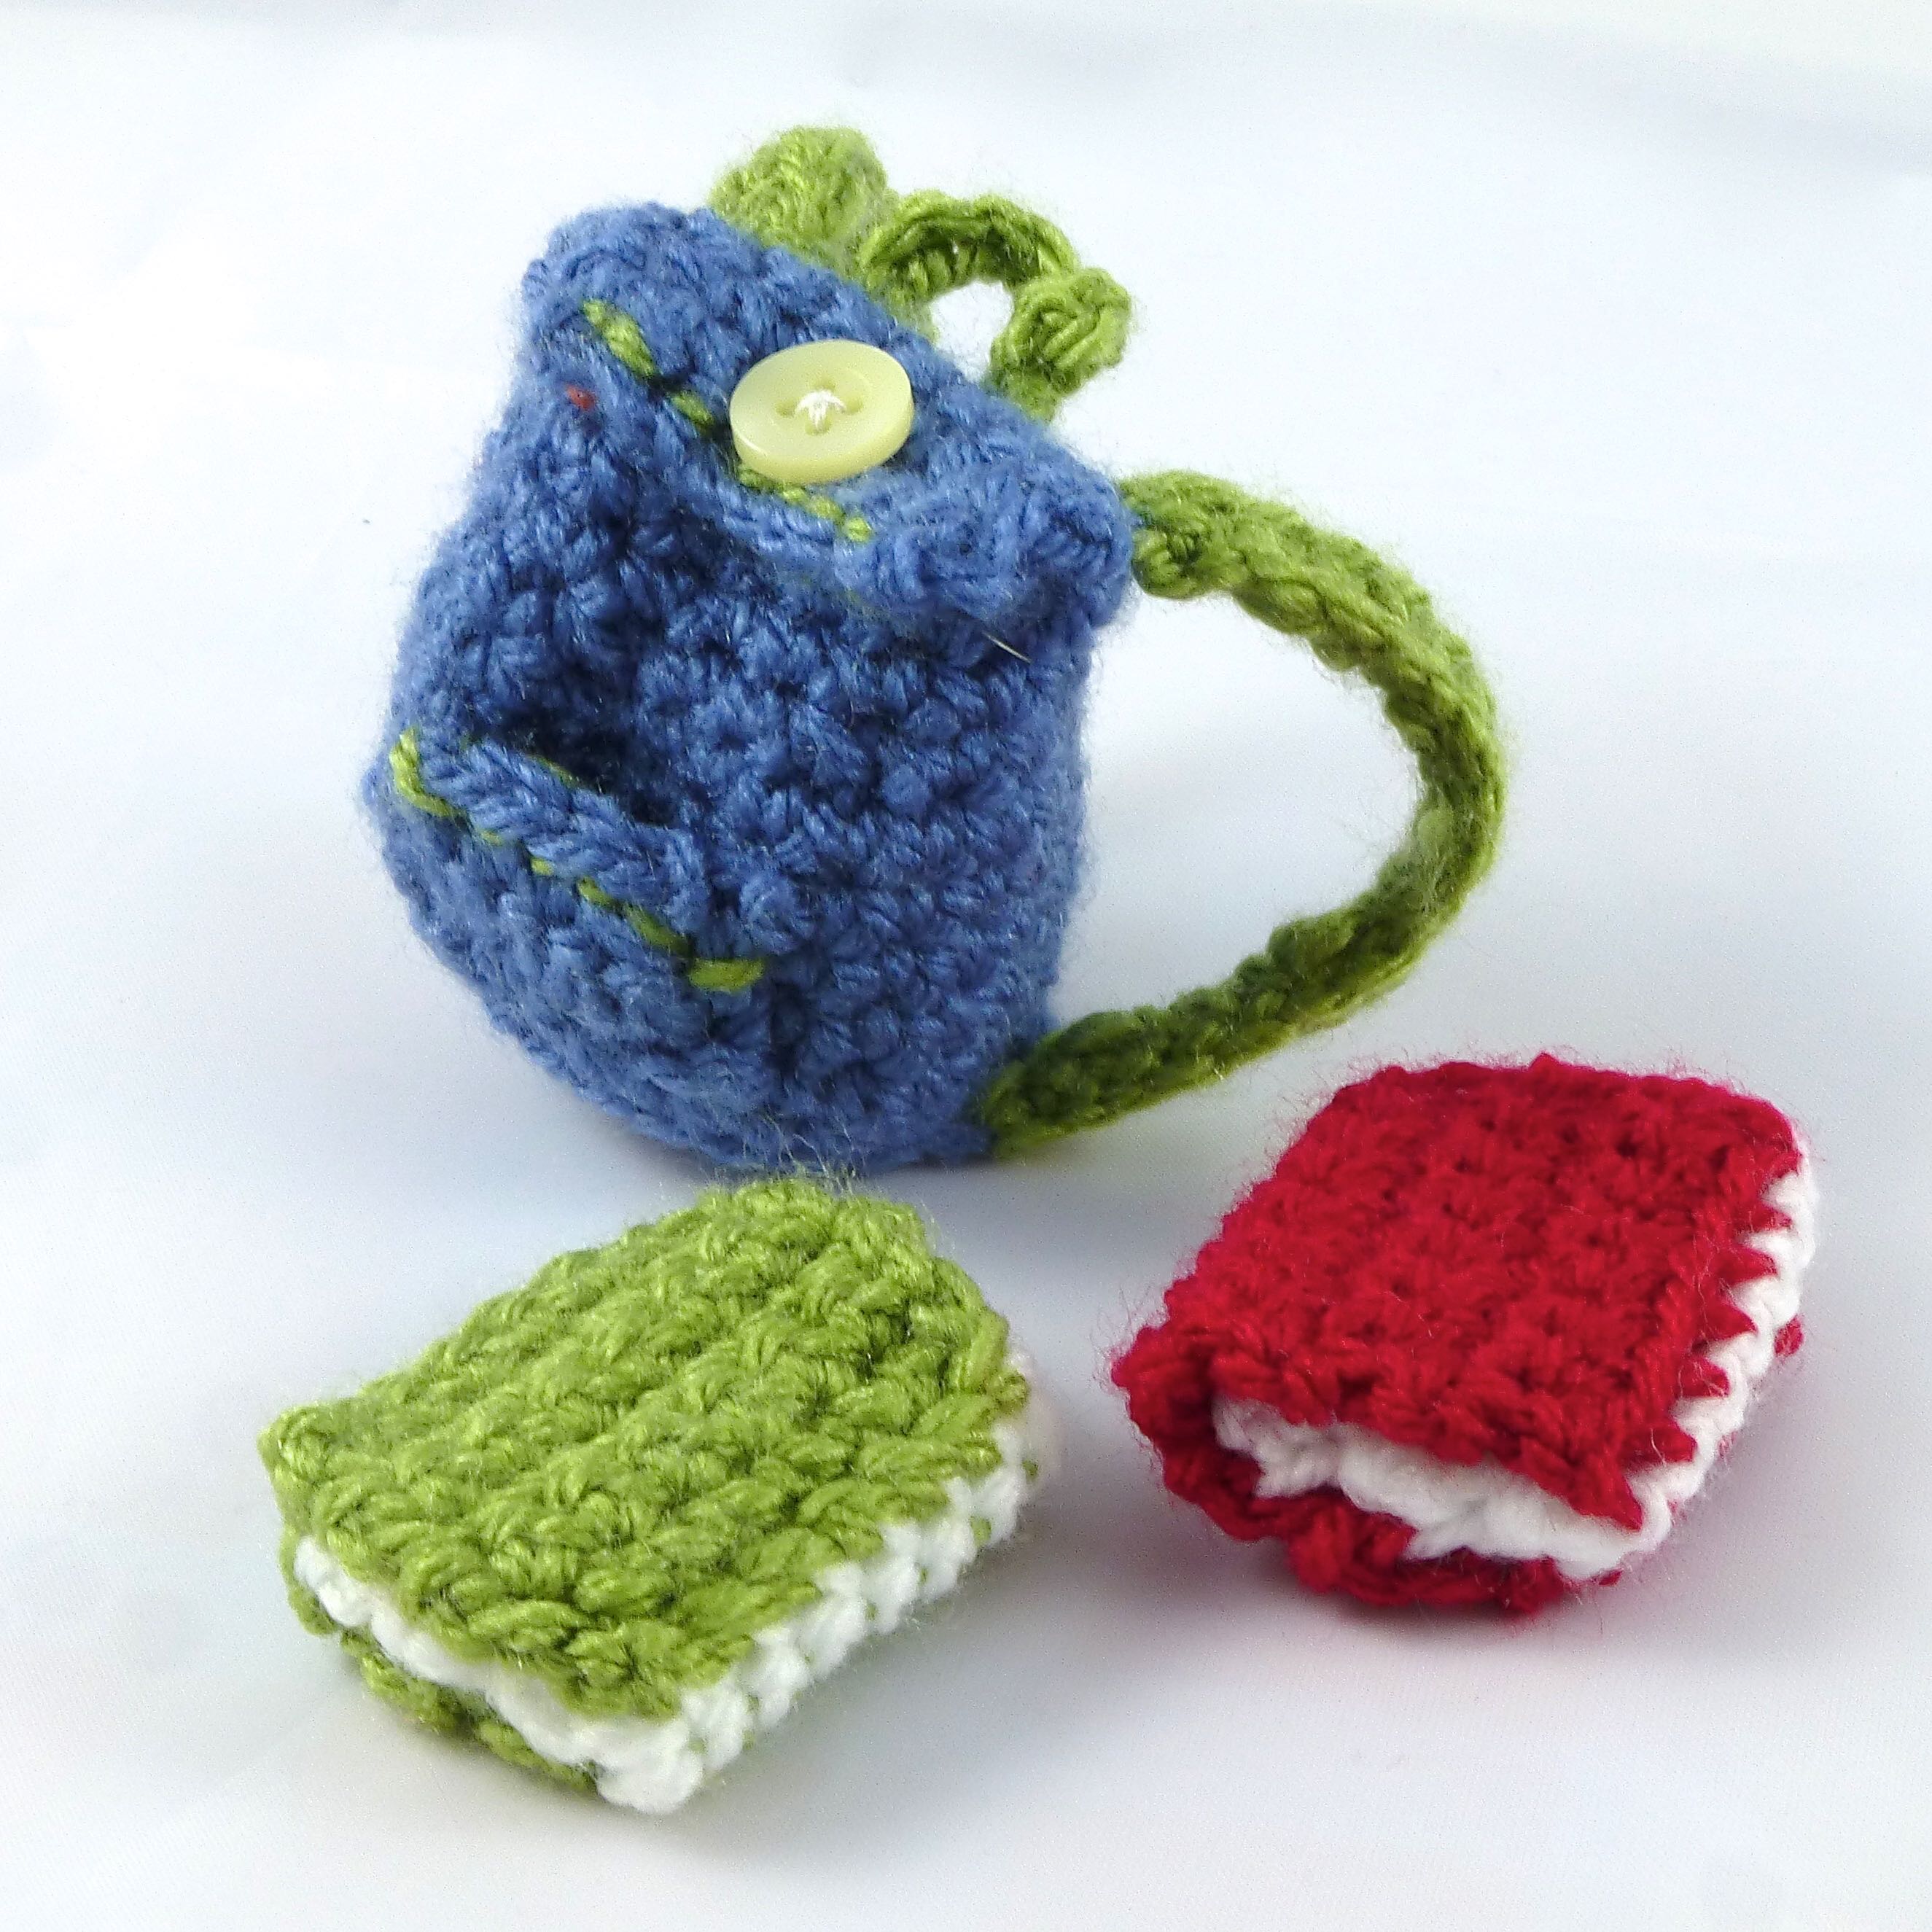
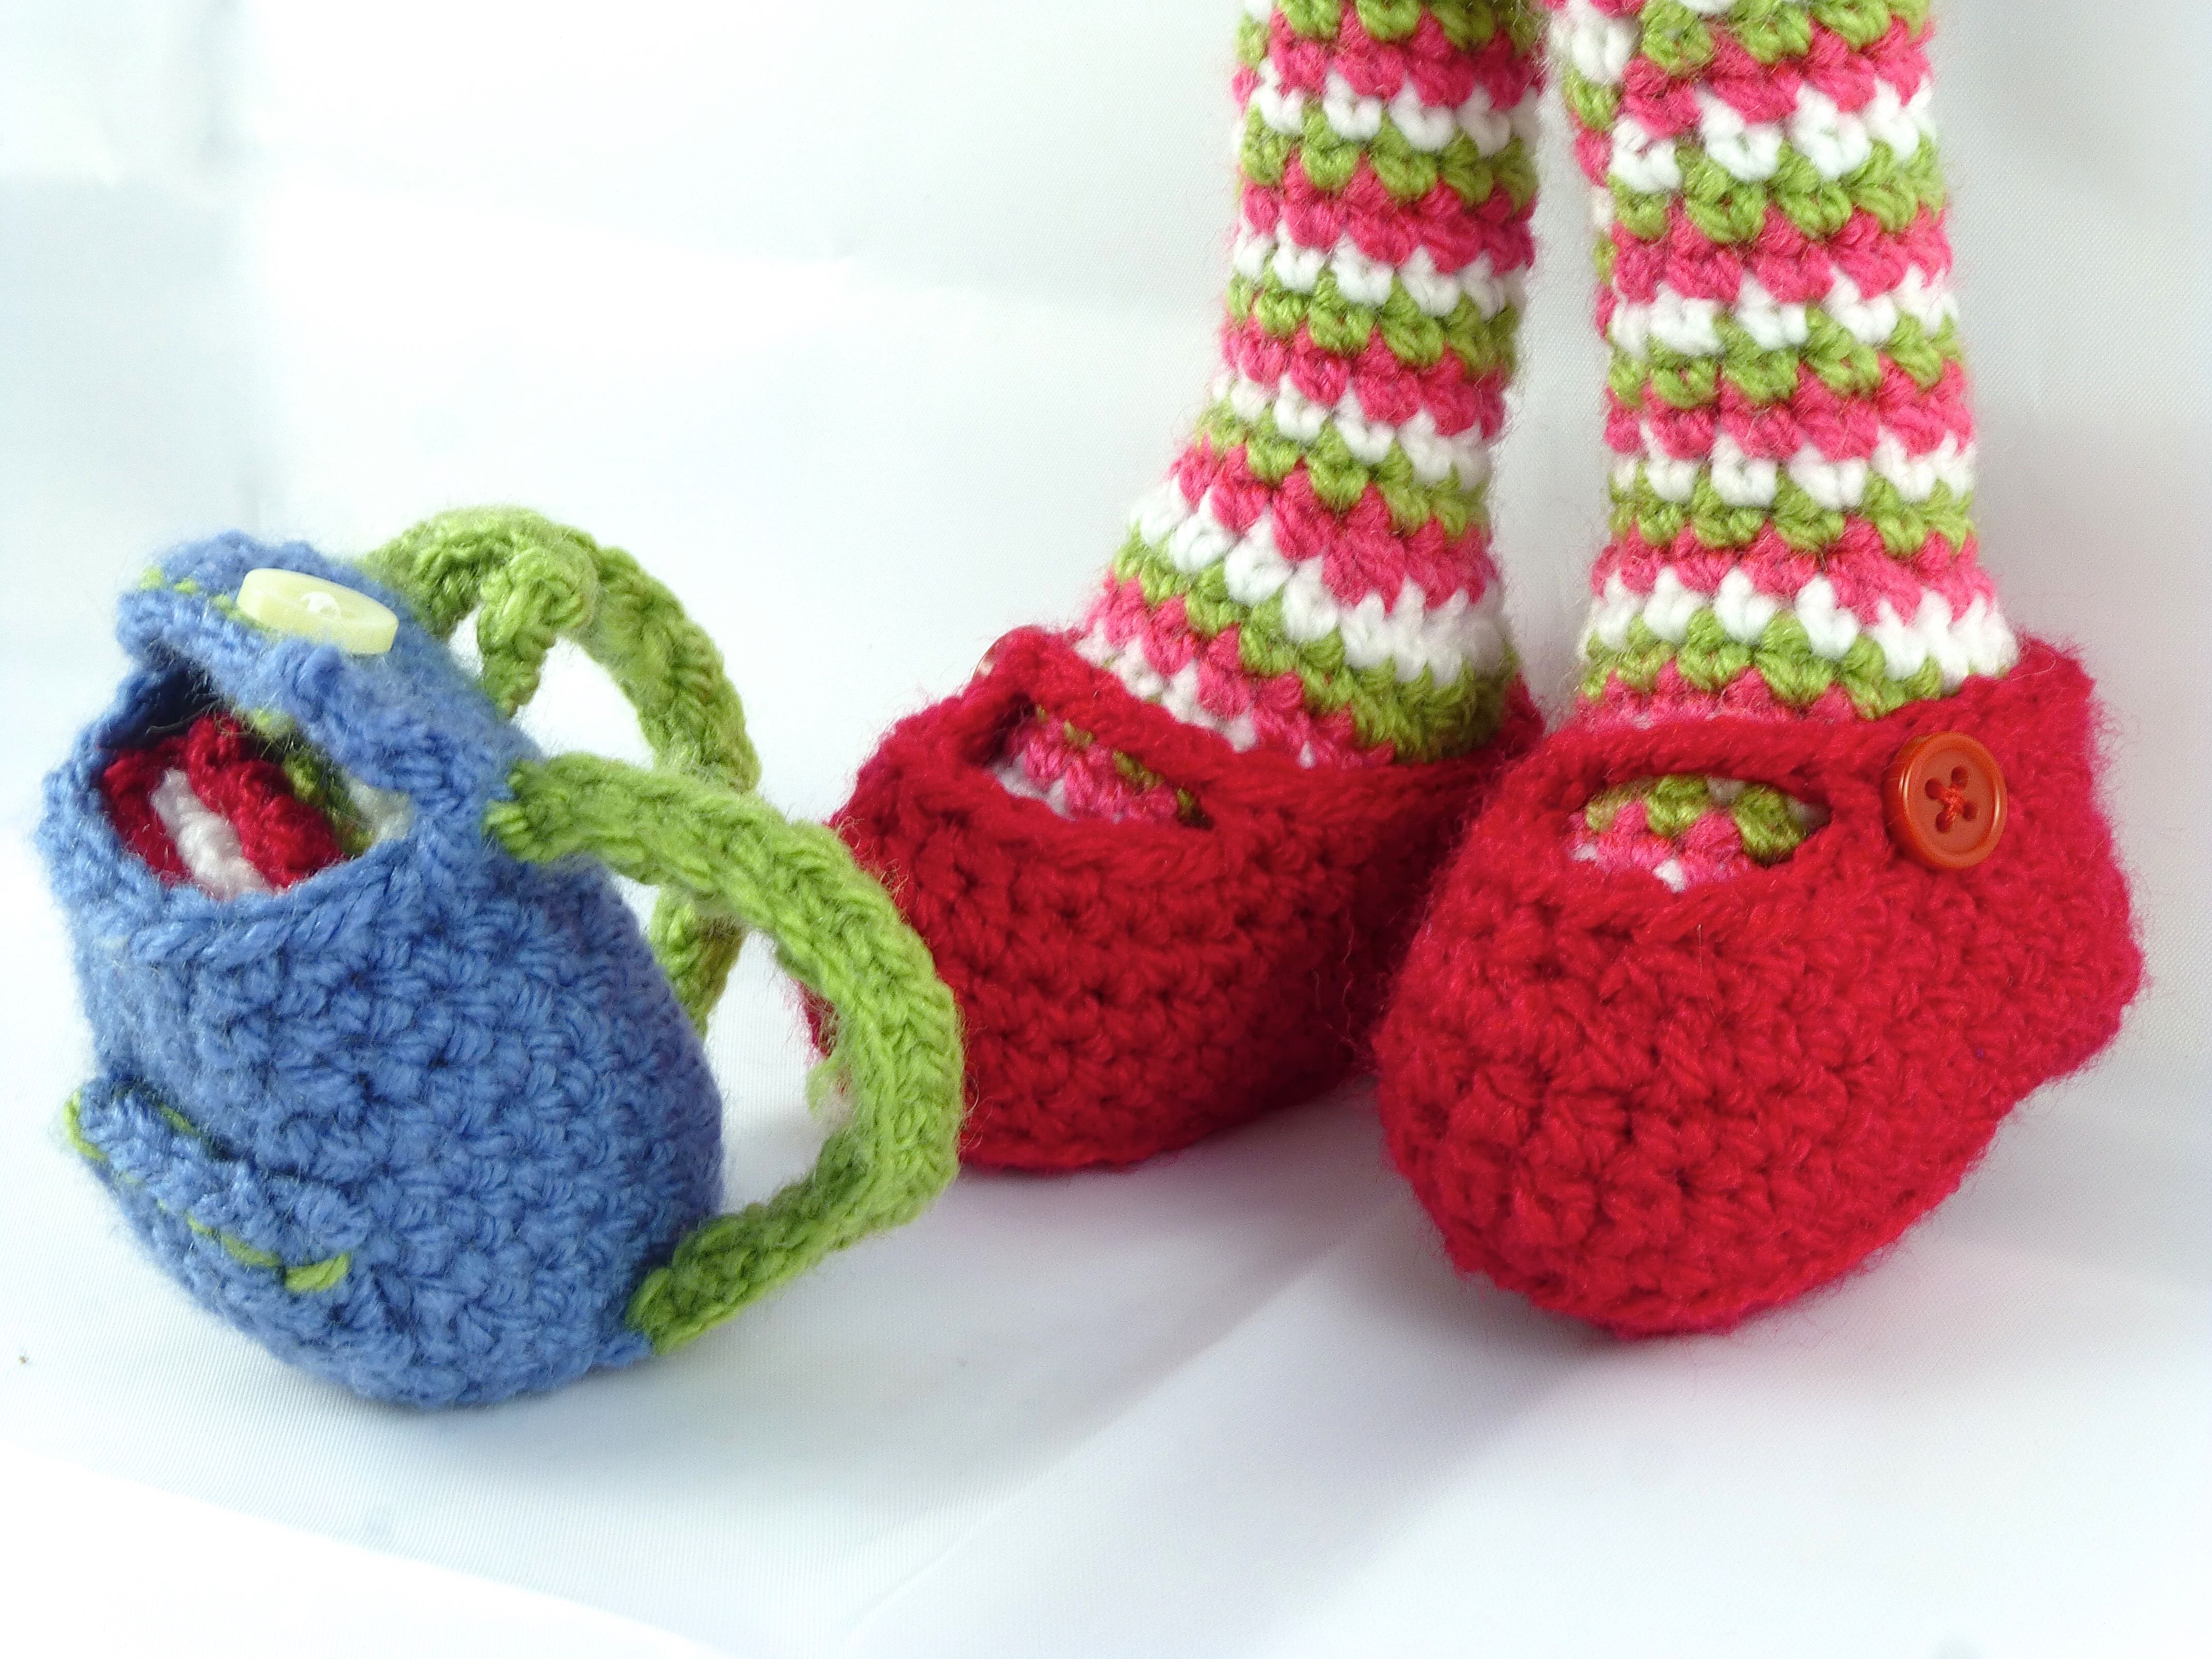
Being a college girl, the obligatory accompanying rucksack even has tiny crocheted textbooks that fit inside!

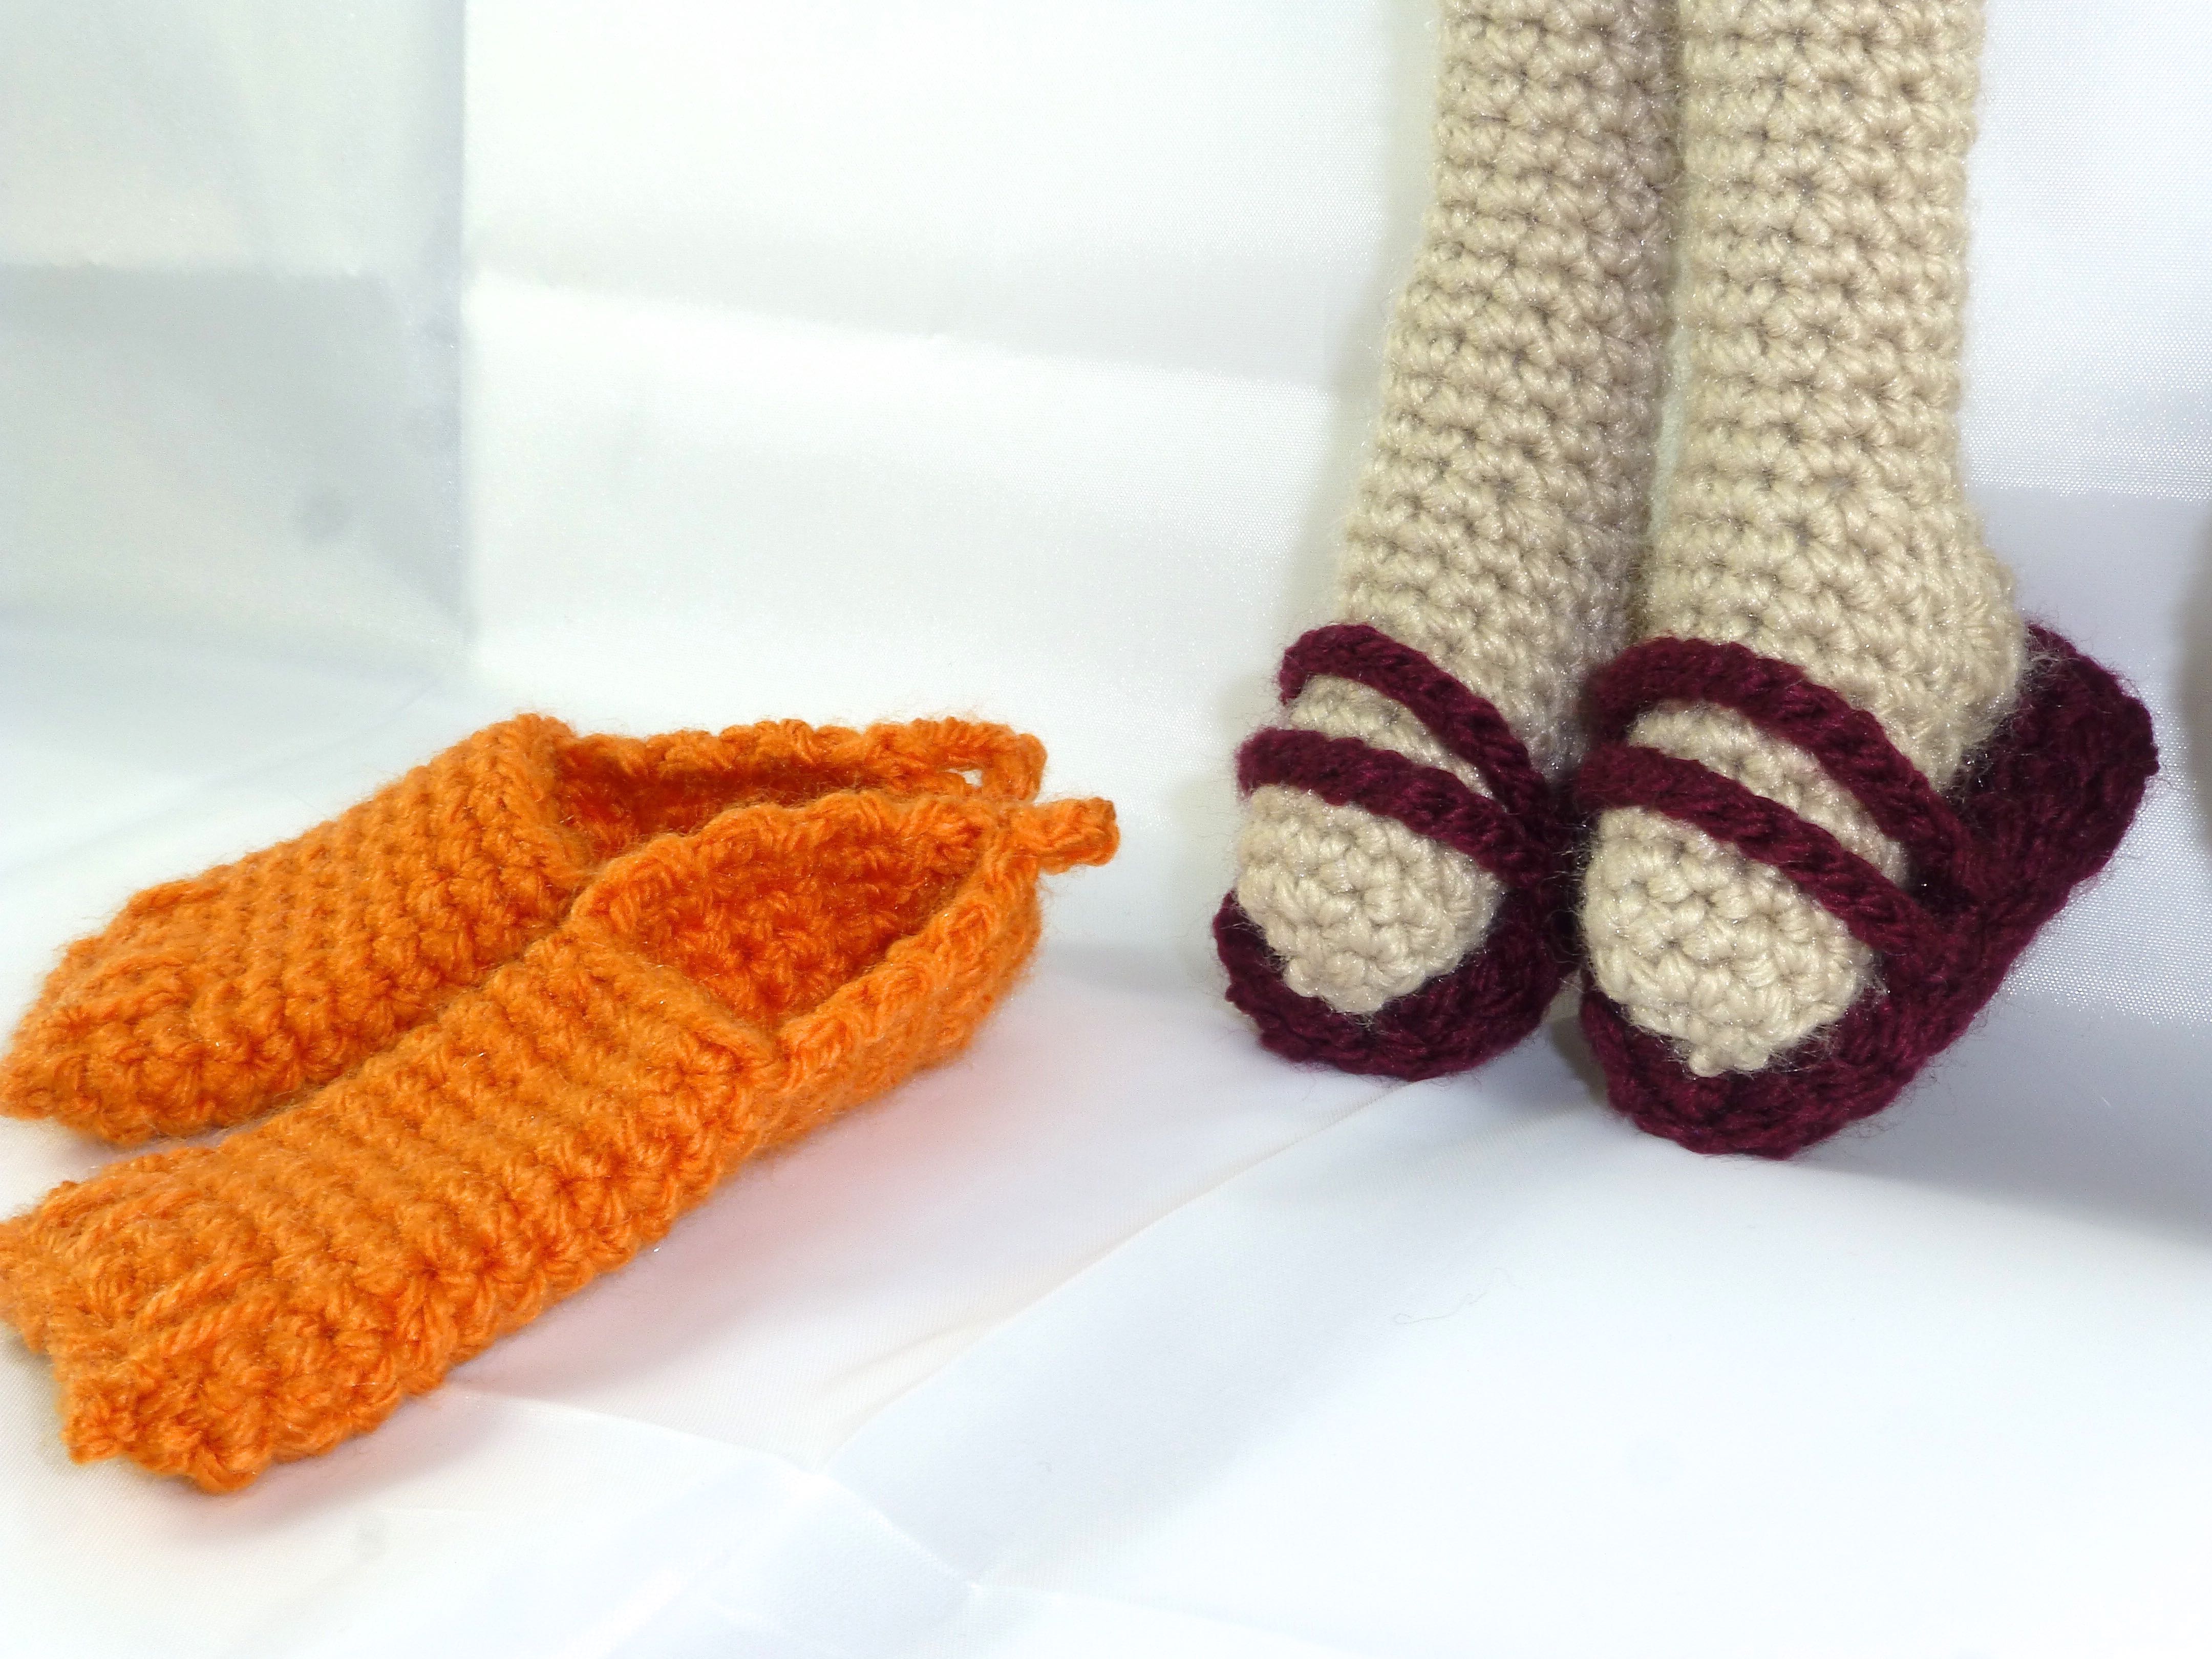
Mary-Jane shoes are adorned with more reclaimed shirt buttons, this time in Cherry Red.
And now for the “Ginger Blue” – TADAH!

And so, on to “Dani Rae”, a sun-worshipper who loves nothing more than a day at the seaside and whose outfit of choice is a one-piece swimsuit.

Dani Rae’s hair was the most fun to make and was crocheted in wig format before being stitched on to the head in its entirety. I love the way the hair curls out at the ends – such great design detail.

Just look at those flip-flops and flippers!
Of course, every girl needs a sun hat to prevent sun stroke and, if it has a flower on it, so much the better.

A ‘rubber’ ring is the essential remaining accessory for fun in the waves.

Here is “Dani Rae” in all her finery ready for her “TADAH!” moment.

Finally, we move on to “Nurse Deb”, a midwife of the highest distinction, dressed in theatre scrubs.
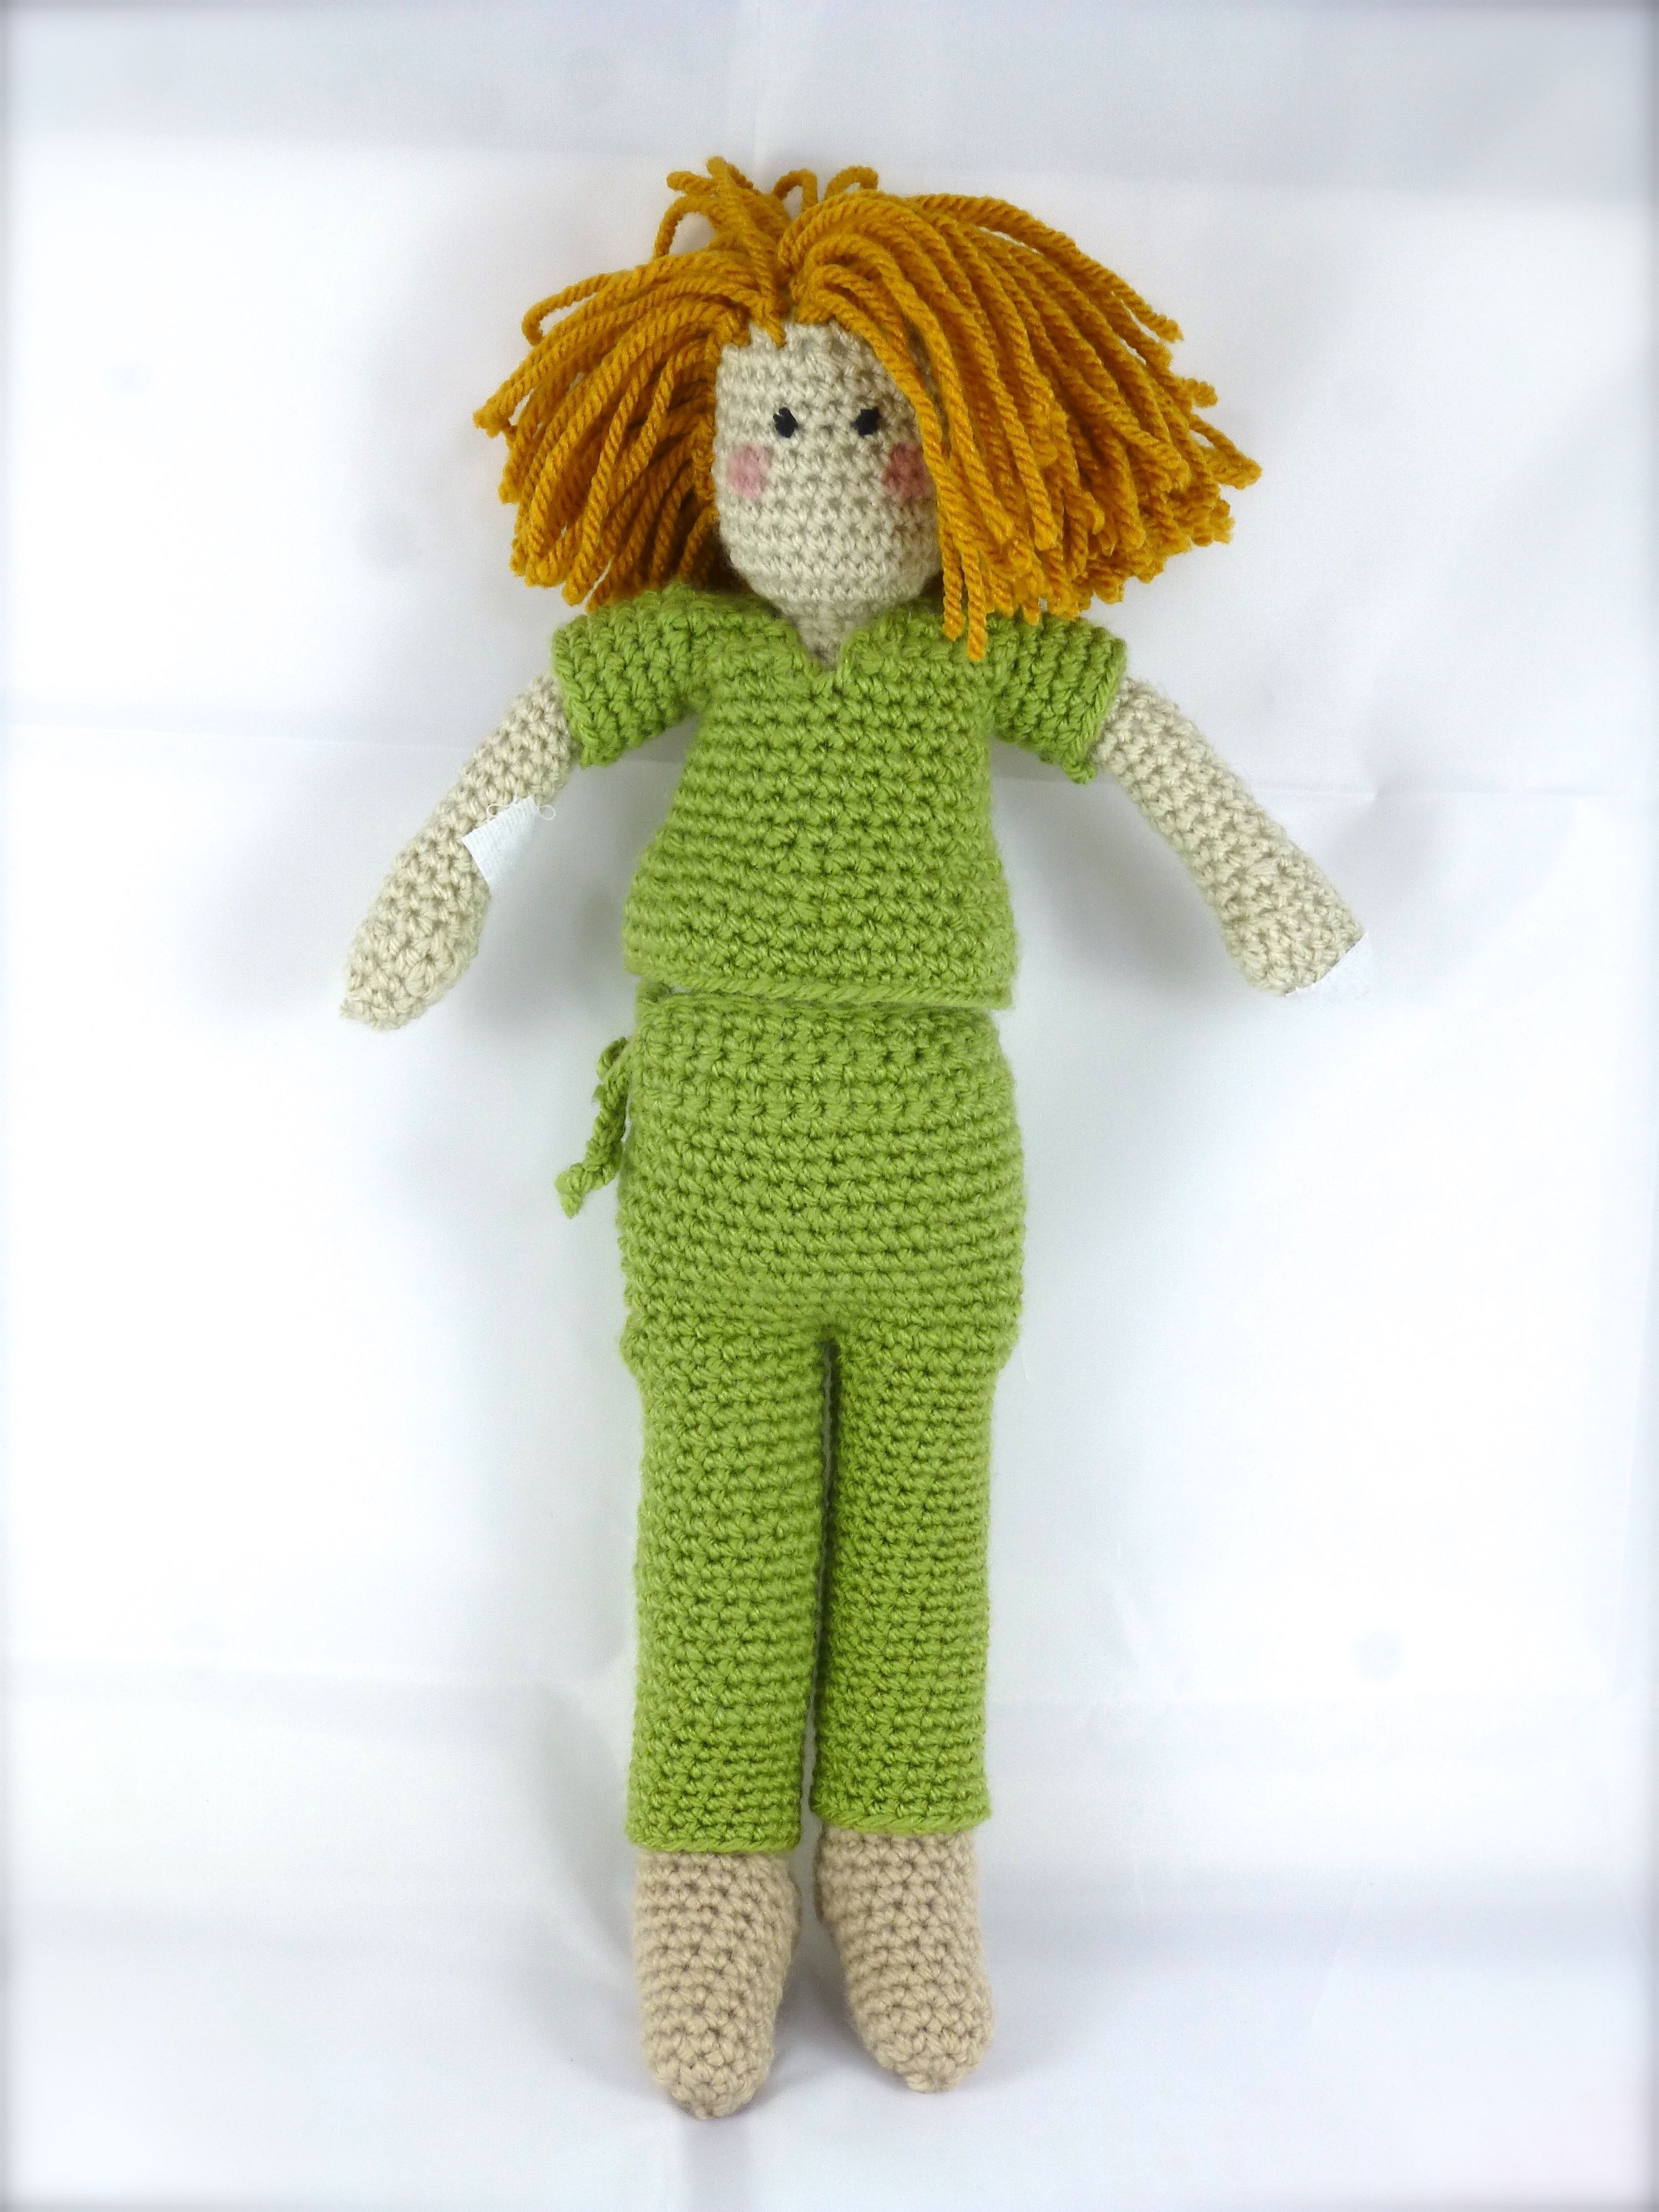
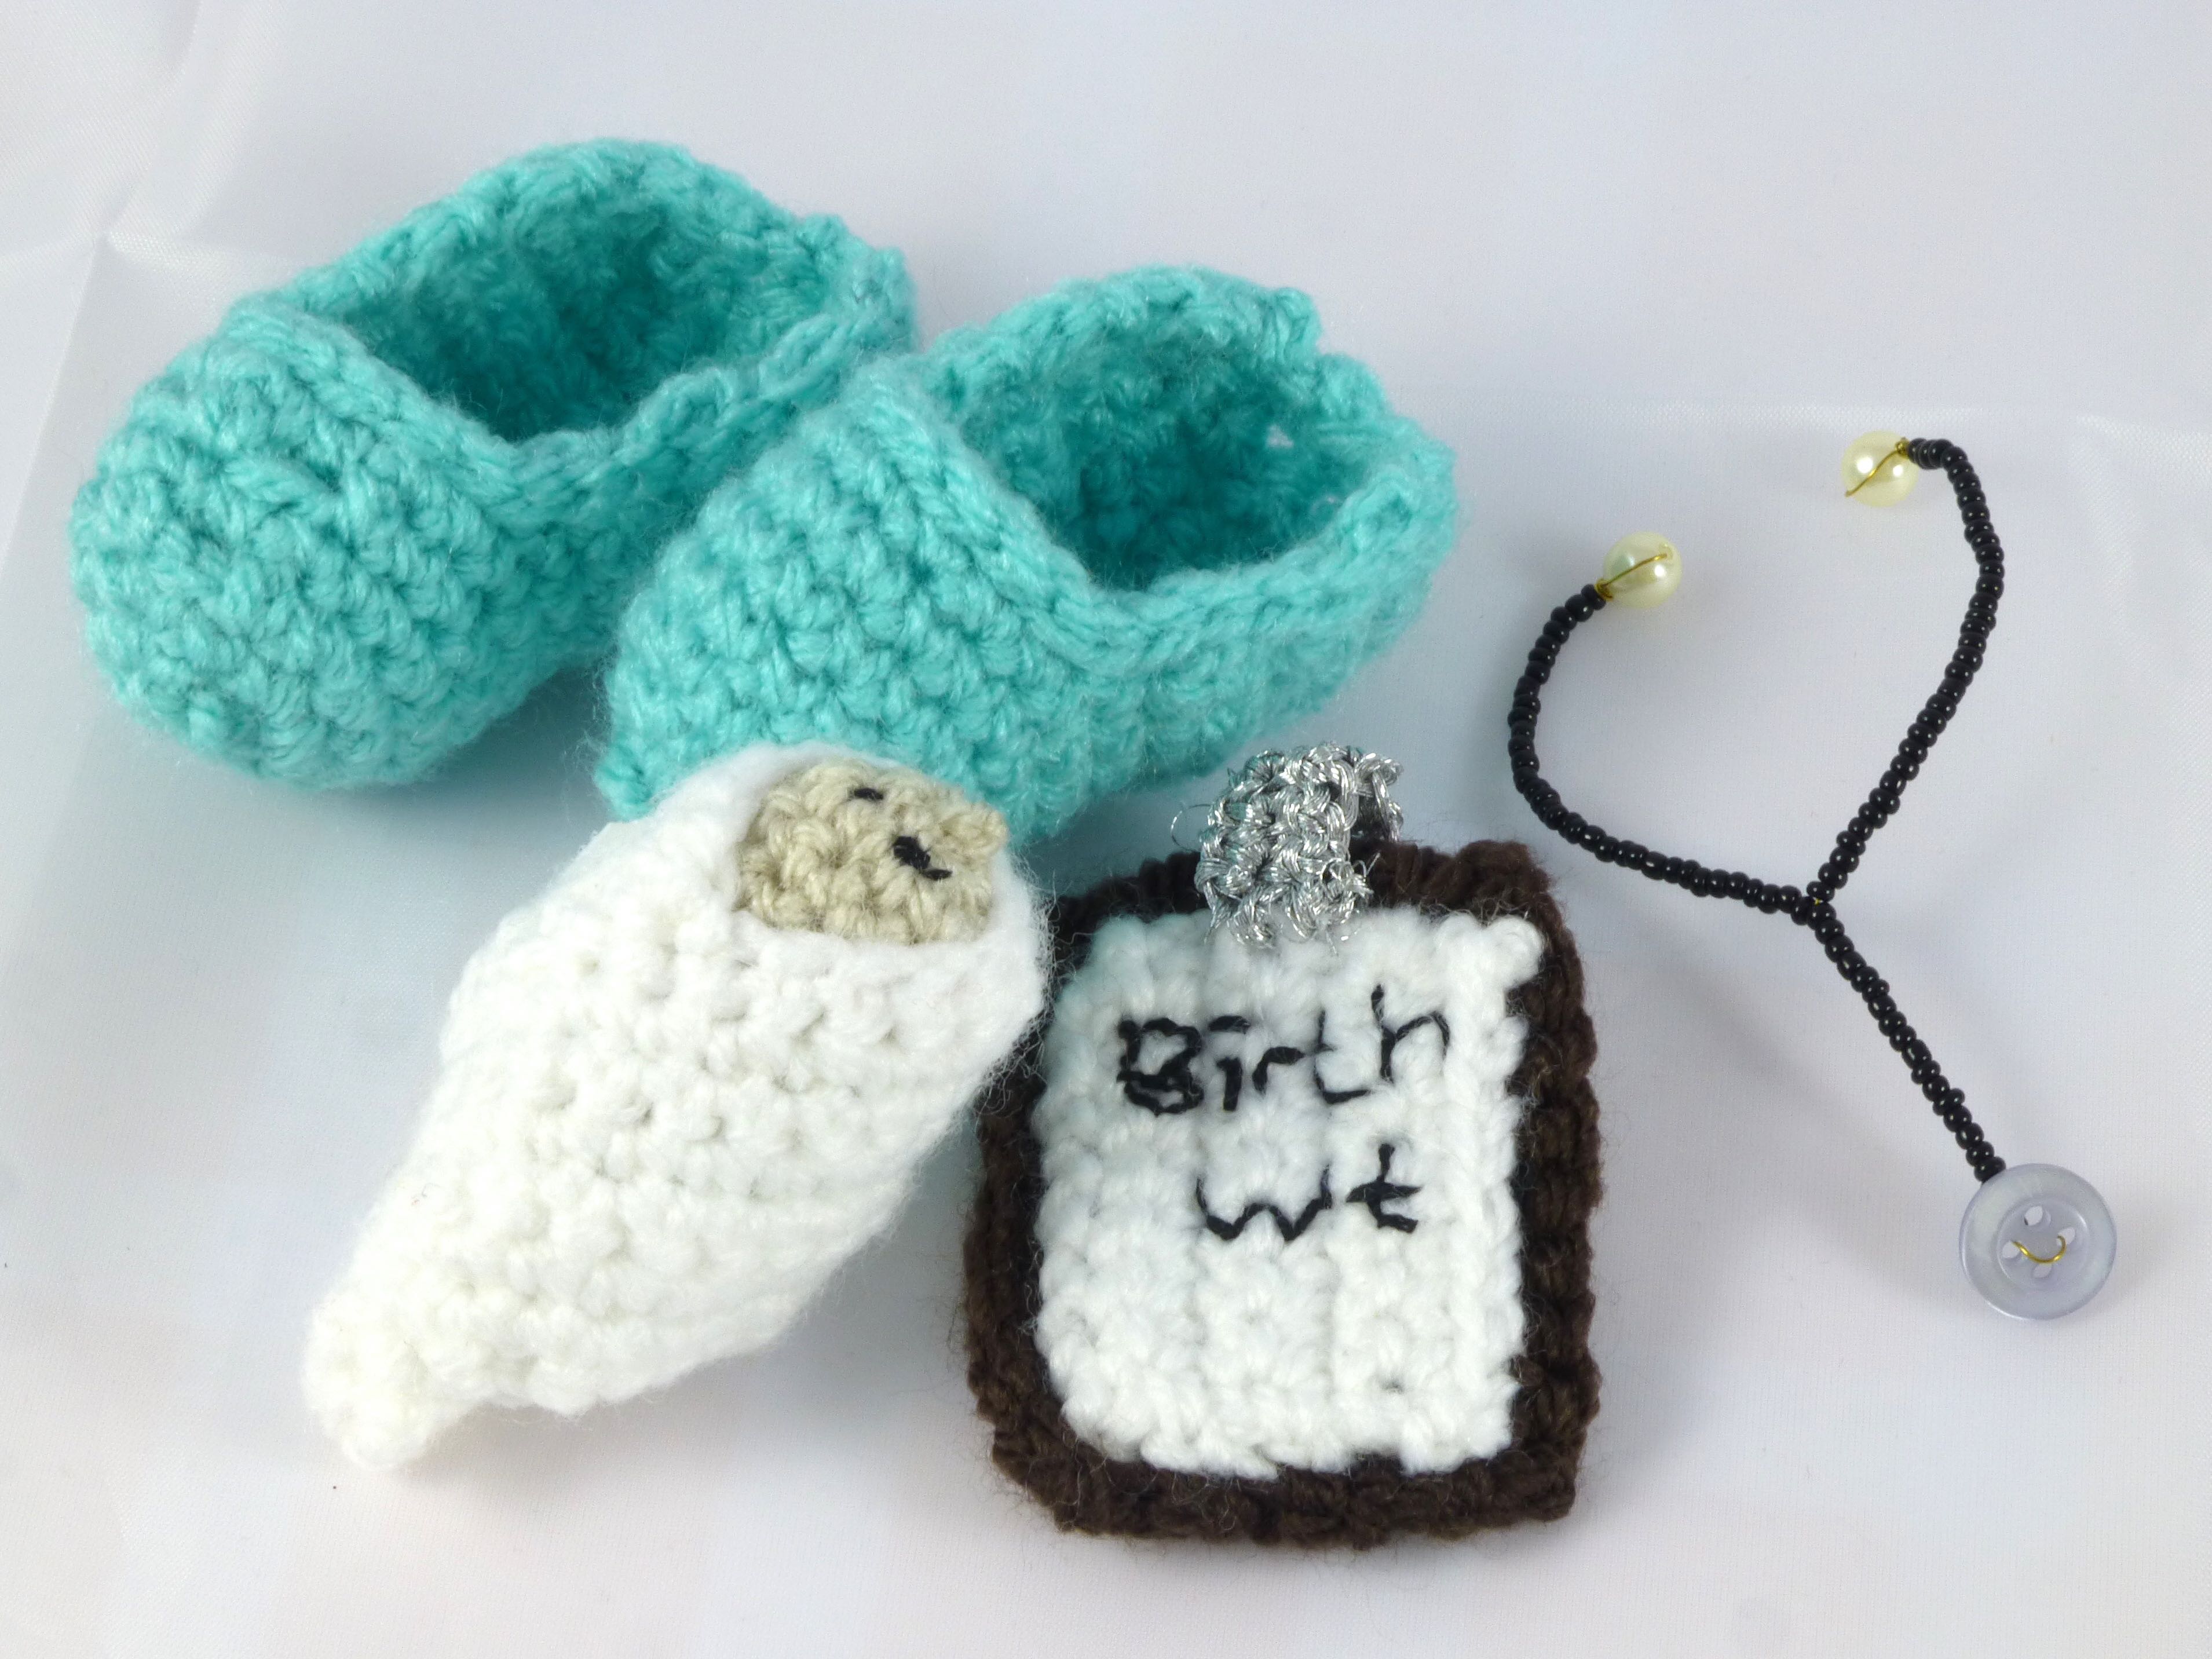
She wears the typical clogs/’Crocs’ that appear to be the footwear favoured by so many hospital staff nowadays.

Nurse Deb’s hair was made in the same way as Bella Ann – each of 135 strands knotted on individually to single stitches on the head in rows…..

……and then trimmed into a neat graduated bob shape to ring the changes.

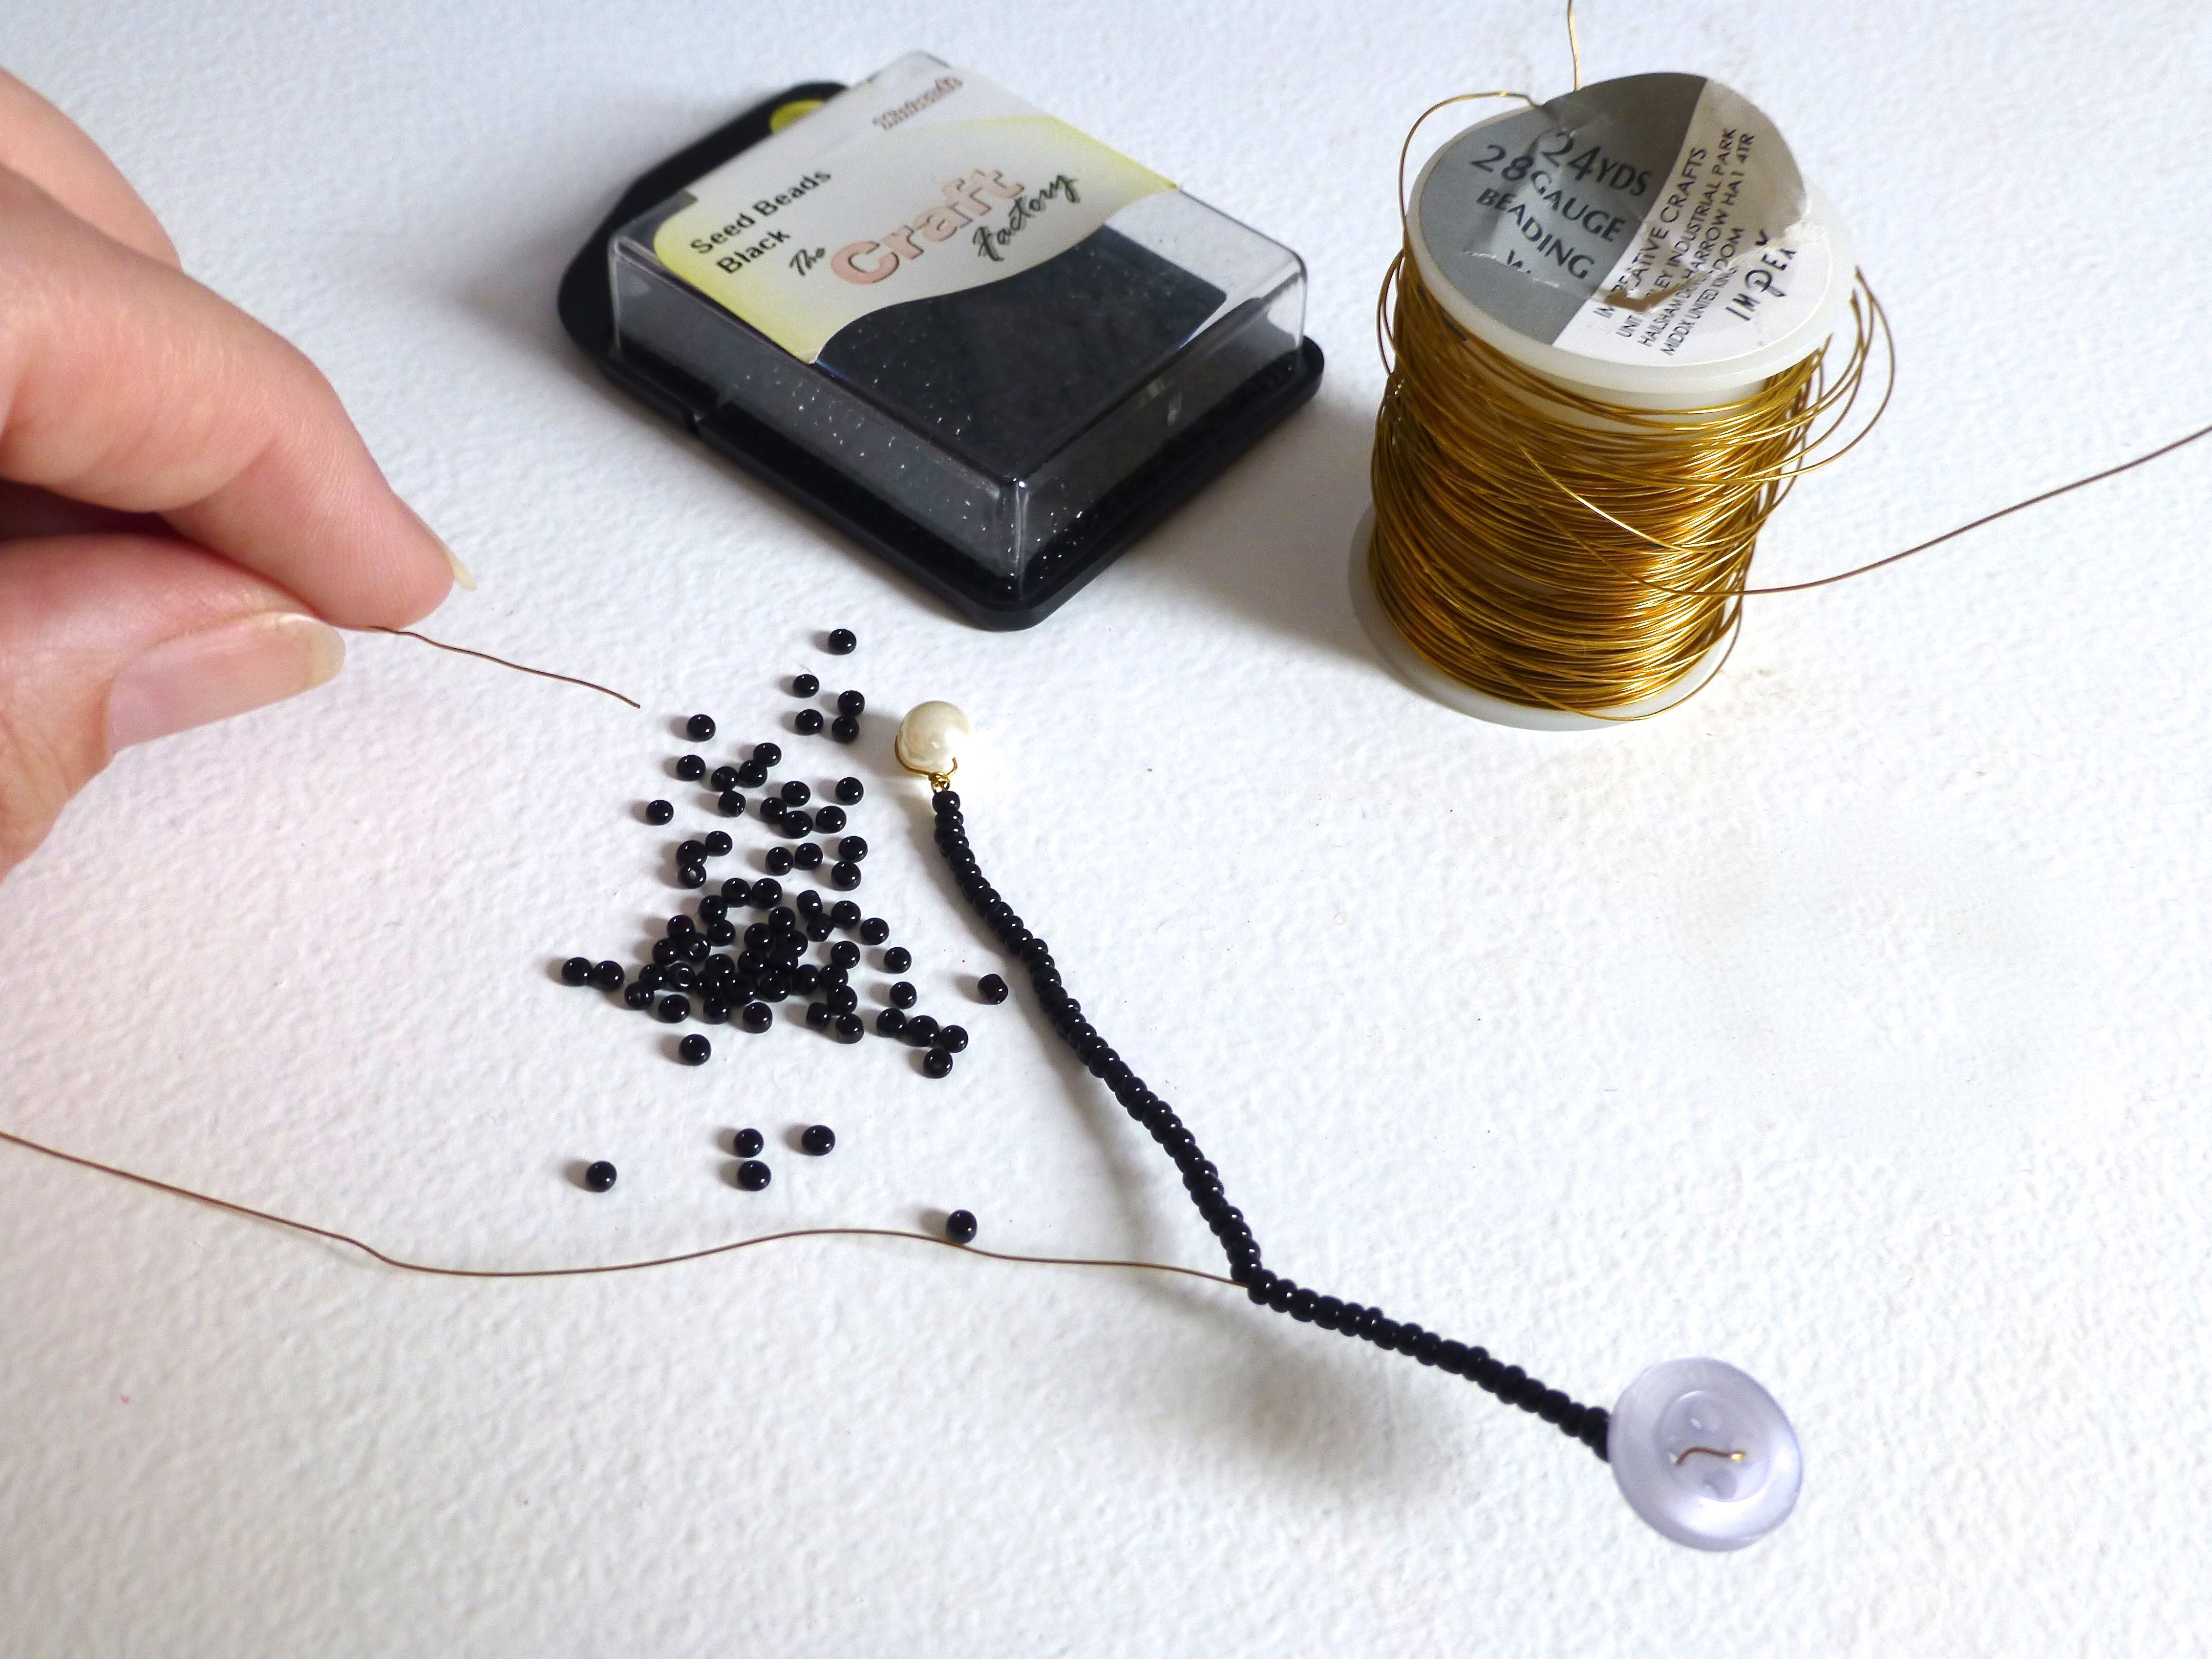
A stethoscope was made from thin wire and seed beads, adding pearls for the eartips and a button for the chestpiece. Quite fiddly to put together, but it looks ace!
She cradles a newborn baby in her arms…..

…..and a medical chart in her other hand.

The instructions were to sew both of these permanently in place but, as half the fun is undressing the doll and putting baby in a crib, this would have been impossible, so I used hook and loop fastener instead to make them removable.
This is “Nurse Deb” posing for her “TADAH”!

Would you like to see them all together?
T A D A H ! ! !

Well, that’s it, all done and dusted and I have to admit that I’m a little bit sad.
I have thoroughly enjoyed the process and seeing all the elements emerge successfully from the unfamiliar-to-me instructions. I can only imagine the fun that this little girl is going to have when she opens these on Christmas morning, and all the adventures the dolls are going to be involved in coming from the imagination of a child.
If you know a little girl who would love these dolls, or you just want the fun of making them yourself, head on over to Minerva Crafts where you can buy the book and all the yarn needed to make all four dolls.
If you have been following my blog this Summer, you may have noticed my penchant for linen and the ‘Lagenlook’ style of clothing.
Linen is not only comfortable to wear and brilliant for keeping you cool on those long, hot Summer days, (not that we had many of those in England this year) but it also gets better with washing – softer and more drapey.
The pattern I wanted to try was V8813 by Marcy Tilton for Vogue which called for a lightweight linen or jersey. Obviously I chose a linen, and went for a stunning Pillar Box Red 100% linen from Minerva Crafts. It has a subtle sheen to it which is quite unlike the linens I have bought before.
This is what arrived in the post: –

As we’re heading into Autumn, short sleeves were not an option so I opted for view B with three-quarter length sleeves.
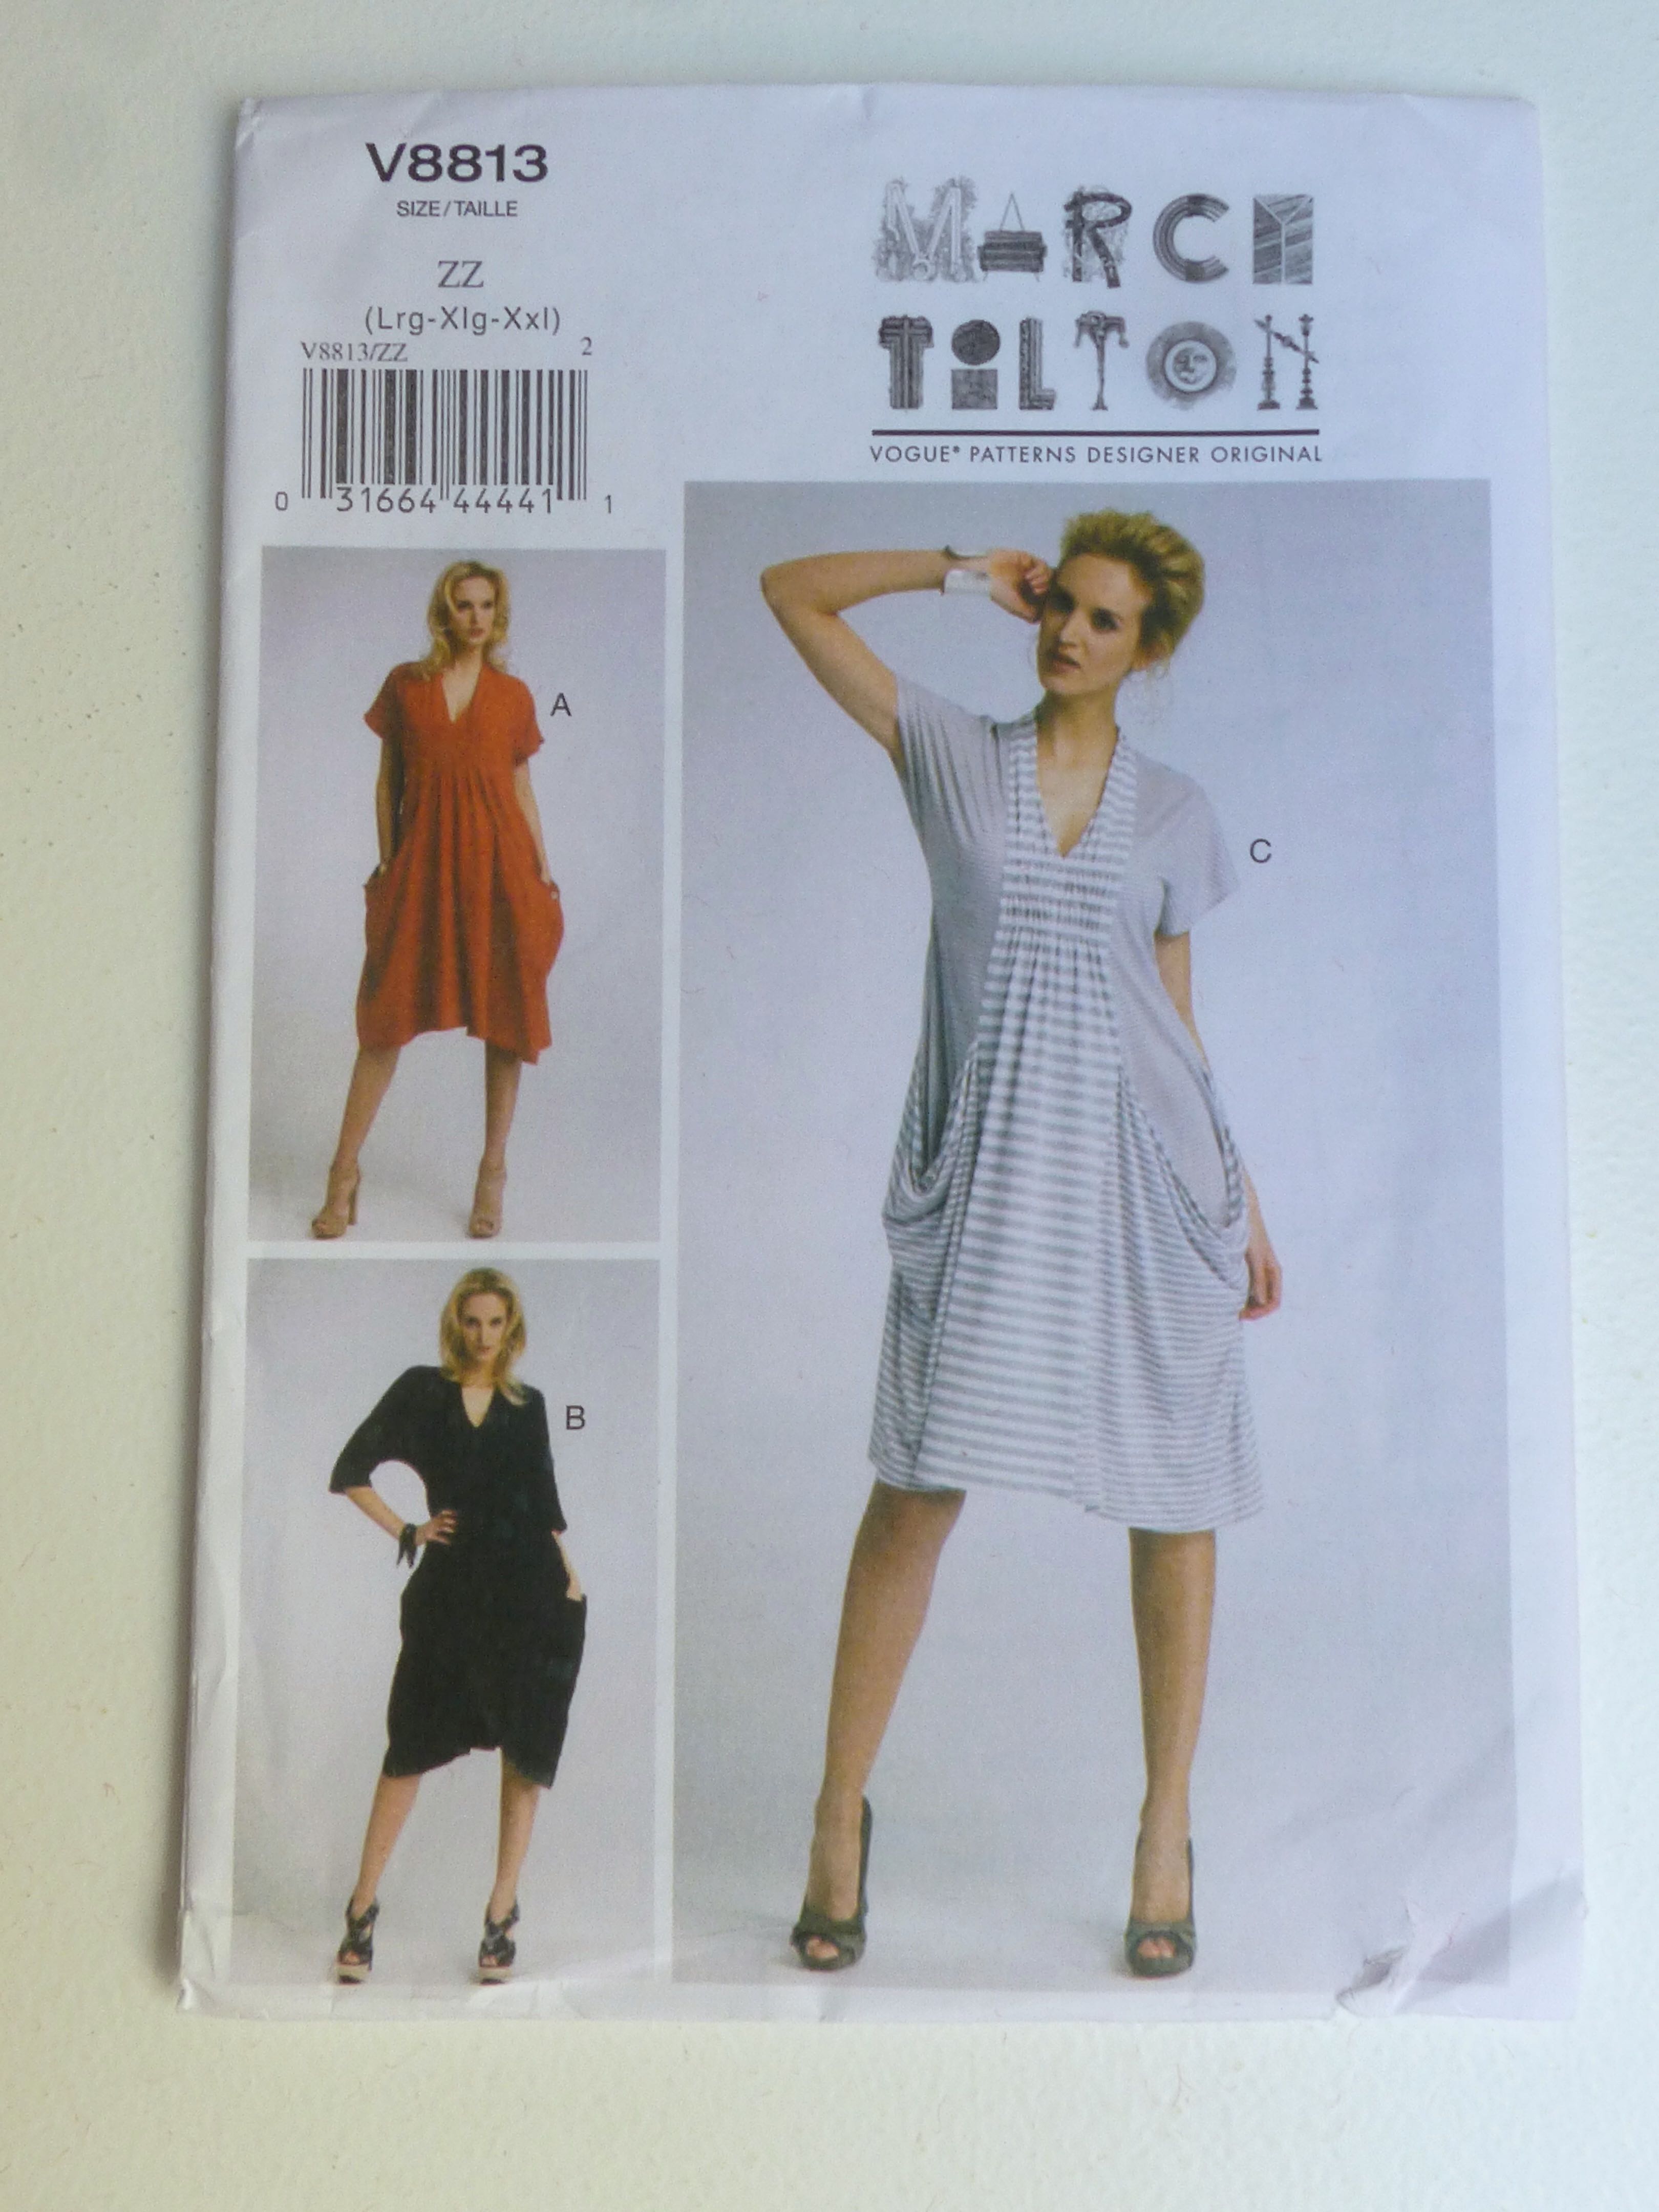

Although not immediately obvious on the pattern envelope, the oversized pockets have a pleat in them which is held in place by a button. As the fabric is plain, I decided to make a statement with these swirly patterned buttons which are very striking and quite unusual; they look like they’re hand painted.

The dress came together very easily but, although I washed the fabric before starting to sew, it is still stiffer than I’d like. A few more washes will soften the linen more and more though, and those pockets will drape better eventually – they just look a little too structured at the moment.

After the main body of the dress has been constructed, the centre front panel is inserted and then the gathered detail is added.
Having read several other blogs featuring this pattern, it seems some people are finding that it is less fiddly to complete the gathers prior to inserting the front panel. However, I am used to using Vogue patterns and decided to follow their instructions which worked for me.
The pattern includes a great way to get really even gathers so I thought I’d show it in more detail as it’s a technique that would transfer to many other projects.
You cut lengths of cord twice as long as the guide lines – I used a baker’s twine but any thin cord will do.

Pin the cord in place along the guidelines.
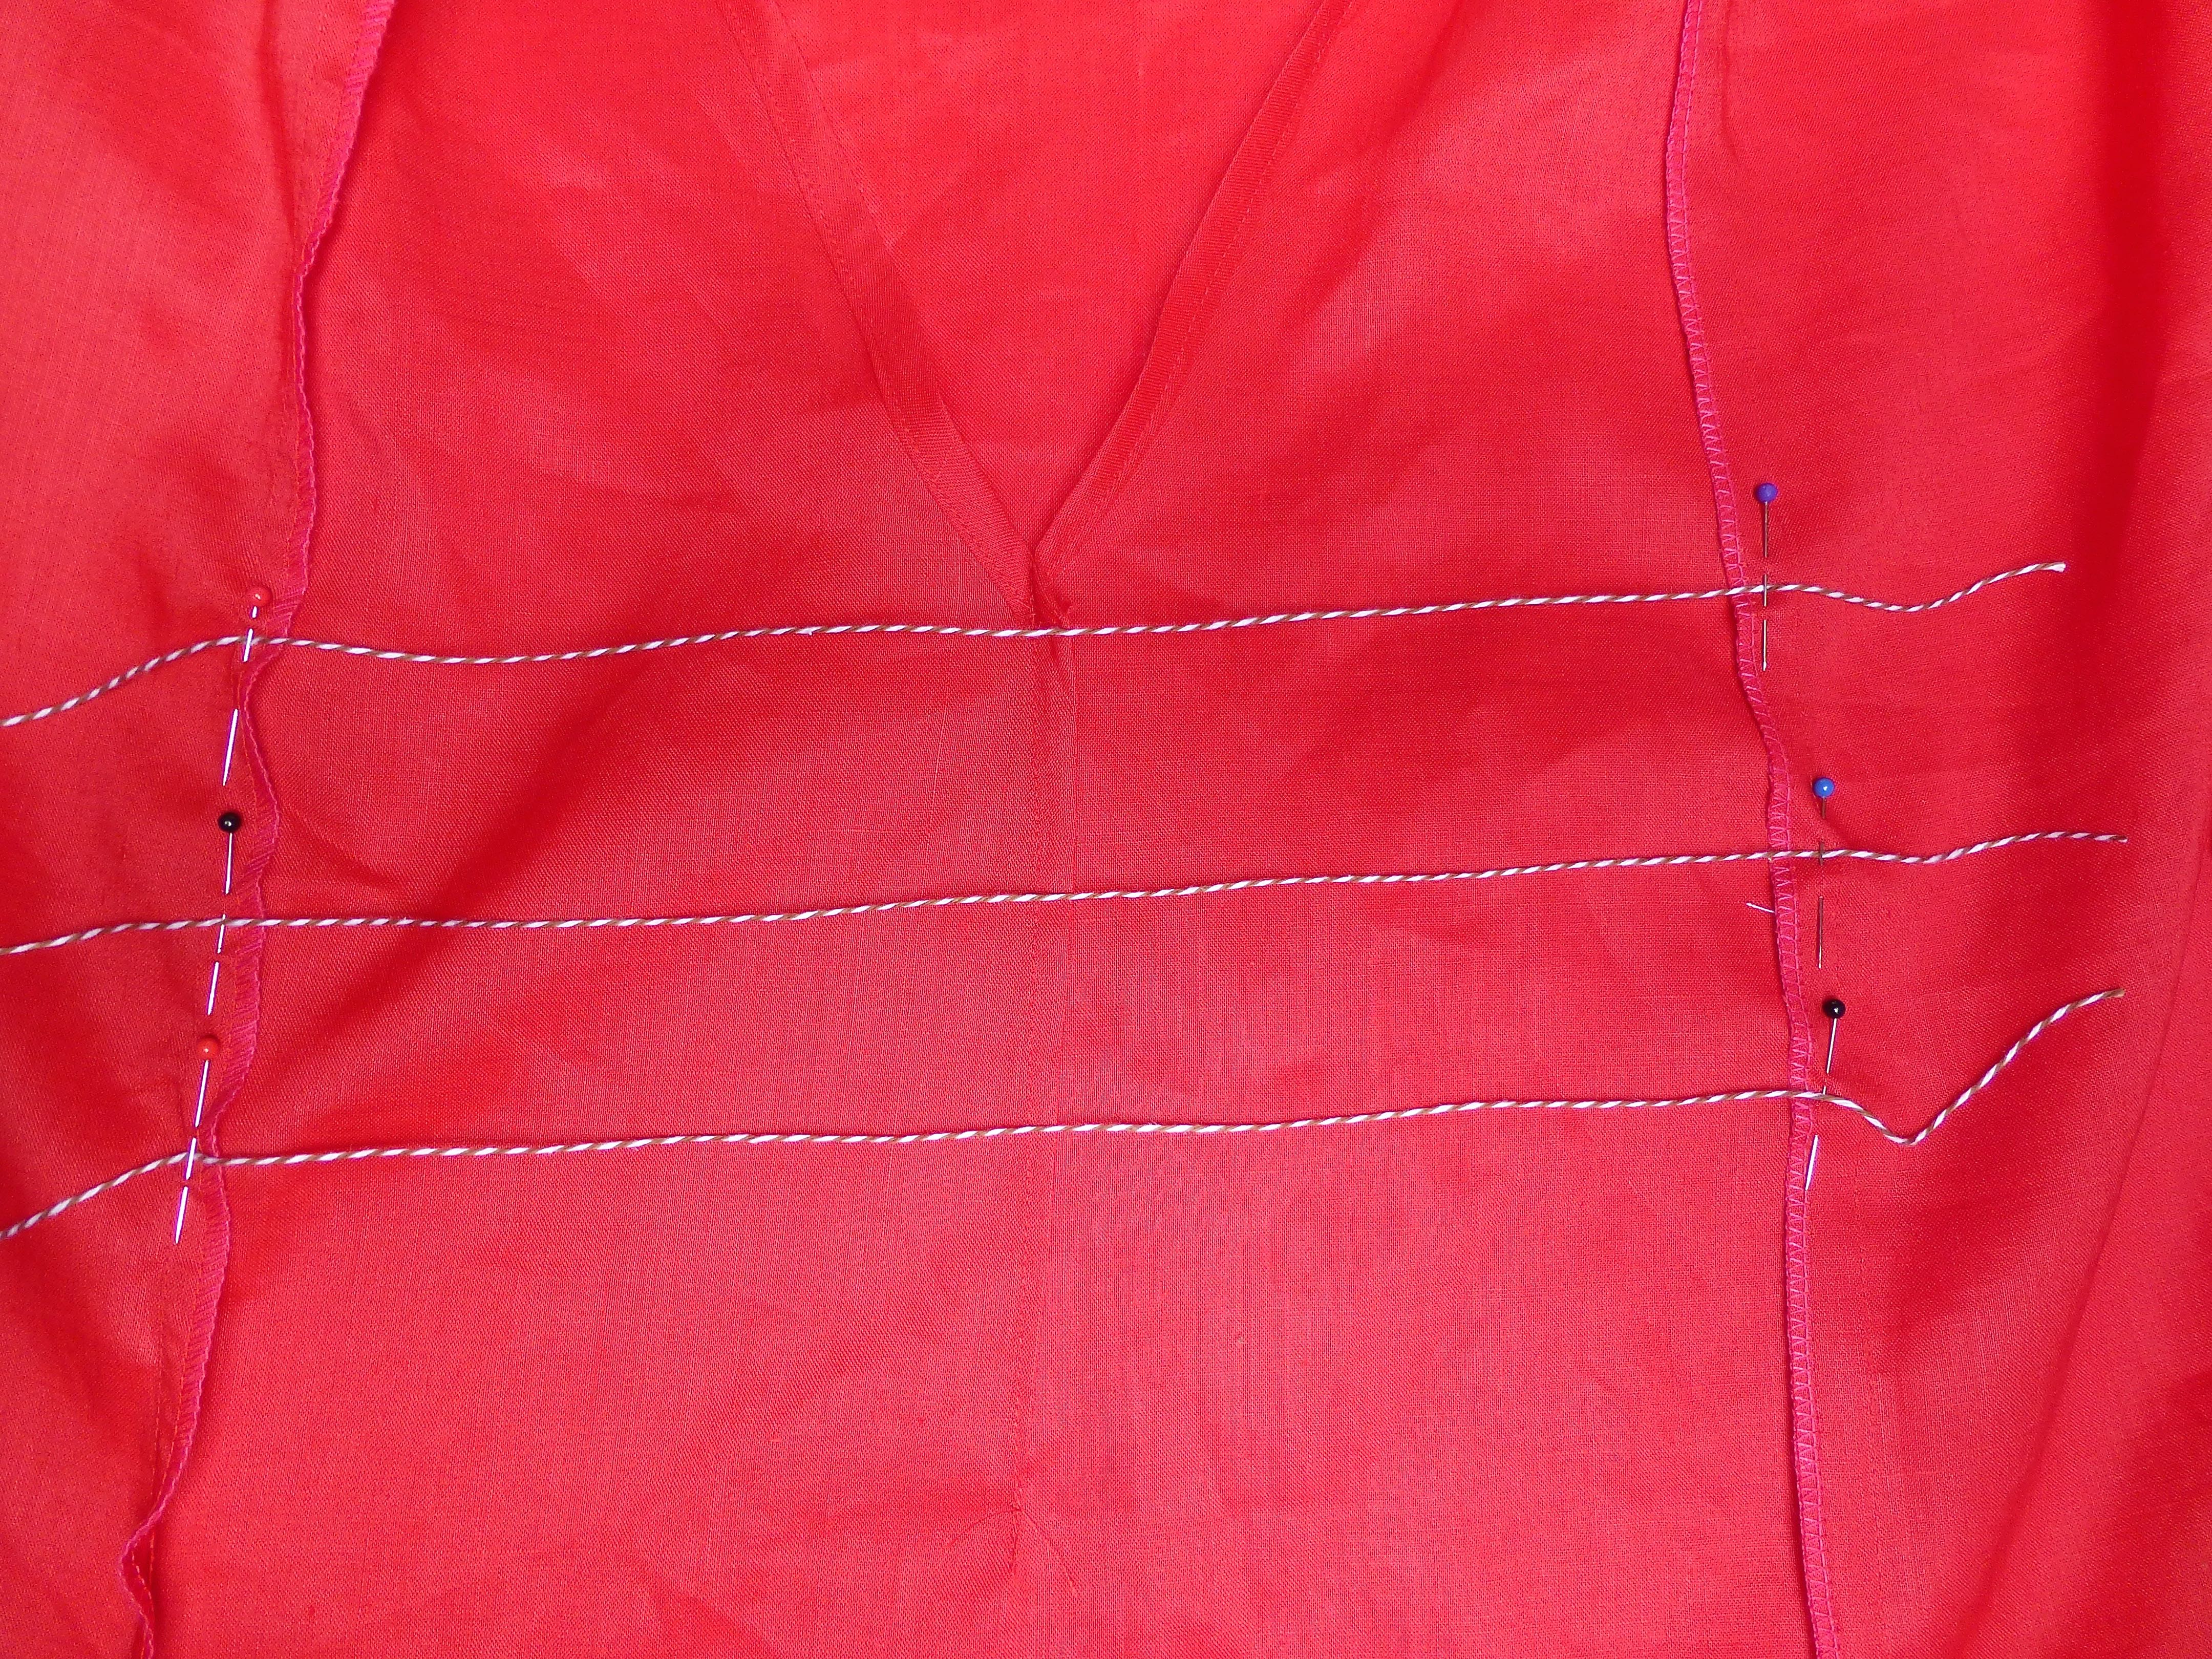
Set your stitch width to a wide zig zag.

Choose a medium stitch length.

Zig zag over the cord being careful not to catch the cord in the stitching. I found that it just stayed in the groove of the sewing machine foot which made it easy.


When all the cord has been enclosed, secure one end of each of the cords by wrapping it around a pin in a figure of eight motion.

Then simply pull the other end of the cord to create even gathers across the entire length.
Secure with another pin at the other end and steam the gathers so they stay in place.
Finally, top stitch from the right side in two rows either side of the previous zig zag stitching.

This is my favourite way to create gathers which are nice and even – it might take a little longer than the usual method of just pulling up the bobbin thread, but it’s much more professional looking and well worth perfecting the technique.

I amended the design by adding a row of top stitching to the shoulder seams as it’s always a nice finishing touch.

I prefer to leave the sleeve hems and bottom hem to the very end so deviated from the instructions at this point.
The very last thing to do was to sew those wonderful buttons in place!

Can you see the slight sheen? It’s almost like silk.


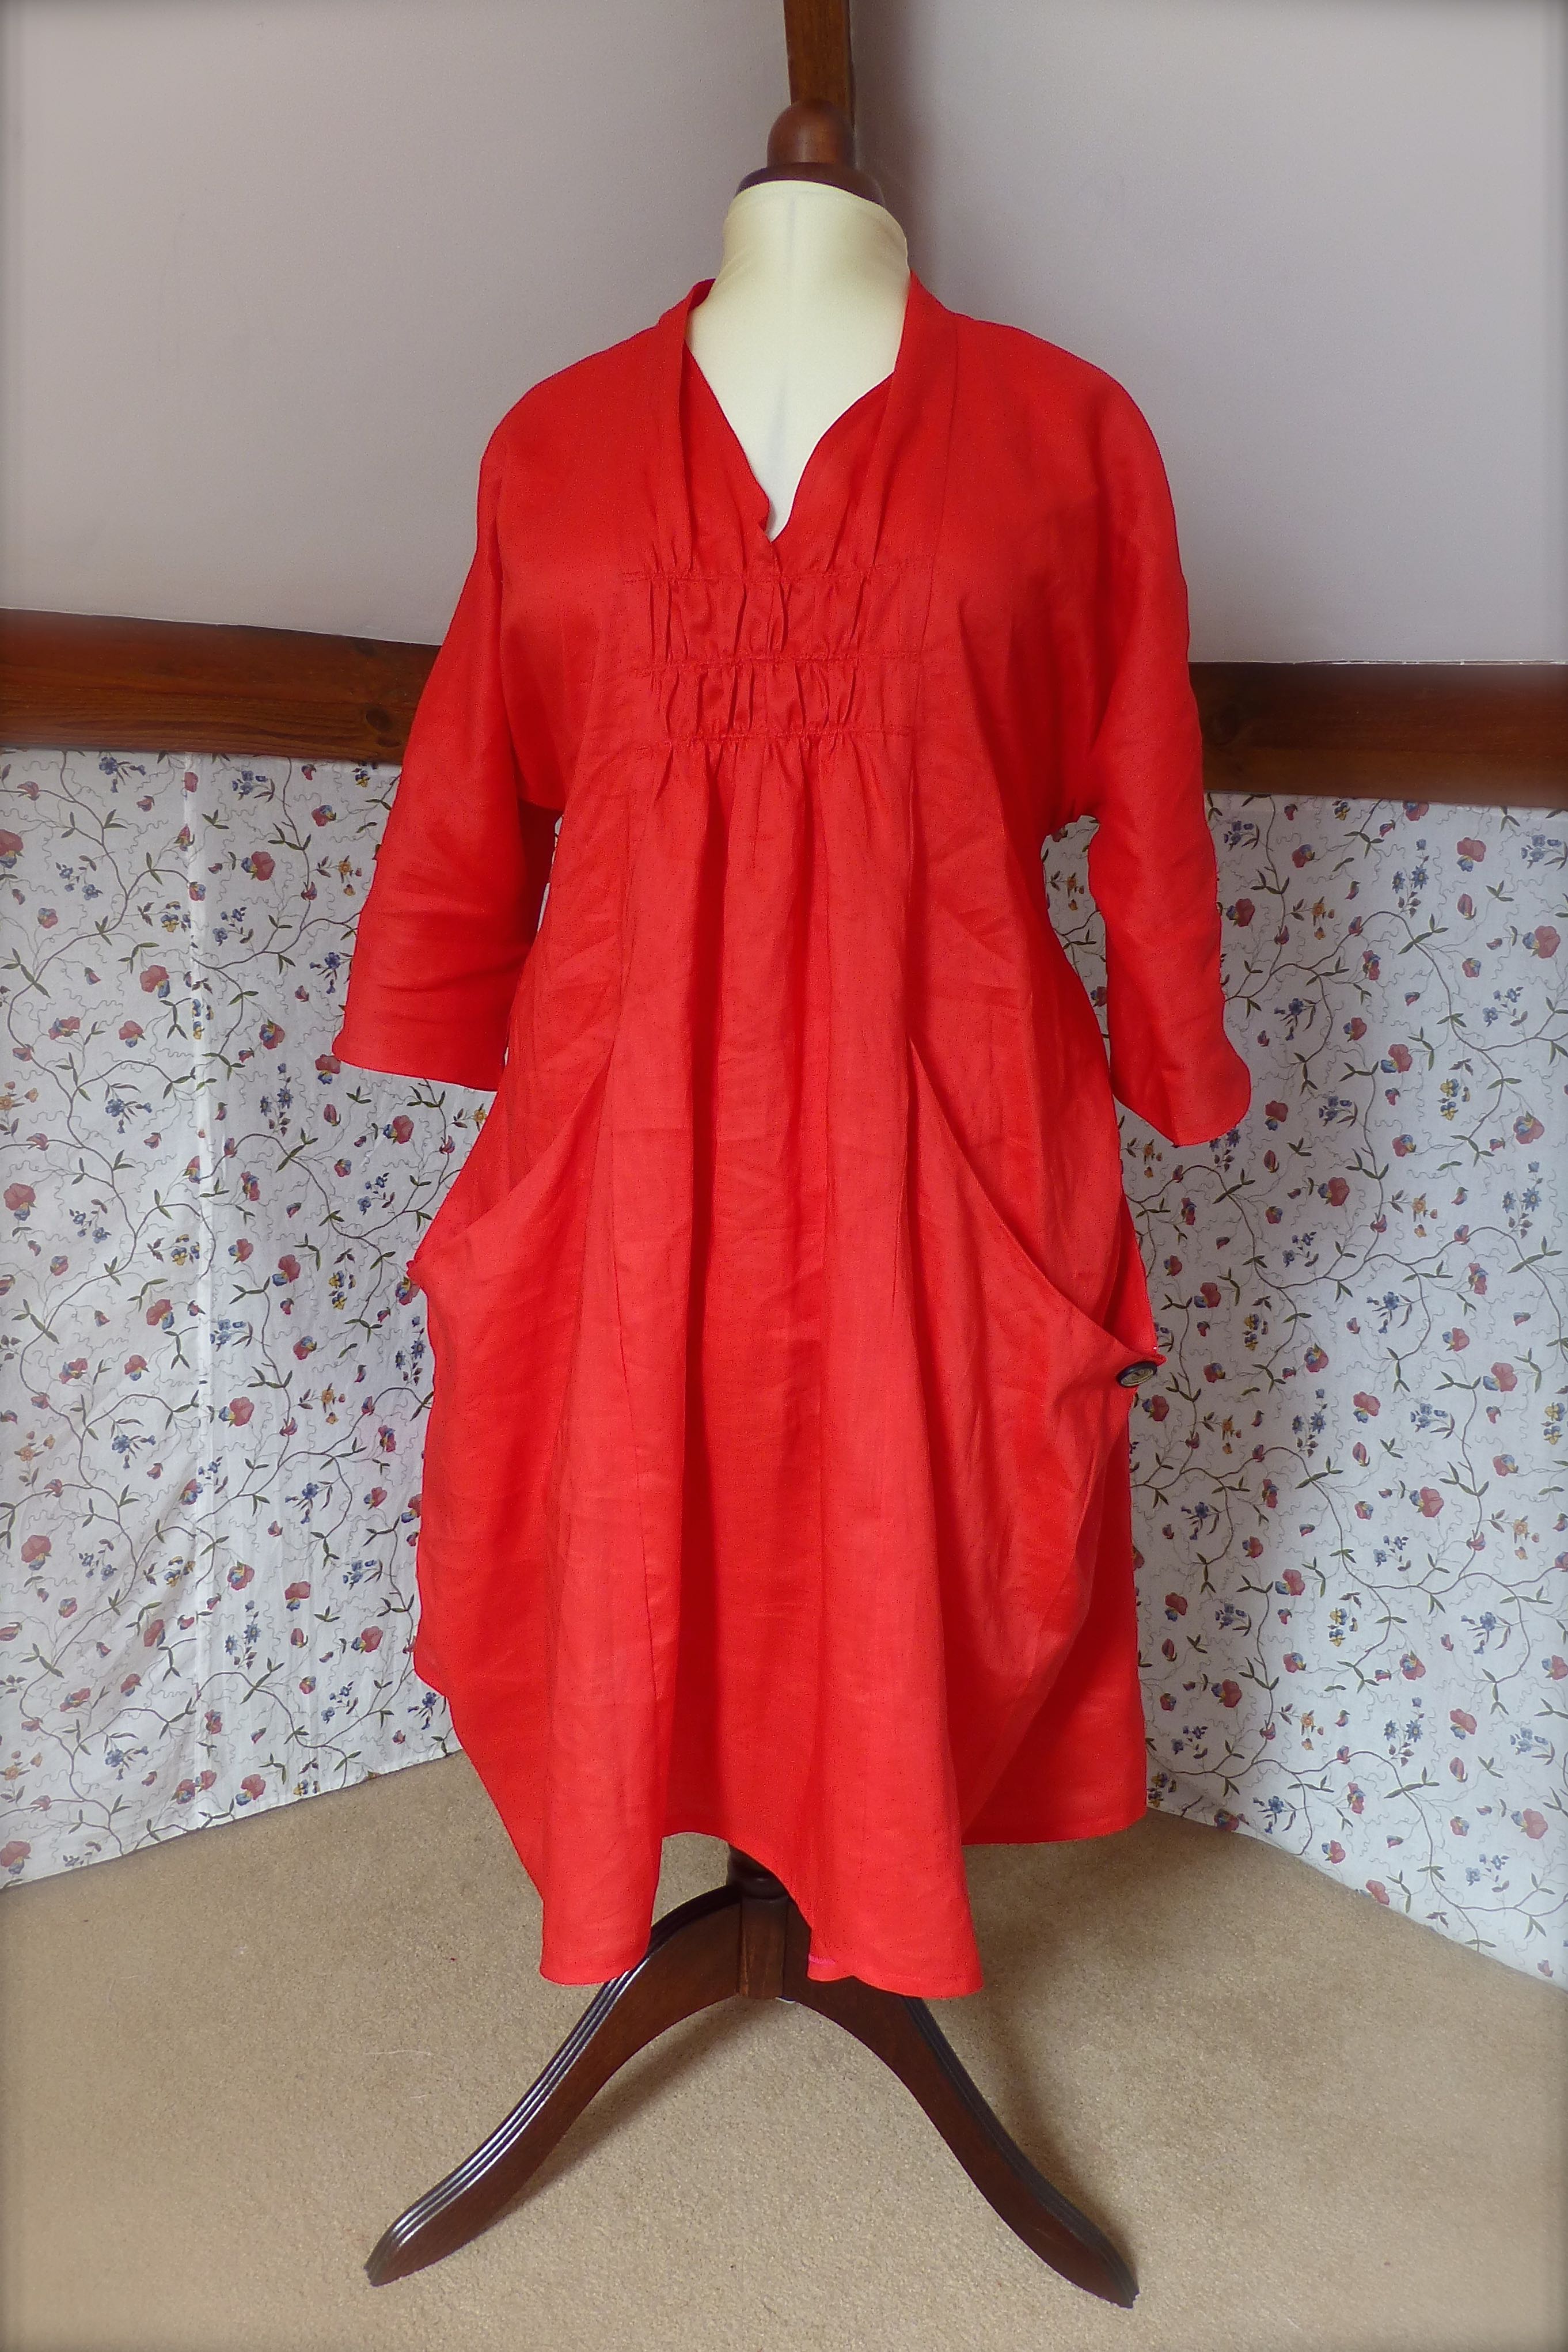
It is SUCH a comfortable dress to wear and will drape more softly after a few more washes. I can see myself teaming it with a pair of tights and boots for the colder weather.
If you are tempted to try this pattern, there’s never been a better time as it is half price at the moment!
Here’s the link: – V8813 Marcy Tilton
Artist and tutor
a creative life on the spectrum
Everyday craft inspirations
Movin' On Up
Because We're All a Work in Progress
Previously Boys and Chickens, I have created a new blog to share my sewing adventure as 2018 is they year I plan to teach myself to sew! There will also be bits of crochet and cooking too.
Sewing, crochet, crafts, accessories, baking, tutorials,
small steps to a kinder world
Sew What... Sewing, Embroidery and handmade
"She is too fond of books and it has addled her brain." (Louisa May Alcott)
A life of books . . .
Official crafty blog for my Quiet Water Craft Etsy shop
Sewing, crochet, crafts, accessories, baking, tutorials,
my year of trying to be more creative in different ways
Sewing, crochet, crafts, accessories, baking, tutorials,
The latest news on WordPress.com and the WordPress community.
Adventures in dressmaking from an improving sewist!
Knitting, Sewing, Crafting
Sewing, crochet, crafts, accessories, baking, tutorials,
Sewing, crochet, crafts, accessories, baking, tutorials,
Sewing, crochet, crafts, accessories, baking, tutorials,
Sewing up a self-made wardrobe
Sewing, crochet, crafts, accessories, baking, tutorials,
Sewing, crochet, crafts, accessories, baking, tutorials,
My art work and other musings
Fabric, life, and all that
Sewing, crochet, crafts, accessories, baking, tutorials,
Sewing, crochet, crafts, accessories, baking, tutorials,
Making and creating
From Scraps to Quilts
here’s what I’m sewing...
Lesley blogging about her sewing projects
lathaminteriors.co.uk
Sewing, crochet, crafts, accessories, baking, tutorials,
What's happening in North Cheriton
Returning sewist, crafter and runner
My quest to sew a wardrobe of clothes which actually fit me
a blog about making things
the joy of creativity
My challenge: One year - I will not buy clothes - I will upcycle to make what I need - everything from underwear to evening wear! Join me for tips, exclusive BrawHem makes, and inevitably some hilarious disasters...
Go Sew Something
